Many modern mobile PC models do not have disk drives. For novice users, this makes it difficult when you have to reinstall the operating system. This is an inevitable process, since sooner or later it starts to freeze.
How to be in this case, and do without a DVD drive? There is an exit! Consider how to do bootable flash drive. In this case, this is the only option, because USB connectors are still made built-in.

Programs for bootable flash drives
There are several programs that will help you burn a bootable OS image. Using the Windows7USB/DVD Download Tool, you can quickly create a bootable USB flash drive for windows installation. The program can work with any removable media.


The first way to create a Windows boot image
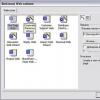
Consider detailed instructions how to make a flash drive with automatic loading. To do this, run the utility in a standard way. By clicking on the shortcut with the right mouse button, we launch the program with administrator rights.

In the window that opens, click "Browse", this will allow you to make a choice windows version from which the ISO image will be created. Then we move on (“Next”).

The program offers to make a choice between removable media where the image will be written. In this case, there are two options, either a DVD disc or a USB flash drive. Select the second method, and click USB device.
The next step of the utility is to make a choice between available USB drives. We select the one to which we want to record, and start the process with the “Begin copying” button.

A prerequisite for writing an image to a USB flash drive is its formatting. Care should be taken to ensure that there is no important data on it, otherwise they will be irretrievably lost.

Formatting, like recording, is not noticeable to the user. The program itself will make the necessary choice of parameters, and at the end it will provide a finished device. It remains to close the program window and you can use the flash drive.

Create a bootable image on UltraISO
Another popular UltraISO software Designed just to work with various drives. Its capabilities are much wider than the previous utility. It is capable of editing, reading, creating a disk image, etc.

Beginning of work
We also run it with administrator rights. In the program menu, you need to click the "file" item, and then "open". A similar procedure can be done with the key combination Ctrl + O. Next, you need to decide on the choice of Windows, which will be written to the drive. Usually, the bitness of the operating system is selected.

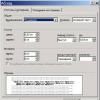
Making a selection with the mouse left button), and go to the boot menu. There is an option for recording an image hard drive. We select it.

At the last stage, you should double-check all the selected parameters in the pop-up window, namely: flash drive, OS. It is worth paying attention to the USB-HDD parameter, this is the same recording method that should be used for a flash drive. Let's start recording.

The end of the process will be a message in the dialog box - "recording completed." We close the program, and use the flash drive!

Write a bootable USB flash drive through the command line
Do windows image to a flash drive using the command line. This method stands out among others in that it does not need outsiders software tools. But it is more complicated, and will require additional knowledge and time from the user.


Working on the command line
Consider step by step instructions:
In the start menu, you need to launch the "run" function. It can also be launched with the Win + R key combination. It's built in software windows.


In the field of the window that appears, you need to write "cmd". This is the command to run the "command line". All further actions will take place in it.

The first command to enter is "DISKPART", press ENTER (it should be pressed every time you want to run the command). We write the following command "list disk". It will open a list of drives available on the computer.


For a boot image, the flash drive must be empty, so it is cleared with the “clean” command. Set the primary partition using "create partition primary". The partition that was created must be selected, for this we write “select partition”. Activate the section, write "active".


The "format fs=NTFS" instruction formats the drive. We are waiting for the end to 100%.

We assign a flash drive letter designation. This is done with the "assign letter=O" command. It is worth paying attention to the letter “O” chosen at the end of the command, it is given as an example. Any other letter can be used instead.

At the end, a folder with the selected flash drive should open. Finishing operations in command line, for this we write "Exit". The program is closed.

The OS files should be transferred to the folder of the created removable disk “O”. There should be no archives! The image drive is ready to go!

Conclusion
Considered methods of formation boot images, are the simplest and easiest to use. Choosing from them The best way, making a bootable USB flash drive is not difficult. It is also possible to create a working windows image, it will help start the OS if it refuses to work.

On the Internet, you can see a photo of a bootable USB flash drive. It is worth remembering that it must have sufficient capacity, otherwise the image will not fit. Having configured the BIOS system to boot the OS from the USB port, you can get to work.
Despite the rapid development cloud technologies, until now, many people continue to use external media. Someone for storage, someone for data transmission. Sometimes you need, or just want this media to work very quickly. If you are satisfied with the size of a little more than a regular flash drive, the read speed is more than 400 MB / s, the write speed is more than 300 MB / s, then welcome.
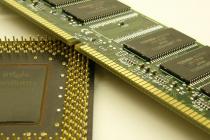
First, you need an mSATA drive.
About the Chinese company Netac and I learned a year ago. Nothing special at first sight, an ordinary "Chinese", if it were not for the reviews of the model with 120 GB of memory. All reviews boiled down to the fact that with one of the most low prices on the market, the drive has speeds that are only found in higher-capacity or higher-priced models. The linear write speed exceeds 300 MB/s.
You can buy this SSD anywhere. It is on Aliexpress (MALL, the most cheap price), on eBay, in selected stores. When I bought a Netac N5M 120 GB for $50, its price when converted into rubles was the lowest on the Ya.Market among drives with an mSATA interface and approximately corresponded to the cheapest 2.5" SSD, for example, Smartbuy. Now, due to cheap ruble, on the local market you can buy mSATA media of the same volume even cheaper, but this will not last long, as long as stocks purchased at the old ruble prices remain in the sellers' warehouses.
The drive comes in a small box. Inside only the device itself and a brief guide.


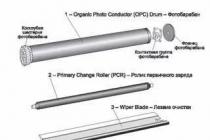
The drive itself is a standard size. On one side is: the controller is a very popular solution for budget SSDs, a cache based on Samsung module K4B2G1646Q 2 GB and flash memory module marked PHGAC 1519. Netac claims that the drive uses modern Toshiba A19 MLC memory modules. Like it or not, it's hard to say, because. labeling does not provide accurate answers.


On the opposite side is another memory module marked PHGAC 1519.

The manufacturer does not indicate the number of rewriting cycles or the amount of recorded information per day and the duration of work. There is only the MTBF value, 150 million hours. Which is absolute nonsense, and translated into an understandable language means that the probability of AFR failure for the entire warranty period (3 years) is 0.005%. Consumer SSDs from A-brands have an MTBF in the region of 2 million hours.
Secondly, you need a case for such an SSD.
I will use the fairly popular Acasis FA-2283. You can buy it on any site, it costs about $10. You can buy another model, but I made my choice for two reasons: the ASMedia ASM1153E controller (more on that below) and the design without protruding parts.
Scope of delivery: case itself, USB 3.0 A cable<>USB 3.0 micro-B 50 cm, user manual, two screws and a screwdriver.

The box is made of aluminum 1 mm thick. Dimensions 80 x 40 x 12 mm. End cap made of plastic with screw fastening. FA-2283 has USB connector 3.0 micro-B and blue LED for read/write indication.

Inside is a board with an mSATA connector and a screwless fastening of the SSD module.

On the opposite side of the board is the heart of the box - the ASMedia ASM1153E controller. This is one of best solutions on the market among bridges / adapters USB 3.0 > SATA Revision 3.0 (up to 6 Gb / s).

Its peculiarity is that it works according to the protocol (UAS), one of the purposes of which is precisely SSD drives- full support for all necessary commands (including TRIM) and high speed data transmission.
This protocol is supported in all modern operating systems, third party drivers not required.

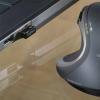
We insert Netac N5M into Acasis FA-2283 and twist the case.

It turns out here is such a flash drive.


For a visual size comparison: external drive 3.5", external drive 2.5", ACASIS, regular flash drive, compact flash drive:

Don't like the long cable? No problem, for a couple of dollars, take a cable of any length, for example, this (10 cm):

We will test the external drive as follows. Connect the drive to the computer with USB ports 3.0, which are made on the controller from Intel. In Windows 10, let's run tests: CrystalDiskMark 5.1 to measure the speed of work and Intel IOmeter to measure IOPS (operations per second). Then we take the SSD out of the case and connect it to the mSATA port of the Eglobal mini-computer. Let's do similar tests.

And finally, we will measure the linear speeds of work in the Blackmagic Design Disk Speed Test when connected via USB to a Mac with Mac OS X 10.11.2. Mac OS X could not determine if TRIM is supported when connected via USB. Adequate official support TRIM for third-party drives has been around since Mac OS X 10.10. Whether this support applies to devices that are connected via UAS is not clear.


A small note. During the tests, it turned out that the N5M has a read / write indicator - a red LED.

Testing
Using CrystalDiskMark, we will determine: linear speed, speed with random blocks of 4 KB each and queue depths of 1 and 32.

The speed is very high level for USB connections. Linear read speed when connected via USB is limited USB capabilities 3.0 controller (usually up to 450 MB / s) - I have already seen a similar level of speed in other tests of SSD devices. Working with random blocks of 4 KB is generally at a fantastic level for USB devices.
The speed of work in Mac OS X and Windows is practically the same.
Using IOmeter, we will determine the number of operations per second when working with random blocks of 4 KB and a queue depth of 32. Such a load is almost unattainable in normal use.

According to the mSATA interface, the drive does not show an amazing result, an ordinary SSD is average. But on the USB interface, the results are excellent.
For comparison, one of the fastest flash drives on the market SanDisk Extreme USB 3.0 has a linear read / write speed of up to 250/200 MB / s. At the same time, the speed of working with blocks of 4 KB generally sags to 10/5 MB / s, regardless of the depth of the queue. This flash drive costs almost the same as the designer from the review, but at the same time, the capacity is only 64 GB (now, due to the cheap ruble, it costs significantly less).

There is also the super-fast Corsair Flash Voyager GTX 128 GB. But it also cannot compete with the device from the review in terms of linear speed, 400/200 MB / s, and even more so when working with 4K blocks. But its price is 2-3 times higher than the monitored device.
Conclusion

Priced at less than $60, this compact 120GB USB flash drive is only slightly larger than a regular flash drive. Its linear read / write speed is prohibitive 417/315 MB / s, which is unattainable for conventional flash drives. For example, to record a 30 GB video project on it, you only need about 100 seconds. With a huge number of small files, he will also cope without any problems.
Flash drives often break and, as a rule, the outer shell - the case - fails. How to revive the drive so that it will serve you for a long time? Read on for how to make a DIY flash drive case: step by step instructions.
Today we're going to look at a few questions:
- how to properly disassemble flash drives of different designs;
- what tools are needed for this;
- how to make a case for a flash drive.
In addition, we will tell you what materials at hand can be used to create a new case, and which ones are better not to use so as not to damage the media. At the end there will be small workshops on how to design this device in the form of a Lego cube and a lighter.
Flash drives are an integral part of life modern man. Of course, there are various other kinds of storage media. Computers, laptops have long appeared in everyday life, in the end, some even use their smartphones for this. But despite this, these storage media do not lose their relevance: they can store large amounts of information, quickly and easily connect to various devices, do not take up much space. They are used to store photos, videos, movies, music, and for many, this is an indispensable thing at work, for transferring reports, presentations and important documents.
Usually they are in a plastic "body", sometimes in silicone - manufacturers like to make such types in funny forms like fruits, cartoon characters and TV shows. And much less often they are more impressive, for example, steel. Plastic data carriers are easily damaged, they can break from an unexpected fall, bend at a break, crack when under a heavy object.
What is the way out of this situation? Spending money to buy a new device, time to transfer information? Why, if you can just read this article and learn how to create your own original case for a flash drive. V options you are limited only by the availability of materials and your imagination, the methods and types of home-made cases can be different: from a Lego cube or a piece of a bar left after repair, and ending with an ordinary cork. Some craftsmen create real works of art in various styles and even sell them. Since there are a lot of options, we will look at the basic principles - how to properly remove a flash drive from an old "body", and how not to damage it, what tools you may need and what items can be used to create a new design, and what materials should not be used.

Removing a flash drive
So, let's begin! First, just in case, transfer all the content to another device. A flash drive is:
- whole;
- collapsible.
If the former have a visible gap in the case, then the latter look monolithic. But both of them can be easily disassembled, the main thing is to know how.
Let's start with the "whole" type. Its connector is connected by a latch to the board, and this latch is latched, and it is impossible to disconnect it in the usual way. We need a thin, flat screwdriver. Using this tool, we make a hole between the body and the latch. Carefully, so as not to damage anything, lightly pressing, swing up and down. Such holes must be made in three or four places where the connection goes, now we can easily remove it.

Now about how to remove the case from a "collapsible" flash drive. Such a drive is much simpler and its disassembly requires less effort: there is a small slot along the case that facilitates work. We will also need a thin pen screwdriver. Unlike the monolithic type, there is no latch here, but there are latches that we need to open. We insert a screwdriver into the groove and open the case using the same rocking method. The latches may break, but this will not cause any harm to the drive.
Making a case for a flash drive
Well, we dismantled the flash drive, and now we move on to the main task - how to make a case for a flash drive? Your homemade version, as mentioned earlier, can be of any kind - the main thing is to keep the functionality of the drive. Firstly, the item must be easily connected to the computer, and secondly, the materials must not damage its components.
That is, the protruding edges should not interfere with the connection to the USB port, since an incompletely inserted one may not work, and it is also necessary to avoid collision of components with hot glue, paint and other aggressive materials. The new case must be sealed and prevent moisture from entering the board. The easiest way to choose plastic. It is much more difficult to create a shell made of wood or metal, but it will definitely last a long time and will retain its “presentation”.

One of the options for the case - from electrical tape
We make a flash drive case from a lighter
We will consider the simplest option, made from an ordinary lighter. Almost everyone has an old used lighter lying around somewhere at home, and sometimes they have an interesting design. We will need a clerical knife, a glue gun, a lighter of a suitable size, a screwdriver with a 3 mm drill. Such a lighter is suitable so that a flash drive without a case fits completely into it and only the USB port protrudes. Glue can be used any of those suitable for plastic.
First you need to release the remaining gas from the lighter, then make two holes in the bottom. Next, we make a cut with a knife along the contour framed by holes. Inside we install a USB flash drive and glue it with the case, remove the remaining glue. Our new drive enclosure is ready. We have an interesting and practical flash drive-lighter. As you can see, it is not difficult at all and does not take much time.

Flash drive - Lego cube
Another way to design a flash drive in an original way is to make it in the form of a Lego cube, which almost everyone has. We will need a few Lego blocks, a penknife, pliers, glue suitable for plastic, polish and sandpaper. First, we select cubes that are suitable in size for our flash drive. You can make a case from several cubes different sizes and flowers. We cut all the internal partitions with a penknife, now we break them out with pliers. We use the second same cube for the lid, cutting off everything to the top. At the end, we cut a hole for the USB connector, adjust, install the device.

Using the remains of the brick, we fix the flash drive so that it lies parallel. We fill the empty space, for this you can use transparent silicone. So that there is no gap between the base part and the cover, we rub the joint with sandpaper, glue it. After the glue dries, remove the residue using sandpaper. With the help of a polish, we complete the work.

Your exclusive do-it-yourself flash drive is ready!
So, as you may have noticed, making a case for a flash drive is not so difficult. The main advantage of making it yourself is that it will be truly original. After all, before proceeding with its implementation, you turn on your imagination, choose materials from improvised and more accessible to you, put them together and as a result you have an original and individual flash drive, which 100% will not go unnoticed. It will certainly emphasize your individuality and creativity.
How to make a flash drive?
Our article, dear reader, will tell you about a very exciting activity that can even turn into a hobby. Today, we will deal with how a flash drive is made, its internal organization, various engineering techniques for its implementation in real life. After reading our article, you will be able to assemble a flash drive from scratch with your own hands from almost any material. So let's get started:
Flash drive with your own hands!
I think everyone understands that if these "own hands" grow not from the shoulders, but from another place, then it is best to transfer the design of the flash drive to your more skilled comrade. If, however, your case is the opposite, then here's what you can do.
The essence of creating a new flash drive is to disassemble the old one. Why is this needed? The point is that that electronic stuffing an old flash drive will be the main component of your future product. Although, if you are able to solder a working electronic circuit on your own, please. So, the first step is to get the contents from the old flash drive and "dress" it in a new case.

As already noted, this way case manufacturing is not the only one. Craftsmen who feel confident working with wood can use wooden blocks instead of a ruler. Undoubtedly, such material will be more reliable and durable. Do not forget that you can make various linings for the body of the flash drive. These can be metal strips, or plastic patterns from finished household appliances. All in your hands. In addition, you can try your hand at wood carving directly on the finished case, however, it will not be easy, given the very small size of our product.