The question of how to make a luminous keyboard arises in cases where the user works a lot at night without an input device solves this problem. There are two ways to do this. The first is to buy such a device initially. A reliable and simple choice, but you will have to overpay for it anyway. Exclusive performance requires additional payment. The second option is to add backlighting to the old keyboard at home. A cheaper solution, but requires good preparation and small financial investments.
Neon
This is the hardest way to make a glowing keyboard. To implement it, you need neon with a length of 3 meters and a supply voltage of 9V, glue for fixing and a voltage source of 9V. A battery, rechargeable battery or power supply will do. Next, we disassemble In those places where the neon will pass, bend the lower fixing elements. Then we lay it, while fixing it with glue every 5 centimeters. To supply power, we make a hole with a drill and put wires through it. We check the quality of the keys. If necessary, we correct, and then collect everything. Now it will be enough for the neon to supply voltage.
LEDs

This method is similar to the one previously described with the only difference that the light source is located outside the peripheral device. If you have a computer desk and the keyboard slides out, then you can stretch the strip of LEDs over the exit point. Otherwise, you will have to do homemade stand... And then stretch the light source along it. Now let's figure out how to make a glowing keyboard in this case. And everything is very simple - we stretch out led strip on the base and fix it with glue every 5 centimeters. Then we connect to a voltage source - and you're done. To turn on the LEDs, just flip the toggle switch.
Phosphor
This is the easiest way to make a glowing keyboard. To implement it, it is enough to purchase a phosphor-based paint and transparent keyboard stickers. Next, carefully cover the keyboard with paint and let it dry. Then we glue the stickers and you're done.
Turnkey solution
Many computer manufacturers try to produce exclusive devices. One of them is SVEN company. Its products combine high quality and democratic value. This brand occupies a leading position in the segment of peripheral devices. One of them is SVEN keyboard of Comfort 7200 EL model. It connects according to the standard USB interface... All keys are transparent and backlit. The perfect solution for those,

Your choice
The luminous keyboard allows the user to work without any problems at night. Which of the options to choose is a personal matter for everyone. The first three options require some preparation. But a device upgraded in this way is both more enjoyable and increases self-esteem. well and ready-made solutions are more expensive, but in this case there is no point in puzzling over how to independently make lighting for this class of peripheral device.
To date, new laptop models that are being produced already have a keyboard backlight function, this is very convenient and useful function in the laptop. Especially comfortable with such a function will feel those who have to or who like to work at night or when not very good lighting... With backlighting, you don't need to strain your eyes to see this or that character on the keyboard. There are several ways how to turn on the keyboard backlight on a laptop, the differences are only in the models or the companies produced by the manufacturers. You can also create your own keyboard backlight.
By the way, I have repeatedly observed this device in online stores and what is nice, it is not expensive. I also want to note that backlighting is rare in budget laptops, but it is worth checking all these.
Turn on the backlight
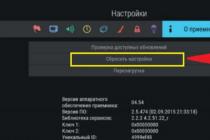
First of all, you need to determine if your laptop has a keyboard backlight function. If there is such a function, then turning on the backlight is not difficult. Each manufacturer applies to the keys Special symbols, additional keys with symbols on F1 - F12.
In order to turn on the backlight on the keyboard, press the Fn key and hold down another additional key, which different models can be different - you can experiment by pressing F1 - F12. You can try these combinations: Fn - F5 / Fn - F6 / Fn - space (space) / Fn - right arrow.

The only thing to consider when pressing additional keys is that when they are pressed, other keys can be activated. various functions... For example, sleep mode, turn off Wi-Fi, or turn off the monitor. To disable / enable these functions, you need to press the same key combination again.
In the image below, you can see how to turn on the keyboard backlight on an HP laptop:

There is another way how to turn on the keyboard backlight on a laptop, if your laptop does not have such a function. The backlight can be designed by yourself - it is an external backlight.
How to make external lighting
I found the instructions below on the Internet, if someone wants to do needlework, then this is for you.
To do this, you will need - + 5V power from the USB - connector and a white LED. We plug into the USB power connector. However, given that the LED has a voltage of 3.5V, and the LED current has 0.02A, while a resistor is required to extinguish 1.5V, the additional resistor has a resistance of 1.5V / 0.02A - this is 75 Ohm. Since the USB connector gives up to 0.5A, respectively, 25 LEDs can be powered from it, but it is imperative to control the current consumed by the LEDs, since the difference in 18 - 20 MA reduces the LED's service life.
After checking the external backlight you made and the brightness of its glow, if you need to increase the brightness of the keyboard backlight, you can connect another LED in parallel with the same resistor. The required current must be set by selecting a resistor. Your hand-made backlight is ready, you can install it and start working on your backlit laptop.
In my opinion, of course, it is better to order a ready-made backlight, since it is cheap.
Within the framework of this article, we would like to fully disclose the question of how to make a backlight on the keyboard, having considered several options for its manufacture at once, namely:
So let's get started!
1. Backlighting of the keyboard keys from above by LEDs
Purpose: Of course, it is suitable for those who like to work at the computer at night and do not have the opportunity to turn on the light in the room. For most people, this situation means at least a 50% drop in labor efficiency due to the constant search for the right buttons.
The list of required materials and tools is shown in the photo below:
soldering iron, LEDs, heat shrink tubing, fairly rigid wires and a keyboard.
The first step is to disassemble the keyboard. The vast majority of models are assembled on screws, so this issue can be easily solved with one screwdriver. Then we find the place where the CapsLock, NumLock, etc. indicators are installed. It is from these LEDs that our backlight will be powered. We twist 2 wires 20-30 cm long with a "pigtail" and solder them to the indicator LED on the keyboard.


We put a heat-shrink tube on the twisted wires, heat it with a soldering iron so that it shrinks, and solder the LED on top. Ready! The result is a very convenient and at the same time simple backlighting. An important advantage is that this backlight can be adjusted by bending the rod on which the LED is fixed.


2. Option using flexible neon
Purpose: suitable for modding enthusiasts and those who just wanted to upgrade appearance keyboard. In general, there is little benefit from this technology, but there is an interesting decorative effect.
Similar to the previous case, first we disassemble the keyboard.


Then we cut out the space for the driver. 
Now we stretch through the hole and lay it down. We connect the cord to the driver.


The first attempt did not work out very neatly, so attempt number 2 was made, the result of which can be seen below.


If the description seemed not detailed enough for you, we recommend watching this video:
3. Illumination of the surface under the keyboard.
Purpose: exclusively as a decoration. With the right approach, the effect will be more than interesting.
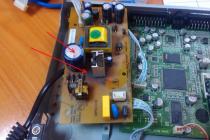
After disassembling the keyboard, we find the place where the power is connected to the board inside it. Having measured the current supplied to the keyboard with a multimeter, we calculate the connection of the LEDs to the network. How


We install the LEDs in the holes, solder the resistors, carefully distribute the wires and connect them to the power supply.


4. Backlight laptop keyboard
Purpose: useful for those who like to sit in the dark with a laptop on their laps. Also, this backlight can be used to read e-books in the dark on devices intended for this.
Obviously, disassembling a laptop for the sake of making LED backlighting is not a prudent matter, so below we will consider a method of making a universal LED USB lamp for keyboard backlighting.
First of all, we collect the LEDs in a circuit, based on the fact that we have USB as a power source. Note that a variable resistance resistor is used as a resistor - it will allow you to further adjust the brightness. This option is useful if you plan to use the backlight for different tasks (for example, lighting the screen while reading or just backlighting the keys).


We used a special hardening plasticine as the basis for the illumination. Having opened the package, we placed the soldered LEDs in it in a convenient way (so that the light in the end was diffused).


We give a more or less pleasant look to our mini-lamp, wait until the plasticine dries. Ready! You can use it.
Instructions
Before modifying the keyboard, be sure to disconnect it from the computer. Then carefully disassemble. If inside instead of a large "canvas" you find many individual pushers, carefully fold them into a jar without losing a single one. Then remove the board and the multilayer contact tape. Putting them aside, if the keyboard is dirty, place its plastic parts (top panel with keys and bottom cover) in a bowl of water with a little dishwashing liquid added. Leave them there for a few hours (if the keyboard is very dirty, for a day). Then remove them from there, remove the dirt that has not fallen off by itself with a sponge, and then rinse thoroughly with running water. Place them on a radiator to dry. Do not use a hair dryer or electric heater to dry - parts may warp. Do not wash the keyboard with hydrogen peroxide - although it will turn white, residues of this substance can then dissolve the circuitry wires.
A very effective color scheme will be obtained if the color of the keys is in contrast to the color of the case, as in the keyboards of some old computers (released before the widespread distribution of the IBM PC). To get this effect, buy two absolutely identical keyboards, differing from each other only in color. Having disassembled them, rearrange the black keys to the white keyboard and the white keys to the black one. Then collect both keyboards.
To paint the keyboard case, first separate all the keys from the top panel, having previously photographed their location. Degrease both parts of the case without keys with alcohol, let it dry completely, and then cover with a layer of paint from a can. Before doing this, cover the fields for the keys with pieces of paper, which then remove. Do not hold the can close to the part to be painted - place it about 30 centimeters from it. Then the paint particles will reach it, and the solvent will have time to evaporate along the way. Let a layer of paint dry completely, then apply a second layer, and when it is dry, a layer of special varnish, which also let dry. If desired, make a drawing, for example, with gouache, before applying the varnish. Do not smoke or use open flames while working. Do not dry the varnish with electric heating devices. Take flash photography with no paint or varnish vapors in the air. Work in a ventilated area.
To assemble the keyboard, first place all the keys in place. Place a canvas with pushers or individual pushers on top of them. Carefully so that they do not move, put the film with contacts. Replace the board by pressing it evenly against the film with all screws through the supplied clamping bar. Close the keyboard by installing all the screws. Check it in operation, make sure that all keys are functional.