Every day, the operating system undergoes a huge number of file structure changes. In the process of using a computer, files are created, deleted and moved by both the system and the user. However, these changes do not always take place for the benefit of the user; often they are the result of the work of a malicious software whose goal is to damage integrity file system PC by deleting or encrypting important items.
But Microsoft has carefully thought out and perfectly implemented a means of resisting unwanted changes in the Windows operating system. A tool called Windows System Protection will remember Current state computer and, if necessary, rollback all changes to the last restore point without changing user data on all connected drives.
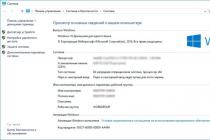
How to keep the current state of the Windows 7 operating system
The scheme of the tool is quite simple - it archives critical system elements into one large file called a "recovery point". It has a fairly large weight (sometimes up to several gigabytes), which guarantees the most accurate return to the previous state.
To create a restore point ordinary users you do not need to resort to the help of third-party software, you can handle it through the internal capabilities of the system. The only requirement that you need to consider before proceeding with the instructions is that the user must be an administrator operating system or has sufficient rights to access system resources.
- Once you need to left-click on the Start button (by default, it is on the screen at the bottom left), after which a small window of the same name will open.
- At the very bottom in the search bar, you need to type the phrase "Create a restore point"(can be copied and pasted). One result will be displayed at the top of the Start menu, you need to click on it once.
- After clicking on an item in the search, the Start menu will close, and a small window with the title will be displayed instead "System properties"... By default, the tab we need will be activated "System protection".
- At the bottom of the window you need to find the inscription Create a restore point for disks with system protection enabled, next to it there will be a button "Create", click on it once.
- A dialog box will appear asking you to choose a name for the restore point so that you can easily find it in the list if necessary.
- After the name of the restore point is indicated, in the same window you need to click the button "Create"... After that, the backup of critical system data will begin, which, depending on the performance of the computer, can take from 1 to 10 minutes, sometimes more.
- The system will notify the end of the operation with a standard sound notification and a corresponding inscription in the working window.


In the list of points available on the computer, the newly created one will have a user-specified name, which will also indicate the exact date and time. This will allow you to immediately specify it and roll back to the previous state if necessary.
When restoring from a backup, the operating system returns system files that have been modified by an inexperienced user, or malware and also returns the initial state registry. It is recommended to create a restore point before installing critical operating system updates and before installing unfamiliar software. You can also create a preventive backup at least once a week. Remember - regular creation of a restore point will help avoid the loss of important data and destabilize the operating state of the operating system.
Today we will figure out how to create a windows 7 restore point for subsequent system recovery as a result of a failure. Unfortunately, there are situations after which your computer does not boot or boots incorrectly. The fastest and less problematic option to restore work is to use a rollback of the system to a stable version.
You can “break” the system different ways, but the most common are software installation, driver installation, incorrect Windows update... These actions, in 90% of cases, lead, as well as to the failure of the operating system. But it's okay if you always have fresh system restore points.
In this article, we will figure out how to make restore points and how to use them to restore the system in case of a failure. If the recommendations below do not help you, you can always contact the professionals from hardmaster.info to recover your data.
Create a system restore point
To create a system restore point, open the computer properties
open the item “ System protection”
 In the window that opens, press the button “ Create”
 enter the name of the restore point, the date and time can be omitted in the name, they will be installed automatically. After entering the name, click “ Create”
 The creation of the restore point will begin, wait for the process to complete
 if everything went well you will see the message
 after that, calmly perform experimental actions on your computer, in case of problems, you can restore a working version of the system.
Restoring the system from a restore point
And now let's imagine that your system refused to work correctly. If your computer does not boot at all, you can use the disc to Windows installations 7. While loading the disc, select the item “ System Restore”And follow the path of choosing the operating system and the created restore point.
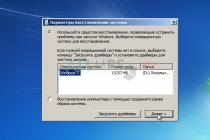
If Windows boots up but does not work correctly, you can use the standard system recovery tools. To do this, open the “System Properties” window and go to the “System Protection” tab (the windows are described above in the section on creating a system restore point).
In the window, press the button “ Recovery“, Then we press“ Further”
 select the previously created system restore point (or the most recent one) and click “ Further”
 In the window that appears, click “ Ready”
 and once again agree with what we do
 after which the system recovery will begin. During recovery, the computer will restart without your intervention. After a successful reboot, you will see the message

Ready! The system has been restored and is back in working order. I would like to add that before each system update, restore points are created automatically. So if a system update has caused a breakdown, you can always use recovery.
Restore points allow you to restore operating system settings and older versions files in the event of a software failure. V this material we will tell you how to create a restore point in Windows 7 and then how to use this point to restore the system.
In order to create a restore point in Windows 7, you must first open the system properties window. This can be done in several ways. For example, if you have a "Computer" icon on your desktop, then you can simply right-click on it and select the "Properties" menu item.
You can also open system properties through the Control Panel. To do this, you need to follow the path "Start - Control Panel - System and Security - System".

Well, or you can use the most in a simple way, namely press the key combination Windows + Pause / Break.

After you have opened the system properties window, you need to go to the "System Protection" section. To do this, click on the corresponding link on the left side of the window.

As a result, you will see a small window with system protection settings. There will be a list of disks, opposite which it will be indicated for which disks are protected and for which not. If for your system disk(usually this is drive C :) protection is enabled, then you need to select it and click on the "Create" button

After that, you just need to enter a name for the created restore point and click on the "Create" button again. After that, the Windows 7 operating system will begin the process of creating a restore point.

If the system disk protection is disabled, then you must first enable it. To do this, select the disk and click on the "Configure" button.

After that, activate the function "Restore system settings and previous versions of files" and specify what percentage of the disk you want to allocate for creating points Windows recovery 7. After making these settings, close the window by clicking on the "Ok" button and you can start creating a restore point.

Please note that in the same window you can delete previously created restore points. There is a separate "Delete" button for this.

Restoring Windows 7 system from a previously created point
In order to restore the Windows 7 system using a previously created restore point, you need to open the Control Panel and use the search to find the "Recovery" section.

In the "Recovery" section, you need to click on the "Start System Restore" button.


If Windows 7 does not boot, then you can start recovery using installation disk... To do this, boot from the installation Windows disk 7, select a language and go to "System Restore".

After that, select the operating system Windows 7 and click on the "Next" button.


And follow the instructions that appear on the screen.

Thus, you can restore Windows 7 from a previously created restore point even if Windows 7 refuses to start.
Before creating a Windows 7 restore point, you need to understand what they are and what they are for. In short, this is saving computer state settings in automatic or manual mode In other words, backup, backup, etc. This function only affects the operating system files that are needed for it. correct work and does not knock, does not delete user settings of programs or personal files. As a rule, the creation of backup points in automatic mode occur:
- Once a month or week (depending on the settings, which can be changed at any time).
- Every time you start installing third-party software or drivers.
Recovery may be needed when it becomes necessary to roll back the system parameters to the time when it was working properly. The reasons for this can be different:
- Accidental deletion of system files.
- Infection of a computer with a virus that has caused indescribable harm.
- Unsuccessful installation of any software or game;
- Another failure or change of important settings.
- Noticeable device malfunctions have appeared.
In any case, one of the above reasons is usually accompanied by the occurrence critical errors after which the system stops working normally and freezes occur.
We save system settings for future recovery
To make a backup copy of Windows settings, you need to open “start” and right-click on the line “computer”.
Then select “system properties” from above. A dialog box will appear indicating the basic properties of the computer. On the left you can see a list, clicking on which will open this or that window. Select “System Protection”. A small dialog box will appear.

Below, in the "system protection" tab, you will see two items for working with Windows backups:
- Customization.
- Create.

Since we need to create a backup point, we select the second item. After that, the computer will ask you to come up with a name for it. We strongly recommend using a capacious and understandable name (and not a set of letters and symbols, as is often the case), which will help you if you have to use the rollback option. After you enter the name, the computer will begin to remember the state of Windows at the moment.

How to get to the backup menu
Having a similar backup Windows settings, you have the opportunity to return normal work devices at any time. In order to do this, you need to go to the "system recovery" menu. There are several ways to do this. The easiest one is to open the "start" menu, click on the line "all programs", scroll through the list to "standard", open the next folder "service" and select "system restore".
How to rollback
In order to return the computer settings at the time of the rollback point creation, you must:
- Open “start” - “control panel”.
- Sort icons by category.
- Select the "system and security" block.

- In the window that opens, select the "Support Center" block and click on the line "restore the previous state of the computer".

- You will see a new window describing this procedure.
- Click start.

- In the dialog box that opens, Windows will again acquaint you with the basics of this operation and offer to continue the procedure or cancel it.
- click "next".

- Select the date you want to rollback your computer.
- Click next.

- Windows will prompt you to confirm the action.
- Click done.

The device will begin rolling back and rebooting. Keep in mind that when the recovery starts, all windows will automatically close, so save all files in advance so as not to lose important information.
How to delete backup points
As you already understood, rollback points are created by copying the current state of the computer settings for rollback. There is no magic here, and the "magic points" for rolling back the computer take up a certain amount of space on the hard disk. If you do them too often, then there may be a problem of insufficient free disk space. In order not to waste free space, it is recommended to delete old points, giving preference to newly created ones.
If you are not using special utilities to clean your computer, Windows allows you to do this in two ways:
- Delete everything up to the last restore point (in this case, you must be sure that at the moment the state of the computer is in an acceptable state and after deleting the rest of the restore points, make a new one).
- Leave only the last copy and delete the rest.
Removing every restore point
Go back to the menu where you have already created backup points. For this:

Leave only the last backup date and delete others

Now, if your computer starts to malfunction, you can always roll back its settings to the moment when it worked smoothly, and, if necessary, get rid of unnecessary backups... If a rollback does not help solve the problem, then as a rule, a full reset to factory settings or a complete reinstallation of Windows is required.
In contact with
A system restore point is necessary so that in case of creating erroneous actions on the computer that lead to its unstable operation, the user will always be able to restore the system to an earlier moment. For example, you decided to install a program downloaded from a suspicious site that turned out to be infected with a virus. The virus turned out to be not simple, but disabled half of all programs previously installed on the PC. You can of course use antivirus utilities, however, even in case of successful deletion malicious file other programs are unlikely to work. It is for such cases that System Restore exists.
However, not all so simple. The fact is that by default the operating system does not automatically create restore points, so you must do this procedure yourself. Otherwise, it will be simply impossible for you to roll back the system!
Create a restore point
Before we begin to describe the whole process, we must warn you that only the basic settings of the operating system are saved. That is, various temporary files, audio or video recordings are not saved, so if you deleted them, then you need to use third party application for data recovery.
First. Press the "Start" button on the right side of your screen and in the drop-down menu select the section "Control Panel" - "System".

On the left side you will see a small menu in which we are interested in the "System Protection" section.

A new window has opened, the "System Protection" tab. There are two buttons at the bottom of this window. By clicking on the "Configure" button, you can, for example, adjust the maximum amount of filled space required to create recovery points. The larger this section, the more points you can create. As the space fills up, the system will automatically delete them. However, you do not have to touch this item at all.
We are much more interested in the "Create" button.

Click on it. A window will appear in which you need to enter the name of the restore point.

Then click on the "Create" button and that's it, the point will be created and saved automatically.

As you can see, there is nothing complicated in this process.
How do I roll back the system?
If suddenly you have an embarrassment and need to roll back the system before a certain date, then you need to go to the "Control Panel" again, only this time select the "Recovery" section.

Then click on the "Start Recovery System" button.

By clicking on this button, you can select the desired system restore point. Select the one you need and click the "Next" button. Follow all instructions.

Do not forget that the computer will be restarted - this is one of the prerequisites for this process.