A scanner is a specialized device that is used to convert images of a selected surface into digital form. Pages of books, magazines, notebooks, photographs, slides and other documents with graphics and text data can serve as such surfaces. Scanning devices can operate as a PC peripheral or as a standalone device, that is, they can independently transmit a scanned image via global network or wifi.
For the first time, scanning technology appeared in 1857 thanks to the Florentine abbot Giovanni Caselli. He created the pantelegraph device, which transmitted images over wires. When received, it was applied to the drum using conductive ink, then read with a needle. Five years later, the photoelectric scanning principle was patented. In the future, the device operating on this technology began to be called telefax. Modern scanning devices have undergone significant changes, they have become an order of magnitude more efficient and productive.
Kinds
The scanner can conditionally be:
- Industrial purpose.
- Household purpose.
Industrial are used in various industries. High demands are placed on them in terms of speed, scan quality, reliability and other operating parameters, because they are designed for continuous operation. Homemade ones are rarely used, as a result of which they are cheaper and less productive. However, in Lately devices for the home are produced, which are not inferior to industrial ones in terms of scanning speed.
According to the field of application, scanning devices can be:
- Tablet variant. It is the most popular in domestic use. In this case, the object to be scanned is placed on a glass plate. A photoelectric carriage with optical elements moves over the tablet, the read image is converted into a digital code as a result. Tablet models, as a rule, are inexpensive, they are light and easy to use.
- Film option. This is a specialized device that is used only to scan transparent objects, such as transparencies, negatives or slides. Devices of this kind are often used by studio employees or professional photographers. In everyday life, such devices are rarely used, as people prefer to use the services of photo studios.

- drum variant. In it, the scanned image is mounted on a rotating drum. The digital image is taken by the beam as the drum rotates. Such devices provide very high picture quality. However, they have a high cost and large dimensions, as a result of which they are used only by large companies. They are mainly used in the printing industry.

- lingering. Such devices are used for loose-leaf documents. They are often referred to as document scanners, because they make it possible to automate the scanning of significant volumes of office documents. The principle of automatic sheet feeding works here. The system provides for pulling the scanned materials through the photoreading system, therefore they are often called in-line. However, such devices are not capable of scanning stapled sheets.

- Flatbed broaching are a combination of broaching and flatbed devices.

- Passport. These devices are adapted for scanning driver's licenses, passports and other identification documents. They stand out for their compactness and good scanning speed.

- planetary. Provide contactless scanning of magazines and documents. These devices are often used to digitize originals that require a delicate approach, such as historical documents that time has not spared.

- Network. They are connected directly to the network infrastructure without the use of a PC. Thanks to this, each employee of the company can scan documents, sending them by e-mail or saving to a network folder.


Device
The book scanner has the following main elements:
- Scan head, it is at a small height above the image. In most cases, it is in the form of a scanning ruler and scans from one end of a book or magazine to the other.
- A number of models have book cradle, which is required to ensure the height alignment of the book surface. A pressure glass can be used to smooth and reduce distortion. For books, V-shaped cradles can be used.
- Heads often contain matrices, which are similar to digital matrices. For these units, scanning is carried out during the shutter opening period, which allows you to speed up the process. The matrix transforms the light reflection of the image into analog electrical signals (NUCLEAR POWER STATION).
- (NUCLEAR POWER STATION) the signals pass through an analog-to-digital converter. He translates analog signal into digital form.
- CPU coordinates the interaction of all nodes of the device, including generating image data for subsequent sending to a PC.
- Controller interface controls the exchange of data and commands between the PC and the scanner.
- Lamp installed on the scanning carriage.
- stepper motor and Control block drive the carriage and the scanning head on it.
Operating principle
The scanner performs a scanning function to transmit digital image on a PC or send by mail. For this purpose, the object is placed on the transparent glass of the device. When the unit is started, the carriage is set in motion, which begins to glow. The optical system of the device, which includes a lens and mirrors, directs the light flux from the scanned surface of the object to the receiving element. It transforms the data.
The analog signal is sent to the converter, where it is converted into a digital code. Next, the controller comes into action, which transmits the code through the cable to Personal Computer. On a PC, the resulting image can be edited and used for its intended purpose.
Application
The scanner is used in a wide variety of fields of activity in:
- Companies and organizations where the device is used to scan documents.
- Polygraphy.
- Photo studios.
- Industry.
- Libraries.
- Scientific laboratories.
- Schools, technical schools and universities.
- Everyday life, and where there is a need to scan an image from a book, document, magazine, photograph, slide, and so on.
How to choose
The scanner should be selected based on where you intend to use it. It is necessary to decide what tasks it will perform. Unlike a computer, it will be problematic to upgrade a scanning device by installing additional components into it. Therefore, you should weigh the pros and cons before buying.
- When choosing a scanner for home or office use, it is important to study specifications. An office scanning device should meet the specifics of the organization as much as possible. In most cases, this technique in the office is used for scanning text documents and digitization of archives. Therefore, the machine must have an auto paper feed function.
- Organizations that work with large formats and printing important the ability to scan documents of large sizes, as well as the quality of scanning.
- For scanning at home, in most cases, they are guided by a low price and compactness. For domestic use, it makes no sense to purchase expensive equipment, because almost all scanning devices can cope with the tasks of an undemanding user. It does not require the highest resolution, large format or interface that runs at high speed.
- The presence of a slide adapter in the device, including additional options in the form of a red-eye removal or color restoration function, will make use more convenient, especially if you want to scan photographs and negatives.
- Color depth determines how many shades of color the scanning device will perceive. For home use, 24 bits is enough.
- When buying directly, be sure to check the scanning device. To do this, you need to scan a photo or other document. You need to see how fast the scanner works, how colors are transmitted, especially white. You should evaluate the clarity of scanning the smallest details at a certain resolution, including in which image formats can be saved on a computer. If everything suits you, then you can safely make a purchase.
Not only office work involves the ability to use various devices associated with the computer. These include , scanner, etc. These skills are also necessary in the daily life of any mother, as they very often help to complete homework with a child or get the necessary drawing or text from a book.
But, even if you have a computer and a scanner, it does not mean that you will be able to work with them right away. Of course, when buying along with this office equipment, you will receive instructions for working with the scanner. But for a person who does not have experience in operating such devices, it will be difficult to master it on their own. Therefore, for those who doubt their abilities, in this article we will highlight how to use the scanner correctly.
First of all, you need to figure out how to turn it on and set it to work.
How to connect a scanner to a computer?
It is quite natural that it must be connected to both the power supply network and the computer. After all, the scanner reads a two-dimensional image and presents it in electronic form, so you need a PC monitor to see the result.
To connect the scanner to a computer, insert its USB port into one of the slots on the rear panel of the power supply. After that, turn on the connected devices and proceed to install the drivers. To do this, just insert installation disk and follow the prompts that appear. If you installed everything correctly, then your "smart" machine will see the new device. You can understand this by the presence of a scanner icon on the taskbar.
Based on what you need a scanner for, you should also install programs on your computer through which you will work with it: scan and recognize text - ABBYY FineReader, with pictures - Adobe Photoshop or xnView. Usually, programs that have a scanning function are available on the driver disk for the device.
Working with the scanner
Let's start scanning.
- We lift the lid and put the paper carrier on the glass with a pattern (text) down.
- We launch the scanning program or press the button on the device itself.
- With the help of lines, we edit the size of the preliminary image that appears on the screen of your computer. You can also change its resolution (the higher, the clearer the result will be) and color range, or even make it black and white.
- V open window program, we press the “scan” button, there is also “start” or “accept”, and wait until the scanner beam passes in one direction and back. The larger the original drawing and the higher established resolution, the slower the read head will move. Therefore, be patient.
- When an already digitized version of your paper original is displayed on the screen, it should be saved. To do this, select "File", and in the window that opens later, click "Save As". We name the file with the scan result as we need and select the folder where it should be saved.
When using ABBYY FineReader to digitize a document, it will be enough to click "Scan&Read" and all steps will be performed automatically.
 Scanner Precautions
Since the surface on which the paper original is placed is glass, it should be handled very carefully:
- Don't push hard. Even if you need to scan a spread of a book that does not fit snugly on the surface of the device.
- Avoid scratches and stains. They will reduce the quality of the resulting image. To avoid this, do not place dirty papers on the glass. And if this still happened, then when cleaning the surface, you can not use powder products.
The printer and scanner are fairly common types of office equipment. The need for them is extremely high, because it is necessary to photocopy a document or send information from a printer to a PC almost every day, especially when it comes to workflow. In this article, we will learn how to use additional useful features printer and scanner - learn how to optimally photocopy documents and scan them.
To photocopy one copy of a passport or scan an important document onto a computer, it is not at all necessary to run to the nearest kiosk with a sign "photocopy-printout", it is enough to have at hand modern device which can copy information. To date, quite a lot of models support this feature. The printer has long ceased to be a device with limited functionality only for printing. Most often, a modern MFP is not only the printer itself, but also a scanner and a copier.
Most copiers can transfer scanned information to a computer, including both inkjet and laser printers. Today, the question sounds a little different: what devices cannot make a photocopy and send scanned information from a printer to a computer? Most often, only the most inexpensive models of printing equipment are limited to the possibility of printing. Each manufacturer produces models of different price category and, accordingly, opportunities, it is worth remembering when choosing such equipment. Medium and high product line price segment has all the possibilities.
To find out if the design of the device has a scanner and a copier, it is best to look into its characteristics. However, sometimes superficially enough study the corpus. If there is a cover on the top of the device, under which there is a glass surface, then this device has the above features. The printer, as a rule, is equipped only with a blank paper tray and prints it vertically upwards, while in the MFP, the printed product exits from the end, below the scanner area.

Important: if you are not sure about the capabilities of the device, it would be best to study its documentation, which details all the characteristics without exception. After spending a few minutes studying the document, you can get much more information than a superficial examination of the device itself.
Learning to use the scanner yourself
Scanning is one of the most frequent procedures in office work, it applies to everything: documents, business literature, filing articles, photos, etc. It is hard to imagine an enterprise that does not know what a scan is and does not use it in its daily activities.
At home, in everyday life, a scanner is needed no less, because. helps to quickly and easily digitize pictures, photos and documents, transferring them to a computer. But even being a fairly common and familiar device, the scanner requires the right attitude. Do not try to use the device without proper skills, this can lead to costly damage.
Preparation for work
So, to use the scanner, you need to follow a few simple steps.

Once the driver installation process is complete, the device will be recognized by your operating system. You can always find it in the appropriate section (printers and faxes, etc.). Typically, the name of the device is the full designation of its model, including an alphabetic and numeric index. If desired, the name can be changed to any other through the system settings.

After the process of installing drivers and synchronizing the device with the system, you need to decide which software you will use. The Windows OS family offers programs built into them by default, but this is far from the only solution. In any case, it is important to understand that without specialized program, which will be responsible for the scanning process, you can not do without. It remains to choose from among the most popular: Adobe products, the XnView product line and the equally famous VueScan. Of course, the list of programs that allow you to scan is much longer, but those listed above are the most relevant.
Scanning
To check the capabilities of your scanner (and adjust it if necessary), in the interface of any of running programs click on the "file" option. After it opens, look for "import". If the last branch contains the full name of your device, everything is in order, it works properly. Next, you need to do the following.

After saving, your image remains digitized and will be ready for use at any time. It can be sent by mail, published on a website, or set as a background screen saver on your desktop.
Options for Scanning in Text or Photo Mode
Despite the fact that the drivers of all manufacturers are different and do not have one universal scheme, there is a series basic settings, which are present in all devices without exception.
The first thing worth mentioning is it's DPI. This item, when working with text, should not be lower than 300 (the same from a printer or MFP). The higher it is, the more accurate the picture will be. With a high DPI value, scanning will take a little longer, but the text will be more likely to be readable, without having to resort to its recognition. The optimal value is 300-400 DPI.
The second thing to pay attention to is color saturation(color). There are only three options here: the option to scan black and white text, gray and color (magazines, documents, posters, etc.). The higher the color, the longer it will take to scan.
In photo mode the most important thing is to avoid blurring the picture, and also to make sure that all edges lie flat on the surface. The color and tonality are set in the settings in the preview mode before starting the scanning process from the printer.
It should be noted that for photo digitization, not only the scanning process itself is important, but also the post-processing of the finished material using specialized programs.
To scan a photo, it is advisable to use the maximum clarity settings, this will minimize possible inaccuracies during the process itself, although it will take 10-15 seconds more.
Making a photocopy on a printer
One of the most common office tasks is photocopying documents. It is necessary to copy documents (passport, driver's license, etc.), important papers, books, abstracts. Learning to copy is quite simple, for this you need to adhere to the following algorithm of actions.
- Make sure the device is connected to the network.
- Check printer drivers.
- Check the condition of the documents for soiling, wrinkling, fading, and fingerprints.
- Open the top cover of the device.
- Place the document carefully side to be copied down. Make sure that the paper lies exactly on the marks on the device.
- Press the "start" button (on the printer and copier) or "copy", if it is an MFP, and then "start". Pick up finished copies from the receiving tray, remove the source from the scanning compartment.
Important: the number of copies is controlled by hardware, using buttons (most often in the form of arrows).
The printer also has a number of additional features. For example, you can make multiple copies of pages to fit on one sheet. How to do photocopy of passport on one page The easiest way to find out is from the following video:
What to do if the device does not scan
There aren't many reasons why this happens.

Before taking your device to a service, try connecting it to another PC, installing drivers, and scanning something. If it doesn’t work out, then the breakdown is possibly serious, and it is difficult to fix it with improvised means.
Technique for operating scanners and MFPs
It is important to remember that a scanner costs money, and not a small one at that, so in order for it to serve you as long as possible, you need to follow some rules. Where to start? Be as careful as possible when working with the glass coating - this is the most sensitive element of the scanner. If there are wear, scratches and dirt on it, this will certainly affect the quality of the digitized material. Dust the glass periodically with a soft material (such as synthetic suede).

- Whenever you are about to scan a document, make sure the piece of paper is clean and free of dirt and dust. In no case should you scan dirty objects, as well as use an abrasive.
- Even if your device does not scan, do not rush to fix problems yourself.
- Do not press or apply pressure to the glass surface.
- Never try to clean the glass with powder or a lot of moisture, the former can scratch the surface, and the latter can wet the electrics.
It is best to prepare the document to be scanned in advance. For example, if the document is not in very good condition, then at high resolution all the flaws will be visible on it. Explore document state before setting the desired permission. Also make sure that there are no pieces of adhesive tape or other fastening materials (staples, etc.) on the piece of paper. If there are obvious fingerprints on the paper, it is best to remove them with an eraser or flannel cloth.

Learning how to correctly use all the possibilities of scanning and photocopying is not so difficult, it is enough to show perseverance and patience, and then any technique will obey you. If you are unsure of yourself, at the first stage it is better to stick to simple instructions until you feel like you can use the scanner and photocopy yourself.
A scanner is a mechanical device that allows you to convert various objects (text, image, photo, documents) into a digital format (more precisely, into a picture) with their subsequent storage in the memory of a computer device.
We will talk about what a scanner is, adhering to the following plan:
The word "scanner" came to us from in English: scanner - from scan, which can be translated as "look closely, examine."
Scanner
Different levels of reflection allow the scanner to form a digital copy of the scanned object. There are scanners that can scan not only an image on paper, but even voluminous objects.
Scanners come in several types. However, devices that allow you to work with text and graphic documents have gained the greatest popularity.
Most budget low-cost models are tablet-type devices. Here, scanning (or photocopying) occurs as follows.
A sheet of paper with the information on it is placed on a special transparent window (glass) of the scanner and is pressed on top with a tight cover. Then a stream of light rays is sent to the sheet, which are reflected from the scanned image and captured, recognized and converted into a digital copy.
The main element of the scanner is a matrix that captures and recognizes the image. It is of two types:
- CCD and
First type CCD - Charge Coupled Device - image scanning using sensitive elements called CCD (Charge Coupled Device) sensors.
The model of the first type has a matrix with a carriage with a built-in backlight. A system of focusing systems (lenses) collects the reflected light. To obtain a color image, it is divided into components of the color spectrum and captured by photocells.
This allows you to get rich and bright output images. Moreover, a tight pressing of a sheet of paper with a scanned image to the scanner window is not required. Since the luminous flux has sufficient intensity to overcome short distances. And this circumstance is very important for simple devices, for wide application.
Information in such scanners is processed with quite high speed. The disadvantages can be considered a short lamp life and the need to use an external power supply.
Second type CIS - capital letters from Contact Image Sensor - translates as "contact image sensor".
A carriage with photocells and LEDs is built into the CIS type matrix. In the process of scanning, it slowly moves along the copied object, turning on LEDs of various colors (red, blue, green) in turn, which allows you to form a color image.
Such models are highly reliable. In addition, their cost is relatively low. The main disadvantages of the device include the need to firmly press the paper to the scanner window and the low scanning speed.
The main characteristic of these devices is the so-called color span (24, 32, 42 bits) and resolution or simply resolution. The more bits in the resolution of the device, the better the quality of the resulting image will be. Resolution is expressed as XXX (resolution in dots): YYY (carriage steps), for example, 600:300 dpi (bits per inch).
In the first video, you can see how to prepare the scanner and document for subsequent scanning.
Video 1: How to prepare a scanner and document on the HP Laser Jet MFP M1005
The second video shows how to scan and post-process the resulting scanned file, again using the HP Laser Jet M1005 MFP as an example.
Video 2. "Scanning and processing the scanner on the HP LaserJet M1005"
For the first part of the second video below is a text description.
Starting a scan
Before using the scanner, you must
- connect the scanner to 220V,
- and also connect the scanner to the computer, usually through the .
- It is also important to press the power button on the scanner, if there is one.
Then, on the scanner window, you need to correctly place the document for scanning (down with text or a picture on the window, pressing it to the corner shown in the diagram printed right next to the scanner window).
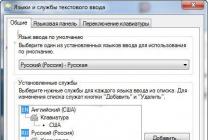
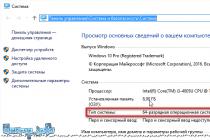
So, we assembled the hardware, connected it, let's move on to its program management on the computer. To do this, click the "Start" button. In the Start menu, click on "Devices and Printers". A window opens as shown in Fig. one:

Rice. 1. Where can I find an MFP (printer, copier, scanner in one bottle) in Windows 7 if it is connected to a PC
On fig. 1 number 1 indicates the printer (+scanner, +copier), which is connected and ready for use. Green tick in fig. 1 shows us the status of the printer (+scanner), that this particular printer is the "Default Printer".
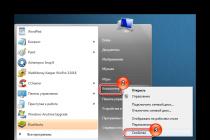
On the printer (+scanner), right-click (right-click). A context menu will appear, as shown in Fig. 2:

Rice. 2. How to start scanning?
In this menu we find the option "Start scanning" (number 1 in Fig. 2). The New Scan window will open (Fig. 3):

Rice. 3. New Scan window in Windows 7
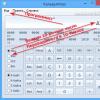
Five scan settings
1) Before starting scanning, you can make settings if necessary. Let's start with the " Color format» (number 1 in Fig. 3). By clicking on the small triangle (number 1 in Fig. 3), you can select one of the formats:
- color
- shades of gray
- black and white
I chose the Color format as I was getting ready to scan a color postcard.
2) The next parameter is " File type» (number 2 in Fig. 3). This refers to the type of the file that we will receive as a result of scanning. You can choose the following formats if you wish:
- BMP (Bitmap)
- JPG (Figure JPEG)
- PNG (Drawing PNG)
- TIF (Figure TIFF)
I have selected the type "JPG (JPEG Picture)", as this type allows you to store the file in a more compressed form, and saves space on your hard drive.
3) Parameter " Resolution (DPI)» is indicated by number 3 in Fig. 3.
The lower the resolution selected, the worse the scan quality. The minimum resolution is 75. The maximum for this device is 1200.
The higher the resolution, the better quality received scan. But the scan will take longer and the resulting file (scan) will have a larger volume, that is, take up more space on your hard drive.
4) Parameter " Brightness» is marked with number 4 in Fig. 3. You can adjust the scanning brightness with the slider. I have the brightness set to 25, slightly to the right of the middle of the scale.
5) Scan option " Contrast» is marked with number 5 in fig. 3, adjustable slider. In my case, the contrast is 0, that is, exactly in the middle of the scale. Brightness and contrast are selected empirically. No precise recommendations can be made here.
We press the button "Start scanning" (number 6 in Fig. 3). After the scan is completed, a preview of the scan will appear (a smaller copy of the scan for a compact presentation to the user) and along with it a field in which it is proposed to give the received scan a name.
In my example (Windows 7, HP LaserJet M1005 scanner), the scan obtained in this way is located on the computer in the Pictures folder.
You can, if necessary, process the resulting scan: remove unnecessary, add inscriptions and more. Video 2 describes in more detail, for example, how to crop extra white fields on the resulting scan.
On other devices, preparing the scanner, preparing documents for scanning, scanning itself and subsequent processing of scanned images is done in a similar way.
Buttons on the HP Laser Jet M1005

Rice. 4. Buttons on the HP LaserJet M1005
The top row of buttons is used to select from the menu those options that are required when setting up the printer or scanner.
1 in fig. 4 - Entering the menu appears after pressing the “OK” button.
2 and 3 in fig. 4 - Moving through the different options in the menu is done using the left / right arrows, which are located on both sides of the "OK" button. The same button completes the selection from the menu.
4 in fig. 4 - If the user changes his mind about using the menu (he is satisfied standard settings), then you need to click on the pink “Cancel” button.
5 – “Number of copies” – sets the number of copies.
6 - “Lighter / darker” - adjusts the color to lighter or darker.
7 – “Extra options copying” – you can set, for example, the scale.
8 - “Start copying” - we launch a copier (copy) of a document previously placed in the device.
Answers to 12 "simple" scanner questions
1) What is a copier printer scanner?
This MFP is a three-in-one Multifunctional Device. In other words, a printer, a scanner, a copier in one bottle, which is called an MFP.
2) What does a scanner do in a printer?
A scanner is needed in a printer in order to convert text, an image, a document from paper into digital form, into a picture, i.e. in the file that can be sent, for example, by e-mail or presented as proof that you have this or that document "on hand" in paper form.
For example, sometimes in the Internet banking, in the accounting department, when preparing negotiations, in order to carry out any actions, they require you to send a scan of a document (a scan of a signed contract with a seal, a scan of a birth certificate, etc.).
3) What is better MFP or printer and scanner? What's with the scanner?
MFP (multifunctional device) is a printer, scanner and copier.
Therefore, an MFP is better than a printer and a scanner for the reason that three in one (3 in 1) is better than two in one (2 in 1).
With the exception of breakdowns. If the device is one, and it is broken, then the user is deprived of all the possibilities (printer, scanner, copier) at the same time.
Complete set with a scanner means that in addition to the printer, the device also includes a scanner.
4) Which is better printer or scanner?
The printer and scanner have different functions, so the question: “which is better” is not correct. The printer prints documents, images, and other files that are on the computer on paper.
The printer prints files from the computer on paper. The scanner does the opposite: it converts into a file (i.e. into a picture, into digital form) the information that is "on hand" in paper form.
Together, the printer and scanner complement each other: the transfer from “numbers” to paper, and the transfer from paper to “numbers”.
5) What is a scanner driver?
The scanner driver is software(software), i.e. these are the programs with the help of which the scanner "from iron" turns into a controlled device.
If your computer does not have a scanner driver, this may be one of the reasons why the scanner is not working.
Typically, the presence of a scanner driver is checked the first time you connect the scanner to your computer. Recently, drivers are automatically downloaded from the Internet (if the Internet is connected) the very first time you connect the scanner to your computer.
If this does not happen, then it is worth remembering that a driver disk was attached to the scanner when it was sold. Then the scanner drivers are installed on the computer from this disk.
There is also a complex version. First, the drivers and programs for the scanner are installed from the disk supplied with the scanner, and then these drivers and programs are additionally updated from the Internet.
6) What is scanner resolution? What is scanner resolution?
This parameter indicates the quality of the digital image of the scanned original (see number 3 in Fig. 3).
The higher the resolution, the more accurate the digital copy (scan) will be, it will be more similar to the original. But at the same time, the scan will take longer, and the volume of the resulting file will also be large.
At a lower resolution, scanning is faster, the resulting file is smaller, and the quality is worse.
The PC user chooses the resolution himself, depending on the purpose of the scan. As a rule, it is recommended to set not too a high resolution, for example, 300 dpi.
7) Type of scanner flatbed, what is it? Type of scanner is lingering, what is it?
V tablet scanner, the original is placed on the scanning window and closed with a lid. The original lies motionless under the cover, but moves inside the scanner. This is how scanning is done.
Flatbed scanners can be both independent devices and can be part of multifunctional devices: printer, copier, scanner.
V lingering scanner, the original is pulled from one end to the other end of the scanner. The scanner itself is stationary. In this case, it is more likely that the original may jam, jam, or be damaged.
But the mechanism of a pull-through scanner is simpler than that of a flatbed scanner, it works longer. In pull-through scanners, as a rule, you can put documents, as they say, in a bundle. And they will be automatically fed for scanning one by one. This is its convenience compared to a flatbed scanner.
True, there are already multifunctional devices with flatbed scanners, which can also be used to feed originals in a batch. So manufacturers continue their endless competition for consumer preferences.
8) The scanner does not scan, what should I do? The computer (laptop) does not see the scanner, what should I do?
Check the following points:
- Connecting the scanner to 220V.
- Whether the scanner is turned on (the scanner may have its own power button).
- Connecting the scanner to a computer (usually via a USB port).
- Check if the scanner driver is ready to start as follows:
- move the mouse over the scanner image in the "Devices and Printers" window,
- we take a short break
- a small window appears with inscriptions indicating the status of the device, which should be connected and ready for use.
- If you are connecting the scanner to your computer for the first time, then you need to make sure that the scanner driver is available.
9) What should I do if the scanner gives an error? What is a scanner error?
To begin with, it is better to restart the computer, close unnecessary windows, disable all extra programs and devices. And try to scan the document or picture again.
If this does not help, then the easiest thing in such a situation is to “google”, i.e. search the internet for an answer:
- Highlight the error code (or “paint it blue”) that the scanner issues.
- Copy the highlighted error code, for example, using the Ctrl+C hotkeys.
- Insert the error code into the search (for example, Google, Yandex), for example, using the Ctrl + V hot keys.
- View information about the error and apply it in practice.
10) The scanner does not scan well, what should I do? The scanner scans faintly, what should I do? The scanner writes that the parameter is set incorrectly.
Change scanner settings (Fig. 3): color format, resolution, brightness, contrast. Optimal Settings is selected by the PC user empirically.
I set up my scanner for several hours, trying different settings, until I settled on the parameters:
- color format,
- file format.jpg,
- resolution 300 dpi,
- brightness 25,
- contrast 0.
11) Scanner says busy
If the scanner is shared from multiple computers, it can be used on a first-come, first-served basis. Until the previous user completes the scan, this access cannot be obtained.
If the scanner is privately accessed, on a personal PC, then you need to check if you have accidentally opened a shared access to it via the Internet. In sysadmin jargon, this is called "share the scanner", that is, "share the scanner" from the English word share - share.
You can check this by right-clicking on the scanner image in the "Devices and Printers" window, then select "Scanner Properties" or "Printer Properties" (for multifunctional devices) from the menu.
In the "Properties: type of scanner or printer" window that opens, on the Access tab, there should be no checkmark next to the inscription " General access to this scanner (printer)"
12) Antivirus scanner - what is it?
Antivirus scanner - it is no longer a device, it is a program that has nothing to do with everything that is written above!
The antivirus scanner checks and treats the infected operating system computer. It does not conflict with antivirus program installed on the computer.
There are different anti-virus scanners, for example, Dr.Web CureIt! or kaspersky security Scan, more details. An antivirus scanner is also called a curing utility.
P.S. Other articles on computer literacy:
Get up-to-date articles on computer literacy directly to your mailbox
.
Already more 3.000 subscribers
The need to get a digital copy of your photos or text can arise at any time, so it will be useful to know how to scan documents from a printer to a computer. It should be understood that an MFP is meant - a multifunctional device that has a built-in scanner, copier and printer. At the moment, there are many manufacturers of office equipment for home and office on the market, for example, HP, Epson, Canon, Brother, Kyocera, etc.
How to scan text from printer to computer
There are two main options for how to scan a document to a computer - as an image or as text. By default, the scanner works like this: it creates a photo, if you put a sheet with text in the copier, then it is impossible to edit it in the future. For this feature to appear, you need to use a recognizer (special software) that will turn the picture into an editable format.
How to scan a document using the Scanner Wizard
The field of how you connected universal printer to the computer, installed the drivers, carried out the initial setup for scanning, you can use the built-in functionality of Windows. The “Scanner Wizard” is suitable for this, the execution algorithm is as follows:
- Turn on the scanner, lift the lid. Check that the glass is clean, if there is dust, wipe the surface.
- Place the text or photo with the surface to be scanned facing down on the glass.
- Close the lid.
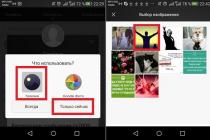
- Go to "Control Panel", click on "Hardware and Sound".
- Find the item "Devices and Printers", go to it.
- Right-click on the icon with your MFP, select "Start Scan".
- Set the desired options for the scan and click Preview.
- A window will appear with a picture of how your scanned text will look if it turned out too dim, or vice versa, you can change the settings and click "Preview" again. If everything suits you, click "Scan".
- Save the result on your computer or send the file for printing.
Scanning documents to a computer using dedicated software
Together with any MFP, there must be a disk with drivers and native software for this one. As a rule, the use of such programs provides an opportunity to achieve the most effective interaction with the device, to get the best quality. For example, how to scan canon printer using this software:
- After installing the device and software, open the list of programs.
- Find the application for your printer model, run it.
- Click Scan.
- The program will prompt you to select the type, format, color or black and white scan and resolution. If you set all the parameters correctly, the result will be better.
- Through the explorer, specify the path to save the final file. Give the document a name right away to make it easier to find later. If desired, the storage location can be removable media.
- Preview the document to correct any errors or immediately click the "Scan" button. Next, the MFP will recognize the data, after which you need to click "Save".

How to scan personal documents on the printer
Official documents must be High Quality so that all elements are clearly visible, readable. It concerns important information A: Birth certificates, passports, identity cards and similar documentation. More often, ABBY FineReader is used for these purposes, but any other software with similar functionality may be suitable. Instructions on how to scan a document to a computer from a printer using a passport as an example:
- Be sure to remove the cover, it will interfere during the procedure.
- In the settings, set the following parameters: "grayscale", resolution - 300 dpi (or dpi).
- Unfold the passport on the first page, put it facing the glass. It is better to put closer to the edge, leaving a small gap.
- Close the cover of the device tightly; for more detailed copying, you can press it a little with your hand.
- Click "Preview", make sure that the color, detailing of the letters is transferred correctly.
- At the bottom, click "Scan", wait until the machine finishes recognizing the file. After that, check the picture and click "Save".
- Using the frame, select the area with the image (the passport itself), empty fields should be outside of it.
- To store official data, you should choose the tif or bmp format.
How to scan photos on a printer
Now more often people print digital photos from a computer, but sometimes there is a situation when you need to scan them. It is important to properly configure the MFP so that the image is of high quality. The procedure for how to scan a document to a computer from a printer is as follows:
- Connect the MFP to the computer, turn it on. To digitize photos, you need to check that there are no spots, fluff and other dirt on them.
- The photo must be placed face down on the scanner glass.
- It is better to scan a photo using . This option will provide an opportunity to make adjustments during the preview.
- In the application, specify the scan type (black and white, color) and set the format to Photo.
- Set the maximum resolution value. So you can scan the photo in the best quality.
- If you want to copy the file well, then you should not make changes to the settings during the process or lift the lid.
- After the procedure, save the file in any place convenient for you on your computer.
- Use to correct the image graphics editor. It will give you more options than the scanner program.