Instructions
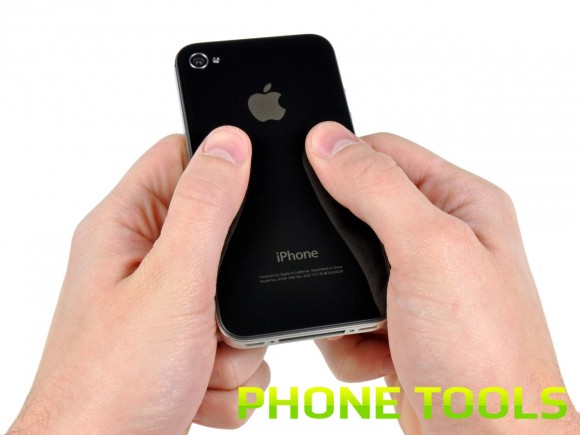
Take your iPhone 4 in hand and take a close look from all angles. At the bottom you can see 2 screws, unscrew them with a screwdriver. For subsequent collection, it is very important that each bolt is in its original place. A little trick will help you avoid confusion. Take an adhesive tape, unwind a strip about 20 cm long from it, place it on the table with the adhesive side up. When unscrewing the screws, lay them in a row one after the other on this tape. This method has 2 advantages. First, this way you eliminate the likelihood that small parts are accidentally lost, secondly, screwing them in the reverse order, you will always know which of the bolts you need next.
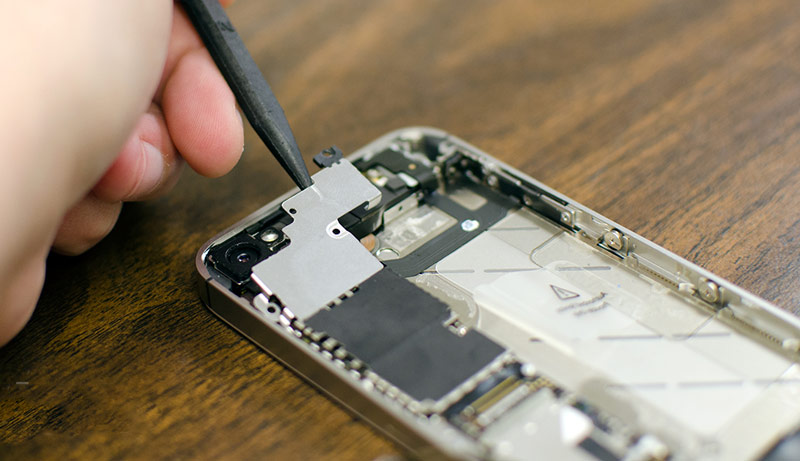
Remove the 2 screws holding the metal plate next to the charging connector. You will see a flat wide cable next to it, disconnect it and bend it to the side. Using the same spatula, carefully disconnect the antenna cable. Remove the plastic ring from the camera lens. The next in line will be the bolts holding the motherboard, there should be 4 of them in total, unscrew them, remove the metal plate that they held.
Disconnect the camera cable from the motherboard with a spatula. It is a wide black plate, just lift it up. Use tweezers to remove the camera from the iPhone 4. If you still haven't removed your SIM card, it's time to do so. To do this, insert the end of a paper clip into the hole on the side of the iPhone and press lightly. The card will drop out of its slot.
Remove all flat cables, there should be 5 of them. One of them is held with a screw, unscrew it. After that, you will see the flat connector of the Wi-Fi antenna, remove that too. Remove any screws you can see. One of them is underneath the black duct tape, carefully peel it off and place it with the adhesive side up to put it back in place later. After unscrewing the last bolt, the motherboard should easily slide out of the case. It's best to start doing this at the bottom next to the black speaker, just lift it slightly.
After removing the motherboard from the case, a golden grounding plate will fall out, be careful not to lose it. Lift the vibration motor with a spatula, being careful not to break the contacts. In all 4 corners of the case you will see 4 screws holding the display, one of which is hidden underneath a black adhesive tape. Additionally, slightly tighten the 6 bolts on the side walls, but do not loosen them at all.
Use a plastic spatula to detach the old display. Remove the Home button and speakers, glue them to the new screen. Remove the protective film from that. Put the new display in place of the old one, reassemble the iPhone 4 in the reverse order of disassembly. Make sure that each cable is in place and connected. If you've done everything right, your iPhone will look and work as good as new after the renovation.
V Lately on forums and in in social networks often the question arises: how can you independently replace the glass, screen, display on iPhone models 4 and 4s? It doesn't matter what the users call the display module, the main thing is that they need detailed advice to replace the display module, consisting of the LCD itself, a touchscreen and a new protective glass, which is practically impossible to replace separately, and the chances that the replacement will take place without loss in quality tend to zero.
The fact is that the glass on the iPhone 4 (like the 4s) in the factory assembly is glued to the screen. Even if you manage to successfully separate the elements of the module from each other, glue new protection it will be even more difficult to the screen, because there is a huge probability of dust, moisture and other particles getting between them, and this will negatively affect appearance, and on the performance of the "apple phone".
What is the way out? Changing parts of the display module of the fourth and fifth generation iPhone is only necessary with the help of a ready-made modular assembly. Only in this way will you completely eliminate the malfunction and solve all your problems with the iPhone without unnecessary headaches. And in order to protect your new screen from risks to soon repeat the fate of its predecessor, it is best to immediately stick on it protective film... It will definitely protect you from scratches and abrasions.
However, even a ready-made module cannot be installed with bare hands. This will require specialized tools for the repair of portable equipment. Among them: plastic disassembly accessories mobile phones Apple: small flat screwdriver, Pentalobe screwdriver, tool for removing the SIM card holder (the latter can be replaced with a paper clip).
Now that you are warned about the pitfalls of replacing the module iPhone screen and tools that are simply vital for disassembling and repairing a device, you can proceed directly to a step-by-step description of the process itself.
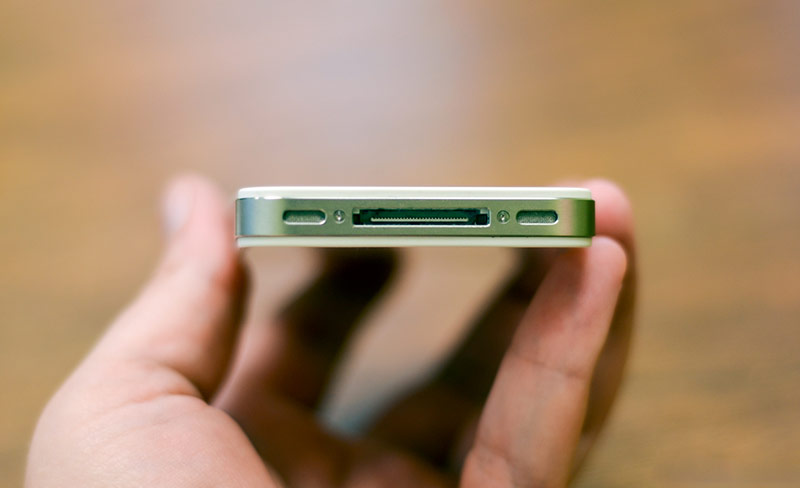
Step 1... Removing the back panel. To do this, you need to unscrew the two screws located next to the dock connector on the bottom edge of the phone. They can be of two types: Pentalobe or Philips - this is a feature of the iPhone 4 / 4s. When the screws are already removed, it is enough to gently press on the top of the cover, slide it and remove it.
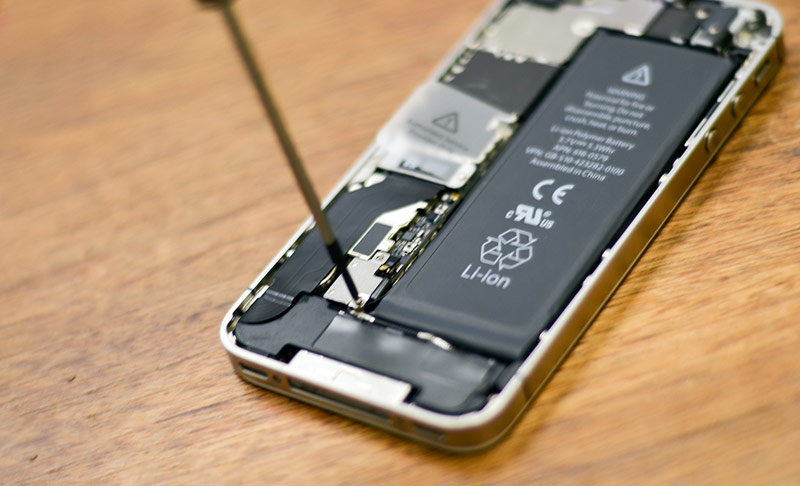
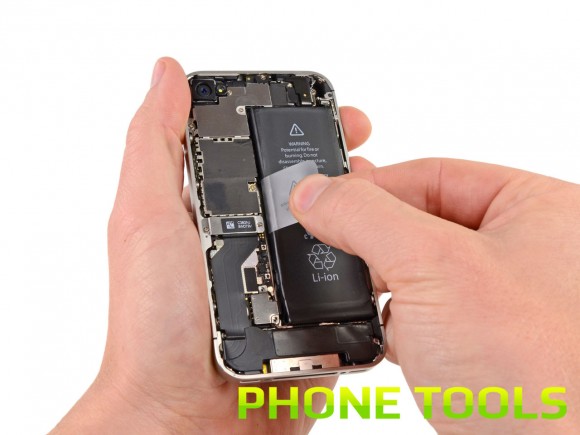
Step 2. Accumulator battery and removing its protective plate. Unscrew the screw securing the protective plate and battery connector to the board, and then use a spatula to remove it. After that, you can safely but carefully disconnect the battery connector and peel it off directly. Removing the battery connector will require special concentration. You need to lift it up without hitting the black connector on motherboard- if you pull it carelessly, you can break it completely.
Taking off itself iPhone battery, you should also be careful. It cannot be bent too much, since it does not take a lot of effort to damage the cell shell, and when this trouble occurs, you will also have to buy a new battery.
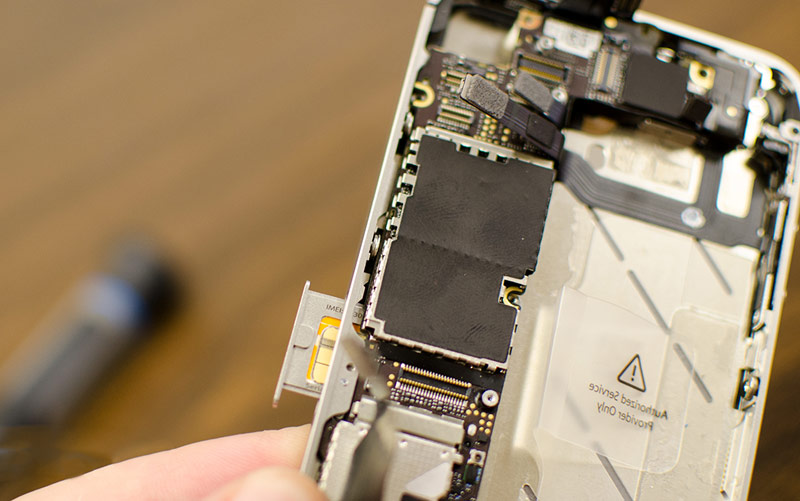
Step 3... Removing the SIM card. The most straightforward stage. During it, you can even do without professional tools. You can pull out the SIM card and the holder tray from the device using an ordinary paper clip.
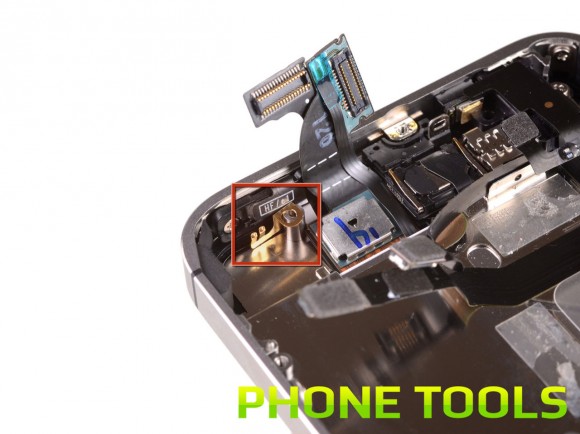
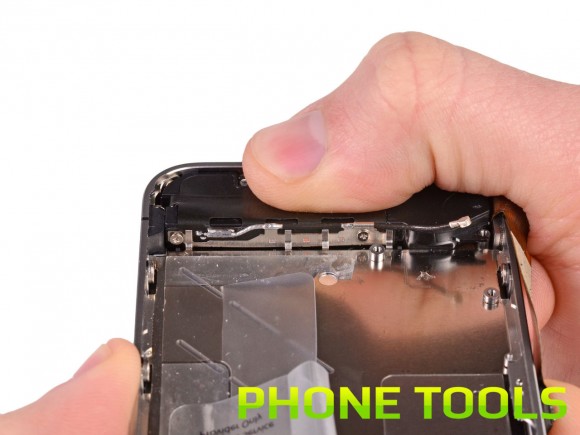
Step 4... Removing the docking station, docking cable and ribbon cable. First you have to unscrew a couple of screws, remove the thin steel dock connector, very carefully lift the dock cable connector up and away from motherboard and carefully, without applying force, remove the docking station cable and the lower speaker.
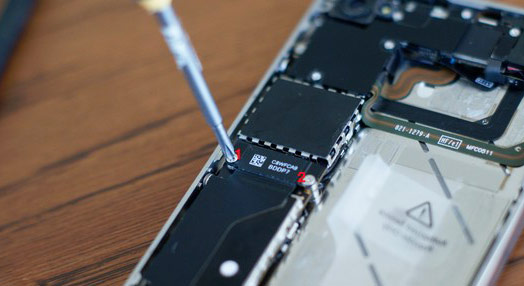
Step 5... Wi-Fi antenna. Lift the Wi-Fi antenna connector, check the functionality of the blue fuse, remove the screw on the bottom of the case and a whole series of screws holding the antenna in place. Using the plastic stack, lift the antenna and pull the bracket out of the case, and then the antenna itself. It will be useful to degrease the surface of the Wi-Fi antenna.
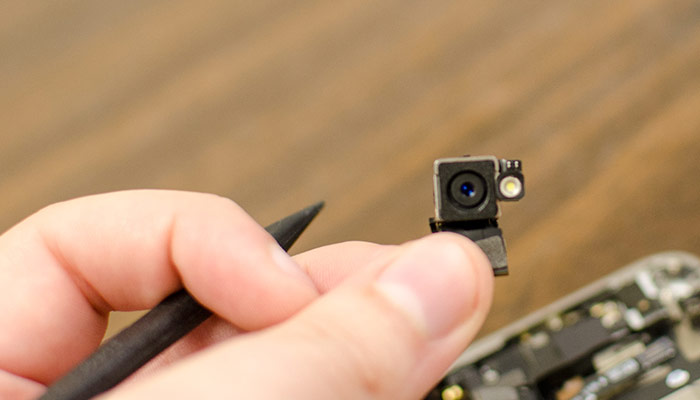
Step 6... The main camera of the smartphone. Nothing complicated here. Disconnect the camera connector and carefully lift and slide the rear camera of your iPhone out of the slot.
Step 7... Warranty sticker and moisture indicator. Peel off the warranty sticker and unscrew the screw hidden under the sticker.
Step 8... Motherboard. Sequentially, using a plastic stack and a screwdriver, it is necessary to disconnect and remove all elements of the motherboard - sensor cable, LCD screen, audio jack, volume control buttons, on / off buttons, microphone, selfie camera. After all the connectors are disconnected, you can remove the motherboard and pull it out of the case without touching the existing cables.
Step 9... Extracting components. We'll have to work a little more with a screwdriver. Unscrew the screw holding the speaker case; remove the speaker case; we unscrew the two screws connecting the vibration motor to the inner frame; remove the vibration motor; unscrew the screw located near the audio jack on the front panel and three more screws in the area of the side volume buttons; unscrew the screw near the bottom microphone and the screw near the docking station cable; We remove a series of screws along the slot of the SIM card tray and the sleep button.
Step 10... Screen module. Insert a plastic stack between the rubber bezel on the front and the steel frame of the iPhone 4 / 4s case from the top. Carefully lift and detach the panel from the main part. For convenience, you can use a special suction cup to remove the display module. But, in any of the two options for the final stage of disassembly, do not forget about caution: the "Menu / Back" button may stick to the front panel from the inside. If you jerk violently, then removing the lower part of the screen, you can break the integrity of the loop of this button.
Step 11... Installing a new display module on your iPhone. All points are done exactly the opposite. After installing a new module, do not forget to make sure that the display and touchscreen cables are not twisted or pinched between the parts. Such an arrangement can lead to cable damage and rapid module failure.
How does the repair work:
- 1
We diagnose the delivered
device you or our courier. - 2 We make repairs and also give a guarantee for newly installed parts. On average, repairs take 20-30 minutes.
- 3 Receive a working device yourself or call our courier.
One of the main factors in determining the cost of replacing a screen on an iPhone 4s is the cost of purchasing parts. Its influence is quite controversial. On the one side this model has long been released "in circulation", thanks to which even the original is inexpensive. Its counterparts from third party manufacturers... At the same time, it is necessary to take into account the design of this part, which is part of a non-separable module, which includes the front panel, sensor and display. Due to damage to any of them, it is required to change everything "assembled", which significantly raises the cost of this procedure.
Exceptional complexity
It will not be possible to change the iPhone 4 s screen, the price for the repair of which will be low, first of all, due to the exceptional complexity of this procedure. Even our very experienced craftsmen take at least an hour to complete it. During this time, they manage to dismantle and then install back several dozen components inside the smartphone. Without its almost complete disassembly, it is impossible to gain access to the screen mount.
Quality components
If you need to qualitatively replace the screen with an iPhone 4s, then the price will not be low, even if you use a non-original. Such components are conventionally divided into categories A, AA and AAA. As an alternative to the original, to replace the display module, we only use spare parts of the latest category. Only they differ in technical and consumer properties identical to the original products. But at the same time, such displays are significantly more expensive than their A- and AA-category counterparts.
Save and replace the screen on the iPhone yourself
Many, having learned how much it costs to change the screen to an iPhone 4s, prefer to perform this procedure on their own. Profitability this decision questionable for several reasons at once. One of them is the need to purchase a special tool, which differs markedly from analogues in its special shape and size. In addition, you should take into account a lot of nuances, for example, the need to wipe the joints of the display cables with alcohol after installation and the display before turning on the smartphone. This will eliminate static electricity, which can damage various electronic components.
Save money by using a regular service
Another option to reduce the cost of replacing the display module in the 4s is to contact a regular service that does not specialize in iPhones. In addition to the lack of proper qualifications and experience of the craftsmen working in such places, their services are dangerous with a high probability of using used or low-quality non-original components.
We serve the employees of these companies


The price of replacing the screen on the iPhone 4s in our service
Contacting our service center You can be convinced of the following advantages:
- Prices are much lower than the average in Moscow, thanks to the purchase of spare parts without intermediaries and a large amount of repair work.
- Experience - we have masters with extensive experience in iPhone repair.
- Original (or very high quality) components.
- Free diagnostics before and after repairs.
- Short terms of execution of work - 10-15 minutes (for models of the 5th and higher generations).
Step 1
Before disassembling your iPhone, make sure it is turned off.
Remove the two Pentalobe 3.5mm screws located next to the charging connector. It is best to replace the screws you have with Phillips screws during assembly. We suggest preparing all the necessary set of instruments and using Phillips screws for replacement.
Use the screwdriver only once, as the screws have a small margin, and they may simply not withstand repeated tightening.
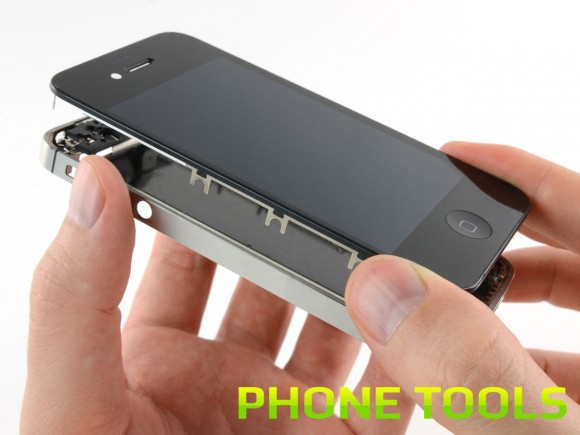
Step 2
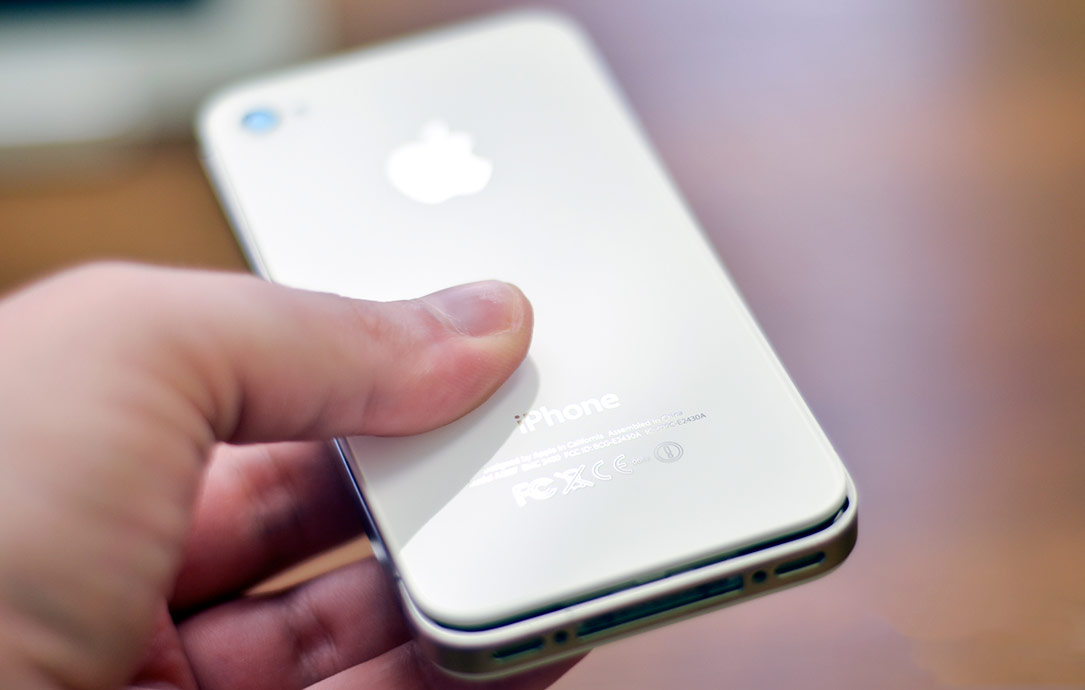
Press lightly on the back of the phone
As a result, it will move by about 2 mm.
Step 3
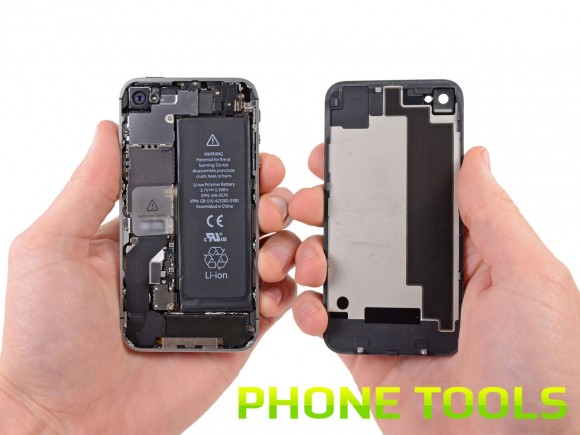
Pull the back cover slightly, being careful not to damage the plastic clips. Remove the rear panel.
Step 4
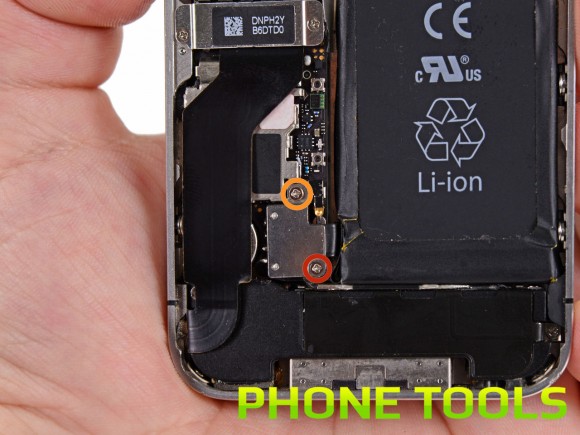
Remove the screws that hold the battery connector to the motherboard:
First screw - 1.7mm Phillips
Second screw - Phillips 1.5mm
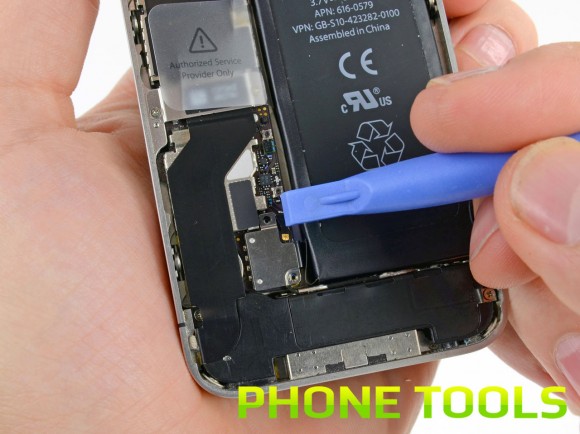
Use a plastic tool to carefully disconnect the battery connector from the charging socket. It is best to start loosening the connector from the bottom side while placing the tip of the tool between the speaker cabinet and the metal connector cover.
Disconnects the battery connector from the motherboard in an upright position. Never pull it sideways.
Please note that the contact located at the top screw may be live. However, when the connector is disconnected, the voltage will immediately disappear.
Step 5
Use a plastic tool to pry out the contact that is under the battery connector.
Before doing this, treat the contact with an alcohol solution. Greasy fingers will interfere with assembly.
Pay attention to the location of the small black clip near the top screw of the battery connector. This clip should only be attached to the top screw. If you reinstall it, it must be aligned so that the gold-plated contact rests against back cover.
Be careful not to rip off the battery connector that is soldered to the motherboard! The connector is soldered with only 4 thin points and can be easily torn off.
Step 6
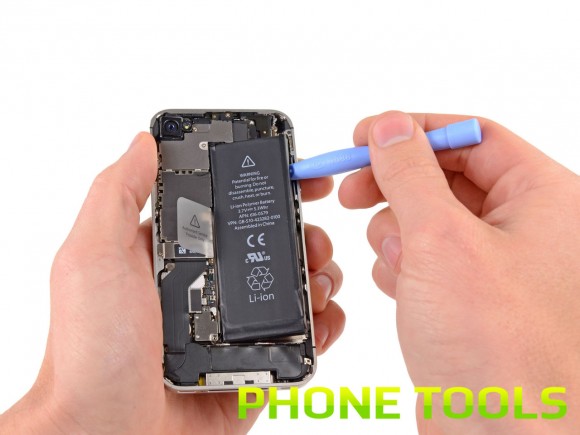
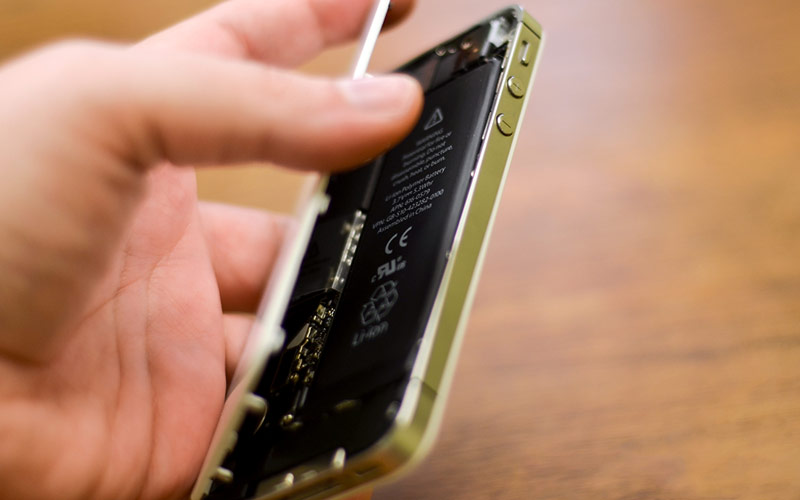
Insert the edge of the plastic tool into the hole between the battery and the outside of the phone.
Run the plastic tool along the right edge of the battery and lift it slightly to separate it from the case on the right side.
Step 7
Pull the tab on the plastic tab to peel the battery off the left edge.
Next, remove the battery.
Step 8
Remove the screws that secure the battery connector to the motherboard
Phillips screw 1.5 mm
Phillips screw 1.2mm
Get rid of the metal connector on the cable cover.
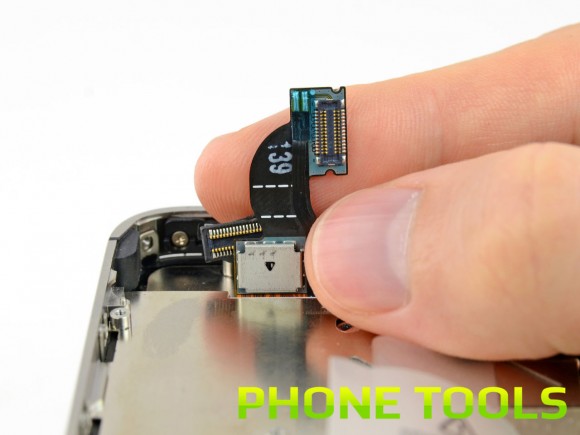
Step 9
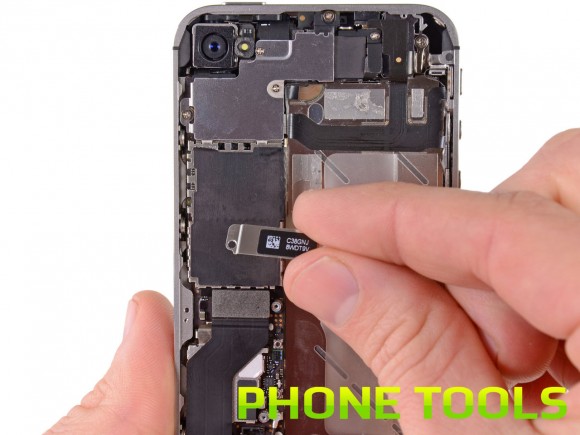
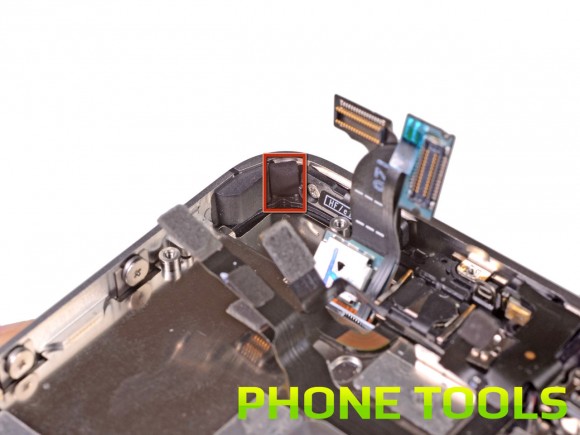
Use the edge of a plastic tool to separate the end of the ribbon cable from the socket on the motherboard.
Step 10
Remove the edge of the ribbon cable from the motherboard and the side panel of the speaker case.
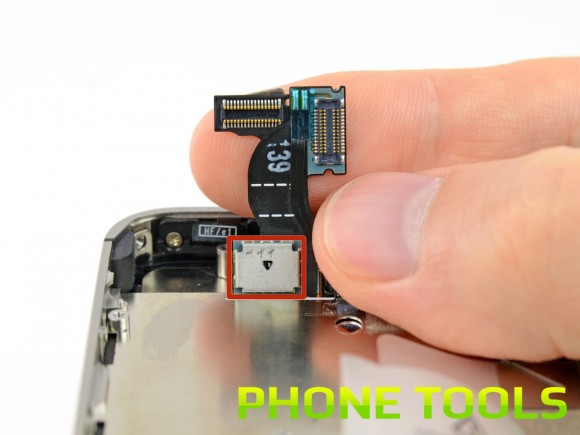
Step 11

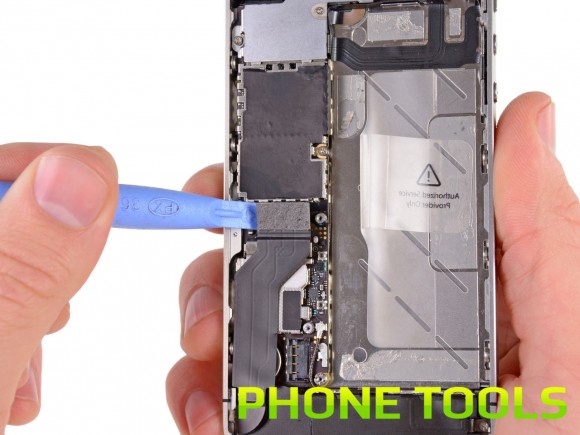
Use the edge of a plastic tool to peel off antenna cable from the motherboard.
Unplug the cable from the socket on the motherboard.
Step 12
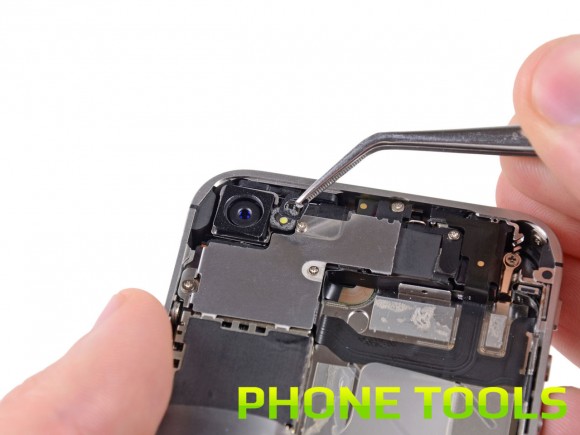
Try to carefully remove the plastic ring that is at the top of the rear camera near the flash, you can use tweezers for this purpose.
Step 13
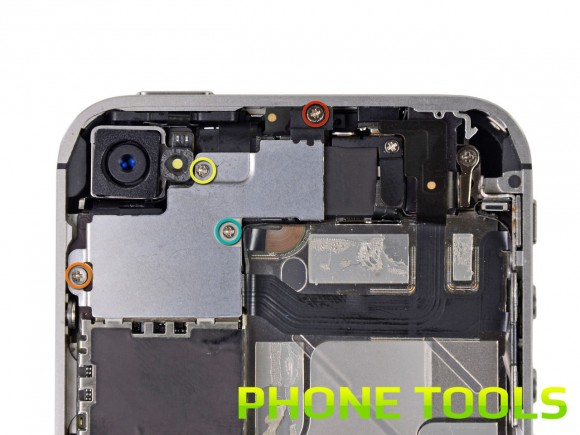
Remove the screws that hold the cable cover to the motherboard
Phillips screw 2.7 mm
Phillips screw 2.6 mm
Phillips screw 1.3 mm
Phillips screw 1.2mm
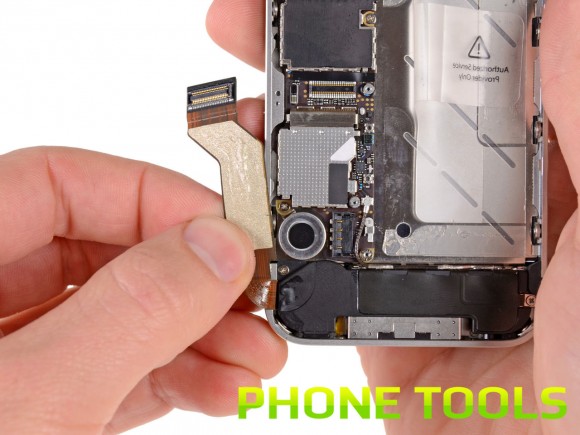
Step 14
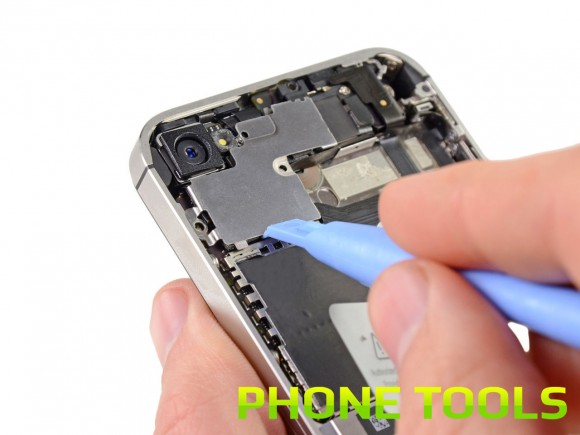
Use the edge of a plastic tool to pry the metal cover away from the screen.
Lift the cable cover starting at the top and remove it from the phone.
Step 15
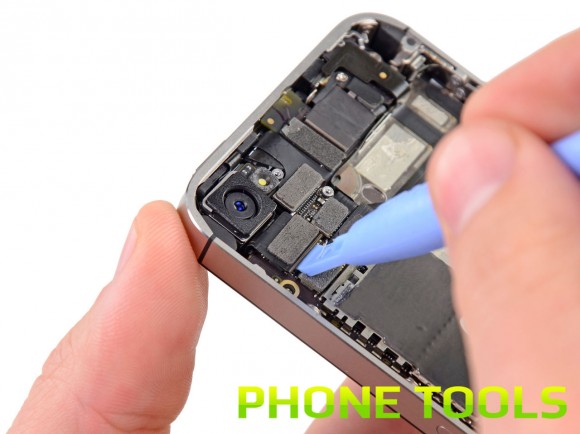
Use a plastic tool to pry the rear camera connector from the motherboard.
Be careful not to damage nearby elements located on the motherboard.
Remove the back camera of your phone.
There are small rubber pads under the rear camera. After assembly, make sure they are installed correctly
Step 16
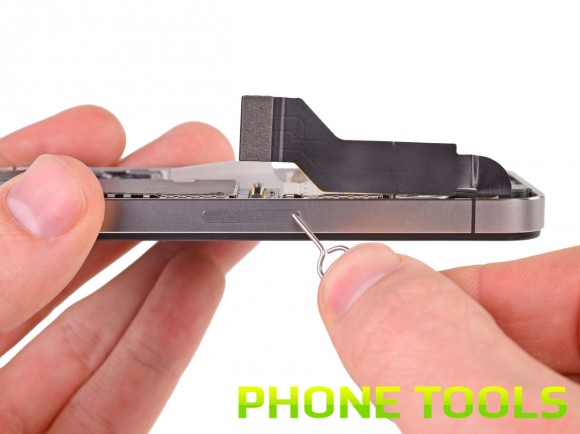
Use a special screwdriver to remove the SIM card or use a paper clip for this. You may need a lot of effort to do this.
Remove the sim card.
Step 17
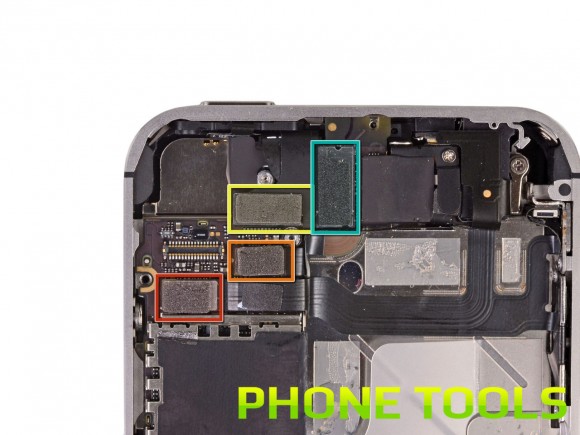
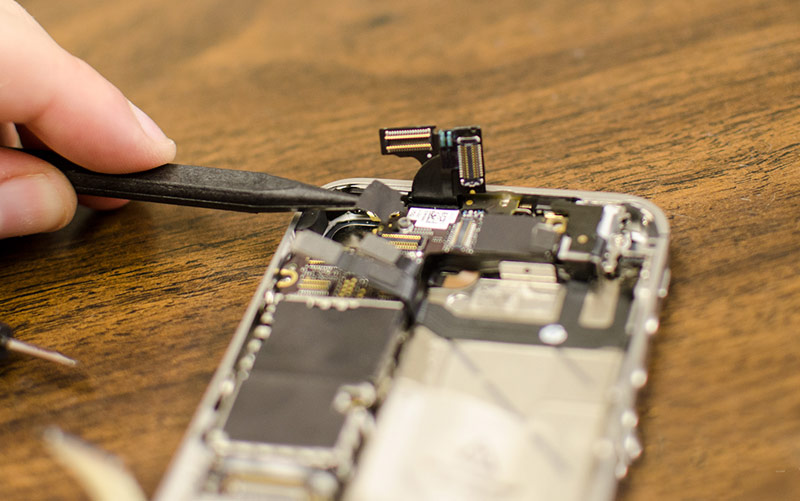
Remove the 5 cables from the top of the motherboard in the following order:
Cable that goes to the headphone jack and volume buttons;
Front camera cable;
Data cable;
Shield cable
To disconnect the cables, use the edge of a plastic tool and gently lift up the female connector on the motherboard.
Be careful not to break small parts of the motherboard.
Step 18
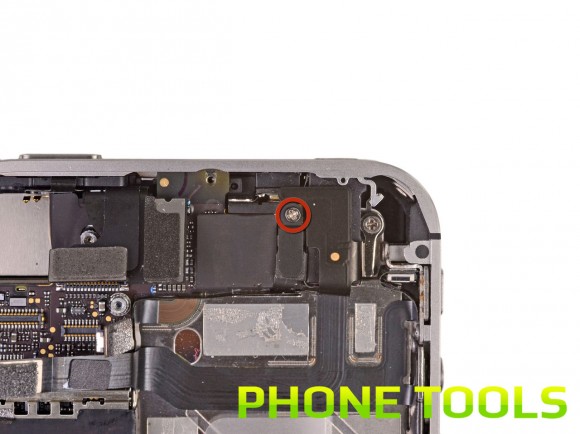
Remove the 1.5mm Phillips screw that secures the grounded clip to the motherboard near the headphone jack.
Step 19
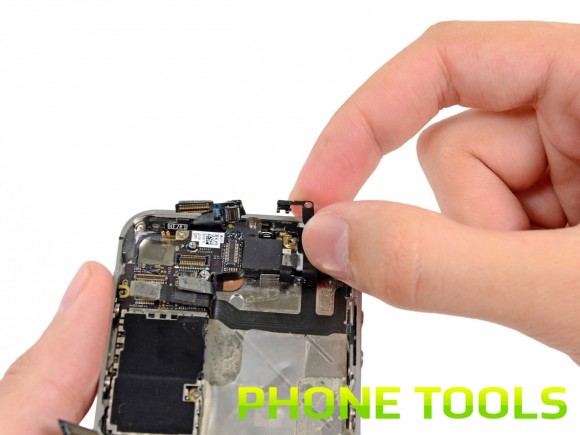
Use a pencil tool to pry the small grounding clip from the motherboard.
Gently grasp the clip and separate it from the phone.
Degrease the ground clamp contact points with isopropyl alcohol before disassembling. Oily fingers will get in your way.
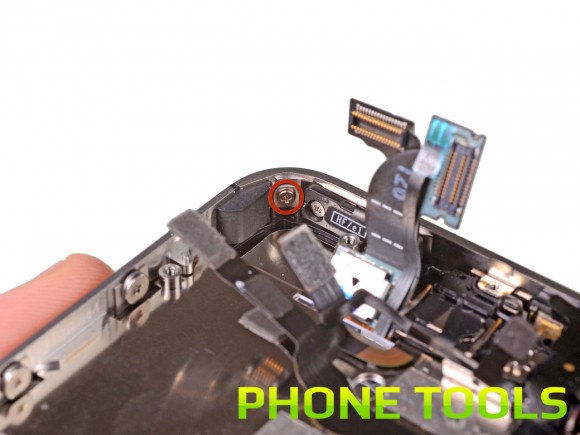
Step 20
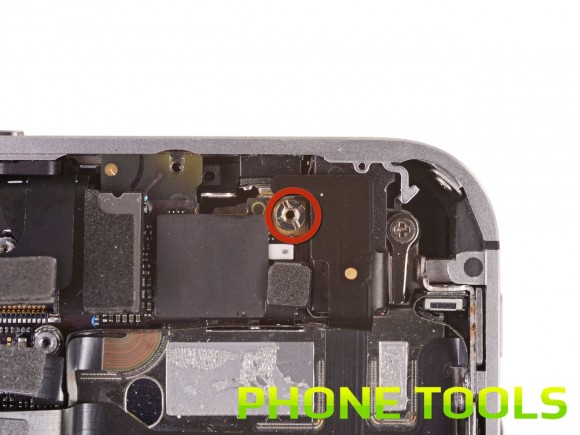
Use a small flat-blade screwdriver to remove the 4.8mm screw holder located near the headphone jack.
Step 21
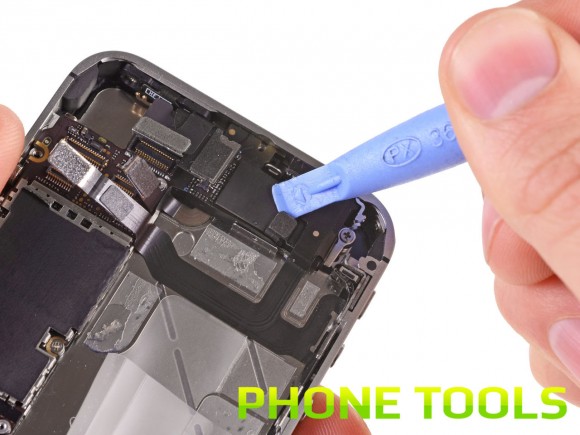
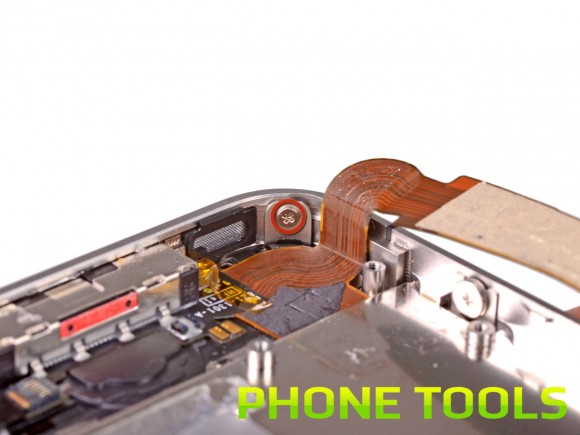
Use the edge of a plastic tool to disconnect the Wi-Fi antenna from the motherboard.
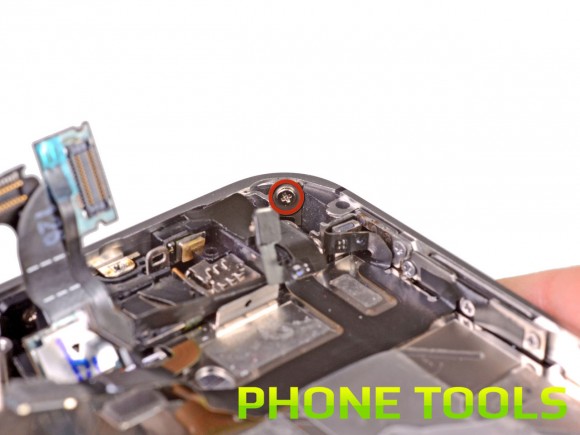
Step 22
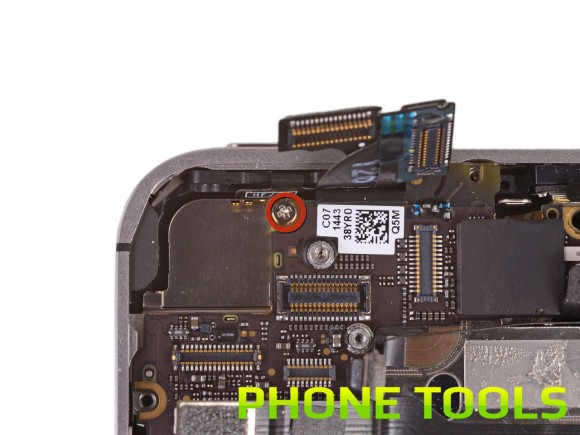
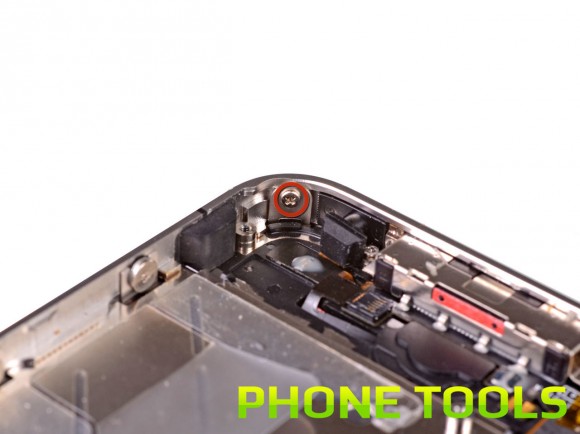
If there is black tape covering the hidden screw near the power button, remove it.
Opening a 2.6mm Phillips screw from the motherboard next to the power button.
Be careful when removing this screw and removing the power terminal.
There is a rubber gasket between the screen and the digitizing cable. If you remove the motherboard, it may fall or get stuck in one of the cables.
Step 23
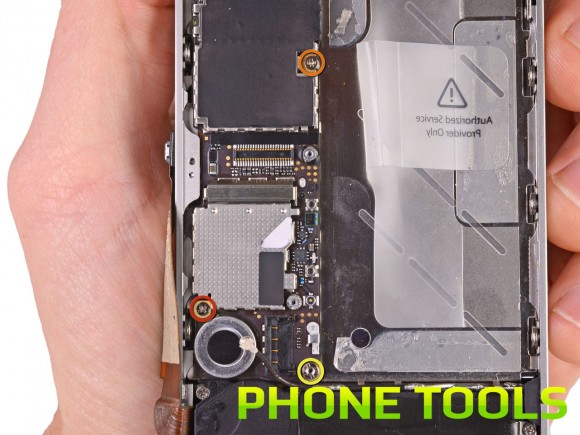
Remove the screws that secure the motherboard to the case:
One 2.5 mm Phillips screw located near the vibration motor;
One 2.4mm Phillips screw
A 3.6mm screw holder that is located on the motherboard next to the battery slot.
Use a small flathead screwdriver to do this.
Step 24

Gently lift the part of the motherboard closest to you and slide it away from the top edge of the phone.
Before assembling, degrease all metal elements without processing the soldered contacts.
Pay attention to the rubber pad on the top edge of the board. When removed, it may fall or become stuck on one of the cables. See step 22 for more details.
Step 25
Don't lose the small gold-colored metal piece that serves to ground the rear camera next to the power button.
Step 26
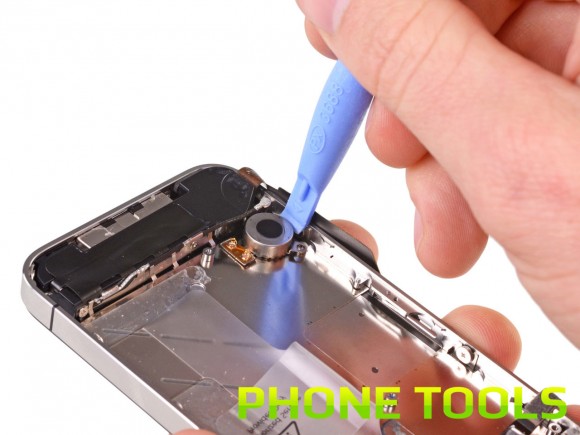
Use a plastic tool to create a gap between the vibrator and one side of the phone.
Lift the vibrator so that it is separated from the body.
Next, remove the vibrator.
Step 27
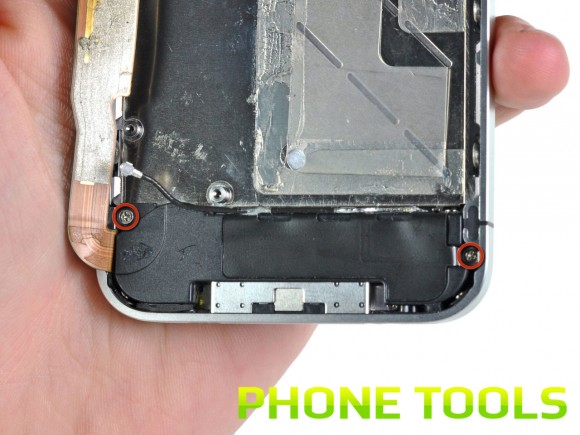
Remove the two 2.4mm Phillips screws from the side of the speaker cabinet.
Step 28
Remove the small plastic bracket located under the screw closer to the ribbon cable.
Step 29
Remove the speaker case.
Before assembling, make sure that the Wi-Fi grounding conductors are located in the same way as shown in the second photo.
All metal contact elements must be treated with isopropyl alcohol prior to assembly.
Step 30
Remove the small pieces of black tape covering the display mounting tabs.
These are corner screws that are not 1.5mm thick. Put them separately.
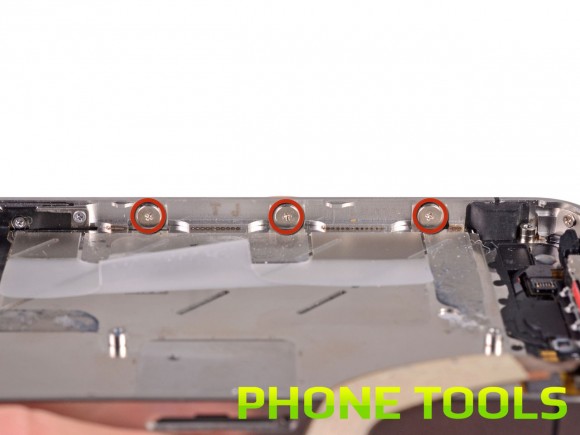
Step 31
Remove the 1.5mm Phillips display screws located near the power button.
Step 32
Remove the 1.5mm Phillips screw next to the headphone jack.
Step 33
Remove the 1.5mm Phillips screw located near the bottom microphone.
Step 34
Remove the 1.5mm Phillips screw located near the ribbon cable.
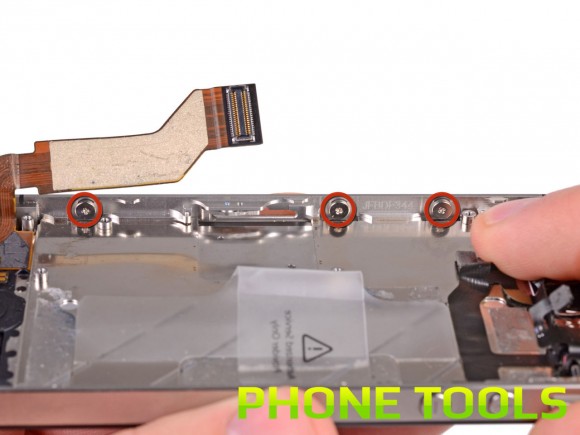
Step 35
Loosen the Phillips screws that are along the iPhone's volume button half a turn.
It is not necessary to remove the screws completely. When reinstalling the display assembly, make sure the washers are closest to the screw head (as in the second photo)
Step 36
Loosen the Phillips screws on the other side of the phone half a turn.
Step 37

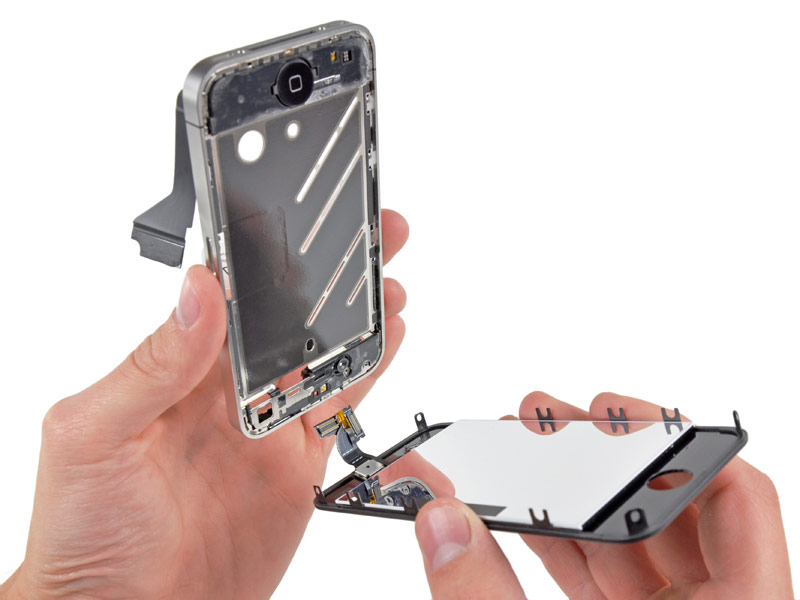
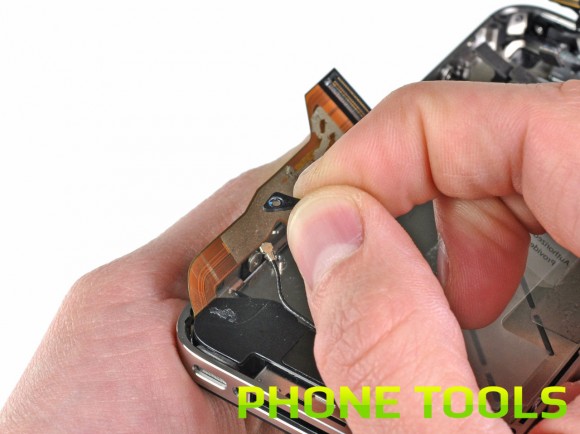
Use a plastic tool to gently pry the display around its perimeter.
Step 38
Remove the display from the phone.
Step 39
![]()
Please note the following to successfully replace your display:
Remember to switch Home button from the old display to the new one. There is usually a rubber gasket under the button, you need to be careful not to tear it.
Check if there is a mesh in the new kit, if not, transfer it from the old one.
Be sure to peel off the protective backing (pink or blue) from the new panel before installing it.
It so happens that a new set does not include a plastic transparent ring for a 7 mm camera. If not, do the same.
Step 40
When installing a display assembly or reusing an old display, note the following:
Be sure to straighten the screen and digitization cables, pull them out through the slot and then pass them through the case. It is important that each cable runs through the body.
In the attached photo, the trains are not stretched as they should.
If the ribbon cable is installed incorrectly, it will not reach its socket on the motherboard. Do not pull it too hard as it may break. Straighten the cable and pull it out correctly.
Step 41
When assembling, do not touch the metal on the screen cable. This can lead to complications. If this happens, be sure to degrease the affected area.
After assembly has been done, wipe the touchscreen of the screen using alcohol. Alcohol can be used to dissipate static electricity that can cause screen problems.
After you have finished assembling, connect the iPhone to the charger. When you turn on your iPhone, disconnect it from the charger.
To assemble your iPhone, follow the instructions in reverse order.
- Attention!
- A comment