Choosing computer components on your own, you will not only be able to choose the components that best suit your needs, but also significantly reduce the total cost of the computer as a whole.
Very often in stores, sellers of the finished product "scare" inexperienced in IT-issues buyers that separately purchased computer components cannot be replaced in case of breakdowns under warranty. Nothing like this. Be sure that you will receive a guarantee for each element and in case of any breakdowns you can easily fix them using the warranty card. Let's consider in more detail the information on how and what components should be chosen.
We select a processor, motherboard and RAM
First of all, we need the filling for the system unit. Let's start with. First, be clear about: for what purposes the stationary PC will be used. If among them there is a "freeze" in computer games, then jump straight to the category of powerful processors. Remember: what more powerful processor, the higher the speed of the computer device.

Pay attention to two indicators: clock frequency(at least 2 GHz) and RAM(at least 2 GB). It is better if these indicators are even higher.
Advice. When choosing a processor, always pay attention to the cache memory (an excellent indicator for it is from 3 MB).
The basis of the "machine". Today, the most venerable manufacturers of this computer element are: Asus, Gigabyte, Foxconn, Msi, etc. For powerful computer you will need an ATX motherboard as it has more connectors and slots for upgrades. In addition, such a motherboard is much easier to install into a system unit.
Advice. Be sure to check before buying a motherboard its compatibility with the selected processor (the type of motherboard and processor connector must match), otherwise problems may arise during installation.
And finally - the RAM. At the moment, the most popular type of memory is DDR3. It is on this option that we will stop. But choosing the type of RAM is not all. Pay attention also to the amount of RAM - you should choose models with at least 4 GB of working volume, and even better - 8 GB.

Choosing a video card
The quality of all images appearing on your computer will depend on the choice in the future, so the choice of this element should be taken no less seriously than all the previous ones. The selection principle is very similar to the RAM - the larger the volume and frequency of the video card's own memory, the better. In terms of manufacturers, Nvidia and AMD are already firmly in the niche. the best manufacturers computer components of this kind.
Advice. Do not be afraid to "run into" an unscrupulous manufacturer (the probability of such a situation is close to zero). This is because the development of video chips is a rather expensive "pleasure", and just about anyone can hardly afford it.
The overwhelming majority of companies use technology and are engaged in the release of computer products, licensed from the world's giants.
A few words about the power supply
The minimum power of the selected power supply must be from 600 watts. In addition, it will be nice if a UPS is included with the power supply (source uninterruptible power supply). And most importantly, the total output power power supply unit. Keep in mind that it should be 40-50% more power consumed by all other components of the system unit.
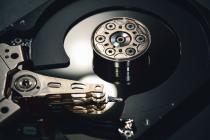
Options for choosing a hard disk (hard drive)
Let's not beat around the bush and say that for a stationary computer the best option will install at least two hard drives... One with high speed rotation - from 7200 rpm) - for the operating system; the second (with a rotation speed of 5400 rpm) - for storing various files. It is important to understand that the main task hard disk- long-term storage of information. Based on this, its capacity should be chosen. For example, if you are a music lover / movie lover, then the better option for you would be more capacity drives.
V Lately prices for hard drives have dropped significantly and it is quite possible to purchase a 1 TB disk.
Advice. When buying a hard drive, make sure that it belongs to the SATA3 type and the manufacturer provides a warranty on it.
Choosing an optical drive
For a high-quality modern drive, two indicators are extremely important: the speed of reading and writing files. Models presented by well-known manufacturers will be optimal: SONY, PIONEER, etc. We do not recommend purchasing outdated models, such as CD-ROMs, etc. In general, it is quite difficult to find them on the computer components market.

Additional accessories: monitor, keyboard, mouse, speakers
The choice of a work monitor should be largely determined by the goals pursued during the operation of the computer. If you plan to work on it most of the time, then you should not choose too large a diagonal. If you are a gambling addict or want to arrange your own cinema in the evenings, the diagonal is already needed more, as well as the resolution (the clarity of the screen picture depends on it). Accordingly, the cost of such a monitor will be higher.
When choosing a keyboard, you can already roam. Again, if the computer will be used primarily for work, then you should give preference to the "keyboard" with a pyramidal layout, if you are a gamer, then, accordingly, your option is a keyboard with special buttons for gamers.
Choosing a mouse is perhaps the easiest stage in the selection of computer components. It is enough for it to be as comfortable as possible for your hand and suit you with its external characteristics.
Assembling computer components with your own hands
After all the elements are picked up and delivered home, it's time to start assembling them into a single whole. Before starting the assembly process, remember an important rule: all components have special protection against incorrect installation. And if the part “doesn’t work”, you should not persist: try to install it differently.
Let's consider schematically the process of assembling a computer:
- Remove the side cover of the system unit and install the power supply. The mounting holes are positioned so you can't go wrong.
- Then we start installing the coolers. The minimum number is two. One of them works for the inflow and is located in the front of the system unit (below); the other draws out hot air and is located at the back of the system unit. We use screws or rubber clamps as fasteners.
- We cling to the motherboard of all "neighbors": a processor, a cooling system and RAM modules. The processor is fixed so that the motherboard socket and the processor pins match. Be sure to apply a thin layer of thermal paste to the surface of an already installed processor to avoid various kinds of damage when it comes into contact with the cooler. We attach the cooler to the upper part of the processor using special clamps, bolts, etc.

- We connect the cooler power cable to the motherboard (CPU FAN connector).
- We fix the racks in the system unit under the motherboard and its plug. It will prevent dust from getting inside.
- The next step is to install the RAM. We open the latches, insert the modules into the slots and slightly press until they click.
- It's the motherboard's turn. We lower it to a place specially prepared for it in the case. Then we check that all the connectors on the back wall are in place. We fasten the motherboard with screws to the racks already fixed in the case.
- We install the optical drive in one of the upper bays of the system unit (there may be several of them). First, remove the plug and then insert the drive there from the outside. We fix it with screws.
- The bays below are for hard drives. We install them either from the inside or from the side in such a way that the supply and signal cables can be connected to them. We fix it with screws.
- We break open the plug in the place where the video card is installed (the back wall of the system unit). We clean the contacts with an eraser and insert the card into the slot, while slightly pressing on it until it clicks. Then we screw it on.
- The most unpleasant moment is the connection of the wires. Be especially careful. Power is supplied to the motherboard via ATX (it can only be inserted in one position). Be sure to fix it with a latch.
- The optical drive and hard drive are powered by L-shaped connectors.
- Power to the video card (if any) is connected using a 6-pin connector.
- Let's not forget about case coolers. We power them by connecting to the motherboard through the SYS (CHA) _FAN connectors.
- We connect the front panel of the case to the motherboard. All case indicators are connected to the connectors of the same name on the motherboard.
- It remains to connect external USB connectors and an audio output.
- Inside the system unit, we have a complex web of wires, which must be brought into a more or less "divine" form. We arm ourselves with nylon ties and act.
Now we close the lid of the system unit and connect the monitor, mouse, keyboard and all other accessories purchased in the store to it.
So our article has come to an end. Now you are armed with information on how you can put together a great personal computer on your own quickly and correctly. We wish you good luck!
How to assemble a computer yourself: video
Water from precipitation and melting snow must be drained both from the roof surface and from the entire building. Modern manufacturers offer a huge selection of products to meet the needs of any homeowner or developer. The presented systems are distinguished by simple installation, characterized by long-term flawless operation, excellent design and various colors.
With the initial knowledge and observing the rules for installing the drainage system, even a novice master is able to perform the work. Great importance during installation, it has instructions available from all manufacturers.
Design features and types of roof gutters
A drain is a structure that includes gutters and pipes. The diametrical section of its parts is selected in accordance with the volume of wastewater that exerts pressure on the roof.
Special brackets and hooks are used to attach the gutters to the building. The pipes are connected to the gutters by means of funnels, and the pipes are fixed to the walls of the house with clamps.

The gutter consists of different elements that are selected in accordance with the exterior of the house:
- Corner elements are used to join parts of the gutters in the corners of the building.
- Plugs and gutter connection elements.
- With the help of a pipe elbow, pipes are connected at the bend.
- Pipe lugs add a finishing touch to the entire structure.
Shapes and sizes
Details of the drainage system can be rectangular or round. The parameters of the elements are determined by the area of the roof, while the width of the gutter in most cases varies from 10 to 20 cm, and the cross-section of the pipe - from 7.5 to 12 cm.
In most cases, plastic or metal gutters are produced. Galvanized iron is not used due to its poor water resistance. Sometimes you can find copper, titanium or zinc gutters, but the cost of such structures is very high.
The type and layout of the drainage system is determined at the design stage of the house. The main condition is that the structure must continuously perform the assigned task and be an integral part of the overall exterior of the building.

When installing the drainage system yourself, you need to take into account several points:
- The amount of precipitation that falls throughout the year in the region.
- Materials used for the facade and roof, as well as their color scheme.
- Roof dimensions and type.
- Architectural features of the house.
Before starting the installation of roof gutters, be sure to read the instructions from the manufacturer of the system.
The location of the drainage system and the tools used
The drain pipes are located depending on the size of the roof overhang. If this parameter is less than 10 meters, one drain is installed. If the size of the overhang exceeds 10 meters, then two drains are installed.

Do-it-yourself assembly of the drainage system is performed with the following tools:
- Tape measure, cord and marker or pencil.
- Scissors for cutting metal.
- A device with which hooks are folded.
- Level.
- Rivet pliers.
- Screwdriver or drill.
- Rubber hammer and mallet.
How to assemble gutters with your own hands - a step-by-step guide
Answering the question of how to properly assemble the drainage system, it should be noted that installation work requires the sequential execution of all actions.
- At the first stage of work, hooks are installed. These elements can be short, long and adjustable. Hooks are fastened to the bottom board of the sheathing, to the rafter leg or to it. Each fastening is performed with a separate type of hook.

- The angle of inclination of the hooks is calculated, ideally this parameter is 3 mm for each running meter. The hooks should be laid out side by side, numbered and the fold line marked. Using the hook bending device, bend over the mark.

- When fixing the first hook, pay attention to the following: the outer side of the gutter should be located from the visual extension of the roof at a distance of no more than 2.5 cm.

- A gap of about 90 cm is maintained between the hooks, tilting the system by 3 mm for each running meter of the roof. Installation of extreme hooks is carried out at a distance of 10-15 cm from the edge of the roof.

When installing hooks on a rafter leg or batten rail, plunge should be performed in order to align the surfaces of the element and the attachment points.
- In order to insert the funnel into the groove, cuts are required. To do this, make a mark with a pencil or marker and make a slot with a hacksaw. Use pliers to shape the funnel and remove the burrs.

The metal in the place of the cut must be treated with paint or a composition to protect it from corrosion. First you need to fix the funnel from the outside of the gutter, and then fix it with a special clamp on the inside.
Before installing the gutters, you need to put a plug on the end of each gutter, pressing it with your hands or hammering it in with a rubber hammer. The finished gutter is laid by lightly pressing on the gutter near each hook.
It is very important that the constituent elements of the system are connected to the gutter before the final installation of the gutter system on the roof. - It is necessary to connect the gutters to each other by means of connecting locks, therefore, when installing between the end ends, a free gap of about 3 mm is required. The sealing part is coated with sealant, drawing lines in the central and lateral parts. Then back part the lock is attached to the inner part of the gutter and the entire part is pressed down, moving to the outer part of the structure. The lock is snapped into place, fixing with clamping parts.

- Similar actions are performed during the installation of corner elements at the bend points of the drainage system. In both cases, the gap left acts as an expansion joint, preventing the destruction or deformation of the drain.

- The work is carried out according to the installation diagram of the drainage system. The pipe elements are attached to the walls by means of clamps located in 2 meter increments, and they, in turn, are fixed with dowels.

The drains should be fixed at least 4 cm to the wall. Cut the pipes with a hacksaw, remembering not to cut from the narrower side.
Connection and fastening of pipes of the drainage system
When assembling a gutter system, it is sometimes necessary to connect two elbows. To do this, perform the following actions: determine the distance between them and add 10 cm. These additional centimeters ensure the entry of the connecting element into the end ends of the knees, 5 cm on each side.


The given instruction on how to assemble a drainage system is a description of the main stages of work. All the details of installation are indicated in the manufacturer's instructions, since each product has its own characteristics.
For those who decide to assemble their own computer from scratch, rather than buying a ready-made system unit, it will be useful to know how to assemble the individual elements correctly into a single workable whole. I present to your attention a guide on how to assemble a computer.
What to buy
The first step is to buy the minimum necessary kit to start your computer
- frame
- a source
- motherboard
- cpu cooling system
- RAM
- Video card (discrete not always required)
- HDD
It must be understood that all purchased items must be compatible.
When buying a motherboard and a processor, the socket (in other words, the platform where the processor is inserted) on the board and the CPU must be the same. This parameter is always indicated in technical characteristics, For example Intel Core i3-4130, has an LGA1150 socket, we can easily install it on ASRock board H81M. You also need to take into account the slot for RAM, at the time of the article's release, the most common DDR3, therefore, you need to buy DDR3 memory.
We start with the case, which will be the “home” for all other components. After unpacking, unscrew the side panel.
We see the ready-made holes for the motherboard fasteners. All that is needed is to "try on" the board to the holes and fix it. There are many holes, since some cases are designed for motherboards of different sizes (form factors).


However, before attaching the motherboard, you need to install some elements on it.
Installing an Intel processor and cooling system
Open the processor socket using the latch shown in the figure. The thing is quite delicate, you don't need to make much effort.

After opening the slot, pay attention to the processor. In the case of Intel, there is a special edge, and on motherboard a guide rail that prevents you from inserting the processor correctly. This greatly simplifies our life, those who are familiar with electronics know how to bother with microcircuits in order to properly solder them to the board. As a rule, there are no guides on the board, only a point in the corner of the microcircuit, showing the first leg.


After installing the processor, we finish the procedure, protecting the socket: we close it in the same way as we opened it before.

The next important step is connecting the cooling system.
A cooler often comes with a purchased processor, if not, the processor manufacturer has a list of recommended ones for connection.
Be sure to remember about thermal paste. In some radiators, thermal paste has already been applied, if it is not there, then you need to apply
Note that the cooling system is secured with four latches that fit perfectly into the holes on the board, in the corners next to the socket. 

Actually, we install it in the holes, and begin to press it without much effort, until you hear four clicks. 


It remains for us only to connect the fan to the power supply system, on the board the connector is designated as CPUF AN, and we connect to it) 

If you bought the cooling separately, you decided that the standard is not enough for you. Then it will certainly be necessary to apply thermal paste. Just apply a small amount to the center of the processor and spread it all over the surface, with an old credit card or unnecessary plastic card, to precisely fit the surface of the processor and cooler

Note: When buying a cooling system, do not forget to peel off the film

Installing a system with a processor and heatsink - AMD
Consider that in the case of an AMD CPU, installing a cooling system 
First, unblock the socket by pulling on the metal handle directly adjacent to the edge

Legs AMD processors are arranged so that the slot can only be inserted in one way: as in the case of Intel, it is impossible to install the processor in any other way than the manufacturer intended. Inserted and secured. 
Then we apply thermal paste ... 
We combine the planes of the processor and the base of the cooling system

The coolers have different mounting methods, and all of them are indicated in the manual, there shouldn't be any difficulties. In our case, next to the socket we have a plastic base with protrusions. The metal mount is included with the cooling kit. 

Installing memory (RAM)
The last element we can install in this phase is RAM.
To do this, you need to find the RAM slots located next to the processor socket.

Before installing memory, you need to check the motherboard manual to find out which slots to install in the first place (if the number of modules is less than four). In our case, these are blue slots. Opening the latches

Insert modules properly


After installation in the memory slot, we return the plastic latches to their original position

At this stage, you should receive a motherboard with a processor, cooling and memory modules. We put everything aside for a while and move on to the case and the power supply.
Installing the power supply
We install the power supply in the lower part of the case. 
We fix it with a fan DOWN.

This position provides him with ideal working conditions: the device constantly has access to cold air from under the case and at the same time excludes the ingress of warm air that is thrown out of it onto other elements, and nothing is additionally heated.
On the back of the case, secure the power adapter by tightening the four screws.

If the power supply does not have removable wires, then we simply pass all the wires through the rubber grommets to the back of the case.
If it is modular (detachable cables), then you must first connect the necessary cables, including power PCI Express(for a video card) and SATA (for data carriers). 


Only now we pass the entire bundle of wires from the power supply unit through rubber hoses behind a tray with motherboard.
Installing the motherboard into the case
We insert the board into the case; there should be a specially allocated space for it in the case. 
We do not put any spacers and pads, we use only the set that comes with the kit (bolts plus stands) 
Then you need to connect external USB ports on the front panel, as well as the Power and Reset buttons, two LEDs showing media and power activity.
First we look for a connector signed as USB, then we connect the plug

And then find the pins (JFP1) associated with the buttons and LEDs, connect them to the connector, according to the marking next. 


Installation media (HDD / SSD)
Speaking of mounting hard drives, again, everything is individual. In our case, we have a rack with a plastic slide. We attach the hard drive to these sleds, and insert into the rack. 


Next, the necessary step is to connect the media / media to the motherboard using SATA signal cables, and also bring power to them.

To do this, find on the board small connectors labeled as SATA. In the instructions for the board, we check which of them are the fastest (SATA 3 - 6 Gb / s), and it is to them that we connect the disk on which we will install the system, especially if the system is installed on an SSD. Other media will fully satisfy the slower speed (SATA 2 - 3Gb / s). 

First of all, we connect the power cable, and then the signal cable
Installing a graphics card
The graphics card is the last item (within the basic configuration) to be installed. 
Look for the first free PCI Express x 16 port (blue, closer to the CPU cooler in the photo below). First, we deal with traffic jams. 99% of currently available video cards require the space occupied by two dies on the back 

As in the case of the slots for memory modules, the PCI Express slot has small protrusions that will prevent you from mistakenly installing the video card. You simply have no choice, you will do everything right. 

Then we fix the video card. 

Connecting power to the motherboard
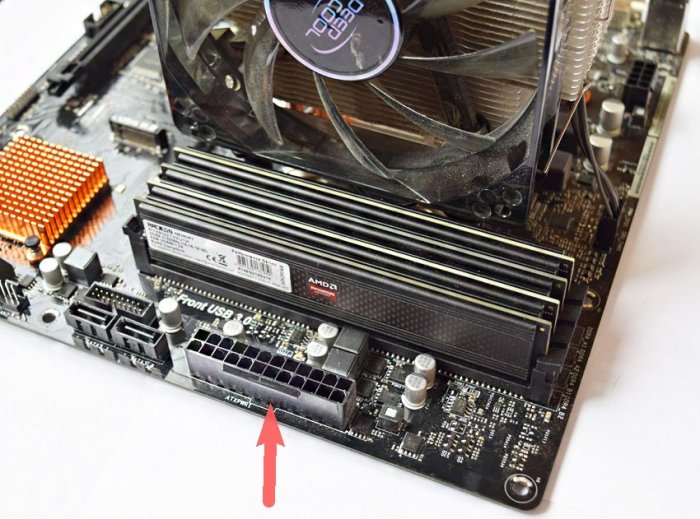
The motherboard is powered by two wires. One is the 24-pin connector shown in the picture below. Located on the right side of the board, next to the RAM. 
The second power cable is the heart of the computer - the processor. we insert it into the slot located in the upper left corner.

It remains to "feed" our video card. The most power hungry (but powerful) models require two plugs, seen in the picture.


Before closing the case, you need to check the operation of the power button, restart and LED information (the part that tells you that your computer is turned on, and others that indicate the activity of the HDD / SSD).
Outcomes
The idea that something is extremely complex in the assembly is erroneous. You really need to try hard to ruin something. Equipment manufacturers care about the convenience of users by introducing physical restrictions: the processor can only be inserted into the socket in one position, it is impossible to connect the power connector in the wrong direction, or to the wrong connector. The worst thing that can happen is that you can forget about any of the cables. But don't worry about that: the computer won't do anything, it just won't start until the wires are properly connected. Good luck!
Well, if the components have already been purchased, and it only remains to assemble your computer from all this, then let's figure out together what is where and why
STEP 1: Getting Started
Assembling a computer yourself is not so difficult as it seems at first glance - the main thing is to do everything carefully, not to rush anywhere. To build your computer you will need:
- crosshead screwdriver
- pliers
- cable ties
- wire cutters
- iodine or brilliant green with bandages
A Phillips screwdriver is the most basic tool. In principle, it is often enough just this to completely assemble a computer.
Pliers may be needed, for example, for twisting the racks under the motherboard, bending some elements of the case.
Ties are necessary in order to neatly lay and tighten the wires inside the case after assembly, and wire cutters are necessary to cut the ties and break out the body caps.
Iodine, brilliant green, bandages may be needed if your body has sharp edges. You can cut yourself corny, this happens quite often, so it is better to have it all at hand.
STEP 2: Understanding the Basic Types of Mounts
Mounts for accessories should be supplied with the case. Here is the purpose of the main ones:
1. To fix the side covers of the system unit: 
2. For screwing into plastic parts. Used, for example, to secure case fans:

3. Racks-mounts are screwed into the case of the system unit in the places where the motherboard is attached:

4. Used to mount hard drives, drives. The same screws, but slightly smaller, are used to secure the motherboard:

5. For fixing all other parts inside the case of the system unit, for example, a video card, sound card, power supply. They can also be used to tighten the side covers of the case if there are no fasteners No. 1:

When tightening, it is necessary to avoid excessive force, tighten it firmly, but in moderation so as not to disrupt the thread.
STEP 3: Getting Started
Assembly must be done as carefully as possible, without rushing anywhere. Never use excessive force to something - all the parts of the computer connect and fit into each other very easily.
If something is difficult to screw or insert, then you are doing something wrong.
Any computer assembly begins with fixing the motherboard inside the case. Open the case cover, put it on its side. On the wall, you will see holes for the motherboard mounts. Place the motherboard inside the case so that its mounting holes line up with the holes in the side of the case. Now in all the holes of the case, suitable for the holes of the motherboard, it is necessary to screw the racks No. 3. This is where pliers come in handy:

After the standoffs are screwed on, insert the metal blank plate that comes with the motherboard into the back of the case:

And only after that do you finally insert the motherboard into its rightful place and screw it on.
STEP 4: Install the processor
After the motherboard is installed, you can install the processor on it. Remove the plastic cover from the motherboard socket and open it. If you don't know how it opens, find the instructions for the motherboard and look in it, everything should be shown in the pictures:
When installing the processor, note that there are triangular marks on the processor and on the socket, and in some cases special grooves. They are needed in order not to confuse exactly how to put the processor. Align the labels and carefully insert the processor into the socket:
And remember - no strength, neither physical nor Jedi!
The processor is very easy to insert and force can permanently damage the socket.
After installing the processor, the socket must be closed. This is done in the same way as the discovery, only the other way around - but I think you yourself have thought of this.
STEP 5: Install RAM
There should be no problems with installing memory. First, move the holders along the edges of the slots, then insert the RAM strips until they click:
Pay attention to the cut in the middle of the memory contacts and the bulge in the memory slot on the board - they must be aligned in order for the bar to fit properly:
Random access memory is one of the few parts that can be inserted with some effort. Try not to bend the motherboard too much when applying force. If necessary, support the right side with your hand.
Pay attention to the colors of the slots for the RAM. For example, if you have two memory sticks, then they should be inserted into slots with the same colors. Thanks to this, the computer will be able to use the dual-channel memory mode, which will allow it to work somewhat faster.
STEP 6: Install CPU Cooling
Before installing cooling, be sure to remove protective film, if any:
Apply a very thin layer of thermal grease to the heatsink sole and install it on the processor. You can see the instructions that came with your cooler for installing it.
Make sure that the cooler fits snugly against the processor surface, there are no distortions after installing it. Incorrect installation cooling is fraught with constant overheating of the processor.
After installation, remember to connect the fan power to the motherboard.
On the motherboard, the fan connector is usually labeled "CPU":
The "CHA" connector is needed to connect the case fans.
It is allowed to connect 3-pin (three-pin) fans to a 4-pin (four-pin) motherboard connector.
STEP 7: Installing the Graphics Card
If you don't have a graphics card and decide to use the motherboard's integrated graphics, skip this step and move on to the next.
There is nothing complicated in installing a video card. Break or pull out the plug in the back of the case where the video card will be installed:
Note if there is a latching mechanism on the PCI-Express graphics card slot, if there is, open it before installing the card. After inserting the card into the slot, the mechanism should snap into place:
Also, do not forget to fasten the video card with screw number 5 to prevent it from accidentally falling out of the slot.
STEP 8: Installing Hard Drives and Drives
There is a hard drive cage in the front of the case. Install the hard drive into it with the cover up, with the contacts towards the motherboard. Hard drives fastened with screws # 4.
There are removable blanking elements on the front panel of the case for installing drives. Remove the front cover from the case and pull out the plug. Also in the case itself, break or pull out the iron plug in the front of the drive cage.
Replace the case bezel, and then install the drive, remembering to tighten it with # 4 screws.
STEP 9: Chassis ventilation system
For proper cooling, constant ventilation of the air inside the case is required. For this, additional case fans are used.
Recommended fans in front lower and side parts of the body to put on fence(blowing) air into the body. And the fans back and top parts of the body to put on blowing out air. This ensures the most optimal ventilation of the internal space inside the case.
The fans are connected to the connectors on the motherboard, designated as "CHA" or "FAN", or directly to the power supply, to the MOLEX - connector, depending on what type of connectors is used on the fan:
In general, the design of a cooling system is a topic for a separate article. Novice assemblers are advised to adhere to the scheme described above - it is the most optimal and widespread. Over time, an understanding will come about which parts require more cooling, and which parts do not need cooling at all, how best to build a cooling system for this particular computer, etc.
STEP 10: Connecting the front panel of the chassis
Each motherboard has system panel connectors, where almost all the elements of the front panel are connected. Where to connect what, you can look either on the board itself, or in the instructions for it:
Often the same designations are used on all motherboards:
- PWR LED- computer power indicator;
- HDD LED- indicator work hard disk;
- PWR SW- power on button;
- RESET- "reset" button;
- SPEAKER- to connect a buzzer (which beeps at startup);
Be careful when connecting the PWR LED and HDD LED indicators - polarity is important for their operation, which is also indicated in the instructions. If connected incorrectly, the indicators will simply not work. To find out which polarity corresponds to the wire of the indicator itself that you connect, look at its color. Black is a minus, and any color is a plus. The system panel connectors have an arrangement such that the plus is always to the left of the minus, - knowing this rule, you can easily determine the polarity of the wire connection.
STEP 11: Connect all other cables
Now you need to connect the SATA cables, USB connectors, and audio outputs. All SATA ports on the board are numbered in order. In the very first, it is recommended (but not necessary) to connect systemic hard disk, then the rest of the disks, and after them is the drive. This scheme is not fundamental, but sometimes it can slightly reduce the time it takes to turn on the computer.
If you have an additional (not integrated) sound card, then you need to connect the cables to it, and not to the motherboard.
Then connect the USB cables to the corresponding connectors on the board:
Power to hard drives and drives:
If the video card has an input for connecting additional power, then we connect the power there too.
If the fans are powered only by the MOLEX connector (large rectangular, with 4 pins), connect them to the power supply. If possible, connect a fan to the motherboard, use it.
STEP 13: Finish and start
Take another close look at the entire computer assembly. Is everything firmly in place, is everything fully inserted and connected. Drive the cat away and put on a bulletproof vest.
Plug in your monitor, keyboard, mouse, power cable and get ready to start your computer for the first time.
If everything was done correctly, then when you press the power button on the computer case, it should turn on. If it does not turn on, check the correct connection of the front panel buttons to the motherboard, check again if everything is connected correctly, if the computer is plugged into a power outlet.
I hope you succeeded the first time, and the computer rustled with fans. If you have any questions, ask in the comments.
BIOS setup and installation operating system we'll look at it in future articles.
P.S. If you have read this huge article to the end and you are still not enough, I suggest you watch the video "How not to assemble gaming computers":
Hello friends! If you are a computer enthusiast then learn by yourselfassembling a computer will not be difficult for you.
When I wrote this article, I immediately showed it to a person who had never assembled personal computer... He read it carefully and began to ask me questions, from which I realized that the publication urgently needs to be supplemented with a lot of little things, only then it will become clear to beginners, as a result, I almost completely rewrote the article several times, and only now I am proposing it to your judgment.
In my last publication, I explained to you, but today we will independently produce a classic PC assembly.It is best to assemble a computer on a table so that you can see everything and as convenient as possible. Let's start withapplying thermal paste to the processor and installing it into the socket of the motherboard, then we assemble the processor cooler and connect it, after that we insert the RAM modules into the special connectors on the motherboard, then we mount the power supply in the case and pull the wires, fix it in the SSD, HDD system unit, and only after that we install the motherboard in the case ...
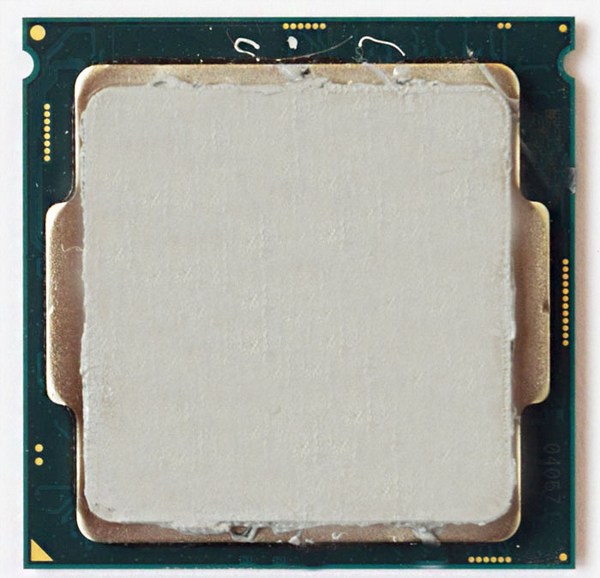
First, we need to buy thermal paste and apply a thin layer to the processor. It is inexpensive and is usually sold together with a special hard card, with the help of which, literally, it is smeared over the surface. Why do you need thermal paste? During operation, the processor gets very hot and with the help of thermal paste effectively removes heat from itself to the cooling heatsink.
Installing the processor into the motherboard
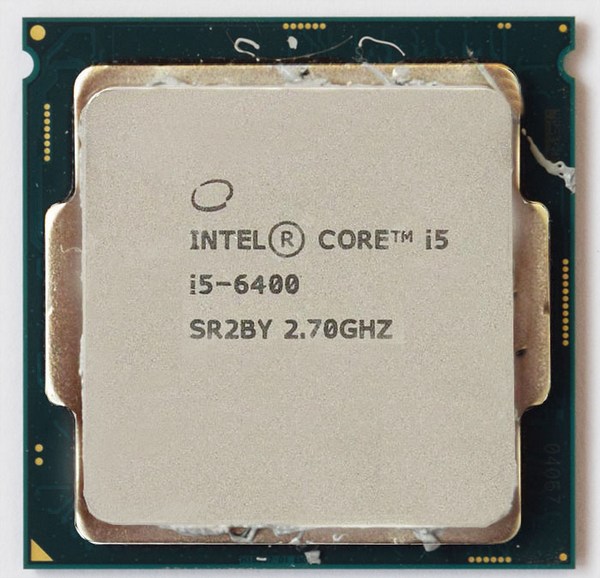
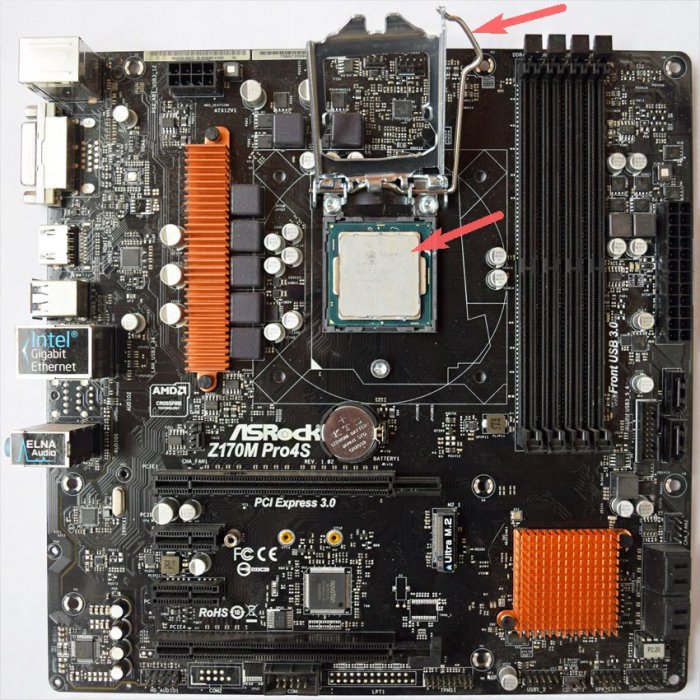
Now we install processor in, in my case i5 6400 and Asrock z170m pro4s. Installing the processor into the socket should be done very carefully and carefully so as not to damage it. In particular, this applies to processors from AMD, since, unlike Intel processors that have contact pads, at the first there are so-called "legs", bending which the processor will stop working. So, open the socket on the motherboard using the side latch and look at the keys that show us how to insert the processor correctly.


We take the processor in hand and see that it has corresponding notches and a triangle in the corner, thanks to which it will be difficult to make mistakes during the installation process.

With a gentle movement of the hand, we simply put the processor into the socket,
We make sure that it does not hang out there and close the side latch.

CPU cooler
Further, I prefer to outfit the motherboard in full and install RAM on it immediately, outside the case, because personally, with my big hands, it is problematic for me to do this in a cramped space (inside the case).
So, we look at the motherboard and see special connectors for the cooler mounts, and we will put it there.


This is done simply, we take a cooler, we get into the holes with special legs and click them.

After installation, everything will look like this.


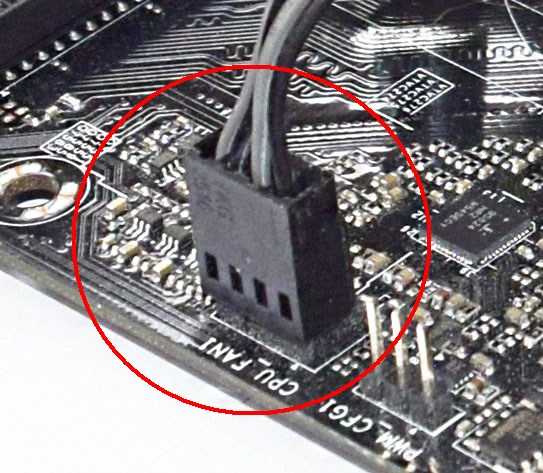
Do not forget to also connect the cooler power to a special connector on the motherboard called CPU FAN.

RAM
Power Supply
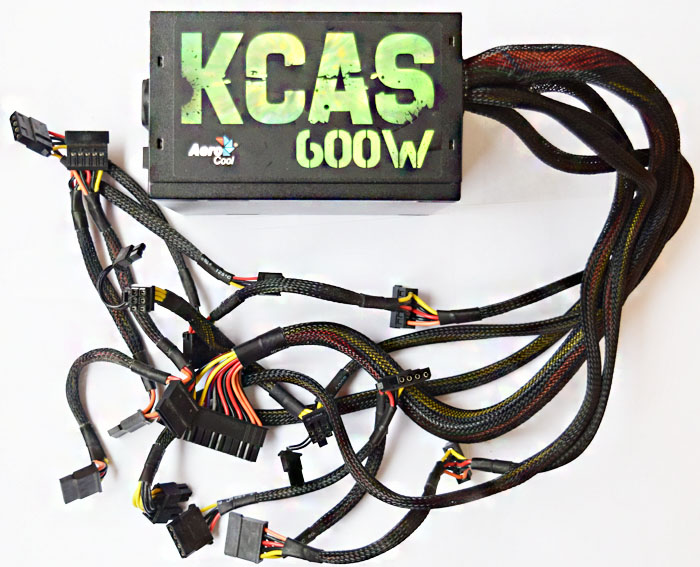
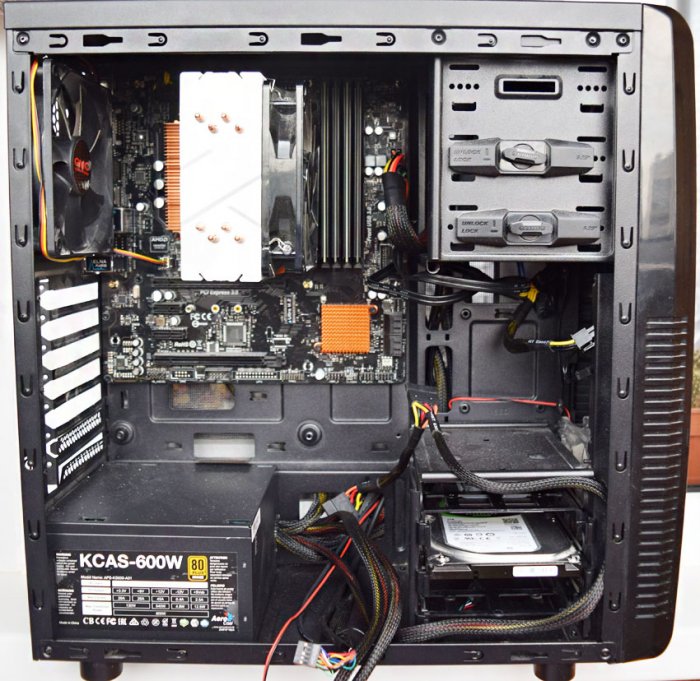
Now that the motherboard is fully charged, proceed to the installation into the case. Many people advise to install the motherboard into the case first, but I prefer and recommend that you start with the power supply unit, because if you follow my advice, you can stretch all the necessary wires properly and avoid damaging the motherboard, since the unit is usually very large and takes up a lot of space ... One awkward move and you can easily damage the microcircuits - goodbye to the motherboard. In my case, the GMC Forge case and the Aerocool KCAS 600W power supply unit.
The installation of the unit is very simple. We put, stretch the wires at will and screw the screws into special holes on the back of the case.


I want to note that the power supply is always installed in such a way that the fan is directed downward when the unit is mounted at the bottom. Inside the case, you can tell your microclimate and your own temperature, so it will be better if the power supply sucks in cool air from the outside, and not warm from the inside.
SSD solid state drive and hard drive
Now before installing the motherboard for the same reason, similar to the power supply. We insert the solid-state drive and hard drive into the corresponding baskets, if they are, if they are not, then we simply screw them to the case. I will have Patriot Spark 128gb and Seagate Barracuda 7200 1000gb working hard on my system.


Motherboard
Let's move on to installing the motherboard into the case. On the mother itself there are special holes for fastening, depending on the model, the number of these holes may vary. We insert the motherboard into the case in accordance with these fasteners and tighten with the screws, which are necessarily included with the case.

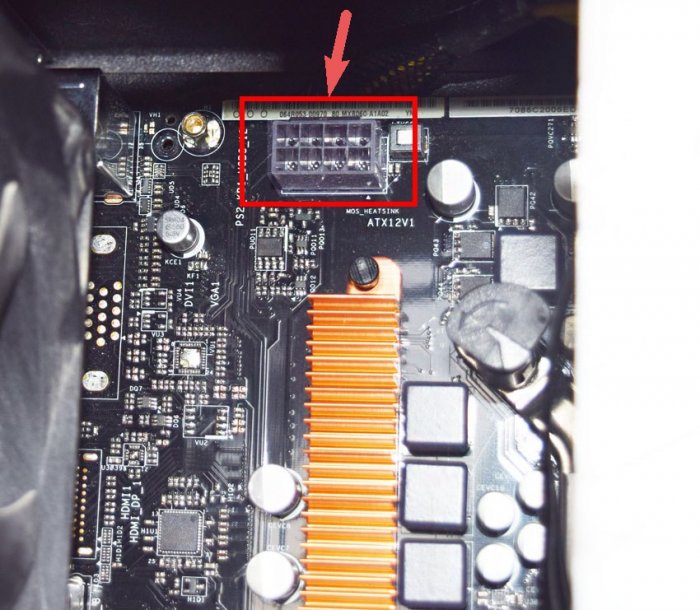
Processor power
And finally, it remains for us to connect all this stuff together. Let's start with the power supply of the processor. The power connector is 4pin and 8pin and is usually located directly next to the processor. We find the appropriate cable from the power supply and connect.

Motherboard power

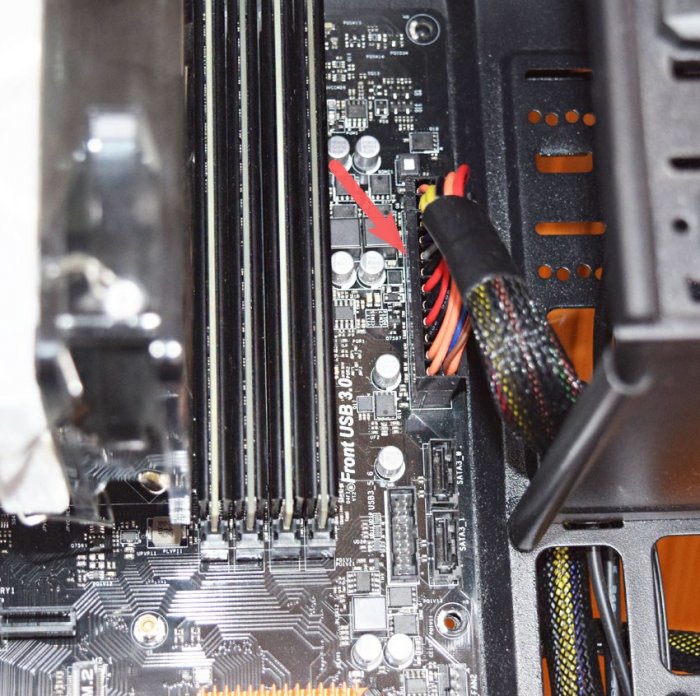
Case cooler
Let's move on to connecting the case coolers for blowing / blowing. They are connected to the corresponding connectors on the motherboard with the name CHA FUN or SYS FAN or similar.


Now let's connect our drives with SATA interface cables to the corresponding slots on the motherboard.
Do not forget to connect additional power to our drives. In my case, this can be done from the back of the case.