For a long time, the Zalman Z9 case has enjoyed well-deserved popular love, both by enthusiasts and ordinary users. Perhaps because of this, the company hesitated for a long time on any changes in this model, except for cosmetic ones. When I finally saw the updated Zalman Z9 Neo chassis on the official website, I just couldn't believe my eyes. It seemed to me that instead of the site of a Korean company, I ended up somewhere in the fiefdom of Antec or Fractal Design. But no, the address turned out to be correct and it was really Zalman Z9, but only with the Neo prefix. Well, let's see if there is anything left in it from the previous model, except for the name.
Specifications
| Model | |
|---|---|
| Product page | zalman.com |
| Type of shell | Midi-Tower |
| Dimensions, mm | 512 (H) x 205 (W) x 485 (D) |
| Material | ABS plastic, steel |
| Weight, kg | 6,8 |
| Colour | Black |
| Form Factor | ATX, MicroATX, Mini-ITX |
| 5.25 ″ devices | 2 |
| 3.5 ″ external devices | - |
| 3.5 ″ / 2.5 ″ devices internal | 4/6 (maximum, depending on configuration) |
| Expansion Slots Supported | 7 |
| Fans | front - 2 x 120/140 mm (2 x 120 mm installed) upper - 2 x 120 mm (installed) rear - 1 x 120 mm (installed) |
| Interface connectors | 2 x USB 2.0, 2 x USB 3.0, mic-in and headphone-out |
| Other | Dust filters on the front and bottom, side window, illumination of the two top fans and USB ports, dummy plugs on the USB ports |
| Recommended cost, $ | 88 |
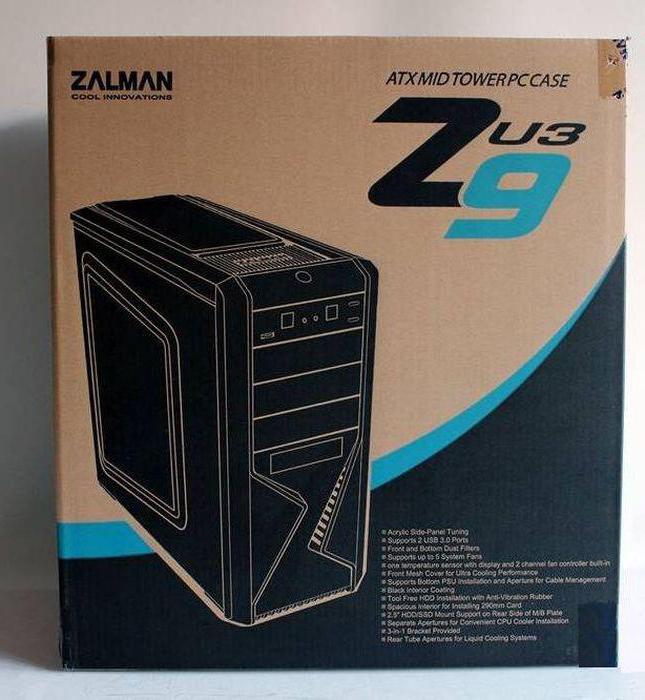
Packaging and delivery set
Zalman's new packaging style is not much different from the old one. There is a schematic representation of the case on both sides. Tables with specifications and some names, for some reason, are glued to the box, and not printed on it. Perhaps because there are photos of other revisions of this chassis on the network. And the boxes are the same for everyone. Protection against damage is standard - foam dampers, bags and stickers.

The delivery set, assembled in a neat plastic cosmetic bag, includes:
- assembly instructions;
- quality control technical sheet;
- five cable ties.
- three additional motherboard racks;
- Four plastic thumb screws for the power supply
- eight case screws;
- 12 flat head screws to secure 3.5 ″ drives;
- six screws for fixing storage baskets;
- 18 small screws for the motherboard, 2.5 "drives and 5.25" devices.

Appearance
There is absolutely nothing left of the mesh ventilated design of its predecessor in the Z9 Neo. The front panel of the case is solid, with a specific gray mirror painting, which makes the plastic look like polished aluminum. The company's logo flaunts at the bottom. Control buttons and ports are located on the upper edge.

The front panel is a door that opens to the right (the opening recess is located on the upper left), and its reverse side is lined with a layer of noise insulation. It is held on two magnets and three hinges. There are two 5.25 ″ device slots behind the door at the top, closed with solid plugs. The lower half of the front panel is occupied by a plastic ventilation grill, behind which the metal mesh of the dust filter is visible.

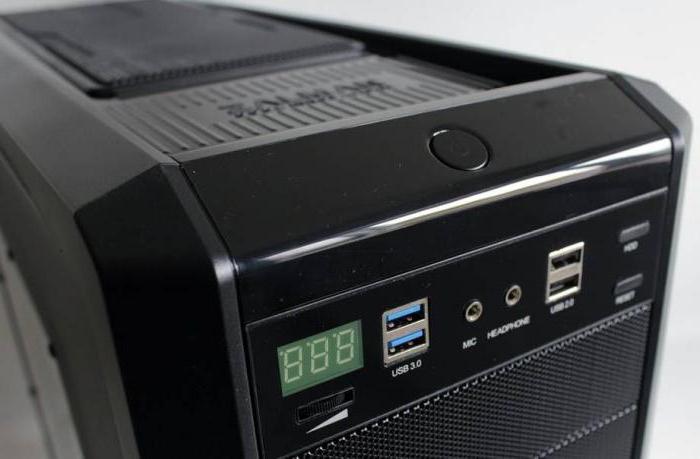
The square start key of the system is located on the left, separately from other elements. Its circular illumination combines power and drive activity indicators. A reset button, two 3.5mm audio ports, two USB 2.0 and two USB 3.0 are placed horizontally on the ledge on the right. The ports, by the way, have rubber plugs to prevent the rapid accumulation of dust. Quite a nice solution, however, the plugs are not attached to anything, and it is very easy to lose them by accident.

The left side panel is decorated with a large smoky acrylic window measuring 350x250 mm. It has curly corners and protrudes 5 mm above the door surface. On the side edges of the front and top panels, a row of ventilation holes is visible for intake of cold air and removal of hot air. The side door is removable towards the rear and has a stamped handle. Held by two plastic knurled screws.

The door is equipped with good stiffening ribs from the inside. The window rests on ordinary metal tabs, without any spacers.

The right panel is solid and, in general, is similar to the left in construction. In the front and top edges on this side, there are also slots for ventilation.

The top panel is made of plastic and its construction is slightly unusual. At the back of the top, where either ventilation holes or a solid wall are usually made, you can see a kind of transparent plastic rim that covers the recess.

This bezel does cover the vent and the instructions even recommend removing it if the user prefers better ventilation instead of less noise. Otherwise, the heated air is ejected under pressure from the fans through narrow slots around the rim perimeter.

The rear view of the Zalman Z9 Neo is not much different from the previous model. A ventilation grill, behind which an exhaust 120 mm propeller is fixed, seven expansion slots with vented plugs (and this time, lo and behold, they are reusable) and mounting holes for the power supply, with which it can be oriented both with the fan up and down.

But under the power supply there is a high-quality dust filter that can be easily removed for cleaning.

At the bottom of the case from the outside, in addition to the filter, there are four holes through which you can additionally fix 3.5 ″ inside HDD and two more larger holes, the purpose of which is not clear. Not otherwise as a drain, in case of an accident in the circuit of the NWO.

The four plastic legs are 22 mm high and are glued from the bottom with rubber patches, which is positive. A cutout at the bottom of the front panel is needed for easy dismantling.

Let's see what has changed inside.
Internal organization
Zalman Z9 Neo case supports vertical installation motherboards ATX, MicroATX and Mini-ITX formats. The maximum allowable height of a processor cooler is 160 mm (in some cases - up to 165 mm if the cooler falls into the plane of the side window). Expansion cards can be up to 385mm long with front-mounted fans. The permissible length of the power supply is up to 180 mm including non-removable cables.

Preinstalled on the hood under the top panel are two 120-mm transparent fans with blue illumination, model ZA1225CSL, based on a sleeve bearing. They are connected using Molex connectors, the standard rotation speed is 1200 rpm. In general, the propellers can be described as quite quiet, albeit with a slight chirping sound. In addition to the 25 mm thick fans in the recess, there is a 30 mm margin under the top panel to the edge of the motherboard, which means that almost any standard 240 mm CBO radiator will fit here. True, in the latter case, the holes for pulling wires will slightly overlap, but this is a small problem.

On the rear panel there is a pre-installed 120 mm fan with a white impeller model ZA1225ASL. It is a plain bearing propeller with a maximum rotational speed of 1200 rpm and a noise level of 45 dB (A). It is capable of confidently starting at 5 V, 500 rpm and 33 dB (A) noise. In general, this is a fairly decent propeller in acoustics, from which you can hear overtones in the form of buzzing only when you are very close. Its black 3-prong power cord is 430mm long.
All PCI slot covers are reusable and secure with plastic thumb screws. This is undoubted progress compared to previous version chassis.

Almost all the space below is occupied by a metal non-removable box that has become fashionable today among manufacturers. Under it, in a volume separate from the main part of the chassis, the power supply unit, cables from it and drives are hidden. There are ventilation holes on the front and side of the drives. In the upper part of the casing, there are two oval cutouts for pulling wires. The distance from the box to the front panel is 55 mm, which means that the SVO radiator assembled with fans can also be attached there.

Two more 120-mm fans of the ZA1225ASL model are preinstalled on the front, for the injection, similar in characteristics to the rear propeller, but with a molex connection to the power supply. As a result, the chassis is equipped with a complete set of five 120-mm fans, four of which are powered through the "Molex", and one (rear) through a three-pin connector.

In the motherboard tray, next to the front fans, there are two perforated grilles that can hold two 2.5 ″ drives using screws.

Two metal trays on top can accept not only 5.25 "devices, but also serve as a basket for one 3.5" or 2.5 "drive. There are no quick fasteners here, but if necessary, the trays themselves can be quickly and easily dismantled by unscrewing a few screws from the side and front panels.

The motherboard tray has undergone a number of positive changes. In particular, the cutout for the strengthening plate of the processor cooler has increased significantly in size. The main cable routing holes are now covered with rubber shutters. The number of eyelets for fastening cable ties has also significantly increased and they are now located in all the right places.

There is also such a cute detail as reusable Velcro cable ties in the amount of three pieces. And for laying the wires behind the pallet, there is up to 22 mm of space in width.

A cage with two drive sleds is located at the front of the chassis. At its bottom, if you wish, you can also attach a third 3.5 ″ drive, securing it with screws to the bottom panel.

The sled is capable of accepting one 3.5 "hard drive, which simply fits into their plastic mounts, or one 2.5" drive, which will have to be fastened with screws. On the side protrusions of the carriage, corrugated rubber pads are put on, which act as vibration dampers. Although the disk connectors are turned towards the plastic handle when installed, it does not interfere with their connection at all, since it is located slightly above these ports.

On the seat of the power supply unit there are rubber dampers, both at the bottom in the form of blotches, and on the side of the casing, in the form of a large insert made of soft material. When selecting a power supply unit in this case, do not exceed 180 mm in length, otherwise it will be extremely problematic to place it together with the wires in this case.

The front panel, unlike the old Zalman Z9, is very easy to dismantle - you just need to gently pull it by the ledge from below, snapping off all eight tulip fasteners in sequence. The wires are tied to the top of the panel, so be sure to free them before removing the front.

Front view of the metal part of the front panel. 5.25 ″ bays are closed with disposable plugs. And opposite the fans is a mesh that acts as a dust filter. It is not very convenient to remove and clean it.

Behind the filter is a large-mesh honeycomb grill, to the long side openings of which you can attach two 120- or 140-mm fans, or radiators of 240 or 280 mm format. Although it would be better here this lattice simply did not exist, so as not to create unnecessary obstacles to the air flow.

The top panel can be easily dismantled after removing the front part of the case. It also rests on eight tulip mounts. There are no wires here, therefore, you can remove it without fear. Looking at how close the top vents are to the pre-installed propellers, it is doubtful that any perceptible air movement is possible through the side perforations at all.

Two 120mm fans can be attached to the tabs on the top panel. The oblong holes allow even tricky radiators with a small spacing between the middle holes, such as those produced by Corsair, to be installed here.

The set of wires includes four standard cables from indicators of system operation and drive activity, start and restart buttons, one USB 2.0 connector, HD Audio cable and one USB 3.0 connector. The length of all cords is sufficient, the color of the insulation of the wiring is completely black.

Let's move on to assembling the system and its thermal test.
Assembly
The assembly of the system in the Zalman Z9 Neo case went without a single problem. In terms of ease of placing and accessing components, routing cables and connecting them, a new version the chassis turned out to be a cut above the old one. The only moment that can cause inconvenience is installing the power supply in the cramped space of the box at the bottom of the chassis. If the unit has a modular cable connection, it is better to connect all the wires to it in advance. Access to the CPU cooler's reinforcement plate is full, you can put it on and off without dismantling the motherboard, which the old Z9 could not boast of. And especially worth noting is the complete Velcro, thanks to which fixing all the cables behind the pallet turns into an easy walk.

The dimming factor of the smoky side window is well chosen, and presents the contents of the case in a good light, hiding unnecessary details.

The backlight came out a bit ambiguous. The interior of the chassis is illuminated by blue LEDs from the two top fans. In addition, some of the light passes through the rim of the top cover. The system start button and all four USB ports are illuminated along the perimeter. The drive activity indicator is combined with the backlight of the start key, and is highlighted with a brighter light when triggered. Everything looks decent in the light, but very bright in the dark. In addition, the USB ports remain lit after the system is turned off if the connector is powered. And if in UEFI motherboard Since the board does not have a parameter responsible for managing USB power, you will have to enjoy this radiance forever, or turn off the same power supply from the outlet.


Test stand
To test the cooling efficiency of components in the Zalman Z9 Neo case, the following configuration was used:
- CPU: Intel Core i7-2600K (3, [email protected], 4 GHz, 1.330 V);
- cooler: Zalman CNPS10X Performa;
- motherboard: Gigabyte GA-Z77MX-D3H TH (Intel Z77);
- video card: ASUS R9270-DC2OC-2GD5 ( AMD Radeon R9 270);
- memory: Kingston KHX24C11X3K4 / 16X (2x4 GB, DDR3-2133, 10-12-12-27-2T, 1.65 V);
- solid state drive: Crucial M4 CT064M4SSD2 (64GB, SATA 6Gb / s);
- hard drive: Western Digital WD2000JS-00MHB0 (200 GB, SATA 3Gb / s, 7200 rpm);
- power supply: be quiet! Dark Power Pro 10 (550W);
- thermal interface: Noctua NT-H1.

Testing methodology
The heat load was created by running LinX 0.6.5 stress tests with 2048 MB of dedicated memory and MSI Kombustor 3.5.1.0 simultaneously for 10 minutes after the temperature stabilized. The hard disk was loaded with the Crystal Disk Mark 5.0.3 x64 program. At the end of the test cycle, the system was idle for 10 minutes to determine the minimum thermal readings. The ambient temperature was 26 degrees Celsius. The fan speeds of the processor cooler and the video card are fixed at the maximum speed. Peak power consumption of the system was 336 watts. Testing was carried out in a single comparison mode with an open bench. All pre-installed propellers were running at their highest available speeds.
Test results

Since the Zalman Z9 Neo has a number of solutions inherent in passive noise canceling cases in its design, it is not very good in terms of cooling components. With the front door closed and the rim mounted on the top panel, even with a full set of fans running at full speed, the temperature readings of the components do not look very optimistic. The processor, power elements and the motherboard heat up seven degrees more, and the video card - 14 degrees - seven degrees compared to an open bench. And only the hard drive feels a little lighter in the case - by two and one degrees, under load and when idle, respectively. Therefore, I can rate the basic ventilation scheme in the case as “worse than average”. How can it be improved? Opening the front door with heavy component loads, remove the front dust filter, remove the top bezel, and possibly cut off the top cover over the fans completely, replacing it with a grill or something similar.
conclusions
The updated Zalman Z9 Neo chassis has many improvements over its predecessor, the Z9. The appearance has become more pleasant and austere, the supply of internal space in the case has noticeably increased due to the removal of unnecessary compartments, the possibility of wiring has improved, a complete set of relatively quiet fans has appeared, it has become possible to install CBO systems on the front and rear panels. This is all undoubtedly positive. After all, a number of painful problems were solved, which stopped many who wanted to buy this building.
However, all these improvements were not in vain, and the overall cost of the case increased slightly as they stopped saving on matches (for example, on reusable plugs, power supply filter, rubber shutters and Velcro for cable management). The second point that confuses me is not very good system ventilation, which will heat up the components in the system. For most ordinary users this is not critical, but for enthusiasts who are fighting for every degree in their overclocked system, this can be a stumbling block.
In general, I liked the updated Zalman Z9 Neo for the combination of its parameters, and therefore it can be recommended for purchase when assembling any computer systems, with the exception of the hottest configurations.
The Z9 Plus from Zalman is a budget ATX midtower designed for the gamer and hobbyist market. The company has long specialized in silent, user-demanded devices with extremely hot hardware. high class.
Zalman Z9 Plus: design overview
A quick glance at the case measuring 207 x 464 x 504 mm and weighing 7.2 kg is enough to understand who it was made by. The name of the manufacturer is heavily used in its design. At the bottom of the front panel is visible capital letter Z covering the area with a 120mm blue backlit fan. This is done not only to mask part of the cooling system, but also to circulate air.
For those who can't get past outdated technology, they'll be happy to know that there is space for a floppy drive between the fan and the three 5.25 "mesh bays. The case has a factory-installed 5.25" to 3.5 "adapter serves to protect the drive.
Zalman decided to add a few extras to the front of the Z9 Plus. On the left is a digital indicator connected to a thermal sensor that can be placed anywhere inside the case to give the user an idea of the heating level. A two-channel controller is located just below it, capable of providing the quietest possible operation of the fans or their overclocking if necessary.
On the right is the first set of USB 2.0 ports, while another set is located on the other side of the 3.5mm headphone and microphone jacks with HD audio or AC '97 support. This separation of USB ports allows you to install large flash drives that can be used simultaneously with other USB devices without blocking them. On the right are the hard drive activity indicator and the reset button with the power switch (higher in the center).
The front panel of the Zalman Z9 Plus Black can be removed by pulling it from the bottom and then from the sides. In the upper right corner there are two small contacts that can be detached to remove the cover completely. Zalman has made them different to ensure they are connected correctly. Each of the 5.25 "compartment covers is equipped with a removable dust filter.

Side panels
Turning ATX case Zalman Z9 Plus counterclockwise, you can see the left panel, which is held in place with two black screws. The capital letter Z is also visible here. In the opposite corners of the surface there are two small windows, between which there is a large diagonal mesh with another 120mm LED fan in the lower left corner. Another cooler can be installed on the top right for additional cooling, but even without it, the open space should allow enough fresh air to flow into the case to keep the heating temperature under control.
The right cover of the Zalman Z9 Plus is solid and has no channels to hide cables behind the motherboard.
Rear panel
From the rear, from top to bottom, there are holes for the motherboard connectors with a 120-mm fan without backlight. There are two rubber-padded passages just below it - a plus for those wishing to use external water cooling. Then there are 7 removable covers for PCI cards, a small mesh-covered hole and a place for a power supply at the bottom, which has now become the norm for amateur and gaming cases.

Up and down
A handy small tray with the manufacturer's name is installed at the top of the front. It should be useful to those owners portable devices(MP3 players, digital cameras or Cell Phones) that regularly leave them on the case. Directly behind the tray can be seen a mesh grille hiding a 3rd pre-mounted 120mm LED fan. There is also a place for another cooler, which, if necessary, must be installed by the user himself.
At the bottom, the body is equipped with four rectangular rubber feet that raise it above the base and prevent slipping. There is also a removable filter for the last 120mm fan and holes for cooling the power supply.
Internal organization
By removing the panels, you can access the inside of the case. On the left front there are 5 hard drive bays that rotate 90 ° with 5.25 "slots above them. At the bottom there are spaces for a 120mm fan and power supply. Above is the motherboard tray. Cable service areas are located on the right, in the CPU area. a hole has been cut to make it easier to change coolers, and there is a passage for the power cable in the upper left corner.

The internal space is a bit small, but not cramped, able to accommodate video cards measuring 29 cm in length. This does not take into account the existence of graphic cards, power to which is supplied in the immediate vicinity of drives on hard drives... Connecting at this point reduces the overall allowable length, so larger graphics cards must meet this condition.
Some may wonder: what is the mesh area under the processor cutout for? While the right side panel is completely clean, underneath is what is becoming more and more popular with case makers - mounting points for 2.5 "hard drives or solid state drives behind the motherboard tray.
Equipment
Complete materials are supplied in a large sealed bag. The kit includes an 8-pin 12V expansion cable, screws with metal and plastic heads, additional motherboard stands, rubber washers and screws for securing and absorbing hard drives, small retainers, and a user manual.
So far, everything looks great, but how will the editing take place?

Installation
Those new to the Zalman Z9 Plus Black will not be sure where to start. First of all, they face two problems.
One is that the frame is not exactly square. When installing the motherboard, it can be aligned with the stands, but it doesn't quite line up with the rear I / O panel. The discrepancy is small, but sufficient to cause concern. After installing the graphics and network cards, users find that they are not lining up properly.
At the same time, to install the video card in place, you have to push it to the hole for the PCI slot and hold it there until it enters its slot. The same has to be done with network card, but to a greater extent, since it is located further from the bottom PCI-E slot. Both components fit, but it takes a lot of work for the first PCI-E slot as it blocks the GPU and it seems like the NIC is not making good contact.
The second problem occurs when mounting SSDs behind the motherboard tray. The four tabs that the screws pass through are too tight. You have to bend them with your hands to make the drive fit. This pliability, combined with the problems of installing expansion cards, makes you think that the Zalman Z9 Plus case could warp. But the packaging is in near-perfect condition and is equipped with styrofoam end caps to protect the case during transport.

Ease of installation
The Zalman Z9 Plus case is delivered unassembled. All front panel cables are long enough to plug into the motherboard, even for the awkwardly located audio connector at the back of the board. The design of the hard drive installation system is also pleasing. It is one of the most reliable items that users have ever dealt with and does not require additional tools. The screws threaded through the rubber washers and secure the actuator laterally. The drive then slides along the rails into the bay, where plastic clips hold it securely in place.
There is a space just over a centimeter wide between the motherboard tray and the right cover. According to user reviews, after installing all the components, this panel is hardly put into place.
Testing
A 20-minute OCCT run based on the GPU benchmark and overclocked clock, which peaked at 1020 MHz core and 1200 MHz memory at +0.025 V, using the TriXX utility, gave the following results. During idle time, the processor temperature remains at +33 ° C. This is in line with the performance of the Lian Li PC-50WB case. The GPU temperature in standby mode and under load is +44 ° C and +86 ° C, respectively. Overclocking temperature GPU reaches +45 ° C at idle and +91 ° C at full load. Yet again, Zalman characteristics Z9 Plus Black is fully in line with Lian Li.

Advantages
At under $ 70, the Zalman Z9 Plus offers a lot of the right stuff for a midtower in this price range. It's roomy enough not to feel cramped. The hard drive mounting system is incredibly successful, and the temperature indicator and controller on the front panel are nice additions. There are plenty of free bays and room for additional fans for future expansions. There are no sharp edges - hands will not be hurt during installation. And for those wishing to install a cooling system more high level connection of external water cooling is provided. A huge marketing advantage of the model is its noiselessness. Indeed, with the case fans turned on, the noise of the processor cooler at idle is clearly audible. The Zalman Z9 Plus case is black on the inside and outside, which enhances its appearance.
disadvantages
Build quality is worrying in the sense that some of the components don't line up properly and the 2.5 "drive mount can be easily bent by hand. In addition, the Zalman Z9 Plus's chassis lacks a few things and has a couple of extra parts. PSU fan and PCI slot covers cannot be reused. These are features that are available on cheaper models. software, you could sacrifice the front panel LED in favor of these essential components.
Conclusion
Summing up, we note the following. From consumer reviews, the Zalman Z9 Plus is a decent chassis that should provide everything the average user needs to create a high-performance, quiet system.
South Korea knows how to create not only worthy films, but also produce computer equipment under the Zalman brand: controllers, cooling systems, power supplies, system cases and even monitors. And if the reader thinks that all products are unique, and their quantities are limited (this is precisely the stupidity that many sellers justify the high cost of Zalman products), then he is greatly mistaken. In this article, a potential buyer will get acquainted with the cases of the Zalman Z9 line. Instructions, photos, reviews and reviews will help the reader decide on the purchase of a worthy system unit.
Market positioning
The Zalman Z9 case is called elite products in most stores, which is fundamentally wrong. The manufacturer positions its brainchild as a high-quality product (note that a lot of elite products, when examined in detail, turn out to be low-quality or have limited functionality). Therefore, Zalman products should be treated like any other on the market.
The small number of body modifications on the Russian market is due not to the limited number of batches, but to the specifics of our market. Before the presentation of the new Zalman Z9, the company conducted marketing research and found that most Russians like large cases with a bunch of fans, backlighting and always have a control panel with a thermometer. But the Germans prefer that the case does not emit a single sound and does not flicker like a Christmas tree, respectively, for their market the Koreans have released a completely different, unique model of the case.
First meeting
An ordinary system case, supplied without a power supply and costing about 10-12 thousand rubles, simply must have decent packaging and equipment. Here the manufacturer has something to surprise the future owner. It's better to start the review with a box, which is huge. Within the walls of the Zalman company, they were worried about transportation, because after opening the package, the buyer will find that the case itself takes up not so much space inside, and all the free space is given to the stiffening ribs made of cardboard.
Inside, in addition to the device itself, the owner will not find anything, but after removing it from the box, he will find that all parts for the case, instructions and manufacturer's brochures are inside a spacious block. It is worth noting that the Zalman Z9 manual is complete and has a Russian translation. Mounting the motherboard, connecting interface connectors, installing drives and securing the power supply - everything is described in detail in the manual and is accompanied by color drawings.
Build quality
It should be noted right away that all modifications of the Z9 line have the same devices and differ only appearance, and, accordingly, the price. The case, made of steel, has a huge weight (7.5 kilograms without a power supply), but this is a plus for most users. After all, all steel walls of the device are very thick and are not capable of vibrations during operation. For the owner, this is a guarantee of noiselessness, since many cheap cases are capable of resonating with the fans installed in the system and making a specific noise.

The buyer will also like the absence of a cutting edge on all steel elements of the Zalman Z9. Assembling the computer will be much more efficient if the user is not afraid to cut their hands on the edges of the case. As you might expect, the manufacturer used a welded joint only when creating the load-bearing part of the body, all other parts can be removed - a usual constructor, which is very convenient during assembly.
Remote Control
As practice shows, a panel with a built-in thermometer and fan speed control is of interest to users in the first week of operation. After making sure that everything is fine, the owner forgets about the existence of the Zalman Z9 control panel. This is quite natural. Still, this panel needs to be given worthy attention. The fact is that additional interfaces in the form of audio and USB connectors have a number of advantages over the contacts located on the motherboard.
It's about durability. For Zalman Z9 Plus, the connection of external interfaces is a priority, and the manufacturer tried to make sure that the connectors do not get jammed during operation (they use proprietary controllers). By the way, the panel displays USB interface 3.0, which is rarely found in cheap Chinese cases.
About hard drives
A removable basket for installing magnetic disks will definitely delight the owner, however, it is not so easy to deal with it. It is the description of its installation that is described in the manual on just one page. The main thing here is to keep a record of the screws and monitor their standard size, so that after installing the disks in the basket of the Zalman Z9 case, you can correctly mount the device. Difficulties are possible, and if they arise, you should refer to the video instructions that can be found in the media.

The only drawback in dealing with hard drives found in Zalman enclosures is the inability to install SSDs in the basket. You can, of course, connect a disk and leave it hanging on the wires in the Zalman Z9 system unit, but this is somehow wrong. Upon a detailed examination of the case, after removing the second protective cover, the user may find a strange cell at the level. Many for some reason think that this is a connector for a cooler (it is original to cool the video card from the back side). This is actually a niche for SSD storage. Albeit one, but still nice.
Cooling system
A review of the Zalman Z9 case may lead the owner to think that the device will be quite noisy in operation, because 4 powerful fans, not counting the coolers of computer components, are capable of emitting a loud hum. It all depends directly on the user. In the initial state, the entire cooling system operates at the same frequency and, by controlling the resistor on the control panel, the owner, when starting the computer for the first time, will have to adjust the fan speed to the operation of the system. This is not difficult to do - the resonance is clearly captured by the human ear.

In the future, during operation, you need to monitor the operation of the cooling system and timely lubricate the fan bearings (2 times a year exactly). Yes, it is time-consuming, but, on the other hand, these actions will save the owner from noise or failure of coolers. Nothing complicated - open the Zalman Z9 case, remove the sticker, pry the valve with a needle and remove it, pour in two drops of machine oil, put the plug back in place and fix the sticker in its original position.
Manufacturer flaw
Without deviating from the topic of cooling, it is worth discussing the location of the Zalman Z9 case. The photo in the instructions for the device informs the owner that fresh air is entering the system from below. But small plastic legs will not allow you to do this if the system unit is placed on the floor (carpet, carpet). Be sure to use a stand, or increase the length of the legs. This is an obvious flaw, considering that the power supply is located at the bottom of the case. All dust that accumulates on the floor is drawn into the system.
The Black case does not have a retaining baffle for fixing the power supply. It is simply screwed onto the body, as is done in cheap devices. This is also wrong. The PSU itself is not going anywhere, but the 120mm fan built into it will create vibration that can be audible (the power supply case can drum on the bottom of the case). Be sure to install rubber gaskets under the power supply unit.
System assembly
Assembly difficulties can arise only when installing the motherboard. For unknown reasons, the manufacturer chose to make a non-removable carrier platform for installing the baseboard. Although, of course, this is not for everybody. Some people like to mount in a case, others prefer to mount all components on a table. In any case, the Zalman Z9 must be connected to the main power system inside the case.

It should be noted that the device comes with a large set of screws and adapters for mounting. You should not be upset if you find an excess of consumables during the assembly process. The manufacturer simply provided the user with spare screws. True, as the owners of the case note in their reviews, the manufacturer saved on rubber gaskets. After all, the case and the computer components installed in it are made of metal. But in the end, this will not hurt to assemble and connect the Zalman Z9.
Finally
In general, the impressions of the body of the Korean giant Zalman are positive. Ease of assembly is excellent: all the necessary components are removed, nothing rumbles inside, there is no need to break out partitions, and the metal itself does not have a cutting edge. Sophisticated ventilation, using the laws of physics, perfectly drives fresh air throughout the system (although for this you need to install the case on a stand). The complete absence of noise in the system is achieved by controlling the fan speed, which is also very convenient. After analyzing the review carried out by the Zalman Z9 case, we can safely conclude that this is one of the few devices that is really made for the convenience of the user, and is not just another toy for beauty.
If you belong to the so-called caste of IT enthusiasts involved in overclocking, modding and hunting for the freshest and most powerful hardware, then Zalman needs no introduction for you. But today we will not talk about complicated coolers and accessories, but about a simple "box" for your computer's parts - computer case Zalman Z9 Mid-ATX form factor.
The product was originally designed for those who value high performance, high quality and a reasonable cost of the case. We decided to check if Zalman succeeded in making it happen.
As a veteran of the case and cooling market, Zalman is well aware of what the person who wants to build good computer... And the goal of the creators of the Z9 was a case that would combine rich functionality and a low price. Let's take a look at what the Zalman Z9 offers us ...
Zalman Z9 Specifications
|
Form Factor | ||
|
207 (W) x 464 (H) x 504 (D) mm |
||
|
Materials (edit) |
Plastic, steel |
|
|
Compatible with motherboards |
Standard ATX / m-ATX |
|
|
PSU compatibility |
Standard ATX / ATX12V |
|
|
Support for large graphics cards |
Full, 290 mm |
|
|
Number of PCI slots | ||
|
Drive bays and optical drives |
External 5.25 '' | |
|
Internal 3.5 '' | ||
|
External 3.5 '' | ||
|
Internal 2.5 '' | ||
|
Fans |
Frontal |
One space for 120mm / 140mm fan (120mm blue LED fan pre-installed) |
|
Space for two 120mm / 140mm fans |
||
|
Space for one 120mm / 140mm fan |
||
|
Space for one 120 mm fan (120 mm fan pre-installed) |
||
|
Space for two 120 mm fans |
||
|
Front panel with I / O ports |
Headphone jack, microphone jack, four USB port 2.0 |
|
|
Body color | ||
Exterior of the case
The appearance of the case is one of the most important factors influencing the choice of the buyer. If the case is perfect on the inside, but ugly on the outside, most people will simply ignore it and opt for a different product, albeit less functional, but more attractive.

In the photo above, you can see the front and left side of the Zalman Z9. The body looks quite stylish - it combines rigor, solidity and a kind of "sporty" element. The matte surface is painted black, in some places you can see glossy inserts that make the case even more attractive. Fortunately, the "glossy madness", kitsch and tastelessness inherent in some (even more expensive!) Similar products are completely absent here. The efforts made by Zalman to make the case look decent are quite noticeable.

The photo of the front part shows that all the requirements for cooling the interior of the case have been taken into account - pay attention to the unobtrusive letter “Z” formed in the lower part of a kind of “petals” that rise above the front panel, at the same time creating a pleasant asymmetry. On the upper part of the "facade" you can find a button for turning on the computer, just below there is an input-output panel with various ports and sockets.

Under it, if you look closely, you can easily distinguish three five-inch compartments, covered with mesh plugs, and a little lower - one 3.5 '' compartment. We will consider all these points in more detail a little later.

This is the back of the Zalman Z9 case. A pre-installed 120-mm fan is visible behind the ventilation holes, under which Zalman has prudently placed two holes covered with rubber rings - as you might guess, they will serve for the SVO pipes. Also here you can mark 7 seats for PCI cards and an empty hole for mounting the power supply, which is supposed to be placed on the bottom of the case.
Specifications
| Model name | Zalman Z9 NEO Plus |
| Type of shell | MidiTower |
| Dimensions (H × W × D), mm | 490 × 205 × 482 |
| Weight, kg | 6,7 |
| Side panel | Transparent matte plastic |
| Colour | Black |
| Material | Steel, ABS plastic |
| Standard cooling system | Front fans (blowing): 120 × 120 × 25 mm (Zalman ZA1225ASL model, 1200 rpm, 2 pcs.). Rear and top fans (exhaust): 120 × 120 × 25 mm (Zalman ZA1225CSL model, 1200 rpm, 3 pcs.) |
| Drive bays | 2 × 5.25 2 × 3.5 4 × 2.5 |
| Expansion slots, pcs. | 7 |
| Motherboard compatibility | 6.7 × 6.7 ( Mini ITX), 9.6 × 9.6 (Micro ATX), 12 × 9.6 (ATX) |
| I / O ports | USB 3.0 × 2, USB 2.0 × 2, HD Audio × 1 |
| Power supply support | Any PS2 compatible power supply |
| Maximum length of the power supply, mm | 200 |
| Maximum cooler height, mm | 160 |
| Maximum length of video cards, mm | 400 |
| Dust filters, pcs. | 2 (front and bottom) |
| Possibility of installing fans | Front Panel: 2 × 120 mm. Top panel: Rear panel: Base: Reverse side panel: |
| Possibility to install LSS radiators | Front Panel: from 120 mm to 240 mm; Top panel: Rear panel: Base: |
| Additionally (features) | - soundproofing of the front cover; - opportunities for cable management; - top and rear backlit fans |
| Manufacturer's warranty, years | 2 |
| Country of Origin | China |
| Minimum retail price, rub. | 4 160 |
⇡ Packaging and equipment
Zalman Z9 NEO Plus comes in a simple cardboard box with a schematic of the case on the front, the model name and a listing of its features at the bottom.

Packaging inside a cardboard box is also quite typical: two foam inserts fix the body, which is additionally sealed in a plastic bag.

The Zalman Z9 NEO Plus package includes five plastic ties, a set of screws and bushings, a speaker and a quick guide.

Everything is like any other budget case.
Country of manufacture of the case - China, warranty - 2 years. The Zalman Z9 NEO Plus cannot be called a novelty - it is an update of a model that has been released in one form or another since spring 2016. The predecessor of the Plus modification - the Z9 NEO - is available in most retail stores at a price of 3,500 rubles. That is, the most that neither is the middle class.
⇡ D design and dimensions
The Zalman Z9 NEO Plus looks pretty conservative. In its design there are no bright eye-catching details, lacquered surfaces or chrome inserts. Everything is very simple and even standard for MidiTower cases. However, see for yourself - perhaps you will have a different opinion.
|
|
|


The materials used in the case are 0.6mm steel and ABS plastic. The height of the Zalman Z9 NEO Plus is 490 mm, the length is 482 mm, and the width is 205 mm. The device weighs only 6.7 kilograms.
If you look at the case from the front, then its left panel is entirely made of matte transparent plastic and is fastened with four thumb screws, and the right panel is made of metal and is completely blank.

The slots on the top and left of it are more decorative, since no air flow through them is felt.
The solid front panel of the case has a barely noticeable textured pattern, reminiscent of a rough polish. It opens to reveal a metal dust filter, followed immediately by the fans. Where do they get the air from? Who knows where, but certainly not from the narrow side slots.
The top bezel can be removed to allow more airflow from the chassis from the top fans.

The lower dust filter can also be removed. True, it slides back, which, as you know, is inconvenient.

The body stands on four 23 mm high legs with oval rubber feet.

On top of the front panel of the Zalman Z9 NEO Plus there is a backlit power button, a Reset button, two USB 3.0 connectors and the same amount of USB 2.0 - all four are closed with rubber caps, as well as connectors for a microphone and headphones.

In general, the build quality of the case and the materials used in it are not bad, although the difference with higher-end products cannot be overlooked. But the price is different, of course.
⇡ Internal structure
The front panel of the case is hinged and held closed by magnets. A plastic grill and two 5.25-inch bay covers are visible underneath.

Two-millimeter sound insulation is glued to the door itself. There is practically no gap between the door and the ventilation grill.
The entire front panel is secured by plastic clips with latches. Removing it reveals a metal dust filter and disposable 5-inch bays.

The top panel is also held on the same plastic clips. Removing it, you can see a metal chassis with a frame on which two 120mm fans are mounted, oriented with the impellers for blowing.

Let's take a look at the Zalman Z9 NEO Plus without side panels.
|
|
|


The main working area of the enclosure looks spacious, any part is easy to access. Here you can place Mini ITX, Micro ATX and ATX motherboards. Large E-ATXs will also fit, but will block openings for cables that have to be routed in some other way. There is also a window in the pallet for installing or removing a processor cooler without removing the motherboard from the case.
At the front, in the upper part of the case, there are two bays for 5.25-inch devices.

Both baskets are removable, they can be easily dismantled from the body and, if desired, not returned back.
For 3.5-inch drives, the case also has two bays, this time with a removable plastic sled.

They can also accommodate 2.5-inch drives, and two more slots for drives this format is located on the vertical partition of the case.

Thus, the total number of 2.5-inch drives in the Zalman Z9 NEO Plus can reach four. Moreover, to install drives, you can use baskets in 5.25-inch bays, which can accommodate two 3.5-inch drives or two 2.5-inch drives.
The case is designed for the installation of power supplies up to 200 mm long. The power supply is fixed in a standard way- screws to the rear wall.

The power supply is fan-mounted downward to draw in fresh air through the built-in dust filter.
As for video cards, the length of the case can even accommodate 400 mm models, and the general configuration can be seen in the following diagram.

The number of slots for expansion cards in the case is standard - seven pieces. The slots are covered with mesh straps that are secured with plastic sheathed thumb screws.

At the end of the internal inspection of the Zalman Z9 NEO Plus, we note the presence of five holes for cable routing with rubber plugs, as well as a large number of ordinary holes and metal jumpers for laying cable ties.
⇡ Cooling system and equipment options
Zalman Z9 NEO Plus is equipped with five 120mm fans at once. Two fans are installed on the front wall and work for blowing into the case.

In turn, two more 120-mm fans are installed on the top wall of the case, and one on the back. This trio works by blowing out of the body.

Thus, the air flow pattern in the Zalman Z9 NEO Plus should be something like this.

True, we have certain doubts about the efficiency of the front fans due to their proximity to the blank front cover ...
All fans are based on sleeve bearings, and their speed is constant at 1200 rpm. The rear fans differ from the front ones in a transparent casing and impeller, as well as in the presence of backlighting.
|
|
|


No fan speed control is provided in the Zalman Z9 NEO Plus, and the fans are connected via a serial connection of five PATA-type connectors, which are then connected to the power supply.
We add that in this case, you can install liquid cooling systems with radiators up to 240 × 120 mm in size on the front or top wall, if the total thickness of the LSS does not exceed 55 mm.
⇡ Assembly
In principle, the assembly process of components in the Zalman Z9 NEO Plus does not differ from the assembly in other cases, and there are no unique features here as a class. 3.5-inch drives are installed in plastic baskets with rubber holders, and this is done without screws at all.

2.5-inch drives are installed on the enclosure partition or elsewhere. It remains only to place the power supply and connect everything with cables.
In the upper part, the case is still cramped, and if you install an LSS radiator with fans there, then the additional power cables will not be connected to the motherboard at all. However, for mid-range configurations, the Zalman Z9 NEO Plus may well fit. However, we even managed to accommodate such a supercooler as the Phanteks PH-TC14PE in it, although its height exceeds 160 mm for Zalman.

Of course, the transparent side cover rested against the supercooler fans, but, bending a little under the pressure of the screws, it still covered the system unit. The assembled and working Zalman Z9 NEO Plus looks quite modern and interesting, despite the most common shapes and simple materials.

During the day, and especially at night, the attention of guests and friends will certainly be attracted by the illumination of the fans, which are visible through the transparent side panel of the case.

⇡ Testing
We tested the efficiency of cooling the components in the Zalman Z9 NEO Plus system unit on a test configuration consisting of the following components:
- motherboard: (Intel X299 Express, LGA2066, BIOS 0802 dated 09/15/2017);
- processor: Intel Core i9-7900X 3.3-4.5 GHz (Skylake-X, 14 nm, U0, 10 × 1024 KB L2, 13.75 MB L3, TDP 140 W);
- CPU cooling system: (two Corsair AF140 Quiet Edition at 700-1080 rpm);
- thermal interface:;
- video card: (GV-N1080G1 GAMING-8GD) 8 GB 1696-1835 (1936) / 10008 MHz;
- RAM: DDR4 4 × 4 GB Corsair Vengeance LPX 2800 MHz (CMK16GX4M4A2800C16) (XMP 2800 MHz / 16-18-18-36_2T / 1.2 V or 3000 MHz / 16-18-18-36_2T / 1.35 V) ;
- system disk: Intel SSD 730 480 GB (SATA III, BIOS vL2010400);
- disk for programs and games: Western Digital VelociRaptor 300 GB (SATA II, 10,000 rpm, 16 MB, NCQ);
- archive disk: Samsung Ecogreen F4 HD204UI 2 TB (SATA II, 5400 rpm, 32 MB, NCQ);
- sound card: Auzen X-Fi HomeTheater HD;
- control and monitoring panel: Zalman ZM-MFC3;
- hulls:
- Zalman Z9 NEO Plus (five 120mm 1200 rpm fans);
- CHIEFTEC GP-01B-OP (three 120mm fans at 800 or 1200 rpm);
- Thermaltake Core X71 [five at 900 rpm];
- Power supplies:
- be quiet! Straight Power 10 500W CM (0.5 kW, 80 Plus Gold), 135mm fan;
- Corsair AX1500i Digital ATX (1.5 kW, 80 Plus Titanium), 140mm fan.
To increase the heat dissipation of the processor and increase the dependence of its cooling efficiency on case ventilation, we overclocked the CPU to 4.4 GHz with an increase in the voltage in the motherboard BIOS to 1.125 V (with LLC 4), and increased the RAM frequency to 2.933 GHz with a significant decrease main timings. The video card worked at its nominal frequencies without manually adjusting the speed of the cooling system fans.

Cooling efficiency testing was conducted under the management operating system Microsoft Windows 10 Pro using a complex load of simultaneous activity of three programs for about 30 minutes. The central processor and RAM were loaded with cyclic testing of the 7-Zip 17.01 beta x64 archiver benchmark, using all 20 processor threads, with a dictionary size of 32 MB. In turn, the video card was loaded 35 cycles of the Fire Strike Extreme stress test from the 3DMark package version 2.4.3819 64. Finally, one of the hottest 3.5-inch hard drives(Western Digital VelociRaptor) warmed up in Average Read Access mode from the disk test of the AIDA64 Extreme utility. Temperature readings were monitored using the HWiNFO64 v5.60-3280 and newer software.

The room temperature during the tests was monitored with an electronic thermometer and ranged from 22.8 to 23.1 degrees Celsius. We measured the noise level of the enclosures with an OKTAVA-110A electronic sound level meter fixed on a tripod at a distance of 70 cm from the system unit case. The lower limit of measurements of this sound level meter is 22.0 dBA.
We will compare the Zalman Z9 NEO Plus with the one we recently tested, as well as our reference Thermaltake Core X71. The hero of today's article was tested in two modes: standard form, that is, with the front bezel closed and the top bezel installed, as well as with the front bezel open and bezel removed.
First, let's take a look at the test results temperature regime components assembled in three cases of system units.

It is hardly surprising that in the standard operating mode - with the front panel closed and the upper frame installed - the Zalman Z9 NEO Plus takes the last places in three of the four controlled parameters. There is simply no place for air to enter the case, so Zalman with its five 120-mm fans loses to the same CHIEFTEC with three of the same fans. Moreover, if we compare these cases at the same fan speed, then in terms of the temperature of the graphics processor, Zalman yielded seven degrees Celsius at the peak of the load, in terms of heating the GPU of the video card - four degrees Celsius, and for the two remaining temperatures, two degrees Celsius.
To improve the efficiency of cooling components inside the Zalman Z9 NEO Plus, a simple action will help - just open the front door and at the same time remove the frame from the top of the case. This allows you to play at once four degrees Celsius in terms of CPU temperature, a couple of degrees on the video card and VRM circuits, and on the hard disk - as much as five degrees Celsius. Since the HDDs are installed immediately after the front lower fan, the opening of fresh air affects them the most, although the drives in our case heat up the least of all the components.
Now let's check the noise level of the Zalman Z9 NEO Plus.

Well, from five 120mm fans at 1200 rpm, installed inside a plastic and thin steel box without serious soundproofing, you could hardly expect anything else. More precisely, the Zalman Z9 NEO Plus is uncomfortable in terms of noise in normal operation and even more uncomfortable when the front door is opened.
⇡ Conclusion
The Zalman Z9 NEO Plus case is a typical representative of the mid-range MidiTower cases. It is compatible with the most popular segment of ATX motherboards and smaller motherboards, supports the installation of long video cards and not too high tower coolers, it can also be installed in enough drives and liquid cooling systems for such configurations. The case also has cable management and even front and bottom dust filters. Finally, the Z9 NEO Plus has a transparent sidewall and fan lighting with a pretense of modding.
But the Z9 NEO Plus also has problems, most often inherent in cases in this price range. Five 120mm fans without speed control make this model quite noisy. In addition, we noted shortcomings in the organization of air flows. However, in such cases, as a rule, top configurations are not assembled, and this Zalman will cope with components of the middle class without problems. However, we will not be mistaken if we say that any user would certainly like to have a case with a reserve for the future, and most certainly this case should not make noise. However, the final choice, as always, is yours.