The need to flash a smartphone arises in two cases: if it started to "glitch" (here we will include "stopped turning on") and if you have a desire to transform its functionality.
Types of firmware
There are several types of firmware:
- Official via computer. To install it, you need to connect your device to the computer, go from the computer to the official website of the company HTC Desire V, download the executable file, run it and "obey" the instructions.
- Official via phone. You will need free wifi... Go to the "Phone settings" menu and select "About phone" → "Phone update". The firmware will install automatically.
- Alternative. This is an unofficial version created by smart users. It offers a lot more options for HTC Desire V. Most likely you will choose it. Therefore, further we will focus on her.
Potential risks
Firmware for HTC Desire V is a serious matter that requires attention. Especially if you decide to flash Android using an alternative version.
There are a number of risks you should be aware of before you take care of your smartphone:
- Loss of warranty. Any unofficial updates to HTC Desire V will lead to service center no one will help you for free. Therefore, you take full responsibility for the phone's operation only on yourself.
- Aggravation of the situation. If you do something wrong or something goes wrong when installing the firmware, the smartphone may become a non-working device. This is a small chance - 3 cases out of 100, but it is possible.
Therefore, be prepared for anything. If you are not confident in your abilities, then do not rush to flash HTC Desire V yourself.

Preparing for the firmware process
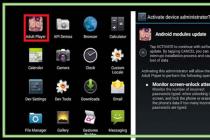
To begin with, you would like to get special Root rights... You can do this by downloading “Unrevoked” to your computer and installing the drivers.
- You need to turn off HTC Desire V and put it in HBOOT mode. To do this, hold down the combination of the "Power" and "Volume Down" buttons.
- Now you need to connect to your computer using a USB cable. HBOOT USB PLUG should appear.
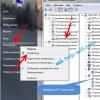
- Open "Device Manager" and right-click on the unidentified Android device 1.0. In the pop-up menu that appears, select Update Drivers.
- Now you need to click "Search for drivers on this computer" and select the folder where the unzipped drivers are located.
- We exit the HBOOT mode. To navigate through its items, use the "Volume Up" and "Volume Down" buttons, and the "Power" button replaces "Enter" - with its help you can select the desired menu item.
- Next, start HTC Desire V in standard mode and enable USB Build.
When installed on your device HTC Sync, you need to remove it, leaving the driver.
- Launch "Unrevoked" and connect your smartphone to your computer. Check the box "I agree with the terms" and wait while the program does its job. During this time, the android may be rebooted several times.

Main part
The HTC Desire V is now ready for flashing. Then follow the instructions below:
- Download the firmware you like. We recommend RuHD.
- Check if everything is ready:
- you have Root rights;
- the firmware file has been downloaded and placed on the memory card;
- important data has been saved to a backup medium;
- everything is in order with the yusb cable;
- the smartphone is 70-100% charged.
To avoid mismatching firmware modules, clear all data on HTC Desire V (full wipe). To do this, go to "Phone Settings", select "Privacy" and "Reset Data".
You can also do this through Recovery. Go to Recovery and select "wipe data / factory reset" → "Yes".
- If you have already entered the Recovery, then select the command “install zip from sd-card”. If not, launch it and click the desired item.
- Enable or disable (if required) verification of the signature (Clockwork) - item "toggle verification mode".
- Find the zip firmware. Start it up. Whatever is required in the instructions for the firmware, be sure to follow all the steps. Their order cannot be changed.
The correctness of the actions can be checked at this stage. The installation should start, and the screen will display the text. At the end of the installation, the message “Installation completed” should appear.
- Now you need to restart HTC Desire V and wait for the download to start.
Standard firmware installation takes about 15-30 minutes. If you decide to flash your device for the first time, the installation may take longer.

Expanding memory for applications
With the correct steps described above, your smartphone should update the Android version to the latest.
However, after these manipulations, no more than 18 MB of free space will remain in the phone's memory, which is needed to install peripheral applications.
To increase this figure to 512 MB, you need to create an additional partition on the memory card. This can be done in many ways. There are only a few of the most reliable ones.
The data on the memory card will be deleted! Do not forget to transfer them to another storage medium.
Method 1 - via smartphone
Download from Market special program"ROM Manager". Run it and find the item "Create partitions on the SD card". Select the size of the ext partition. If necessary, also select a size for the swap partition. HTC Desire V will reboot and create the partition.
Method 2 - through a computer
Download and install any of the hard disk partitioning programs. Delete all partitions from the memory card and create the following (do not change the sequence):
- main partition (FAT32 file system);
- if needed - swap partition (SWAP);
- ext partition with 512 MB (file system Ext 3 or Ext 4).
Finally
With the correct flashing, your HTC Desire V should start performing better, use less battery power, and gain a few more useful features.
If you do something wrong, try to "reanimate" your smartphone yourself. We will tell you how to do this in the article. Sometimes it is worth contacting a service center for help.
Instructions
Before flashing, download latest version software available for HTC Sensation. To download, you can use the resources dedicated to working with the software for this phone... After downloading a suitable archive with firmware, unpack it using an archiving program into a separate folder on your computer.
Download the Android SDK from the official Android website. Install the resulting software package using the installer. If your computer does not have HTC program Sync, install it, because along with it comes a package of all required drivers for flashing.
Put your phone into Fastboot mode. To do this, turn off your HTC and then remove battery and reinsert it into the machine. Turn on your smartphone by simultaneously holding down the power button and the side volume down key. Wait for the boot options selection menu to appear. From the options offered, select Fastboot using the volume buttons. Confirm your choice by clicking on top button nutrition.
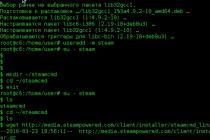
Connect your smartphone to your computer and wait for unpacking required drivers... Run the adb.exe program, which you can find in the folder with the program for Android control("Start" - "Computer" - "Local drive C:" - Program Files- Android - SDK - WindowsPlatform - Tools - ADB). You must launch adb.exe by right-clicking on the file and selecting the "Run in command line».
Type fastboot oem get_identifier_token prompt and press Enter. Copy the key obtained as a result of the operation on the HTC official website in the device unlock section, to access which you will need to go through the registration procedure by filling in the required fields. After going to Step 10, paste the copied code from the command line into the appropriate section and click Submit.
An unlock code will be sent to your phone in the unlock_code.bin format. Download this file and place it in the same directory as adb.exe. At the command prompt, enter fastboot flash unlocktoken unlock_code.bin. If the operation was performed correctly, you will see a corresponding message on the screen of your device. Select Yes.
fastboot flash recovery recovery.img
fastboot flash system system.img
fastboot flash boot boot.img
fastboot flash userdata data.img
fastboot reboot
After entering these commands, the device will be rebooted, and new firmware will be installed on the device.
Before flashing, save all your data on your computer, because they will be lost during the installation of new software. HTC Sync will help you save important data.
Sources:
- Android SDK
- HTC Sync
- how to reflash phone htc
HTC Sensation can automatically check and notify you when new operating system updates are available. Android systems... You can download updates via Wi-Fi or your carrier's packet data service.
Instructions
Establish an internet connection on your device. To do this, use a Wi-Fi hotspot or 3G connection. You will have to download a large amount of data, i.e. it is desirable that the traffic you receive is not charged.
When the Internet connection is on, if there are updates for your phone, you will see a corresponding notification on the screen. Confirm the installation of the software and wait for the updates to install.
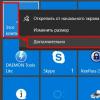
If the message does not appear, pay attention to the top line of screen notifications. Click on the icon that appears in the line and select the update to download. Follow the instructions on the screen to start downloading the software. After completing the operation, click on the "Install now" button, and then "OK".
Every smartphone owner wants to make his device better, turn it into a more functional and modern solution. If the user cannot do anything with the hardware, then everyone can easily improve the software. Htc one X is a high-end phone with excellent technical characteristics... How to reinstall or replace the system software on this device will be discussed in the article.
Considering the NTS One X from the point of view of the firmware capabilities, it should be noted that the device in every possible way "resists" interference in its software part... This state of affairs is due to the manufacturer's policy, therefore, before flashing, you should pay special attention to the study of concepts and instructions, and only after fully understanding the essence of the processes, proceed to direct manipulations with the device.
Every action carries a potential danger to the device! Responsibility for the results of manipulations with a smartphone lies entirely with the user who performs them!
As with other Android devices, the success of HTC One X's firmware procedures is largely determined by proper preparation. We carry out the following preparatory operations, and before carrying out actions with the device, we study the proposed instructions to the end, download the necessary files, prepare the tools that are supposed to be used.

Drivers
The easiest way to add components to the system for interaction of software tools with One X's memory partitions is to install HTC Sync Manager - the manufacturer's proprietary program for working with smartphones.


Backing up information
The use of the methods described below for installing the system software in the device in question assumes the erasure of user data contained in the smartphone. After installing the OS, you will have to restore the information, which is not feasible without a previously created backup. Official way save data next.


Necessary
For operations with partitions of HTC One X, in addition to drivers, you will need to have functional and convenient software tools in your PC as a whole. Be sure to download and unpack the package with and into the root of the C: drive. Below, in the description of the methods, we will not dwell on this issue, implying that Fastboot is present in the user's system.

Run in different modes
To install various system software, you will need to switch the phone to special operating modes - "BootLoader" and Recovery.


Unlocking the bootloader
The instructions for installing modified firmware below assume that the device's bootloader is unlocked. It is recommended to carry out the procedure in advance, but this is done using the official method proposed by HTC. And it also assumes that Sync Manager and Fastboot are installed on the user's computer and the phone is fully charged before doing the following.
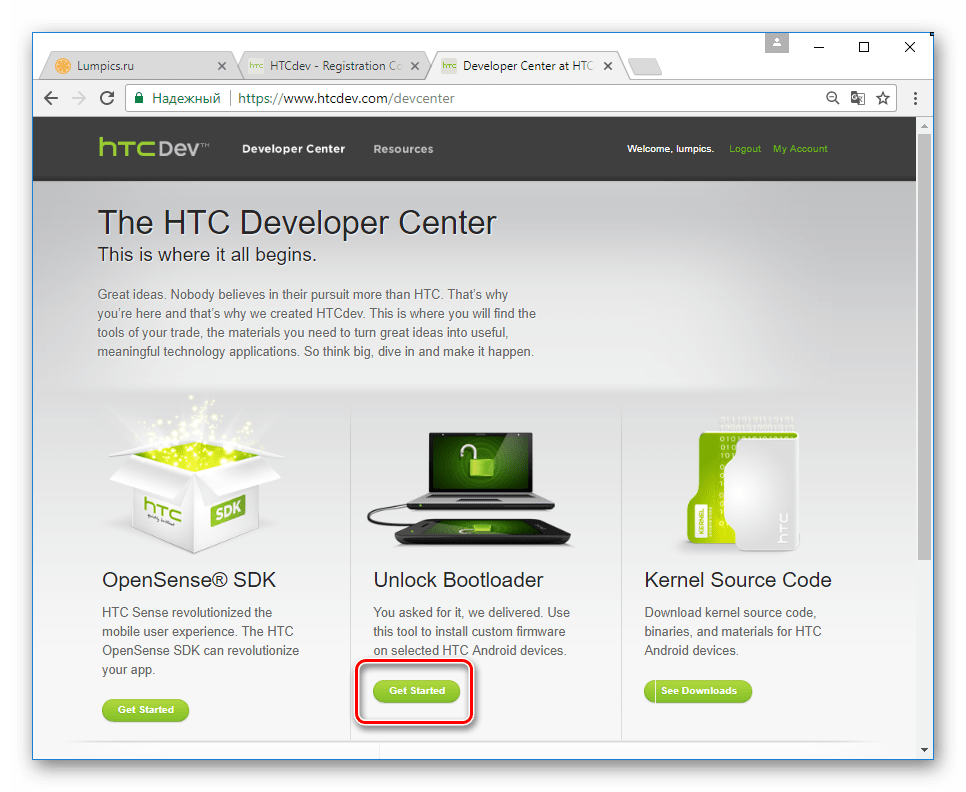
- Follow the link to the official site of the HTC Developer Center and press the button "Register".
- Fill in the form fields and press the green button "Register".
- Go to the mail, open the letter from the HTCDev team and click on the link to activate your account.
- After activating your account, enter your username and password in the appropriate fields on the HTC Developer Center web page and click "Login".
- In the area of "Unlock bootloader" click "Get Started".
- In the list "Supported Devices" you need to select all supported models and then use the button "Begin Unlock Bootloader" to proceed to further steps.
- We confirm the awareness of the potential danger of the procedure by clicking "Yes" in the request window.
- Next, set the marks in both checkboxes and press the button to go to the unlocking instructions.
- In the instruction that opens, skip all the steps.

and leaf through the instructions to the very end. We only need a field to insert the identifier.
- We put the phone into mode "Bootloader"... In the list of commands that opens, you need to select "FASTBOOT", then connect the device to the PC with a USB cable.
- Open the command line and write the following:
cd C: \ ADB_Fastboot

- The next step is to find out the value of the device ID required to obtain permission to unlock from the developer. To get the information, enter the following in the console:
fastboot oem get_identifier_token

and start executing the command by pressing "Enter".
- The resulting set of characters is selected using the arrow buttons on the keyboard or with the mouse,
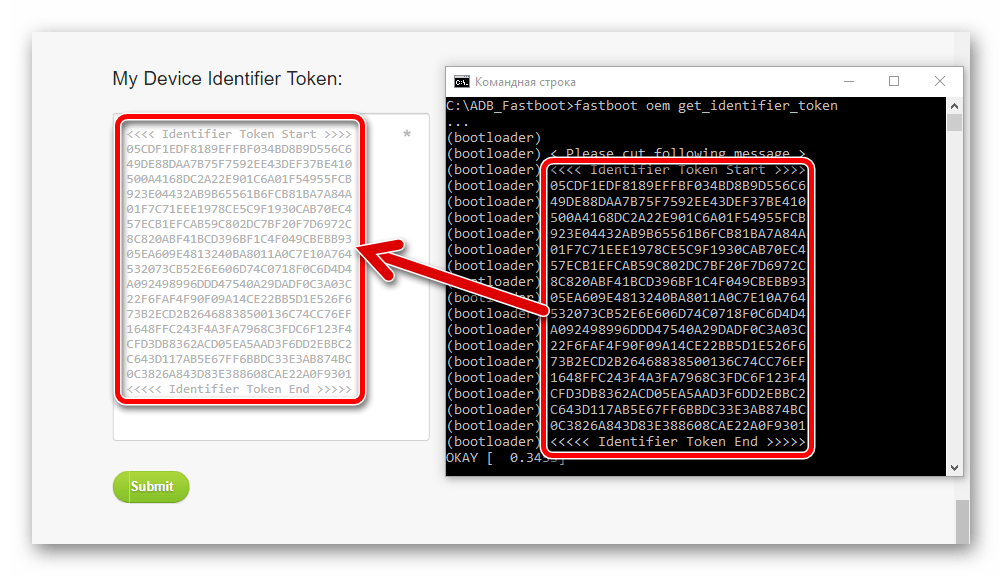
and copy the information (using the combination "Ctrl" + "WITH") into the appropriate field on the HTCDev web page. It should look like this:

To go to the next stage, press "Submit".
- If the above steps are completed successfully, we receive an email from HTCDev containing Unlock_code.bin – special file to transfer to the device. Download the file from the letter and place the downloaded file in the Fastboot directory.
- Send the command via the console:
fastboot flash unlocktoken Unlock_code.bin
- Executing the command above will lead to a prompt on the device screen: "Unlock bootloader?"... We set a mark near "Yes" and confirm the readiness to start the process using the button "Turning on" on the device.
- As a result, the procedure will continue and the Bootloader will be unlocked.
- Confirmation of successful unlocking is the inscription "*** UNLOCKED ***" at the top of the main mode screen "Bootloader".


Installing custom recovery
Any serious manipulation of the HTC One X system software will require a modified recovery environment (custom recovery). Provides a lot of opportunities for the model under consideration. Let's install one of the ported versions of this recovery environment into the machine.


Firmware
In order to bring certain improvements to the software part of the device in question, to upgrade the Android version to more or less relevant, as well as to diversify the functionality, you should resort to using unofficial firmware.
To install custom and ports, you will need a modified environment, which you can install according to the instructions above in the article, but first you can simply update the version of the official software.
Method 1: Android application "Software Updates"
The only way to work with the system software of a smartphone officially authorized by the manufacturer is to use the tool built into the official firmware. "Software Updates"... During life cycle device, that is, while system updates from the manufacturer were being released, this feature regularly reminded of itself with persistent notifications on the device screen.

To date, to update official version The OS will either be convinced of the relevance of the latter, it is necessary to do the following.


Method 2: Android 4.4.4 (MIUI)
Third-party software can breathe new life into your device. The choice of a modified solution lies entirely with the user, the available set of different packages for installation is quite wide. As an example, below we used the firmware ported by the MIUI Russia team for HTC One X, which is based on Android 4.4.4.

- We install the modified recovery in the manner described above in the preparatory procedures.
- Download the software package from the official website of the MIUI Russia team:
- Putting the zip package in internal memory apparatus.
- We load the phone in "Bootloader", further into "RECOVERY"... And we ALWAYS make a backup by selecting the corresponding items in CWM one by one.
- We do wipe (cleaning) of the main system partitions. To do this, you need the item "Wipe data / factory reset".
- Go to "Install zip" on the main screen of CWM, indicate to the system the path to the zip-package with the software, having previously selected "Choose zip from storage / sdcard" and start the installation of MIUI by clicking "Yes - Install ...".
- We are waiting for the appearance of an inscription confirming success - "Install from sd card complete", back to main screen Wednesday and choose "Advanced", and then reboot the device into the Bootloader.
- Unpack the firmware with an archiver and copy boot.img to the directory with Fastboot.
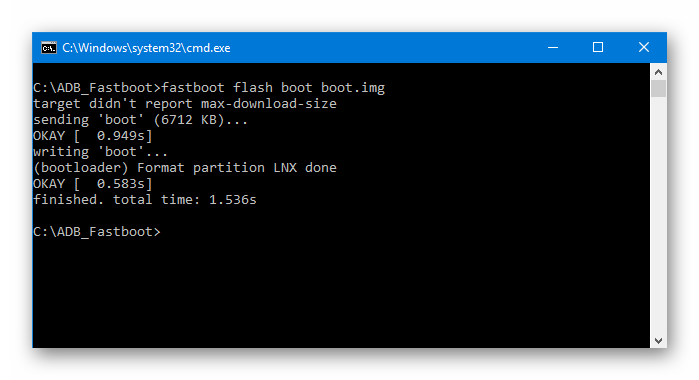
- We put the device into the mode "FASTBOOT" from the bootloader, we connect it to the PC, if disconnected. Run the Fastboot command line and flash the image boot.img:
fastboot flash boot boot.img
- Reboot into the updated Android using the item "REBOOT" on the menu "Bootloader".
- You will have to wait a bit for the initialization of the MIUI 7 components, and then carry out the initial setup of the system.

It should be noted that MIUI works very well on HTC One X.


Additionally. If the smartphone does not boot into Android, which makes it impossible to copy packages to memory for further installation, you can use OTG capabilities... That is, copy the package from the OS to a USB flash drive, connect it via an adapter to the device and, with further manipulations in the recovery, indicate the path to "OTG-Flash".


Method 3: Android 5.1 (CyanogenMod)
In the world of Android devices, there are not many smartphones that have been successfully performing their functions for more than 5 years and at the same time are popular with enthusiastic developers who successfully continue to create and port firmware based on new versions of Android.

Probably, the owners of HTC One X will be pleasantly surprised that a fully functional Android 5.1 can be installed in the device, but by doing the following, we get exactly the same result.
Step 1: Installing TWRP and new markup
Among other things, Android 5.1 carries the need to re-partition the device's memory, that is, to resize partitions to achieve better results in terms of stability and the ability to perform functions added by developers to the new version of the system. To carry out re-partitioning and install custom based on Android 5, you can only use a special version.


Step 2: Install custom
So, the new markup is already installed on the phone, you can proceed to install custom firmware with Android 5.1 as a basis. Install CyanogenMod 12.1 - an unofficial firmware port from the team that needs no introduction.


- "Platform" - "ARM";
- "Andriod" — "5.1";
- "Variant" - "Nano".
To start downloading, click round button with an arrow pointing down.


Unpack the package cm-12.1-20160905-UNOFFICIAL-endeavoru.zip and move boot.img from it to the directory with Fastboot.

Fastboot flash boot boot.img
Then we clear the cache by sending the command:
fastboot erase cache


and enjoy our work new version Android modified for the smartphone in question.

Method 4: Official firmware
If there is a desire or need to return to the official firmware from HTC after installing the custom, you need to turn again to the capabilities of the modified recovery and Fastboot.

- Download the TWRP version for the "old markup" and place the image in the Fastboot folder.
- Download the package with the official firmware. The link below is for the OS version 4.18.401.3 for the European region.
- Downloading an image of the HTC factory recovery environment.
- Unpack the archive with the official firmware and copy boot.img from the resulting directory to the folder with Fastboot.

We put the file there. recovery_4.18.401.3.img.img containing stock recovery.
- Flashing boot.img from official firmware via Fastboot.
fastboot flash boot boot.img - Next, install TWRP for the old markup.
fastboot flash recovery twrp2810.img
- Disconnect the device from the PC and reboot into the modified recovery environment. Then we go the following way. "Wipe" - "Advanced Wipe"- mark the section "Sdcard" - "Repair or Change File System» ... Confirming the start of the change process file system button "Change File System".
- Then we press the button "FAT" and move the switch "Swipe to Change", and then we wait for the formatting to finish and return to the main TWRP screen using the button "Home".
- Selecting an item "Mount", and on the next screen - "Enable MTP".
- The mounting made in the previous step will allow the smartphone to be defined in the system as a removable storage device. We connect One X to the USB port and copy the zip package with the official firmware to the internal memory of the device.
- After copying the package, click "Disable MTP" and return to the main recovery screen.
- We clean up all sections except "Sdcard", going through the points: "Wipe" - "Advanced Wipe"- selection of sections - "Swipe to Wipe".
- Everything is ready to install the official firmware. We choose "Install", indicate the path to the package and start the installation by sliding the switch "Swipe to Confirm Flash".
- Button "Reboot System", which will appear at the end of the firmware, will reboot the smartphone into the official version of the OS, you just need to wait for the latter to initialize.
- If desired, you can restore the factory recovery with the standard Fastboot command:
fastboot flash recovery recovery_4.18.401.3.img
And also block the bootloader:
fastboot oem lock
- Thus, we get a completely reinstalled official version of the software from HTC.


In conclusion, I would like to reiterate the importance of scrupulously following the instructions when installing the system software on HTC One X. Run the firmware carefully, evaluating each step before taking it, and the desired result is guaranteed!