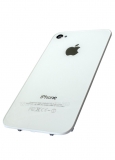
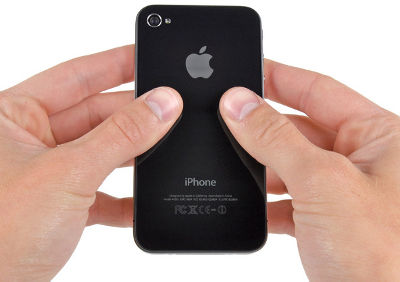
Many Apple technology owners need to replace the display on the iPhone 4S. To Moscow service centers for repair mobile phones this problem is often addressed. This is due to the fact that the sensor and display module are the most vulnerable parts of a smartphone.
When you need to change the iPhone display
Repair or replacement of the touch screen on the iPhone 4S is required in the following cases:
- the phone screen is broken, it has numerous cracks, chips, scratches
- the touchscreen spontaneously works
- display flickers
- stripes and squares appeared on the screen
- sensor does not work
- backlight does not turn on
Causes of LCD display malfunction on iPhone 4c
The most common reason for the appearance of problems with the display module is inaccurate handling of the gadget (hitting a hard surface, falling from a height and other mechanical damage). Also, a malfunction may appear due to any internal breakdowns. You can understand exactly what caused the problem in the front cable after disassembling the mobile device.
How is touch glass and backlight repair carried out?
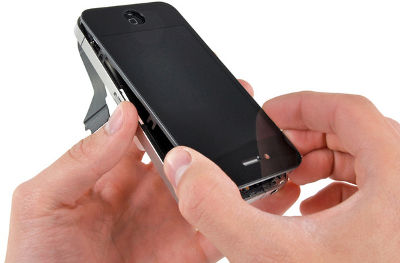
Only a professional can correctly fix a cracked screen of any model of a smartphone from Apple. A service center specialist will carefully disassemble the device - without this, competent repair work is impossible.
After preliminary diagnostics, the master will repair iPhone display 4S. The specialist knows the exact sequence of actions when changing broken glass and smartphone backlighting.
First, the fastening bolts in the lower loop are unscrewed. This is done in order to remove back cover.
After dismantling the rear panel, the front and bottom cables are separated from the case, the frame is released. Then the following parts are disconnected:
- camera
- motherboard
- charging connector
- speaker
Only after partial disassembly of the smartphone, the cracked display is removed from the case and a new one is installed in its place. Next, the device is assembled in the reverse order.
It is very important that an original Apple part is installed instead of the broken display. This will ensure long-term and productive operation of the device.
How long does it take to replace the LCD display on an iPhone 4s?
Specialists of Moscow service centers for servicing mobile phones change broken and broken displays for several hours. If the masters receive a lot of orders, smartphones are under repair for 10-14 days.
It is better to order an on-site replacement of the sensor. A technician can change the display on an iPhone 4S at home in less than an hour and a half.
Where to find a good phone repair specialist in Moscow with a visit to your home?
If you're looking for an inexpensive, home-made iPhone 4S display replacement, order it from YouDo. On the site you will quickly find the addresses of representatives of the best service centers in Moscow.
Benefits of ordering the services of our performers
The specialists registered on the site are successfully engaged in the repair of any phone models. They will efficiently replace any part of the smartphone.
It is very convenient to order the services of Yuda performers. You do not need to look for the nearest service center and wait for the smartphone display to be repaired. The selected specialist will come to you himself.
Our contractors carry out a free visit to carry out diagnostics and repair work. The iPhone screen replacement will be performed by the wizard very quickly, if you want - in your presence.
With a free device diagnosis, a specialist will tell you how much it will cost to repair the display. Not only the screen will be examined, but also other components to detect hidden defects.
The craftsmen offering services on YouDo use only reliable equipment and original spare parts when performing repairs. Using professional tools, they efficiently eliminate damage to displays caused by falling from a height or hitting a heavy object on mobile device... The price of spare parts is included in the cost of repairs.
How much does it cost to replace the iPhone 4c display?
Performers offer Yuda the cheapest iPhone 4S screen replacement in Moscow - the price for the repair is set by the customer. The cost of the master's work is influenced by:
- phone model
- repair time
- the complexity of the fault
Set your price based on the average cost of repairing an iPhone display in Moscow (indicated in the price list on the YouDo website). You can also discuss with the performers who responded how much it costs to replace the display on the iPhone 4S.
Today's article is to help those who want to repair the iPhone on their own, on their own. Experts from the MacPlus service center will show you how to independently replace the touchscreen using the example of the iPhone 4S. After reading this article, you can save a lot on repairing your pet.
So what do we need for this?
1 Pentalobe screwdriver for iPhone. 2 Small Phillips screwdriver 3 Slim flat screwdriver 4 Plastic spatula 5 Accuracy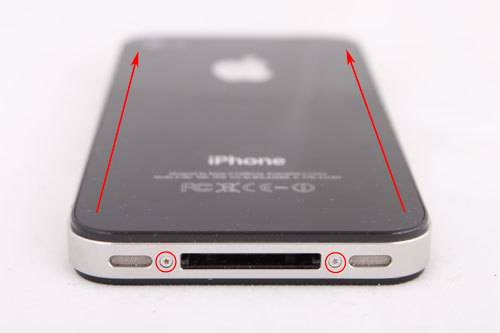 Take an iPhone, a Pentalobe screwdriver, unscrew the two bottom screws, slide the cover up and remove it.
  The first step is to disconnect the battery, so we unscrew the two battery protection screws, remove it.
 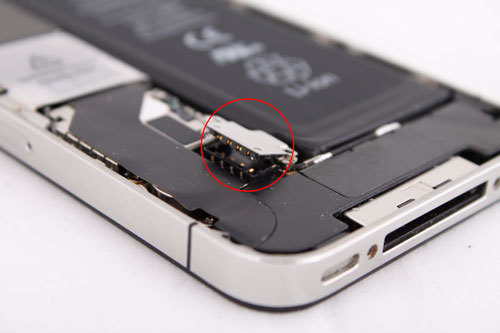 Disconnect the battery cable from the motherboard
 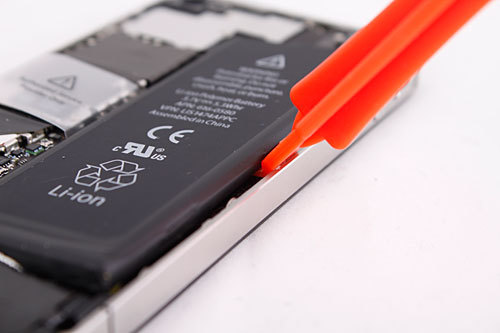 From the side of the case, we pick up the battery with a spatula, carefully peel it off the case and remove the battery. If this is your first time taking apart your iPhone, you will notice that the battery is quite firmly glued to the body. It's okay, walk around the entire perimeter with a spatula, put in a little more effort, but just don't overdo it!
 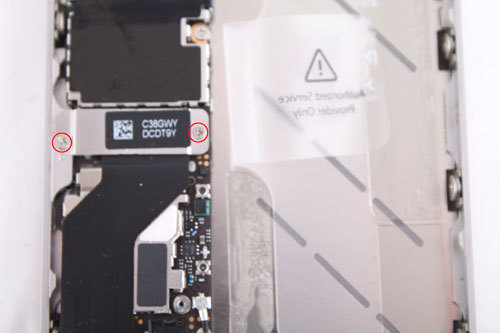 We unscrew the two screws to protect the power cable.
 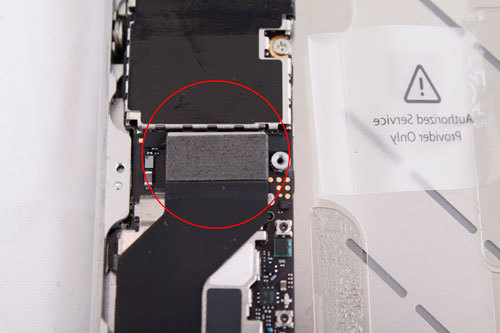 Disconnect the power cable, peel it off the case, and bend it back to the left so as not to interfere in the future.
 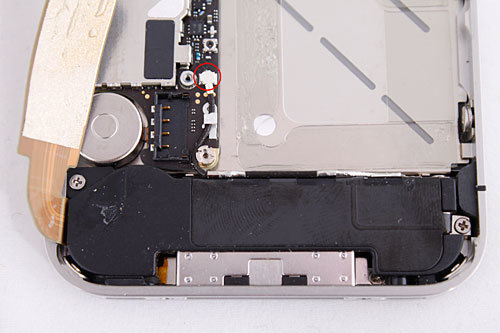 Disconnect the antenna cable from the motherboard.
 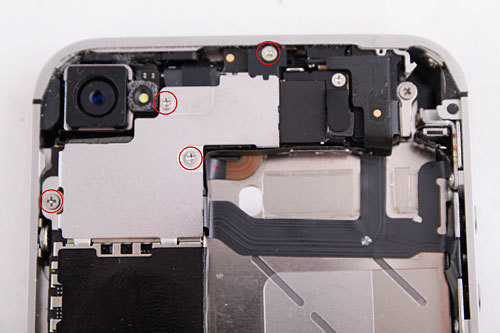 Unscrew the 4 screws for protecting the loops on the motherboard, remove the protection.
 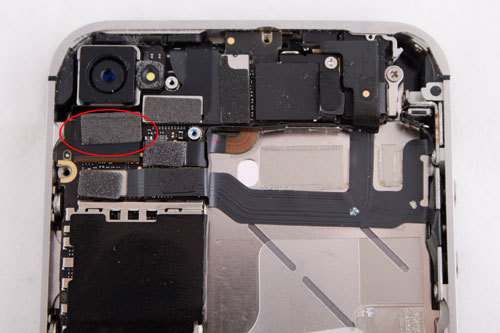 Disconnect the camera from the motherboard and remove it.
 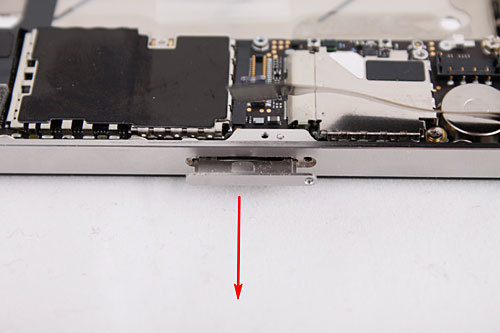 We remove the SIM card tray. If this is not done, then the motherboard will be impossible to remove.
 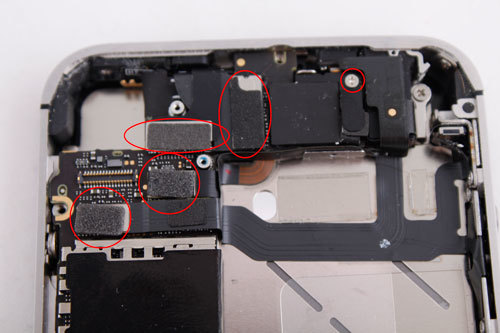 Disconnect the cables from the motherboard, unscrew the antenna cable protection screw.
 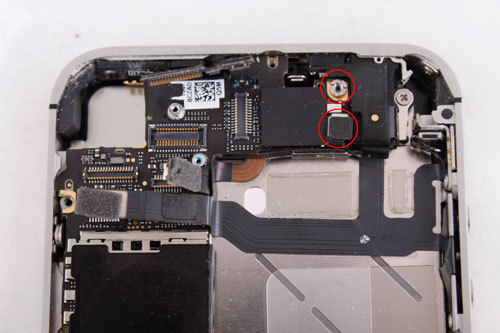 Disconnect the wi-fi antenna cable, and use a flat screwdriver to unscrew the screw a little higher.
 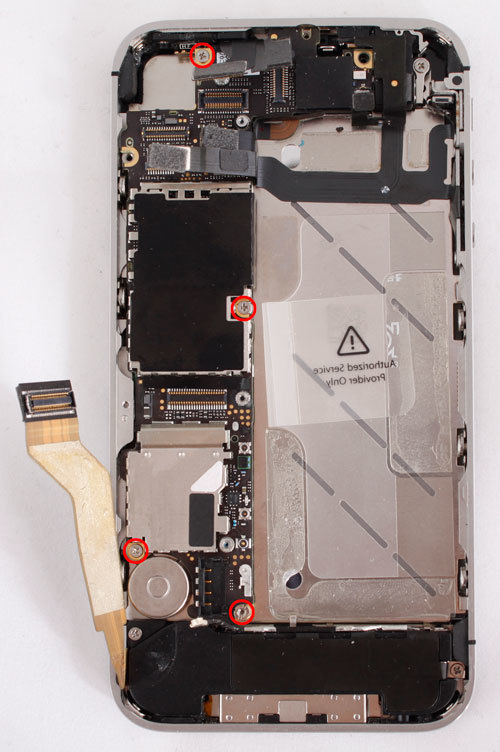 We unscrew the 4 screws of the motherboard.
 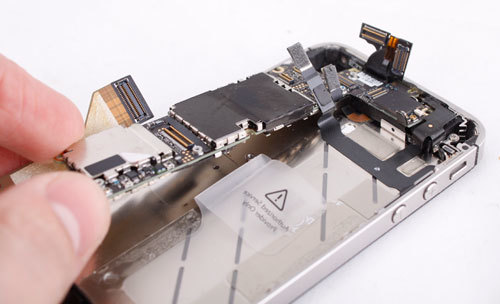 We remove the motherboard.
 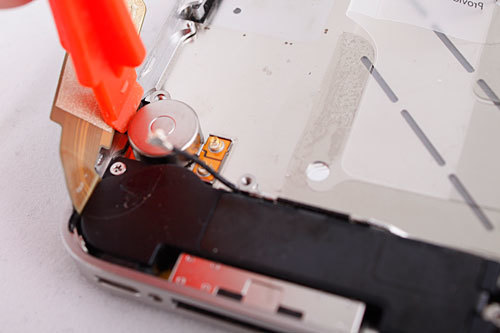 Use a spatula to pry on the vibration motor, peel it off the body and remove it.
 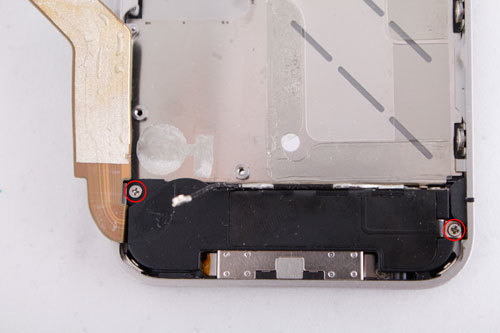 We unscrew the two screws from the speakers. Don't lose the black plastic that is under the left screw.
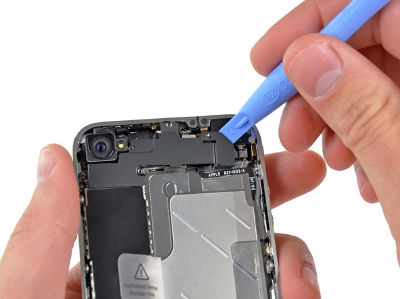
 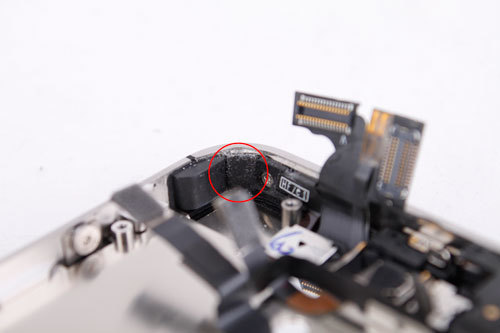 In the left upper corner peel off the tape, under it is the screw that holds the touchscreen.
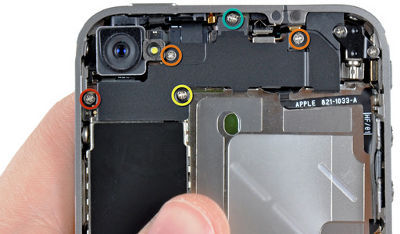
 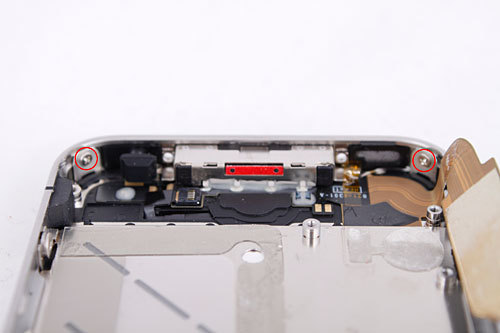 Unscrew 4 screws in the corners, two of the lower corners ...
 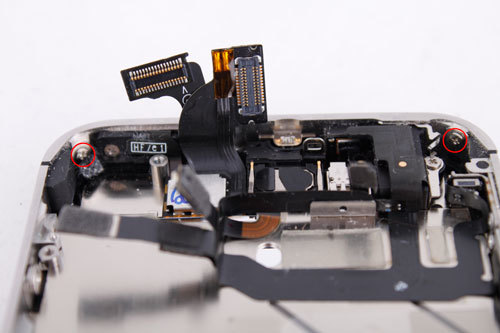 ... two of the top ones.
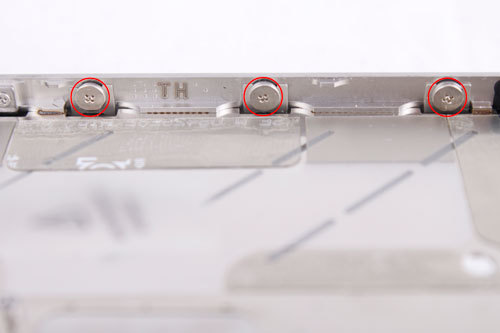
 Unscrew three screws on each side. They do not have to be completely unscrewed as they simply hold the touchscreen.
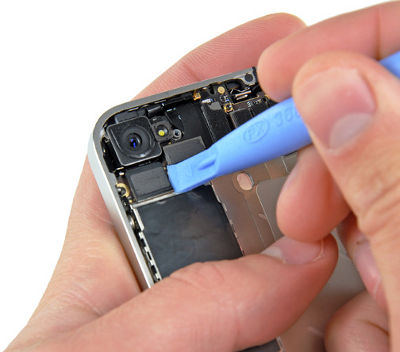
 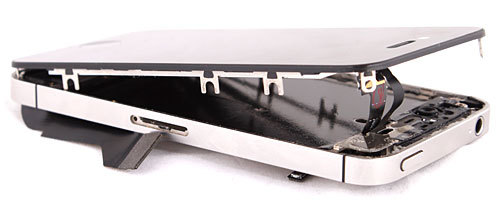 Pry off the touchscreen with a spatula and lift it up. Be careful with the touchscreen loops, they can catch on and get damaged.
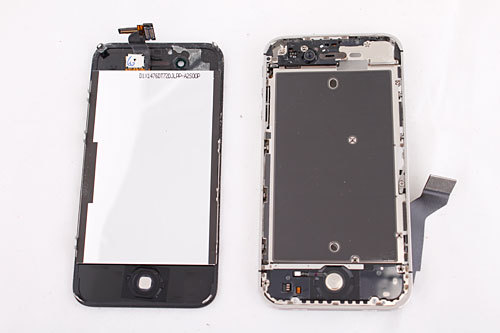
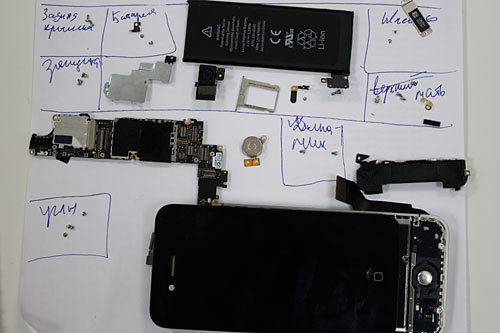 That's all, the touchscreen has been successfully removed, now put a new one and repeat all the steps in the reverse order. When assembling, pay special attention to the cables of the matrix and the touchscreen, make sure that they are fully pushed into the slot and do not bend when you press the touchscreen against the body. To make it easier to assemble, I recommend drawing a diagram, as in last photo... If you have any difficulties, our technicians can replace the iPhone 4s glass for you. Vadim NefedovHow to replace the iPhone 4 and iPhone 4S screen yourself 0
 Today's article is to help those who want to repair the iPhone on their own, on their own. Experts from the MacPlus service center will show you how to independently replace the touchscreen using the example of the iPhone 4S. After reading this article, you can save a lot on repairing your pet. So what do we need for this? 1 Pentalobe screwdriver for iPhone 2 Small Phillips screwdriver 3 Thin flat screwdriver 4 Plastic spatula 5 Accuracy Take the iPhone, the Pentalobe screwdriver, unscrew the two bottom screws, slide the cover up and remove it. The first step is to disconnect the battery, so unscrew two screws to protect the battery, remove it. Disconnect the battery cable from the motherboard From the side of the case, we pick up the battery with a spatula, carefully peel it off the case and remove the battery. If this is your first time taking apart your iPhone, you will notice that the battery is quite firmly glued to the body. It's okay, walk around the entire perimeter with a spatula, make a little more effort, but just don't overdo it! Unscrew the two screws to protect the power cable. Disconnect the power cable, peel it off the case, bend it to the left so as not to interfere in the future. Disconnect the antenna cable from the motherboard. .Unscrew the 4 screws to protect the loops on the motherboard, remove the protection. Disconnect the camera from the motherboard and remove it. Remove the SIM card tray. If this is not done, then the motherboard will be impossible to remove. Disconnect the cables from the motherboard, unscrew the antenna cable protection screw. Disconnect the wi-fi antenna cable, and unscrew the screw a little higher with a flat screwdriver. Unscrew the 4 screws of the motherboard. Remove the motherboard, pry on the vibration motor with a spatula, peel it off the case and remove it. Unscrew the two screws from the speakers. Do not lose the black plastic that is under the left screw. In the upper left corner, peel off the tape, under it is the screw that holds the touchscreen. Unscrew 4 screws in the corners, two from the bottom corners ... ... two from the top. On the sides, unscrew three screws. It is not necessary to unscrew them completely, as they just hold the touchscreen. We pry the touchscreen with a spatula and lift it up. Be careful with the touchscreen loops, they can catch and get damaged. That's all, the touchscreen has been successfully removed, now put a new one and repeat all the steps in reverse order. When assembling, pay special attention to the cables of the matrix and the touchscreen, make sure that they are fully pushed into the slot and do not bend when you press the touchscreen against the body. To make it easier to assemble, I recommend drawing a diagram like in the last photo. If you have any difficulties, our technicians can replace the iPhone 4s glass for you.
Works with the hardware of the iPhone 4
| Type of work | Departure Cost, rub. |
In the office Cost, rub. |
|---|---|---|
IPhone 4 touchscreen glass replacement Glass Touch Screen with LCD Assembly iPhone 4 blackGlass Touch Screen with LCD assembly iPhone 4 whiteThis part is required if the glass is broken or the display does not work. The price of the original part is 1000 rubles |
3000 | 690 |
LCD Display (Screen) Replacement LCD display with Touch Screen glass assembly iPhone 4 blackLCD display with Touch Screen glass assembly iPhone 4 whiteThis part is required if the display does not work or the glass is broken. The price of the original part is 1000 rubles. |
3000 | 690 |
| Rear cover replacement
Back Glass Cover Original iPhone 4 Black
Back Glass Cover Original iPhone 4 WhiteThis part is required if the back cover is broken. Part price 300 rubles |
3000 | 500 |
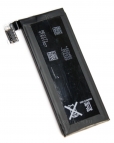
| IPhone 4 Battery Replacement
IPhone 4 Battery 1420mAh (Original)Needs to be replaced if the phone runs out of power quickly. Part price 400 rubles |
1500 | 500 |
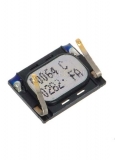
Speaker replacement (hearing speaker) Speaker Replacement for iPhone 4 OriginalIt is necessary to replace if the speaker (sound) on the iphone does not work Part price 1100 rubles |
2700 | 690 |
| Ringer replacement (external speaker)
Hearing speaker for iPhone 4 OriginalIt is necessary to replace if you do not hear your interlocutor Price of a part 590 rubles |
2300 | 500 |
Replacing the microphone IPhone 4 Microphone Replacement OriginalIf the microphone in the iPhone does not work, then you hear your partner, but he does not hear you. The price of a part is 550 rubles |
3000 | 790 |
Replacing the power button, volume and vibration mode Replacing the volume and vibration buttons OriginalThe button is used to control the volume level, switch to silent mode Part price 250 rubles |
3000 | 500 |
| Recovery after moisture ingress
Recovering from moisture in iPhone 4If iPhone 4 falls into water, problems can affect every part, both one and several at the same time. Unlike impact, the result of contact with water can appear much later. |
from 900 | 500 |
Replacing the camera IPhone 4 Camera Module Replacement OriginalRequired if photo / video filming does not work Part price 750 rubles |
2200 | 590 |
Replacing the vibration motor IPhone 4 Vibration Motor Replacement OriginalVibration mode not working on the IPhone 4? Replacing the vibration motor will solve the problem. Part price 800 rubles |
2200 | 500 |
| Replacing the HOME cable | 590 | |
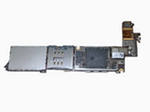
| Replacing the system board
IPhone 4 System Board Replacement OriginalIt is very difficult to find it, since this part is not produced, then it can be transferred only from another iPhone 4 Prices on the black market range from 5t to 15t |
2400 | 500 |
Replacing the charging connector Charge connector OriginalCharge connector cable and microphone iPhone 4 Part price 400 rubles |
3000 | 780 |
Repair of the Wi-Fi / GSM / Bluetouth module Wi-Fi antenna iPhone 4Required to change if iPhone does not catch Wi-Fi networks The price of the original part is 650 rubles |
- | 990 |

A full range of services for the repair and maintenance of fourth-generation iPhones
If something happened to a stylish gadget, and it stops working or periodically bugs, our service center will help to eliminate any malfunction of software or hardware origin.
You can bring the device to us at any convenient time from 11:00 to 22:00, we work without interruption. But even if the gadget is required urgently, you can call a wizard at any time of the day, who will fix the malfunction on the road.
If you want to become our regular customer, issue a special coupon and get a 15% discount. Accurate diagnostics will help determine the malfunction, estimate the cost of work and the duration of the repair. If you limit yourself to it, you will have to pay 500 rubles, however, having decided to fix the malfunction with us, you will not have to pay for diagnostic services. We will provide them absolutely free!
Troubleshooting software problems
Working with the gadget software is the most important area of the technical center's activity. Our technicians will update the firmware either software while retaining all the necessary data. We also suggest installing new programs and applications for your iPhone.
Depending on your needs, you can choose the most suitable applications - the driver may be interested in maps of the area, gamers - in games, and business people may be interested in all kinds of business planners. Even if you do not know which program you want to install, our specialists will offer several solutions, of which you will only have to choose the most suitable one. And if the client has not fully figured out how to use the device? We will teach him how to use the basic functions.
If you got a real American Apple, you may not want to use it on English language... Unfortunately, the manufacturer does not install the Russian-language menu in all devices. How to be in this situation? Just deliver the fashionable gadget to us, and we will perform its Russification. The translation was carried out by professional translators, and the programmers helped them adapt the program to the device.
No digital device is immune to system failure. If a similar trouble happened to your Apple and you want to restore it, just contact us. Our experts will help you recover lost data and restore optimal settings. We specialize in product repair Apple, therefore, we know perfectly the features of its software and hardware.
If the part is out of order
If for some reason the touch glass is broken or scratched, we will help you replace it. Most often this happens due to mechanical damage. We always have a stock of the most popular parts, so you don't have to wait for the delivery of spare parts - our specialists will immediately carry out repair work.
However, mechanical damage is terrible not only to the sensor and display, but to the back cover, volume buttons and charging connector. If you want a fashionable gadget to regain its original appearance and lost functionality, we will help you with this.
It is much more difficult to restore the functionality of the motherboard if liquid gets on its surface. In view of such an incident, the device may even stop turning on. If this happened with your device, do not worry - this is a fixable business. All that is required of you is to deliver the gadget to our technical center and shift the care of its restoration onto the shoulders of qualified specialists. The repair costs are reasonable and much less than the price of a new smartphone.
Whatever problem your device has - a system failure, a hardware failure, or you just want to clean it from dust, just contact us. Qualified specialists at a high professional level will carry out restoration work and return the device to its lost working capacity. Contact us! We solve any problems with the fourth generation iPhones!
Parts for replacing the screen on the iPhone 4 are always in stock, we have different suppliers and the cost for the same part differs depending on the quality of the part.
. Replacing the display module will give you new glass, touch screen and lcd display. The LCD screen is glued to the glass at the factory and it is very difficult to separate them without damage. After a successful replacing the display module in the iPhone 4, we recommend that you protect your new display from scratches, you must install protective film.
IPhone 4 disassembly tools
- Plastic Opening Tools
- Small flat screwdriver
- Spudger
- iPhone 4 5-point Pentalobe screwdriver if iPhone has external pentalobe screws
- iPhone SIM card eject tool or paper clip
Step 1 - iPhone 4 back panel
IPhone 4 back cover can have either 2 # 000 Phillips screws or Apple 5-Point "Pentalobe" screws. Check which screws your model has and make sure you also have the correct screwdriver to remove them.
Remove the two 3.6mm Pentalobe or Phillips # 000 screws next to the dock connector. During reassembly, we recommend that you replace the 5-sided screws similar to the Phillips screws.
Step 2 - remove the back panel
Press down on the back cover at the top of the iPhone 4 and slide it out 2mm.
Step 3 - Remove the back cover of the iPhone 4

Step 4 - iphone 4 battery
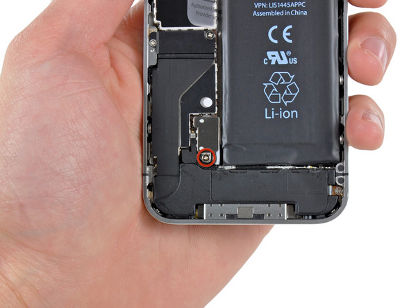
Remove the one 2.5mm Phillips screw that secures the battery connector to the board. Some models may have 2 screws, one of which holds the contact pad located above the screw.
Step 5 - metal connector
Use iPod opening tool to remove the battery connector by hooking it closer to the top and bottom edges of the iPhone 4. Be very careful to lift the metal connector, not the black connector on the motherboard. If you try to lift the board connector, you could break the connector completely.
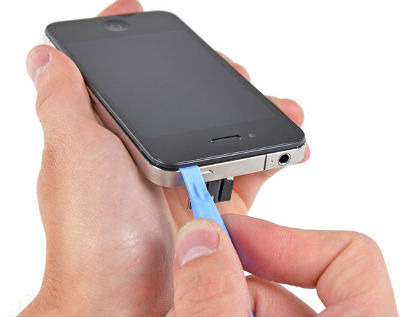
Step 6 - Remove the battery from the iphone 4
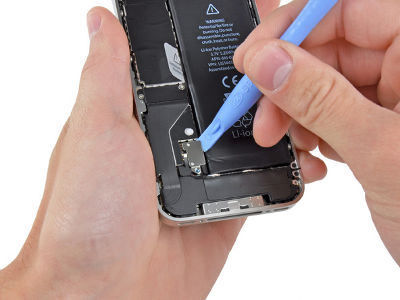
Pull the clear plastic tab to pull out iPhone battery... Be careful when removing the battery with the plastic tab. In some models, Apple uses a lot of glue, which makes it nearly impossible to pull the battery out in this way, and hence the plastic tab can be torn off.
Use a plastic scribe to remove the batteries. To do this, pick up the battery on the right side, as there is no glue at all.
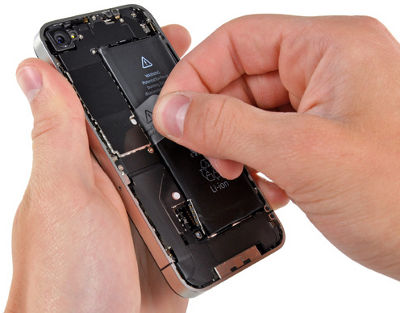
Remove the battery.
Before replacing or reinstalling the battery, make sure the contact pads (shown in red) are correctly positioned next to the battery.
Make sure all metal contact pads are clean before assembly, if not, use a special lubricant such as Windex (96% ethanol alcohol, and make sure the contacts are dry after wiping). Sebum on your fingers can interfere with the electrical conductivity of some contacts and cause interference.
Step 7 - Removing the SIM card from iphona 4
Using the tool for removing the SIM card or a paper clip to remove the sim card and its holder.
Step 8 - IPhone 4 Docking Station

Remove the following two screws:
- One 1.2mm Phillips
- One 1.6mm Phillips
Pull out the thin steel connector of the cable dock in the iPhone 4.
Be sure to clean the contact pads on the dock connector cable cover before reassembling.
Step 9 - dock cable connector
Gently lift the dock cable connector up from the system board.
Step 10 - docking station cable
Peel off carefully docking station and bottom speaker flex... Do not use excessive force to disconnect docking cable from the motherboard, you can easily break the cable.
Step 11 - antenna
Disconnect the bottom antenna connector up from its slot on the board.
Step 12 - securing the iPhone 4 system board
Unscrew the 1.9mm Phillips screw at the bottom that holds the motherboard to the case.
Step 13 - iPhone 4 Wi-Fi Antenna
Remove the following 5 screws securing the Wifi antenna to the board:
- One 2.3 mm Phillips
- Two 1.6 mm Phillips
- One 1.4mm Phillips
- One 4.8 mm Phillips
When assembling, start with a 4.8mm Philips screw and then a 2.3mm screw. This is done in order not to mix up the sequence, and to avoid damage to the LCD and touch screen... Also make sure the long 4.8mm Philips screw is installed back in the correct order. Since it is the basis for Wi-Fi antennas and is often the culprit bad Wi-Fi reception after assembly.
Step 14 - Pull out the Wi-Fi antenna
Lift the top edge of the Wi-Fi antenna slightly away from the system board.
Pull out Wi-Fi antenna with iPhone 4... Be careful not to lose the metal clips on the top cover and the 4.8mm screw. Their loss is the main reason bad Wifi signal after assembly.
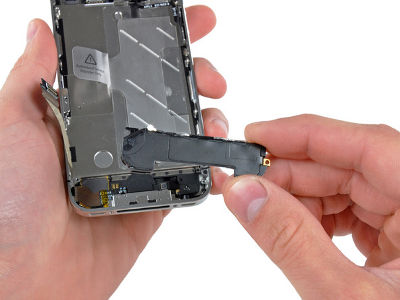
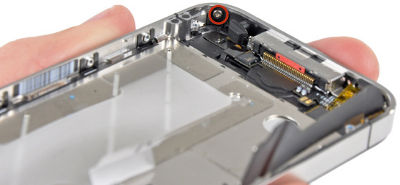
Step 15 - iPhone rear camera
Gently lift and pull rear camera from the slot on the board.
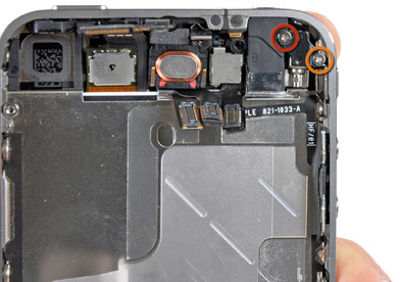
Step 16 - Warranty sticker and water ingress indicator
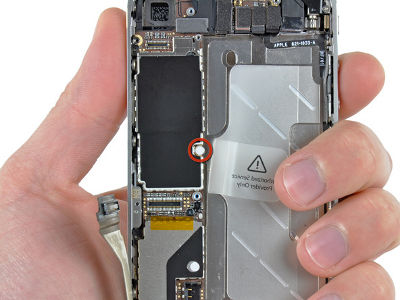
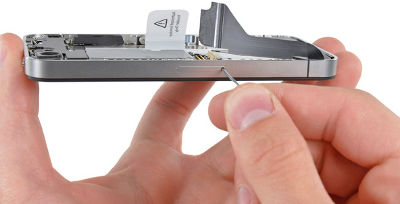
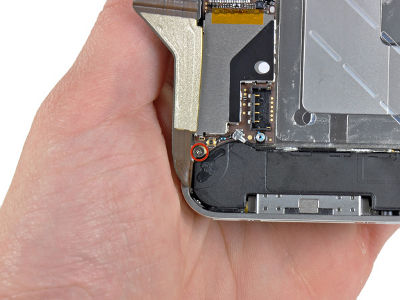
Remove the small round white sticker - this is warranty sticker and water ingress indicator the cover screw next to the battery tab. Remove the 2.4mm Phillips screw that was hidden under the sticker.
Step 17 - loops
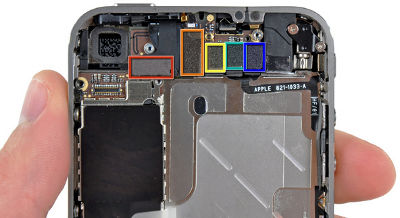
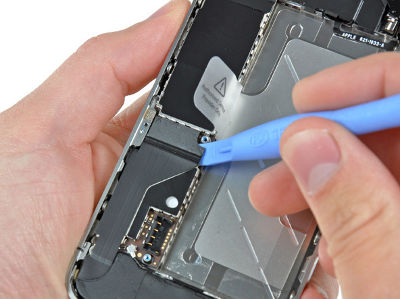
Use the edge of a plastic opening tool to gently pry the following connectors in and out of the eye sockets on the motherboard:
- touchscreen loop
- lcd screen flex
- headphone jack and cable volume buttons
- microphone
- front camera flex cable
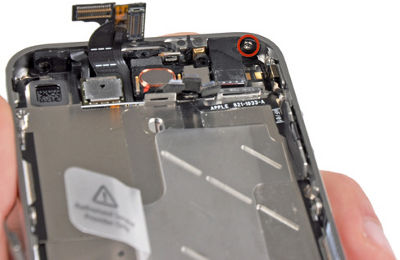
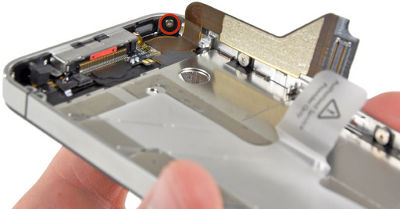
Step 18
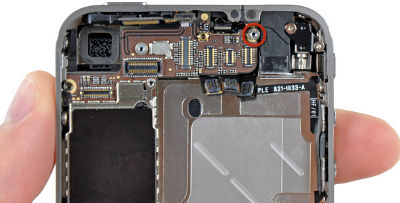
Using a small screwdriver, remove the 4.8mm screw next to headphone jack... When assembling the device, this screw sets the height Wi-Fi screen taken earlier. The screen should be flush with the headphone jack.
When reassembling the board, make sure the edge is under the circle, otherwise the screws will not fit.
When assembling, make sure that a small rubber gasket is in place at the top motherboard iphone 4... Without this gasket on the motherboard, it could damage the loop around it.
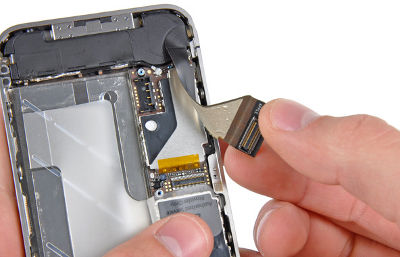
Step 19 - iphone 4 motherboard
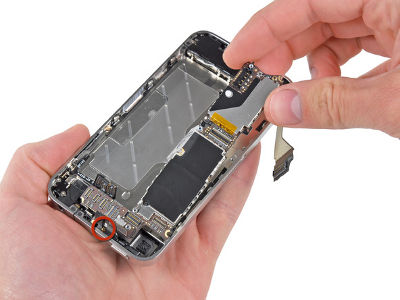
Remove carefully system board iPhone 4 by unplugging any cables that might get caught. Be careful not to damage the small gold-plated contact (marked in red, at the top) - this is a very fragile part.
Step 20 - Speaker

Remove one 2.4mm Phillips speaker housing screw towards the inside of the bezel.
Step 21 - speaker
Remove the case iPhone speaker 4 .
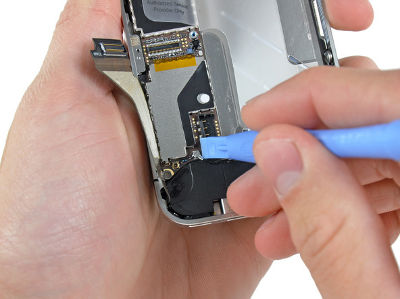
Step 22 - vibration motor
Remove the following 2 screws holding vibration motor to the inner frame:
- One 6mm Phillips
- One 1.4mm Phillips
Pull out vibration motor iPhone 4.
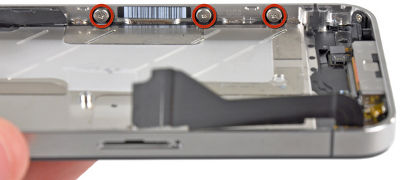
Step 23 - headphone jack
Unscrew the 1.5mm Phillips screw on the front panel next to headphone jack.
Step 24 - Side Volume Button on iPhone 4
Unscrew 3 large 1.5mm Phillips screws lengthwise side volume button on iPhone 4... Do not lose the washers under each of the screws.
Step 25 - microphone
Unscrew the 1.5mm Phillips screw near the bottom microphone.
Step 26 - docking station
Remove the 1.5mm Phillips screw next to the ribbon cable from the connector docking stations.
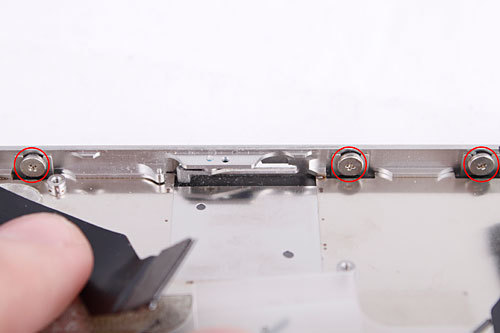
Step 27 - SIM Card Holder and Sleep Mode Buttons
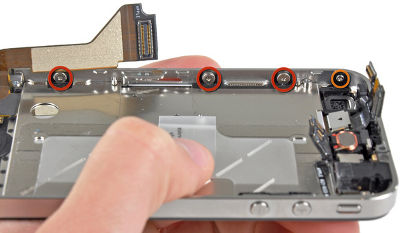
Unscrew 3 large 1.5mm Phillips screws lengthwise holder SIM card iPhone 4... Don't forget the washers under each of the screws.
Unscrew the 1.5mm Phillips screw near sleep buttons.
Step 28 - Opening the front panel of the Iphone 4
Insert the autopsy tool into the gap between rubber frame around the glass bezel and steel inner frame. Do not try to insert the tool between the glass and the rubber frame.
Gently lift the top edge of the front panel away from inner steel frame.
Step 29 - detaching the front panel
Separate carefully top edge of the front panel from the inner steel frame.
Separate carefully lower edge of the front panel from the inner steel frame.
Be careful sometimes Home button sticks to the front panel and you can tear the ribbon cable from it.
Step 30 - Touchscreen and Screen Flex
![]()
Before reattaching the front panel to the inner steel frame, make sure to LCD and touchscreen cables are not twisted or pinched between the inner frame and the front module - this could damage the cable. When the front panel is properly installed LCD and touch screen cable should be next to each other and of the same length, and should just hang over the steel frame.
When replacing the front module, remember that you may have to re- change speaker grill and clear plastic rings around the anterior chamber... It all depends on where you bought it spare parts from Iphone 4.
After assembly, protect your new display from scratches by gluing to it protective film.
Step 31 - Replacing the Iphone 4 Screen
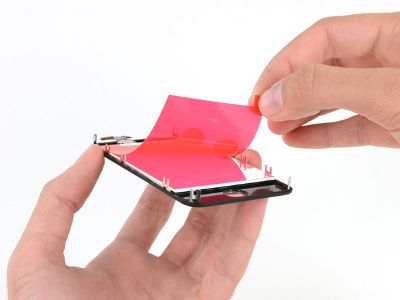
Usually new lcd screens for iphone 4 come with a red plastic film on the back l cd display... If you have one, use the tongue near Home buttons to remove the film from the lcd screen before installing a new one display in the iPhone.
Video instruction for disassembling iPhone 4


