Many users are trying by all possible methods to increase the speed of their computer. To this end, in addition to standard overclocking with the help of special utilities, they install more modern types of storage media in their system unit, namely solid-state drives with a higher data transfer rate.
Thus, they are faced with the need to transfer the operating system from a standard 3.5-inch hard drive to an SSD drive, however, the whole problem is that not everyone knows how to implement this.
What does moving the OS to a solid state drive do?
Before considering the main methods for transferring dozens to a solid-state hard drive, it is necessary to understand the main advantages of this, in addition to the higher reading speed of electronic data that the user receives.
Probably, every user is faced with the fact that some applications or processes on the computer take a very long time. This is due to the fact that conventional hard drives are unable to quickly write and read information. However, the situation changes dramatically if you install an SSD drive in a portable or stationary computer and transfer Windows 10 to it. It would seem that this is so, but the difference is very noticeable. The system will start to work noticeably faster and much less time will be spent to perform the same tasks. At the same time, it is recommended to transfer only the OS to the SSD without any third-party programs. Nevertheless, if it becomes necessary to transfer the entire system as a whole, with all the utilities installed, then with the help of some tools you can implement this.
General information on transfer
There is an erroneous opinion among novice users that in order to transfer an operating system from one hard drive to another, it is enough just to copy all the contents. However, such a transfer will not lead to anything, and the system itself simply will not work. Migration is a systematic process that can be performed using the top ten integrated tools or third-party utilities that have been developed to accomplish this task. It is worth noting that no matter which transfer method you choose, it is very simple and does not take much effort and time. In addition, this process is automated as much as possible, so no special actions are required on the part of the user.
In this article, we will dwell on each of the existing methods for transferring dozens to an SSD drive, as well as consider the most popular applications with which you can implement this idea.
Standard Tools
You can also transfer the top ten to an SSD hard drive using standard Windows tools. In this case, this tool is the “Data Backup and Restore” section, which can be found in the “Control Panel”. This method is one of the easiest, because there is no need to search the web for various third-party applications and install them on your computer.
So, you have installed a brand new solid state drive in your system unit and want to transfer Windows 10 to it. Where to start? The first step is to create an image of the system and write it to an optical drive or USB flash drive, from which the OS will be restored. After starting the recovery process, you will need to specify the path to the drive on which the previously created image is located. At the same time, it is recommended to disconnect the old HDD from the motherboard during the transfer in order to avoid various kinds of problems. In addition, if in the future you will use the old hard drive to store personal information, then you first need to format it. If this is not done, then both operating systems that are on each of the drives will conflict, which will make normal work on the computer impossible.
Regardless of whether you use a laptop or a desktop system, the process of transferring dozens from a standard HDD to an SSD is absolutely identical, except that it will be quite problematic to install an SSD in a laptop yourself, and you will have to pay a considerable amount when contacting a service center. In addition, if the factory warranty has not yet expired, then installing any iron leads to its cancellation, so you should think very carefully before doing anything.
Third party tools
An alternative to the standard Windows tools, with which you can transfer the top ten to a solid state drive, are special applications from third-party developers. To date, you can find a great many of them on the Internet, however, when choosing one of them, you must take into account the fact that some utilities were developed exclusively for hard drives of a certain manufacturer, so they will work unstably with hard drives from other brands or will not function at all. For example, the Acronis True Image utility is designed for HDDs from WD, the Seagate Disk Wizard application works perfectly with hard drives of the same name, and Samsung has developed proprietary software for its products. If we talk about universal programs that can work with all models of hard drives, Paragon Migrate OS is worth noting.
Paragon Migrate OS to SSD
Paragon is a very well-known software developer that has many different utilities, both free and commercial, designed to perform various functions. One of the most famous applications is Paragon Migrate OS to SSD, with which you can transfer the operating system from one HDD to another. It is worth noting that you will have to pay for this program, since it is not freely available, however, it is worth it. Paragon Migrate OS to SSD is a powerful tool for migrating your system to an SSD. Its work is fully automated, so all that is required from the user is to start the process and wait for it to complete. The utility supports the transfer of both OS system files and user personal data, however, the first option is more preferable, since it saves a lot of time and free space on the hard drive. You can choose your preferred transfer mode in the program settings. It is worth noting that after the copying of the system is completed, it will be necessary to enter the BIOS and install the solid state drive as the primary bootloader.
Acronis True Image
Another popular hard drive tool is Acronis True Image. The utility has a simple and intuitive interface, as well as stable operation. It is universal and works equally well with the hard drives of all modern manufacturers of computer components on the market. However, it is worth noting that if a WD hard drive is installed on your PC, then to transfer dozens to it, it is recommended to use a special assembly of this program, which is called the WD Edition.
Transferring a system to an SSD using Acronis True Image is best done in automatic mode, which can be launched from the Disk Cloning section. The time it takes to complete a copy depends on the overall size of the system, as well as the speed of the HDD from which the transfer is being made.
Seagate DiscWizard
As you might guess from the name, the utility was designed to work with hard drives manufactured by Seagate. As for the main aspects of the work and the process of transferring dozens, this tool is an almost complete copy of the two previous applications discussed earlier. Copying also takes place with the help of a wizard that performs all actions without user intervention, so even the most backward user will be able to deal with Seagate DiscWizard.
Samsung Data Migration
This is another representative of narrow-profile utilities designed to service Samsung hard drives. The developer has implemented a step-by-step wizard in his product, following the recommendations of which you can transfer Windows 10 to a solid state drive without any problems. The main advantage of Samsung Data Migration is the ability to selectively transfer, thanks to which the user can independently specify the types of data that will be copied to the new hard drive. This is a very useful feature, since SSDs are much smaller than standard HDDs, so literally every gigabyte counts. As for the transfer process itself, it, as well as in the case of other similar utilities, is maximally brought to automatism.
Macrium Reflect
Another dozen transfer application that has a free license is Macrium Reflect. The main advantage of this software is full compatibility with all hardware, so this utility stands out against the background of many others that can only be found on the network.
According to consumer reviews, Macrium Reflect has great functionality and allows you not only to transfer the operating system from one drive to another, but also create system images and burn it to a CD that can be used as a boot disk. Thus, if you are looking for a universal application with which you can perform absolutely any hard disk operation, then this program is the best fit for you.
What else do you need to know about cloning Windows 10?
So, we have considered the most common tools for transferring the system, however, it remains to talk about some of the nuances that must be considered when performing this procedure. On many computer forums, you can find a lot of information about such a utility as AOMEI Backupper Standard. It is also free and allows you to copy ten to an SSD drive. Nevertheless, it is not recommended to use it for novice users, since the system is cloned by creating a bootable CD or USB flash drive, and from them it is directly transferred to a solid state drive. This process is more time consuming and requires the user to have certain skills. However, which tool to use is entirely up to you.
One of the ways not to lose data, system settings, software products and documents is to transfer the installed Windows 10 OS from the HDD (hard drive) to a more mechanically stable and fast SSD drive. The transfer is performed not only for the purpose of quick file recovery, but also for the purpose of replacing the HDD disk with an SSD. Therefore, it makes sense to figure out in detail how to competently transfer the Windows 10 operating system from a hard drive to an SSD drive.
Using built-in functionality
SSD drives are silent, have a large clipboard, which affects the speed of the PC, and have no moving parts, which guarantees durability. But SSD drives, unlike HDDs, are endowed with a limited number of overwrites, so before you save Windows 10, you need to delve into the process. You can't repeat the process indefinitely.The easiest way, which gives the least number of errors when transferring the OS, is using the built-in functionality. The rewrite operation is performed as follows:
Important! The image written to the media is used to restore the system. If, while working with a PC, the user adds important software products or changes system settings, the procedure should be repeated and overwritten with the old image. You should not use an SSD drive to store photos and other frequently updated files. Repeated overwriting will exhaust the limit, but on average, the disk resource is enough for 7-10 years.
Migration tools available for SSD drives
Large manufacturers of solid state drives Samsung or Seagate, for example, release special software products for data cloning along with drives:DiscWizard- software released by the Seagate brand for transferring information to an SSD of its own production. A very capacious program that covers virtually all user needs: deleting confidential information, cloning the system, transferring OS and software product settings, restoring files, etc .;

data migration- the software is designed to work with Samsung SSD drives. The program helps to optimize the potential of the disk, searches for drivers, clones the system, etc.

The listed software products are comprehensive packages that backup all data from the HDD to SSD drives or only the necessary sections of the main disk. With their help, you can clone the operating system and create disks to boot the system.
Important! Using SSD native software reduces the risk of errors during the cloning process.
There are also universal programs. Acronis has released free True Image software for backing up OS to SSD of any brands: Kingston, Samsung, Seagate, etc. You can find many paid and free analogues on the net - Paragon Drive Copy, Macrium Reflect, etc. To start the process, you need to download from software manufacturer's website and install it on a PC. Installation is performed by the classical method.
How to transfer using Acronis True Image
True Image is considered the most popular and easiest to use. It is equipped with a Russian-language interface, but requires activation during operation (you can bypass the procedure). It is performed by registering on the network. After installing the software, you should not immediately start cloning. SSD drives are not as capacious as hard drives, so system C should be streamlined:- Clean up partitions, or only the system C (System). Remove everything superfluous without a trace;
- Defragment the system space;
- Fix system errors.
- go to the menu Tools»;
- select program block Cloning...»;
- put a dot in front of the automatic mode. Manual configuration of the transfer process is used if it is necessary to clone only the system space or select a list of important partitions;
- select cloned space. In automatic mode, there will be one object, in manual mode, there will be as many objects as the hard drive is divided into;
- select the target media - the connected external drive. At this stage, the program will ask you to exclude those files that do not require cloning;
- checking the selected data. If something is selected incorrectly, you can use the menu " Before" And " After»;
- press " Proceed” and confirm the restart of the PC.
What do we get?
The user's actions after the cloning process is completed depend on the goals of migrating Windows 10 from HDD to SSD. In 8 out of 10 cases, the operation is performed in order to replace the hard drive with a faster drive. To do this, in the BIOS, you just need to select it as the main one. The OS will always boot from a fast storage medium. Since the OS files are static and are not overwritten as often as those used by the user, installing an SSD as the primary drive has many advantages: The freed HDD can be safely used to store photos, videos, etc. In other cases, the cloned data is used for system recovery. The procedure for transferring a data package is simple, so follow the instructions and be aware of the overwrite limit.
 Moving your system to an SSD is an efficient way to organize your computer.
Content:Please note that depending on the version of Windows and the settings of the flash drive you purchased, the migration methods may vary.
What data can be transferred to an SSD
Storing the operating system on an SSD allows not only to speed up its work, but also increases the response of other programs and files that are stored on the disk.
The user can move the following types of data to a flash drive:
- operating system . It is added to the SSD with all drivers and settings ready. In fact, a duplicate of it is created, which was previously stored on the HDD;
- Programs - choose for yourself which applications you want to add to and which you want to leave on (HDD). We advise you to leave voluminous programs for video editing and software development / testing on your computer - this way they will work many times faster;
- User files . It can be any of your documents, photos, music, videos and other types of data.
Components to move
To add a used by Windows to an SSD, the following objects are required:
If you work only with OS resources, you won't need to install a third-party utility to migrate.
Computer requirements
Before you perform any OS transfer steps, make sure your device meets all the minimum requirements that allow the utility to interact with the SSD and transfer large amounts of data.
The minimum requirements are shown in the following table:
| Parameter name: | Minimum value: |
|---|---|
| OS | Windows XP (only 32x); · Windows Vista (all bit depths); · Windows 7 (all bit depths); · Windows 8\8.1 (all bit depths); · Windows 10 (all bits). |
| RAM | At least 1GB |
| Types of discs you are transferring | GPT or MBR |
| Partitions to copy | Standard. Without the ability to migrate RAID arrays |
You can compare your computer's settings with the above specifications using the About window.
It displays the correct data about the main hardware and software components of the device:
Using the built-in features of Windows
Follow the instructions to transfer the operating system to a flash device:
- Open the window "Disk Management". To do this, in the run window, write the command diskmgmt.msc and confirm the action;

Fig. 3 - launching the disk management tool
- Now you need to reduce the amount of OS on the disk. You can perform the action using the Shrink Volume function. All data will remain in the same state, only the occupied space on the HDD will decrease. Right-click on the "System" section, and then on "Compress volume";

Fig. 4 - Volume compression
- After successfully reducing the OS volume, a free partition will appear in the disk scheme. This means that everything was done correctly;
- Connect the drive to the computer and restart the window "Disk Management";
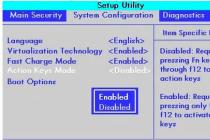
- Now click on the "Wizard" tab and select "Migrate OS SSD" from the list;

Fig. 5 - "Master" tab
- The standard utility for . Click on the "Next" button to go to the settings;
- Click on an item "Unallocated Space" and go to the next window;

Fig.6 - disk space selection
- Now you can independently change the size of the future disk or leave all parameters unchanged;

Fig. 7 - resizing a disk partition
- After clicking on the "Next" button, the wizard will start moving the system. After the action is completed, you can turn off the computer and select the OS that is on the SSD at the next boot.
Windows on the hard drive will also remain. You can delete it or use it as a backup when you need to restore the system.

Fig. 8 - the result of a successful move Windows
Don't forget to click on the "Apply" button in the upper left part of the window "Disk Management" otherwise, all changes made will not be saved.
If you encounter error windows or freezes during the transfer, you should reset your settings, restart your PC, and try the transfer again.

Fig.9 - applying changes
Instructions for SSD from Samsung
The company has released an official utility that allows you to quickly move the OS from your hard drive to your purchased flash drive.
The utility is called Samsung Data Migration. You can download it for free from the official website of the company (section "Memory" - "SSD") or using the disk that is included with the device.
The initial window of the program looks like this:

Fig.10 - Samsung Data Migration utility window
Immediately after starting the utility, connect the SSD to the computer using the appropriate adapter. Click on the "Start" button.

Fig. 11 - analysis of a disk with an installed copy of Windows
After analysis, the program will automatically detect the SSD connected to the computer and show it on the screen:

Fig.12 - reconciliation of the source and destination disk
If the space occupied by Windows on the HDD does not exceed the available space on the SSD, you can immediately start the transfer by pressing the "Start" button.
All components will automatically move. The procedure may take from 30 minutes to 1.5 hours, depending on the version of Windows you are using.

Fig.13 - successful system transfer
As a result, you will receive a success notification. Close the window and delete all Windows data from the HDD.
The advantage of using Samsung Data Migration is the simple interface. The program will do all the work for you and minimize the likelihood of errors or bugs after the OS transfer.
What to do if during the analysis stage you find that there is not enough space for the OS on the SSD? In this case, you need to clear Windows of unused data and applications.
You can do this right in the Samsung Data Migration utility window.

Fig.14 - Error. Not enough space on SSD
After the error text appears (highlighted in red), click on the "Next" button and in the new window delete all library files that clutter up the system.
Clean up the OS until the text appears in the main window of the utility "Ready to clone to SSD".

Fig. 15 - successful cleaning of unnecessary files
Acronis True Image Utility
Acroins is the most popular utility for transferring OS to removable media. It recognizes all brands of SSD. The application is supported by all versions of Windows, so there will be no compatibility issues.
Remember, you can only use the application if your PC hardware has a disk from the manufacturer Acronis.
If the component is missing, the utility will not start, and the user will be notified that it is impossible to work with the program.

Fig.16 - main window of the Acroins application
To move the system, connect the removable media to the computer and in the program window click on the tile "Disk Cloning"-"Copy Partitions".
In the window that opens, select the automatic move mode. It is suitable for all tasks and quickly performs data copying.

Fig.17 - choice of cloning mode
All sections will be copied to . All data that was on the SSD before cloning will be deleted.
The disk itself will become bootable and can only be used to run the operating systems installed on it.

Fig.18 - copying process
Seagate DiscWizard Utility
The utility completely repeats the Acronis interface. It should be used if your PC has at least one hard drive from the manufacturer Seagate.
For cloning, follow the same steps that were described in the previous paragraph of the article.

Figure 19 - Seagate Disc Wizard Main Window
Change bootloader configuration
After cloning the system, a copy of the OS will remain on the computer, and at each boot a window will appear with a choice of boot. After the transfer, we advise you to perform a number of actions:
- Without deleting the original copy from the HDD, test Windows on the HDD. There are times when the system starts to slow down, performance deteriorates. This happens extremely rarely and depends solely on the selected SSD. As long as the first copy is not deleted, you will always have the opportunity to return to its use and remove the OS from the SSD;
- Change the system bootloader settings.
The boot manager is a built-in component with which the computer determines which of the installed operating systems to start. Also, you can configure the startup order of hardware components.
Immediately after, the manager will show two systems with identical names - the original and copied.
In the case of normal Windows operation on an SSD, you need to delete the version that remains on the computer's hard drive. Follow instructions:
- Reboot your PC and run the version that was moved to the flash drive;
- Open ;
- Enter the command shown in the figure below, giving the OS copies on the SSD a unique name;

Fig.20 - command to rename the loader component
- Now configure the dispatcher so that it always starts the new OS first. You can do this with the following command:

Fig. 21 - automatic launch of the cloned OS
- To remove the old system, enter the following command (where ID is the number of the old OS copy in the bootloader list):

Fig. 22 - deleting the original copy of Windows
Outcome
As you can see, to transfer the system to a removable flash drive, it is enough to use a universal utility for duplicating components or perform the transfer yourself.
Don't forget to delete the boot record of a drive that is no longer in use. If this is not done, errors may occur during OS startup.
Users who have migrated the system to an SSD have noted an increase in computer performance and faster completion of complex tasks and processes.
The operating system loading speed is increased by 2-3 times.
Thematic videos:
How to connect an SSD to a desktop computer. Transferring Windows from HDD to SSD
Properly connecting an SSD drive to a personal desktop computer. How to quickly transfer Windows from a hard disk drive (HDD) to a solid state drive (SSD). Practical advice, performance evaluation after replacing with an SSD.
Laptop Hard Disk HDD SSD Transfer System Free
Laptop hard drive HDD SSD system transfer + system cloning program
After buying a new HDD or SSD, the first question that arises is what to do with the operating system currently in use. Not many users have a need to install a clean OS, but on the contrary, they want to clone an existing system from an old disk to a new one.
So that the user who decides to upgrade the hard drive does not have to reinstall the operating system, there is the possibility of transferring it. In this case, the current user profile is saved, and in the future you can use Windows in the same way as before performing the procedure.
Usually, those who want to divide the OS itself and user files into two physical drives are interested in the transfer. After moving, the operating system will appear on the new hard drive, and remain on the old one. In the future, it can be removed from the old hard drive by formatting, or left as a second system.
First, the user needs to connect a new drive to the system unit and make sure that the PC has detected it (this is done through the BIOS or Explorer).
Method 1: AOMEI Partition Assistant Standard Edition
Unlike the previous two programs, Macrium Reflect cannot pre-allocate a free partition on the drive where the OS will be transferred. This means that user files from disk 2 will be deleted. Therefore, it is best to use a blank HDD.
- Click on the link "Clone this disk..." in the main window of the program.
- The Migration Wizard opens. At the top, select the HDD you want to clone from. By default, all drives can be selected, so uncheck those drives you don't want to use.
- Click the link at the bottom of the window "Select a disk to clone to..." and select the hard drive to which you want to clone.
- With Disk 2 selected, you can use the link with cloning options.
- Here you can configure the space that will be occupied by the system. By default, a partition with no free space will be created. We recommend adding at least 20-30 GB (or more) to the system partition for correct future updates and Windows needs. You can do this with knobs or by entering numbers.
- If desired, you can choose the drive letter yourself.
- The rest of the parameters do not need to be changed.
- In the next window, you can set up a cloning schedule, but we don't need it, so just click Next.
- A list of actions that will be performed with the drive will be displayed, click Finish.
- In the window with the offer to make restore points, agree or reject the offer.
- OS cloning will start and you will be notified when it is completed "Clone completed", indicating that the migration was successful.
- Now you can boot from the new drive, having previously made it the main one for booting in the BIOS. How to do this, see Method 1.


We talked about three ways to transfer the OS from one drive to another. As you can see, this is a very simple process and you won't usually run into any errors. After cloning Windows, you can check the drive for health by booting the computer from it. If there are no problems, you can remove the old HDD from the system unit or keep it as a spare.
An SSD solid state drive differs in its properties and way of working from a hard HDD drive, but the process of installing Windows 10 on it will not differ much, there is a noticeable difference only in the preparation of the computer.
Preparing the disk and computer for installation
Owners of SSD drives know that in previous versions of the OS, for the correct, durable and full-fledged operation of the disk, it was necessary to change the system settings manually: disable defragmentation, some functions, hibernation, built-in antiviruses, the paging file, and change a few other parameters. But in Windows 10, the developers took into account these shortcomings, the system now performs all disk settings itself.
It is especially necessary to dwell on defragmentation: it used to greatly harm the disk, but in the new OS it works differently, without harming the SSD, but optimizing it, so you should not turn off automatic defragmentation. It's the same with the rest of the functions - in Windows 10 you don't need to configure the system with the disk manually, everything has already been done for you.
The only thing is that when partitioning a disk, it is recommended to leave 10–15% of its total volume as unallocated space. This will not increase its performance, the write speed will remain the same, but the service life may be slightly extended. But remember, most likely, the disk will last longer than you need without additional settings. Free interest can be released both during the installation of Windows 10 (during the process in the instructions below), and after it using system utilities or third-party programs.
PC preset
In order to install Windows on an SSD drive, you need to switch the computer to AHCI mode and make sure that the motherboard supports the SATA 3.0 interface. Information about whether SATA 3.0 is supported or not can be found on the official website of the company that developed your motherboard, or using third-party programs, such as HWINFO (http://www.hwinfo.com/download32.html).
Switching to SATA mode
- Turn off your computer.
- As soon as the power-on process begins, press the special key on the keyboard to go to the BIOS. Usually the Delete, F2 or other hotkeys are used. Which one will be used in your case will be written in a special footnote during the inclusion process.
- The BIOS interface in different models of motherboards will be different, but the principle of switching to AHCI mode on each of them is almost identical. First, go to the "Settings" section. To move through blocks and items, use the mouse or arrows with the Enter button.
- Go to advanced BIOS settings.
- Go to the sub-item "Embedded Peripherals".
- In the "SATA Configuration" section, find the port to which your SSD is connected and press Enter on the keyboard.
- Select the AHCI operating mode. Perhaps it will already be selected by default, but this had to be verified. Save the settings made in the BIOS and exit it, boot the computer to proceed to prepare the media with the installation file.
Preparing the installation media
If you have a ready-made installation disk, you can skip this step and start installing the OS right away. If you do not have one, then you will need a USB flash drive with at least 4 GB of memory. Creating an installation program on it will look like this:
- We insert the USB flash drive and wait until the computer recognizes it. Open the explorer.
- The first step is to format it. This is done for two reasons: the memory of the flash drive must be completely empty and divided in the format we need. While on the main page of the explorer, right-click on the USB flash drive and select the "Format" item in the menu that opens.
- We select the NTFS formatting mode and begin the operation, which can take up to ten minutes. Please note that all data stored on formatted media will be permanently erased.
- Go to the official Windows 10 page (https://www.microsoft.com/en-us/software-download/windows10) and download the installation tool.
- We launch the downloaded program. We read and accept the license agreement.
- Select the second item "Create installation media", as this method of installing Windows is more reliable, because at any time you can start over, and also use the created installation media to install the OS on other computers in the future.
- Select the system language, version and bit depth. The version you need to take is the one that suits you best. If you are a regular user, then you should not load the system with unnecessary functions that you will never need, install Windows at home. The bit depth depends on how many cores your processor works in: one (32) or two (64). Information about the processor can be found in the properties of the computer or on the official website of the company that developed the processor.
- In the media selection, check the USB device option.
- Select the flash drive from which the installation media will be created.
- We wait until the media creation process is completed.
- We restart the computer without removing the media.
- During power on, enter the BIOS.
- We change the boot order of the computer: your flash drive should be in the first place, and not the hard drive, so that when you turn on the computer, it starts to boot from it and, accordingly, starts the Windows installation process.
Installing Windows 10 on SSD
- Installation begins with the choice of language, set the Russian language in all lines.
- Confirm that you want to start the installation.
- Read and accept the license agreement.
- You may be asked to enter a license key. If you have it, then enter it, if not, then skip this step for now, activate the system after installing it.
- Proceed to a manual installation, as this method will allow you to set up disk partitions.
- A window will open with disk partition settings, click on the "Disk settings" button.
- If you are installing the system for the first time, then all the memory of the SSD disk will be unallocated. Otherwise, you must select one of the partitions to install and format it. Break up unallocated memory or existing disks as follows: allocate more than 40 GB to the main disk on which the OS will be installed so that in the future it will not be clogged, leave 10–15% of the total disk memory unallocated (if all the memory has already been allocated, delete the partitions and start creating them again), we give all the remaining memory for an additional partition (usually drive D) or partitions (drives E, F, G ...). Do not forget to format the main partition given under the OS.
- To start the installation, select the drive and click Next.
- Wait for the system to install automatically. The process may take more than ten minutes, do not interrupt it under any circumstances. After the procedure is completed, the creation of an account and the installation of basic system parameters will begin, follow the instructions on the screen and select the settings for yourself.
Video tutorial: how to install Windows 10 on an SSD
Installing Windows 10 on an SSD is no different from the same process with an HDD. Most importantly, do not forget to enable ACHI mode in the BIOS settings. After installing the system, you should not configure the disk, the system will do it for you.