Many motorists like to listen to music while traveling. But the radio cannot always satisfy their needs, so listening to their favorite tracks from a disc inserted in a car player is preferred. Since the MP3 audio format is the most common today, the question immediately arises of how to burn an MP3 disc in a car in 5 minutes, and even in good quality. Here you can give quite a lot of options for action, but in any case, some nuances should be taken into account.
How to burn an MP3 disc in a car: which media to choose?
Preparation should begin with the choice of the disk on which the recording will be made. The most common discs today are CD and DVD standards, which are available in two main versions - R (one-time burn media) and RW (rewritable discs).
What to choose? CD media (even rewritable ones) are becoming a thing of the past, as there is very little space on them by modern standards. But DVDs can not always be used, because the player in the car itself may simply not recognize them. The option of choosing a one-time "blank" is also impractical. Over time, the disc may become unusable, for example due to scratches. Yes, and re-recording such a medium will not work. Therefore, the best solution would be to choose an RW disk. Even if it is damaged, full formatting can be performed, in which bad sectors will be ignored in the future, and information can be written to the media itself again.
Nuances associated with optical media
Also, on the question of how to burn music to a disc to listen to in a car, you need to consider that some models of radio tape recorders may not see RW discs, although they read the standard R format perfectly.
Also, if you use double-sided or double-layer DVD media, you also need to be careful, as the player may have limitations in perceived volume. Therefore, you must first study the user manual and make sure that the disc being recorded will be played on the car radio.
File preparation
Now a few words about the preparatory stages, without which the solution to the problem of how to burn an MP3 disc into a car on a computer would be incomplete. During the recording process, you will have to add files to the program. If they are in different folders, it is better to immediately copy them to one directory, so that later you do not jump from folder to folder in search of the desired track, but add from one directory.
In addition, despite the fact that the MP3 format is the most popular, music can be presented in other formats (OGG, FLAC, AIFF formats, less often - WAV). But after all, all the material must be recorded in MP3! In this case, you should first use any audio converter that supports batch processing of several formats at the same time.

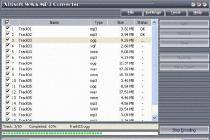
The simplest solution would be to use utilities from Xilisoft or something else. Along the way (except for the main conversion) in such programs, you can also set the desired frequency characteristics, which will be automatically applied to all tracks during the conversion to MP3 format.
General rules for choosing a recording method
Finally, another important condition is the choice of frequency characteristics. In the process of converting, it is better to set the standard parameters in the form of a sampling frequency of 44.1 kHz, a bit rate of 128 kbps and a sound depth of 16 bits.

In this case, the tracks will take up a minimum of space, and the sound will be of high quality. If you look at the size of such a file, a 5-minute track will take about 5-6 MB.
Of course, when the frequency is set to 48 kHz and the bit rate is 320 kbps, the quality will be higher, but it will be impossible to distinguish it from the standard one if a cool professional audio system is not installed in the car. And the tracks themselves will have a much larger size than with standard parameters. Accordingly, fewer of them will fit on the disk.
And one moment. During the burning process, you need to set the minimum speed supported by the application used and the optical media itself (this will avoid errors during the recording process and maintain normal sound quality). In addition, if the program has a function for checking the recorded material, you should also use it.
How to burn an MP3 disc in a car: how to burn music using Windows
Finally, we come to the main question. And first, let's see how to burn an MP3 disc into a car without using third-party programs, preferring Windows tools.

When inserting a blank media into the drive, the system by default offers to write using its own tool. If you select this action, you will then be prompted to select files and activate the burning process.

The use of the standard Windows Media Player is practically no different, in which you also need to add tracks to the playlist, and then use the burn to disc option. But most users do not trust the means of the system (I must say that it is not unreasonable), since their capabilities are extremely limited.
Choice of Third Party Software
As for third-party software, there are a lot of programs for quickly creating MP3 discs today. However, the undisputed leader is the Nero Burning ROM package.

In particular, the program allows you to solve the question of how to burn an MP3 disk as quickly as possible on a machine in a completely elementary way. With Nero Express running, which is part of the complete software package, select "Create Data Disc" and add the required files. It is not recommended to create music projects in the form of a regular CD or media containing different track formats. In the first case, CDA tracks will take up much more space than MP3 files, and in the second case, some recorded tracks may simply not be played back.

So the files have been added. Now you need to set the write speed (preferably 2x). If this option is not supported, you can use 4x or 8x (no more) without sacrificing quality.

After that, in the burning window, it is advisable to check the box next to the line for checking data after writing to disk, remove the use of the multisession mode (subsequently adding files) and press the start button. The time taken to complete the process will vary depending on the media type and burn speed.
So, the question of how to burn an MP3 disc into a car has already been clarified. But real music lovers who prefer to listen to music in high quality, not paying attention to the speed of creating MP3 music discs, can be advised to set higher sound characteristics at the stage of preparing tracks.

In addition, tracks downloaded from the Internet may have different volume levels. But constantly removing or adding volume while driving is not so convenient. Therefore, as one of the sound processing options, we can suggest first normalizing in programs like Adobe Audition, Sound Forge, ACID Pro, etc. All such audio editors have the Normalize function. But if you wish, you can add effects along the way or process the tracks using an equalizer (here you can use the built-in templates or set the frequencies yourself).
Instead of total
As you can see from the above material, the question of how to burn an MP3 disc into a car is solved quite simply. What to use for recording? It seems that the Nero Express application will be the best solution (both quickly and reliably). And of course, you should not ignore some preliminary steps in preparing the recorded material if you want to achieve good sound quality.
Good day. If you have looked at my blog page, then you need computer help or just want to read something informative in order to replenish your knowledge. I'll try not to disappoint you. Today I will talk about how to burn a folder with files to disk. As it turned out, this task causes difficulties for many users. After all, it’s not every day that you have to cut blanks ...
Kinds
First, let's figure out what the marks CD, DVD, +R, -R, +RW, -RW mean.

CD and DVD
There are two types of disc media - CD (Compact Disc) and DVD (Digital Versatile Disc/Digital Video Disc). It is generally accepted that CDs are intended for recording data - documents, music and pictures, and DVDs for recording video. This opinion is wrong. Both types are suitable for storing any files. The difference between them is only in capacity - only 700 megabytes will fit on a CD, and files up to 4.7 gigabytes in size can be written to a standard DVD. Although new generation discs can hold up to 45 gigabytes of information, which is achieved by superimposing 3 recording layers on top of each other.
R&RW
In the disk designation, you can find the English letters R and RW, which indicate how many times this media can be used. The letter R stands for one-time use, while RW can be overwritten multiple times.
Plus and minus
Friends, many of you have probably noticed that in the designation of the type of a blank, sometimes there is a plus, and sometimes a minus. A plus indicates that information can be written to the disk without erasing the data already there, and a minus, respectively, means that this cannot be done. Thus, if CD+R is written on a disc, it means that it is one-time use, but you can add new ones to existing files.
cleaning
Used discs like RW can always be erased, and then write the necessary information to them. In different versions of Windows, the sequence of actions that must be performed in order to clear the media from the data already there is somewhat different. Let's take a closer look at each OS version.
XP
To clean up a disk in Windows XP, follow these steps:
- We insert it into the drive.
- Open it - go to "My Computer", find the desired disk (usually it is signed as (E:) CD or DVD + / - RW drive), double-click on it quickly or press RMB (right mouse button) and select open.
- Right-click anywhere in the free space and start cleaning by selecting the “Erase this ...” item for this and clicking “Next” in the window that opens.
"Seven"
In the seventh version of the operating system in question, the sequence of actions is slightly different:
- Insert the media into the drive.
- We open it, for this, through the "Start" menu, go to "Computer" and make two quick right clicks on the CD / DVD drive.
- You can try to delete only unnecessary files, for which we right-click on them and look for the “Delete” item, if there is, select and wait for the result.
- If there was no command to delete, then right-click again at any point in the empty space and start cleaning by selecting the “Erase” item or something similar, click “Next”, wait for the cleaning to finish and click “Finish”.

"Ten"
You can completely clear disk media in Windows 10 with two commands - "Format" and "Erase this ...". First, the procedure for running both commands is the same:
- We insert the disc into the drive.
- We launch the "Explorer" by clicking on the corresponding icon in the "Start" menu or on the "Taskbar".
- Expand the This PC directory.
- We find the item with the designation of the drive, make a right-click and select one of the commands "Format" or "Erase ...".
- In both cases, confirm the action by pressing the "Next" and "Finish" buttons.

Recording
After the media is prepared, you can start writing the necessary information on them. There are two ways to achieve what you want - to record on your own, that is, using OS tools, or use special programs if they are available on the PC.
On one's own
Programs are, of course, very convenient, but not every computer has them. It would be nice to learn how to cut blanks by hand. I’ll also tell you separately for each version of Windows (I won’t write further about the need to insert a blank into the system unit, I think this is clear anyway).
XP
Let's start with how to burn a folder with files to a CD-R or any other disc using the capabilities of Windows XP:
- Select the prepared files and copy them ("Edit" or RMB =>> "Copy").

- Open the media through "My Computer" and paste the copied (RMB on an empty space =>> "Paste").

- Again, right-click in an empty space and launch the burning wizard by selecting the "Burn files to CD" item.
- If there is a desire, then we set a name and start the “burning” by clicking the “Next” button.

"Seven"
Now let's talk about how to burn a folder with files to a DVD disc or any other in the seventh edition of the designated operating system:
- We also start by copying the selected folders.
- We open the drive (two quick clicks with a tailed friend), going to it through "Start" and "Computer".
- A window will open in which you need to specify the type of future media - it can perform the functions and have the capabilities of a standard flash drive or remain a regular CD or DVD format media.

- When choosing the option with a flash drive, click "Next", answer "Yes" to formatting, spend some time waiting, paste the copied folders, confirm, wait, check the result using the system's suggestion.
- When choosing a standard media, click "Next", paste the copied files into the window that opens, right-click on an empty space, select the "Write ..." command.
"Ten"
Friends, if at the moment you are interested in how to write a folder with files to disk in Windows 10, then just re-read the previous paragraph "Seven", since the algorithms of actions in these two versions of the OS, in general, do not differ.
With the help of programs
It would be nice if one of the following programs settled on a permanent basis on each computer, with which you can easily, quickly and efficiently (to be read on any device) write data of any format to disk media.
UltraISO
The first program that I want to briefly talk about is UltraISO, writing a folder with files to disk using it is not as difficult as it might seem at first glance, but the image must be mounted in advance (more on this another time):
- Run the program and select "Open" from the "File" menu.
- We find the prepared image and select it (its contents should be displayed in the window).
- Open the "Tools" menu and select the "Burn CD image" item or click on the "Burn" icon on the toolbar (burning disc).
- We set the recording speed (the lower, the better, but the longer the wait) and confirm the action with the "Record" button.

Alcohol 120%
If the Alcohol 120% program is installed on the PC, then you can burn the folder with files to disk using it, here's how it's done:
- This program is designed to create virtual disks, which is what you need to do - mount the image by placing the necessary files in it (using the "Create Image" command in the menu on the left).
- In the left window in the list of commands, select the item "Record images" and follow the further instructions of the program.

Nero
In my opinion, the most convenient program for such purposes is Nero (users often affectionately call it “Nyurka” among themselves), I will briefly describe how to burn a folder with files to disk through it:
- We launch Nero and select the type of future media - CD or DVD with data, audio CD or video DVD.

- In the next window, in the two departments on the right, we find the prepared folder and drag it into the second window on the left.
- You can add documents as long as there is enough capacity, as indicated by the green bar and scale at the bottom of the window.

- To start the “burning”, press the button in the form of a blank and a burning match.
- Set the speed parameter, press the "Burn" button and wait for the end.

Friends, I brought only three programs. There are many of them, but I was asked to suggest how to burn discs with these particular softwares. If there is a need, I will describe others. Specify the names in the comments. All for now.
Dear friends, let's talk about how to copy music from disc to computer. Before moving on to this topic, you need to know that music on a disc can be recorded in several ways.
The first is recording mp3 files, like any other documents. With this method, there are no problems with copying music to a computer. Just open the disk on the computer, select the files and copy them to the desired folder on the computer. Everything is very simple.
The second way is to burn music onto an audio CD with copy protection. On such discs, usually no more than 20 songs in good quality. Songs from such a disc cannot simply be selected and copied, only labels will be copied. That is, such songs will not be available in the future. Therefore, further we will talk about how to copy a cd disk to a computer.
We install the disk in the drive and run it. To do this, go to "My Computer" - "Devices with removable media" and double-click on the disk icon.

The disc will launch in Windows Media Player. In the upper right corner, click on the "Switch to Library" icon. Let's go to the library.


In the window that opens, you can change the parameters of the copied files from the disk, namely:
- specify the folder to which the files will be copied;
- select the format of the copied files, for example mp3, WMA, WAV;
- change the quality of audio tracks, the better the quality, the larger the volume of the audio file will be.
After making changes, click the "Apply" button and close the window.

We return to the library again and in the top menu click "Copy to CD". Here you can also select the tracks that you want to copy or copy all.

Now we get into the "Rip Options from CD". Here you need to select the two lower positions and click the "OK" button.

The copying process will be displayed in the library as a green bar opposite the track. The ripping speed depends on the selected quality of the music files.
In this way, you can copy music from a disc to a computer in Windows XP, Windows 7 and Windows 8 without installing additional programs, but using the operating system itself.
Music ripping software
In addition to the method described above, there are many more free programs with which you can easily transfer music from a disc to a computer. Let's look at the most popular ones.

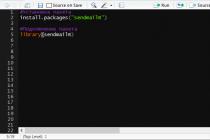
Accord CD Ripper Free is a free program for ripping audio CDs to MP3 or WAV files. The program itself has an English interface, but one is quite simple.

is a free audio and video file converter. To record audio files from a CD, just insert the disc into the drive and select the “Audio” item in the left sidebar, then the format into which you want to convert the files. We make additional settings and copy. We enjoy music.

— free converter of audio tracks from a CD to MP3, OGG, AAC, WMA or WAV (lossless audio) format.
As you can see, there are many options, choose the one that suits you best and go ahead!
How to burn music to disk in a car, instructions.
Do you want to learn how to consistently earn on the Internet from 500 rubles a day?
Download my free book
=>>
I, during my trips, like to listen to motivational songs on the road, which I have already written about on my blog more than once.
These are personal growth books by renowned coaches such as:
- and very many others.
But, as you understand, today we will not talk about books, and even more so not about me, but about music.
Basically, all motorists like to listen to music on the road. Radio quickly gets bored, I want to enjoy only my favorite songs. In such cases, a disc helps out, on which you can record any music. Let's see how to do it.
How to burn music to a disc in a car, choosing a disc
First, you need to select the disk on which the music will be recorded.
There are many options:
- CD-R;
- DVD-R;
- mini disk;
- blu-ray.
The last two options have a large capacity and are rarely used for recording audio files. The most popular for this purpose are CD-R and DVD-R discs.
But, they can write files only once. If you plan to delete music and upload new music, it is better to purchase a CD-RW (DVD-RW) disc, or burn to flash drives.
Recording method
The very process of writing files to a disc is very simple and resembles the usual copying of music from one place to another. For recording, the function of creating a data disc is selected. It is available in every program designed for these purposes, I will write about them a little lower.
Please note that some recording parameters can be changed (recording speed, depth, bitrate, and others). The default settings are set to standard. The files recorded with them are small in size, which is very convenient.
Programs
Let's see what program you can use to record. In fact, there are a huge number of such programs.
But, the easiest way is to use the standard Windows Media file playback program, or Windows tools.
After you insert the disc, Windows itself will offer you a list of actions that you can perform. Just double click on the drive to open it.

You will be asked what you want to do. Check the option to record the disc and give it a name.

When choosing a format, it is better to note the second item, recording for computers and specials. players.

Writing to disk is very easy. Select the files you need, drag them to the disk with the mouse.

Click on the panel - record. You can right-click on free space and also choose to write to disk.

Specify the speed for recording, it is better to choose the minimum, but you can choose any.

Many users refuse to use standard programs to burn a disc. The reason for this is the lack of additional features.
There are universal programs that are loved by many users:
- Nero Burning ROM;
- Nero Express;
- makecd.
They are popular due to their versatility and high recording speed. Although, the recording process itself is almost no different from the method described by me above.
Recording also takes place in several steps:
- The disc creation mode is selected;
- Prepared files (or entire folders) are added;
- The name of the disc is given (optional);
- The disc is being written.
Recording settings
This process is the most important. You need to configure the device that will be used to burn the disc. Select the smallest write speed. Thus, the quality of the recording will not suffer.
Before you start burning, set the option to check the disc after burning. You will be able to make sure that the disc was burned successfully and the quality was not affected.
If you want to change the sound settings, then, for these purposes, you will need to install professional programs.
How to burn music to disc in the car, the result
Burning audio files to a disc in a car is easy. There are many different tools for this. Use our tips and enjoy your favorite music.
Enjoy listening to music on the road! Although, for a change, I sometimes suggest listening to audiobooks, I think that they will not leave anyone indifferent.
P.S. I am attaching a screenshot of my earnings in affiliate programs. And I remind you that everyone can earn money in this way, even a beginner! The main thing is to do it correctly, which means to learn from those who are already earning money, that is, from Internet business professionals.
Check out the list of verified 2018 Affiliate Programs that pay money!
Download the checklist and valuable bonuses for free
=>> "Best Affiliates of 2018"


In Windows operating systems, starting with the 7th version, it became possible to burn files to CDs without the help of third-party programs such as Nero. Now it is possible to do this with built-in Windows tools. Exactly how we will talk in this article.
Preparing files for recording
First you need to insert the disc into the DVD drive. Windows should define the given disk as blank, or rewritable.
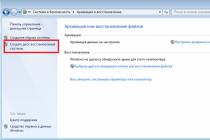
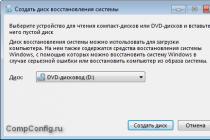
Start burning a disc
In the window that appears, you need to click "Burn files to disk", after which you will be prompted to select the option to use the disk after burning. You can also specify a disk name. Select the required option and click "Next".

Selecting the Type of Recordable Disc
Then a window will open in which you need to drag the files that you want to burn to this disk. You can also just copy and paste them here.

Moving files to disk
After adding files to write about this, a corresponding message will appear with the text "There are files waiting to be written to disk."

Writing or deleting prepared files
Now it remains only to write these files. To do this, at the top left, click the "Burn to CD" button.

The second way to write prepared files
The same operation is available by right-clicking the DVD drive icon in the "My Computer" local drive window and selecting "Burn to disc" in the window that opens.

Specifying Recording Options
A final window will appear before recording, where you can change the name of the disk, as well as specify the recording speed.
How to delete files waiting to be written to disk?
If you suddenly change your mind about writing the prepared files to disk and you are periodically worried about the message about these files, then in order to remove it, you need to delete the files for recording.
To do this, go to the disk through the drive icon in the local disk window "My Computer" and delete files marked "Files prepared for writing to disk" with the "Delete" button.