Lastmanuals volunteer services sharing, storage and retrieval of instructions for the use of various equipment and software: user manuals, manuals quick start work, information about technical characteristics ah ... PLEASE READ THE USER MANUAL BEFORE PURCHASING THE PRODUCT !!!
If this document is the instruction manual you are looking for, download it. Lastmanuals gives you quick and easy access to NIKON instructions D3100. We hope you find this NIKON D3100 manual helpful.
Lastmanuals will help you download your NIKON D3100 user manual.
You can also download following instructions related to this product:
NIKON D3100 (15885 ko)
NIKON D3100 BROCHURE (4707 ko)
NIKON D3100 BROCHURE 2 (6295 ko)
Fragment of instructions: user manual NIKON D3100BROCHURE
Detailed instructions for use are contained in the User Guide.
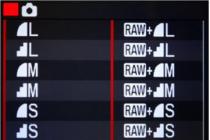
[. . . ] Additional features The D3100 offers Hi 1 and Hi 2 settings, effectively raising ISO sensitivities to 6400 and 12800 equivalents, respectively. Hi 2 (ISO 12800 equivalent) ISO 3200 ISO 1600. Lens: AF-S DX NIKKOR 18-55mm f / 3, 5-5, 6G VR. Exposition: auto mode aperture priority, 1 / 125s, f / 5, 6. White Balance: Auto. ISO sensitivity: 100. Picture Control: Vivid 4 5 S e ttin g Ja n g S t e r t h e s t a t h e s t A camera that teaches you ... The D3100 will make your dreams of better shots come true Easy C a m e r Help mode - a reliable way to get things you want Help mode Charming portrait with a soft blurred background or a couple radiating happiness surrounded by glowing lights. The D3100's Help Mode makes it easy to take such pictures - an on-board guide guides you step-by-step through how to change camera settings. All you need to do is select the Help Mode setting that matches the shooting scene and follow the prompts. You will not only achieve the desired result, but also understand how you did it. [. ... ... ] This solution includes a special air flow control system that changes the direction of dust movement so that it does not fall on the infrared filter in front of the sensor. In addition, when the camera is turned on or off, the filter vibrates at a precisely set frequency to remove dust particles that degrade image quality. Reducing blur in the image and viewfinder caused by camera shake Infrared filter View pictures with amazing special effects. Nikon Vibration Reduction. Viewing images with transitions NEW When viewing images, you can select one of the special transitions. When viewed as a slideshow, you can use effects such as Zoom In / Fade Out and Cube. If you are viewing pictures one at a time, you can apply the Slide or Zoom in / out effect. The large, bright LCD monitor makes viewing even more enjoyable. Slideshows with Cube Effect NIKKOR VR lenses reduce * blur in pictures and Full HD movies caused by camera shake when shooting at slow shutter speeds, such as in low light conditions, or when using micro or telephoto lenses. Unlike in-camera image stabilization systems, Nikon Vibration Reduction is located in the lens, which eliminates blur in the viewfinder, which is inherently Without built-in shake reduction With the camera's built-in VR Nikon system, the queue helps frame and focus because * VR allows shooting without a tripod at three stops slower (four stops longer with VR, the image remains stable. II) than non-VR lenses measured by Nikon. The level of correction depends on the shooting conditions and the photographer. 12 13 Intelligent Image Control by Image Computer (Supplied) NEW System Diagram VIEWFINDER ACCESSORIES Eyepiece Correction Lenses (-5 to +3 m-1) DK-20C. ViewNX 2 Software - Processing Tools ViewNX 2 is a convenient way to manage images, allowing you to store, view, edit, and share your snapshots and movies. You can also tag pictures to make it easier to find. This software offers a wide variety of editing functions, including rotation, resizing, cropping, straightening, automatic red-eye reduction, and more. Movie editing functions allow you to delete scenes. ViewNX 2 software integrates seamlessly with my Picturetown and lets you drag and drop images to download and view online. Speedlight SB-900 Speedlight SB-600 Speedlight SB-400 R1C1 Macro Flash Commander Studio Flash * 2 Nikon SB-900/800 / 600/400 NIKKOR LENSES AF-I NIKKOR equipped with an autofocus motor. Magnifying Eyepiece DG-2 Right Angle Viewing Attachment DR-6 Eyepiece Adapter DK-22 Eyepiece Cover DK-5 * 1 Shoe for Remote Accessory Cable TTL AS-15 SC-28 / SC-29 Adapter Note. AF-assist illuminator turns off when the SB-400 is used. Rubber eyecup DK-20 * 1 TV ACCESSORIES HDMI cable * 2 TV * 2 REMOTE CONTROL EG-D2 video cable GPS device GP-1 Cable remote control MC-DC2 COMPUTER ACCESSORIES CASE Semi-hard case CF-DC1 SD memory card * 2 PC Card adapter * 2 SD memory card reader * 2 Personal computer * 2 -ionic accumulator battery EN-EL14 * 1 NEW ViewNX 2 * 1 NEW Capture NX 2 AC adapter EH-5a EP-5A power connector NEW UC-E4 USB cable Capture NX 2 upgrade * 1: Included accessories * 2: These items are not manufactured by Nikon Intuitive controls for finishing touches Controls 1 2 3 Mode dial Shooting mode selector Info button Exposure compensation button / Aperture button / Flash compensation button Shutter button Power switch AF-assist illuminator / Self-timer lamp / Red-eye reduction indicator Accessory shoe for optional flash units Flash mode / Flash compensation button Microphone Function button Lens release button Playback button 14 15 Menu button Thumbnail / Playback zoom / Help Button Playback Zoom Information Change Button Viewfinder Eyepiece Diopter Adjustment Button a AE-L / AF-L / Protect button Command dial Live View switch Movie-record button Multi selector OK button Delete button Speaker Monitor. Capture NX 2 Software - Advanced Control over creative process(sold separately) 1 2 3 4 5 8 9 18 19 10 11 20 21 22 4 16 17 18 19 20 21 22 23 24 25 26 27 28 5 6 7 Capture NX 2's simple editing tools unleash the potential of an image without compromising his original quality... This software is ideal for optimizing Nikon Original (RAW) NEF files as well as images in JPEG format and TIFF. Thanks to the award-winning U Point® technology, tedious editing is now easier than ever. http: // www. capturenx. com 6 12 13 14 15 16 17 7 23 24 25 26 27 28 8 9 10 11 12 13 Memory card capacity * 1 Recommended memory cards The following tested SD memory cards are recommended for the D3100. We recommend using cards with a writing speed of Class 6 for shooting movies. Shooting may interrupt unexpectedly when using cards with a slower writing speed. SanDisk Toshiba Panasonic LEXAR MEDIA Platinum II Professional SD Memory Cards 512 MB, 1 GB, 2 GB * 1 512 MB, 1 GB, 2 GB * 1 512 MB, 1 GB, 2 GB * 1 512 MB, 1 GB, 2 GB * 1 512 MB, 1 GB, 2 GB * 1 512 MB, 1 GB, 2 GB * 1 SDHC memory cards * 2 4 GB, 8 GB, 16 GB 4 GB, 8 GB, 16 GB, 32 GB 4 GB, 6 GB , 8 GB, 12 GB, 16 GB, 32 GB 4 GB, 8 GB 4 GB, 8 GB 4 GB, 8 GB, 16 GB, 32 GB SDXC memory cards * 3 64 GB 64 GB 48 GB, 64 GB - Share pictures and Web Videos The following table shows the approximate number of images, in varying quality and size, that can be saved on a 4GB SanDisk Extreme SDHC Memory Card. Image quality Image size File size * 1 Number of images * 1 Buffer capacity * 2. my Picturetown - Free storage and sharing of NEF (RAW) + JPEG fine. quality * 3 NEF (RAW) JPEG fine. quality L - LMSLMSLMS 19.8 MB 12.9 MB 6.8 MB 3.9 MB 1.8 MB 3.4 MB 2.0 MB 0.9 MB 1.7 MB 1.0 MB 0.5 MB 151 226 460 815 1700 914 1500 3300 1700 3000 6000 9 13 100 100 100 100 100 100 100 100 100 Nikon's Image Sharing Site makes it easy to store, manage and share images with friends and family around the world. Registration is free and allows you to store up to 2 GB of photos and / or videos. (Pay an additional fee and get up to 200GB of storage *). In addition to JPEG and RAW (NEF, NRW) photos, the service supports MOV and AVI videos. Enjoy working with your photos with my Picturetown! * Availability of JPEG media. quality * 1 If a card reader or other device will be used to read the memory card, make sure that it supports 2 GB memory cards. * 2 If a card reader or other device will be used to read the memory card, make sure that it is SDHC compliant. * 3 If a card reader or other device will be used to read the memory card, make sure it is SDXC compatible. JPEG bottom quality Notes. For questions regarding functions, specifications, warranty card, etc., contact the manufacturer of the SD card. [. ... ... ] 0.5-3 m / 1 ft 8 "to 9 ft 10") -1 to +19 EV (ISO 100 @ 20 ° C / 68 ° F). Autofocus (AF): Single-servo AF (AF-S); Continuous AF-Tracking (AF-C); automatic selection of the AF-S / AF-C (AF-A) mode; Predictive focus tracking, which activates automatically when the subject is in focus. Manual focus (MF): Electronic rangefinder can be used 11 focus points can be selected One-point AF, Dynamic AF, Auto-area AF, 3D-tracking AF (11 points) Focus is locked by pressing the shutter-release button halfway (Single-servo AF) or by pressing AE-L / AF-L (AE-L / AF-L) buttons Auto, Portrait, Child, Macro, Night portrait: Auto flash with auto pop-up P, S, A , M: manually lifted by push button Approx. 12/39, 13/43 at manual mode flashes (m / ft, ISO 100, 20 ° C / 68 ° F) Dimensions (W x H x D) Weight Operating conditions Temperature Humidity Accessories Included accessories Rechargeable Li-ion battery EN-EL14, Charger MH-24, DK-5 eyepiece cap, shipments (may vary with DK-20 rubber eyecup, AN-DC3 camera strap, BS-1 accessory shoe cover, depending on country or region) BF-1B body cap, CD ViewNX 2 Ferrite Core (2 types) Built-in flash Guide number. Microsoft, Windows and Windows 7 are registered trademarks of Microsoft Corporation in the United States and / or other countries. ... Macintosh and QuickTime are registered trademarks or trademarks of Apple Inc. ... The SD logo is a trademark of the SD Card Association. ... SDXC logo is a trademark. [. ... ... ]
DISCLAIMER FOR DOWNLOADING INSTRUCTIONS NIKON D3100
Lastmanuals offers a pro bono service for sharing, storing and retrieving instructions for using various hardware and software: user manuals, quick start guides, technical specifications ...
Lastmanuals accepts no responsibility if the document you need is missing, incomplete, written in a language other than yours, or the model or language does not match the description. For example, Lastmanuals does not provide translation services.
If you agree with the terms of this agreement, click on "Download manual" to start downloading the manual for NIKON D3100.
Camera at work
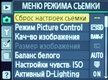
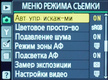
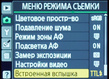
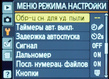
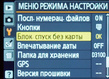
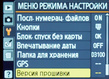
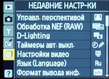
Menu
The menu items in the camera are grouped into five groups, the first contains viewing options, the next two - camera settings when shooting, the fourth - processing and editing tools, and, finally, the fifth - the last used items from the previous four.
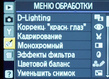
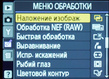
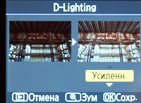
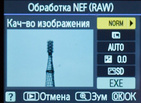
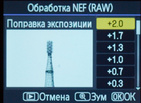
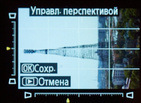
Like previous models, Nikon D3100 allows you to edit images in a fairly wide range. D-Lighting Dynamic Range Optimization, Red-Eye Retouching, Cropping (aspect ratio only), Color Filter Effects, BW conversion, Color Balance Correction, Miniature Effect, Image Overlay, Rotation, Perspective and Lens Correction are available etc..
The new DSLR, despite its low price and compact body, has most of the "adult" functions, including exposure compensation up to 5 EV stops, and quite fast and tenacious autofocus (it's a pity that the cross sensor is only one of 11 - the central one). The exposure meter works quite accurately (there is a choice between matrix, center-weighted and even spot modes), but the camera tends to overexpose contrasting scenes by about 1/2 stop.
Interface
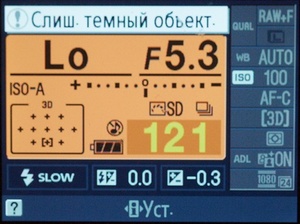
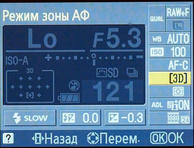
The interface of the camera as a whole is well thought out, questions arise only for a few trifles: the lack of a bracketing mode even in the menu, the graphics of the settings screen are not very successful (there are two types of display, but unlike some competitors' cameras, both modes are not very readable, and switching between them in the menu).
Separately, it is worth mentioning the system of prompts about the functioning of each shooting parameter (and not only exposure - shutter speed / aperture, but also focus modes, metering, etc.) called by the button to the left of the screen. In addition, there is a special Guide mode on the mode selector that allows you to select the desired settings step by step.

The only caveat here is that the font is too large for short English terms. There are too many abbreviations in the Russian translation. The camera menu is quite confusing, which is typical for Nikon (the grouping of items into tabs is not obvious), you get tired of scrolling through long pages - unlike the company's older cameras, this cannot be done with the wheel, but only by clicking the naviped. Rescues the menu of the last used items.
The new shutter mode switch has proven to be a very handy addition to the camera interface. It has 4 positions: single shot, burst (3 fps), self-timer (the choice between 2 and 10 seconds delay is buried deep in the menu) and, finally, quiet mode, in which the camera is slower and quieter to raise the mirror and take a picture. She lowers the mirror only when the photographer releases the shutter button. The advantages of this mode are a softer shutter sound, the disadvantages are a noticeable delay in its operation.
Continuous shooting does not bring any surprises, the camera works through honest 3 frames / s without delays even in RAW + Jpeg format (8 frames are placed in the buffer, then you have to wait until the files are written to the memory card).
Also, the camera has eliminated a serious drawback of its predecessor - now, when the active D-Lighting dynamic range optimization function is enabled, the camera does not slow down the shooting rate. Nevertheless, there were some oddities - the Auto D-Llightning dynamic range optimization setting cannot be made before shooting (only on or off), but in the edit menu you can select the desired exposure level - not very convenient.
The in-camera Auto ISO setting is standard for Nikon and, unfortunately, is poorly adapted for amateur photography. The photographer can set one maximum shutter speed (default 1/30) at which the camera will increase the sensitivity, regardless of the focal length. This mode is designed to deal not with shaking hands, but with blurring from moving people and objects - a function that is more needed in a reportage.
Another feature of this approach is the following: if the photographer needs to change the sensitivity manually, and it goes out of the range specified in the Auto-ISO menu, then nothing will come of it - the camera itself will set the sensitivity from the range selected in the menu (by default - 100-1600). To set a different sensitivity (for example 3200), you must first turn off the Auto-ISO function in the menu.
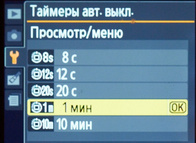
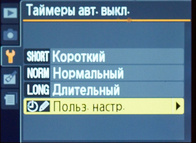
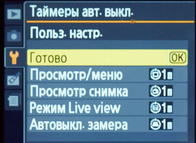
The camera uses up battery power quite economically, which is good news (a new EN-EL14 battery is used, the same capacity as its predecessor, but slightly higher voltage, and therefore is not compatible with other models). In the menu, you can set the shutdown timers of the camera separately for different modes... This is especially valuable for such gluttonous features as LiveView and video.
Screen and viewfinder
The screen is quite large and bright, but the contrast drops noticeably in bright sunlight. The small icons of shooting settings become difficult to distinguish. Its resolution is not always sufficient for an accurate assessment of focus. You have to enlarge the center of the frame, which is not very convenient when viewing a photo just taken when using the side AF points.
The viewfinder is typical for cameras entry level... The magnification factor is x0.8, the coverage is 95% of the field of the frame, the focusing screen is not interchangeable.
To the right of the rubber eyecup is the diopter adjustment wheel (from -1.7 to +0.5 diopters). The correction range is small, which can cause problems for people with imperfect vision.
Among the innovations - only the new illumination of the selected AF point, made very well and clearly distinguishable even when shooting contrasting sun scenes.
Autofocus
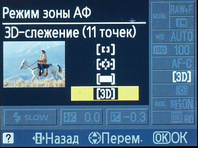
The camera is equipped with an 11-point phase-detection AF sensor and contrast AF mode for video and LiveView. The camera focuses confidently and accurately. In poor lighting conditions, it is advisable to choose only the central point - it has a cross-shaped sensor and is the most tenacious. Tracking AF has proven to be effective in practice, including auto focus point selection and 3D subject tracking. In addition, this is one of the few modern amateur DSLRs where you can quickly change the focus point without looking up from the viewfinder and without going into the menu.
Like all younger models of DSLRs from the company, Nikon D3100 does not have a focusing motor built into the camera (it is located in the lens), and old lenses (not AF-S or released by other manufacturers and not equipped with a built-in motor) will have to be focused manually. In this case, the focus sensors will work, and a hint will appear in the viewfinder in which direction to turn the ring.
But still good old lenses with manual focus (like Nikkor Ai-s 35mm f / 1.4) will be quite problematic to use - in addition to the lack of autofocus, the exposure meter will also be turned off (even in LiveView and video mode).
Live View and Video
The screen mode appeared in this camera right away with video recording and AF-F mode - contrast autofocus. The image quality in this mode is good, no annoying delays were noticed, but when you try to zoom in, the picture immediately disintegrates into large blocks of pixels. They are clearly larger than pixels at 100% view. Manual aiming is not very convenient. And this further complicates the work with non-autofocus optics.
Estimates - 18, average: 4.5
()
Nikon Instruction Manual Model D3100
Fragment of instructions
To restore normal flash output, set the flash compensation to ± 0. Turning the camera off does not reset flash compensation. A The Y (M) and E Buttons Flash compensation can also be set by rotating the command dial while pressing the Y (M) and E buttons. The selected value is displayed in the viewfinder and information display. Y (M) button E button Command dial –0.3 EV +1 EV A Optional Flash Units Flash compensation is also available with optional SB-900, SB-800, SB-600, SB-400, or SB-R200 flash units. The SB-900, SB-800, and SB-600 also provide the ability to set flash compensation using flash controls. Flash compensation set by the optional flash unit is added to the compensation set by the camera. t Active D-Lighting When "On" is selected, the camera automatically adjusts the Active D-Lighting state during shooting to preserve detail in shadows and highlights, allowing for photographs with natural contrast. photograph a brightly lit view through a door or window, or shaded objects on a sunny day. Feature most effective when used with L Matrix metering (079). Active D-Lighting! Off. Active D-Lighting "On. 1 Move the cursor to the information display. If shooting information does not appear in the monitor, press the P button. Press the P button again to place the cursor on the information display. Information Button P Screen t 2 Display Active D-Lighting options. Highlight D-Lighting in the information display and press J. 3 Select an option. Highlight On or Off and press J. Press the shutter-release button halfway to return to shooting mode. D Active D-Lighting Noise (randomly spaced bright dots, streaks, Uneven shading may be noticeable on some subjects A Active D-Lighting and D-Lighting The Active D-Lighting option in the shooting menu adjusts exposure before shooting to optimize dynamic range, while D-Lighting in the processing menu (0153) optimizes dynamic range images after shooting. A The Shooting Menu Active D-Lighting can be adjusted using the Active D-Lighting option in the shooting menu (0131). A See Also For information on using the Fn button and command dial to turn Active D-Lighting on and off, see page 146. t White balance White balance ensures that colors do not change depending on the color of the light source. Auto white balance is recommended for most light sources; in P, S, A, and M modes, you can select other values according to the type of light source if necessary: Option Description v Auto Automatically adjusts White Balance. Recommended for use in most cases. J L-s incandescent Use under incandescent lighting. I L-s daylight Use under light sources listed on page 88. H Direct sunlight. Use when shooting subjects in direct sunlight. N Flash Use with flash. G Cloudy Use in cloudy weather. M Shade Use for subjects in the shade. L Manual setting Take white balance measurements or copy white balance value from existing photograph (090). 1 Move the cursor to the information display. If shooting information does not appear in the monitor, press the P button. Press the P button again to place the cursor on the information display. t Information button P screen 2 Display white balance options. Highlight the current white balance setting in the information display and press J. 3 Select a white balance option. Highlight one of the following modes and press J. To return to shooting mode, press the shutter-release button halfway. A The Shooting Menu White balance can be selected using the White balance option in the shooting menu (0 131), which can also be used for fine tuning white balance (0 89), or to measure the value of the set white balance (090). The I L daylight option in the White balance menu can be used to select a light source in more detail from the list of lamp types shown at right. A Color temperature Human perceived color depends on vision and conditions the environment... Color temperature is an objective measure of the color of a light source, defined as the temperature of an object at which it emits light of the same wavelength. While light sources with a color temperature in the range of 5,000–5,500 K are perceived to be white, light sources with a lower color temperature, such as incandescent lamps, are perceived to be slightly yellowish or reddish. Blue tones are present in light from sources with a higher color temperature. The white balance parameters are adapted to the following color temperatures: t I ...