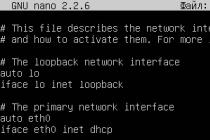
If you have Windows 10 installed on your computer or laptop, and you do not know how to take a screenshot of the screen, then you have come to the right place. In this article, I will collect a few of the simplest and better ways that can be used to take a screenshot in Windows 10.
Windows 10 has at least 4 different standard way that you can take and even edit a screenshot on a computer, laptop, or tablet. By the way, if you have a tablet, then to take a screenshot, press the Win key + the volume down button. These are all standard operating system functions. Without installing special programs for creating screenshots, etc. And all these methods are very simple and working. You can take a screenshot in a few seconds. Save it, edit it, and if necessary, share it in social networks, or in another way.
If you need to take screenshots every day, and immediately edit them, then of course it is better to install some kind of third-party program. There are a lot of them. Free, paid, and with a different set of functions. I personally use PicPick. There is free version"for home". The program is in Russian, light and functional. It is completely suitable for creating screenshots in Windows 10. There is a small editor in which you can draw arrows, write something, draw something, etc. I will tell you about this program at the end of the article. First, let's look at the standard features.
Making a screenshot in the "Scissors" program
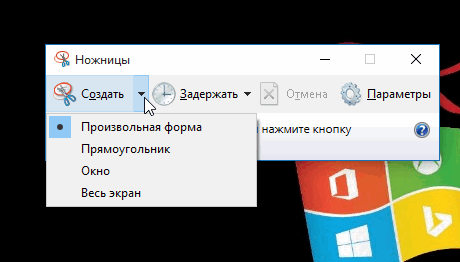
The best option I consider a classic program called "Scissors". To run it, in the search (on the taskbar) enter "scissors", and run the program in the search results.
To take a screenshot, just click on the "Create" button. Or click on the arrow next to the button and choose one of four options for creating a snapshot: free form, rectangle, window, full screen. It is also possible to enable a delay of a few seconds. For example, to have time to open some window or menu.
Then we create a screenshot of the area of the screen, window, or other element we need. The fragment will immediately appear in the editor. There is an opportunity to draw something, and of course save the picture to the desired location on your computer. When saving, the .png format is automatically set. But it can be changed if necessary.
As you can see, everything is very simple. Nothing extra. But everything you need is there. To quickly take a snapshot of some area of the screen, or window, the "Scissors" program is more than enough.
Windows 10 Print Screen key to take a screenshot
Probably the easiest way is to take a picture using the key Print Screen... Such a key is definitely on the keyboard of your laptop, or PC (somewhere closer to the right top corner). Most likely it will be signed as PrtScn.
Please note that if you have installed third-party screenshots programs on your computer, they can "intercept" the Print Screen key. And then this way will not work until you close these programs
Windows 10 has several Print Screen key combinations. I show:

Here's a function key that many don't know about.
Screenshot via Win + Shift + S key combination
This is a new way, and if your Windows 10 is not updated, then most likely it will not work for you. This opportunity appeared after the installation of the update version 1703 (it was released around April 2017).
How this method works: just press the keyboard shortcut Win + Shift + S
Select the area to be screened.
The created snapshot will be placed on the clipboard. From there, you can paste it into different editors (like Paint or Word) using the Ctrl + V keyboard shortcut.
Microsoft Snip Editor
Snip Editor is a new program from Microsoft that lets you take a screenshot in Windows 10 and edit it. The program itself seems to be designed to replace the standard "Scissors" (which I wrote about above). However, Snip Editor is more functional, and the interface is optimized for touch screens.
The icon will be in the notification bar, and a small bar will be glued to the edge of the screen (it can be moved). Hover the mouse over this panel, and we see three large buttons: take a screenshot, open the editor, and start the web-camera.
Select the required area, or press Enter to make a screenshot of the entire screen. The program will also be called by the Print Screen button. The created snapshot will immediately open in the editor.
The first button "Record" allows you to record the annotation. When you explain something and show it in the generated screenshot. So you can draw something, then save it, or share a fragment.
In the settings, you can disable the panel itself (if it bothers you), start at Windows startup, assign keys, and set the delay before taking a snapshot.
Despite the fact that the program is still on English language, it is very simple to work in it. Nice and intuitive interface. I advise!
Screenshot full screen via Win + G - Game bar in Windows 10
Pressing the Win + G keyboard shortcut in Windows 10 will open the Game bar. It is designed to record videos and take screenshots in games and applications that are open in full screen.
It is enough to click on the "Screenshot" button. Or press the keyboard shortcut Win + Alt + Print Screen.
The pictures created through the game panel are saved in the "Videos" - "Clips" folder.
PicPick is a screenshot program for Windows 10
I am by no means claiming that this is best program... There are a lot of them. It's just that I have been using PicPick for a very long time, and it suits me completely. Plus, it's free (home version). Therefore, I decided to show it to you, suddenly it will come in handy.
I recommend downloading the program from the official website: http://ngwin.com/picpick/download?lang=ru
After installation, the PicPick icon will appear on the notification bar. To open the main window of the program, click on more than two times. Or right-click. You can choose one of the options to take a screenshot, or open the editor. In addition to these functions, there is also a ruler, color palette, zoom window, etc.

After switching to Windows 10, I continued to use the PicPick program. You can watch it, maybe you will like it.
I think the above methods are more than enough to quickly take a screenshot in Windows 10, edit it and save it. If you make screenshots in some other way, you can share them in the comments. Well, ask questions on the topic of this article, I will definitely answer everyone!
Hello everyone! Many have heard of the existence of such a thing as a "screenshot" or "screen", but still some do not know what it is, let alone how to take it. Friends, a screenshot is a snapshot of your screen, that is, a snapshot of what is shown on the monitor at a certain moment. Surely you have come across more than once on social networks with the phrases "discard the screen" or "provide a skin shot" or so on. In fact, taking a screenshot is as easy as shelling pears, even in windows 10. Let's take a look at that.
How to take a screenshot without third-party software
The easiest way make a skin shot without any third-party programs- use standard windows tools 10. To do this, open what needs to be photographed (some window, desktop, program, etc.) and press the Win + PrtScr key combination,

the screenshot will be saved in the "Pictures" folder. Let's go to it, go to the explorer and select the images,

now go to the "Screenshots" folder

and see our screenshots in it. Shoot the screen at least every second with the Win + PrtScr combination and all screenshots will be saved in this folder. In Windows 7, taking a screenshot is a little more difficult, you can read it.
How to take a screenshot of a specific window in Windows 10
Friends, sometimes it is necessary take a screenshot of a separate window instead of the entire desktop. You can, of course, take a screenshot of the entire screen, paste it into any graphics editor, cut it and save it, but there is a much simpler option. Make the window you want to screen active and press the Alt + PrtScr key combination,
At this moment, the active window will be photographed and transferred to the clipboard. Now let's open a graphical editor and insert a screenshot. Find Paint in the search menu and open it,

The window of the graphic editor Paint will open, click on the "Insert" button,


How to take a screenshot in Windows 10 using a third-party program
Today there are a huge number of programs for taking screenshots. There is how paid versions and free. I will dwell on only one of them, which I have been using personally for more than a year. It is called ScreenCapture, you can download it at http://www.screencapture.ru/download/
After downloading the program, open and install it,
Still, a large number of computer or laptop owners have not figured out latest version operating system from Microsoft. For this reason, the question often arises: "How to take a screenshot of the screen on a computer on Windows 10?". All inexperienced users who need to capture what is happening on the desktop of the monitor face a similar problem.
The operating system allows you to take screenshots in several different ways... It is not necessary to download additional programs. Built-in standard functions allow not only saving a picture, but also immediately editing it. This article covers the simplest options for taking a screenshot of your Windows 10 screen.
Dedicated Print Screen key
Operating room keyboard developers Windows system specially brought out a separate button so that users can quickly and easily take a snapshot of the work area. It is located in the area of the upper right corner. In most cases, it has an abbreviated inscription PrtScr or PrtScn.
If the laptop or computer is already installed special program to save images, the screenshot in Windows 10 using the key will not work until such add-ons are disabled.
Some keyboard shortcuts with "PrtScn":
- A simple press of Print Screen will make the inexperienced user nervous as nothing will happen. The fact is that a full-screen screenshot is automatically taken and transferred to the clipboard. To place the image in the desired location, just open the Paint or MS Word application. Paste is carried out by the combination Ctrl + V (or the right mouse button - "Paste").
- Pressing two keys Win + PrtScn is responsible for instant saving the snapshot. If you follow this consistently, then a fair question arises: "Where are screenshots saved on Windows 10?" To find it, go to "Explorer", on the left, click "Pictures" and go to the "Screenshots" folder.

- Pressing Alt + PrintScreen at the same time allows you to take a screenshot of the selected window. Further actions to save and edit it are carried out as in the first case.
Thanks to the Printscreen key on Windows 10, you can take unique images of the desktop, and many do not even know about its functions.
How to take a screenshot on a Windows 10 computer with Scissors
This option has advanced features compared to using the Print Screen key. To quickly switch to a classic application, you need to write down its name in the search bar and click the left mouse button.

Working functionality opens. To save an image of the workspace, you just need to click "Create". After that, a certain area of the screen is selected, which must be converted into a picture. Additional features are launched by clicking on the "Mode" button next to "Create". A list opens, allowing you to select the mode for creating a screenshot:
- the whole screen;
- rectangular area;
- free form;
- separate window.

Depending on the selected option, an area of different sizes is captured.
"Hold" allows you to set a timer for a few seconds, so that the user has time to open the desired menu or window.

The selected fragment or full screen is reflected in the editor of the "Scissors" application. This allows you to immediately make adjustments to the new image (erase, add an inscription or underline an important area with a pen, marker).


Now every unsure user will know how to make a screen on a laptop (computer) with Windows 10. There is nothing difficult in this procedure, since you do not need to download additional applications... All major components are included in the standard set of the operating system.
Windows 10, like previous versions of this operating system, has built-in tools for. In this article, we will show you how to take a screenshot of the screen in Windows 10 in three different ways.
Method number 1. Key combination Windows + PrintScreen
If you want to take a screenshot of the screen on Windows 10, then the easiest way is to use Windows + PrintScreen. When using this key combination, the system takes a screenshot of the entire screen.
In this case, the resulting picture remains in the clipboard, and is also saved in the Libraries in the \ Pictures \ Screenshots folder. Thus, when using this key combination, you get a ready-to-use screenshot.

Method number 2. The "Scissors" program.
Also in the operating room Windows system 10 left. With the help of which you can take a screenshot of an arbitrary part of the screen. To run this program open the Start menu and enter the search term "Scissors".

With the help of the "Scissors" program, you can take a screenshot of the entire screen, an arbitrary area, a rectangle or a separate window. In order to select one of these options, you need to open the drop-down menu "Create".

Also, the user can adjust the delay before taking a screenshot from 0 to 5 seconds. During this delay, you can open the desired window or perform other actions that should be displayed on the screenshot.

After taking a screenshot, the Scissors program allows you to take handwritten notes directly on the captured image.

Method # 3. PrintScreen key and Alt + PrintScreen key combination.
Also in Windows 10, you can take screenshots by simply pressing the PrintScreen key. After pressing this key operating system will take a screenshot of the entire screen and place it on the clipboard. In order to save such a screenshot as a file, you need to open any graphics editor and paste a picture from the clipboard into it.

Alternatively, you can use the Alt + PrintScreen key combination. In this case, a screenshot of not the entire screen will be placed on the clipboard, but only the active window.
In this guide, we will look at the tools built into the OS, with which you can take a screenshot in Windows 10, and for free and without using third-party programs. Some of them will also work on previous versions Windows OS.
How to take a screenshot in Windows 10
There are three ways to take a screenshot in Windows 10. Let's start with the simplest and most traditional method - the Print Screen (PrntScr) key. Next, let's take a look at the OS built-in, simple and slightly updated Scissors tool. Finally, I'll show you how to use the Xbox Game Bar feature, which can also capture screenshots. There is another tool called Microsoft Snip, which we will also cover at the end of this article.
1. Standard method with the Print Screen key
PrntScrn key allows you to take quick screenshots and saves it as a picture in PNG format. This works not only in Windows 10, but also in earlier versions of Microsoft OS. The key is located in the upper right part of the keyboard and can have one of the following names: PrtScr, PrntScrn, Print Screen, or something similar.
When you press it, a screenshot of the entire screen is saved to the computer's temporary memory, called the clipboard, which can then be used in text or graphic editor(Word, Paint, Photoshop or any other editor that can work with images) by executing a command from the "Insert" menu (or hotkeys CTRL + V).
If you want to immediately save the snapshot as an image file, use the combination "Win (Windows logo) + PrtScn". Your screen will turn off for a moment, and your screenshot will be saved to the Screenshots folder, which is located in the default Pictures folder.
In case you need to take a screenshot of one window instead of the entire screen, use the Alt + Print Screen keys, having previously prepared the window on top of the others (i.e. making it active). After that, your screenshot is also placed in the computer's memory, from where you can paste it into any editor that can work with images.
2. Screenshot using the Scissors program
The Scissors program appeared in Windows in early versions of the OS, and had one small drawback: it could not capture snapshots of pop-up menus and windows, which in new windows 10 was fixed by adding new function"Detain".

When you press it, you are prompted to select the amount of time in seconds from 0 to 5 to delay the screenshot. For example, if you want to take a screenshot of the Start menu, open "Scissors" and set the delay time to 3 seconds. Next, click the "Create" button - from this moment you have 3 seconds to prepare the screen (in our case, open the Start menu). After this time, you can take a picture, depending on which shape you previously selected (a small black arrow next to the Create button opens a list of 4 shapes).
3. Xbox game bar in Windows 10
The Xbox Game Bar, which comes preinstalled with Windows 10, also lets you take screenshots and even record videos. The app can only capture snapshots of the active window.
To get started, open the app, go to its settings and make sure the "Capture screenshots using Game DVR" option is enabled. Here you can also change the default keyboard shortcuts to your preferred ones.
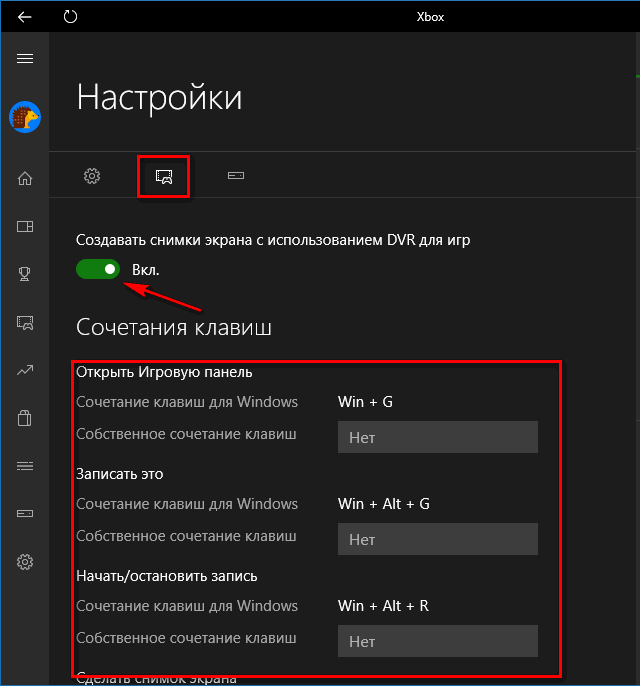
When you're done adjusting the options, press Win (with the Windows logo) + G (or whatever you changed to) to open the Game Bar. If prompted, click Yes, this is a game. Then you select the camera icon and a screenshot of the active window will be saved to: C: \ Users \ [your username] \ videos \ clips.

4) Microsoft Snip Tool
Most recently, Microsoft released new program to work with screenshots for Windows users 10 - Snip Editor. In many ways, the program is similar to the above-mentioned "Scissors", but unlike it, Snip is not built into the OS, you need to download it from the official Microsoft website.
In addition to working with screenshots, the program also provides you with advanced features such as annotations for screenshots, annotations and even audio with your voice with the ability to share them. You can download the program on the official website:
Once installed, Snip will be minimized at the center of the top of your screen, and will expand on hover.

Select the rectangular dotted icon to capture a screenshot of your screen. After that, if necessary, you can add annotations and voice memos. There is also a handle icon, which opens the Editor, and a camera, which opens the Webcam.
I have listed the best, in my opinion, ways to take screenshots on Windows 10 without using any third-party tools, which you can also explore and try. But in this article I decided not to write about them, since I think that this is a topic for a separate material. For basic tasks and most users, the above methods are more than enough.