(Skype) is far from new, and has already won its many followers, whose number has been growing relentlessly for more than ten years.
Thanks to Skype, access to free communication in real time is opened with the ability not only to hear, but also to see the interlocutor. All that is needed in order to use this means of communication is access to the Internet, the presence of an installed program, as well as a headset and a webcam.
Initial settings
During installation, the program prompts you to enter the initial settings, create an account or log into an existing account, set an avatar, and check the quality of sound and video. You can immediately use the advanced settings function. By clicking the "Continue" button, you go to the main application menu.
Before setting up Skype, you can add the interlocutors you need to your contact list. Under the avatar there is a search field with the familiar magnifying glass icon. Using the search and exchange of contact data, a list of contacts is formed on the left side of the application.
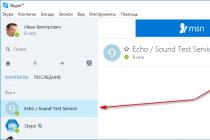
The default contacts are Echo / Sound Test Service. Using this service, you can check the presence of sound and video in the program.

If you are the owner of a modern laptop, netbook or tablet, where you have installed Skype, such devices already have a built-in microphone, speaker and camera, there should be no problems with communication performance, and figuring out how to set up Skype will not be difficult. But if you need to additionally connect a headset and a camera to the computer, then at first the inexperienced user may have some difficulties.
Setting up microphone and sound
The serviceability of the equipment and the correct connection of the microphone to the computer will determine the operation without additional adjustment. After making the connection settings on the PC, installing the necessary drivers, the question of how to set up the microphone in Skype will not appear, since the application will set by default all the parameters necessary for operation.
Steps to take when there is no sound in Skype:
- First, make sure that the microphone and speakers are connected to the appropriate connectors on the computer.
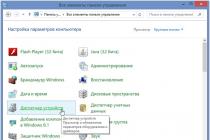
- Now we check the connection to the system using the "Control Panel", which is invoked using the "Start" menu. Go to the "Hardware and Sound" tab, select "Sound". In the appeared settings window in the "Recording" tab, the microphone icon should be displayed. If your computer uses multiple sound cards, you must select the one to which the device is connected. In the case when the microphone is built into the webcam, we select its name. Right-click "Connect".

- The icon for the connected speakers is displayed on the Playback tab.
 If the device is inactive, also select "Connect" on the icon with the right mouse button. In the speaker and microphone properties tab "Levels" of both devices should reach one hundred percent, if not - just drag the slider to the right to the end. However, the microphone gain should not exceed +10.0 dB, otherwise it will not please with its distorted sound.
 - If the necessary system parameters are configured correctly, and the sound directly in the application still does not appear, consider how to set up a microphone in Skype. To do this, go to the "Tools" tab in the program, the "Settings" section and select the "Sound settings" item.

- It is advisable to check the boxes in the appropriate places to automatically configure the speakers and microphone, and then save the specified parameters. During a conversation, the green bar of the microphone volume should fluctuate slightly, but if there are sharp fluctuations in the sound, then it is better to disable this option.
- We launch the Echo / Sound Test Service to test the sound. Provided that all settings have been entered correctly, after the test recording, you will hear your voice from the speaker.
- After you have set up the sound in Skype, and you want to set the melodies at your discretion for a call or other Skype events, you can go to the "Sounds" tab, where you can select the desired melody from the list.

Camera setup
Video calling is an important aspect when making eye contact when communicating. Owners of laptops with built-in devices are worried about how to configure the camera, no additional parameters need to be set to display video. But if an external webcam is connected to your computer, then it must be configured for correct operation.
- The first thing to check is whether the device is plugged into the designated connector on the computer. Drivers can be installed automatically or manually from the included disk.
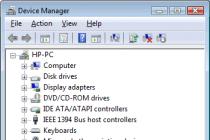
- If there is something wrong with the drivers, they are missing or there is a need to update, then in the "Device Manager" next to the icon of the connected device there will be a yellow exclamation mark. Then you need to open the "Camera Properties" and install or update the drivers.
- The camera does not work continuously, but turns on only when programs that use it, such as Skype, are launched, so we launch the application.
- Open the "Settings" section in the "Tools" tab and select the "Video Settings" item there. If an image appears, then you do not need to configure anything else, you can proceed to communication. And if the video is not displayed, but all the actions described above have been performed, you should find out if the camera is being used by another application.
- The setup menu also assumes the presence of additional parameters, such as adjusting brightness, contrast, image rotation, - they can be found on the "Advanced settings" tab.
After successfully setting up Skype, you can start making video calls to other users.
If the need arises, you can always make adjustments to the audio or video settings in the appropriate section on the "Tools" tab.
Today, in addition to landline and mobile phones, you can also communicate through a webcam. Such communication has no boundaries and is mostly free. You can not only hear, but see the interlocutor, even if he is on the other side of the globe. A webcam is convenient, because with its help you can not only talk with friends, but also travel around the world, many large companies arrange video conferences through a webcam. There are several options for such communication. The most popular are Skype, ISQ, Mail Agent. You can also communicate through a webcam through some social networks and special programs for communication through a webcam. ... It is worth starting such communication with the purchase of a webcam. But having bought it, sometimes the question arises, how to set up a microphone on a webcam or how to turn on a microphone on a webcam?
For this, of course, there is an instruction for the purchased webcam model, but it does not always have all the necessary information, you can rarely find there troubleshooting tips, a clear explanation of the settings. To properly configure the microphone in the webcam, you need to connect the camera to your computer and install the supplied software. Then, after installing the driver, it remains to check the operation of the webcam. Through programs for communication (Skype, ICQ) or standard Windows tools, through the control panel. You need to go to the control panel and select "sounds and audio devices" and sound parameters "realtek hd audio output". After installing all the necessary and available drivers, the Mile-Agent camera icon will appear in the "My Computer" folder. By clicking on this icon, you need to select everything related to the sound.
If problems still exist, you can go to the "Device Manager" and check for an exclamation mark on the "Bus Host Controllers" tab, you need to remove the icon. It is worth considering what software the webcam is designed for, for which windows 7 or 8, xp or vista. If the instructions say that the required software is windows 8, then it is likely that the device will not work correctly on windows 7. Another important parameter for the correct operation of the webcam is compatibility with the installed sound card. You can look at the settings on the Internet, but you need to know the exact model of the webcam, because there is no one universal setting. If the webcam will be used only in Skype, then you need to adjust the sound in the program itself, how to configure the microphone in the webcam?
To do this, Skype has a test call function, with which you can check the quality and availability of sound. When everything is correctly installed and configured, then a voice will be heard in the speakers. If something is wrong in the settings, then in the main window of the program you must click on the "Tools" tab, then "Settings". On the left there will be a button "Sound settings", you need to click on it. In the window that opens, you need to check the correctness of the settings, select the webcam from the list of microphones used. You can also note the automatic settings. After all the settings, you need to save the changes. If a person does not have basic PC skills, it is worth calling a computer wizard. A person with special skills will quickly cope with the problems that have arisen and will not aggravate the situation with non-working information input devices.
If, after all the possible options for configuring the webcam microphone, the sound still does not appear. It is possible that the problem is in the webcam itself. If the camera is still under warranty, then it is worth taking it to the store where the purchase was made, the problem of the lack of sound may be due to a factory defect. In this case, the seller is obliged to either replace this webcam with another one, or return the money. But in order to prevent such a situation from happening, when buying webcams, you should always ask sellers to check it for video and sound quality. Like any technique with a webcam, you should use it carefully so as not to damage the outgoing wires or the built-in microphone yourself. In the case of a breakdown of the webcam, it will have to be repaired at your own expense. And this is often more expensive than the cost of the webcam itself.
When buying a webcam, you need to pay attention to the matrix, resolution, matrix sensitivity and the number of frames per second. The main selection criterion, of course, is the budget. Today, even a schoolchild can buy a webcam. But of course, when buying a webcam, you should give preference to those companies that have been specializing in the production of webcams for more than a year. Such companies give a guarantee for their products for a year, or even two, and they have a better quality of their products. By choosing a reputable, specialized webcam manufacturer, many problems with poor performance and camera defects can be avoided. If there are problems with the operation of the webcam, then large manufacturers have a large number of service centers.
Despite the craze for calls over the Internet and the growth of modern technologies, the audibility of the interlocutor often leaves much to be desired. And it's not about VoIP technology, not about the quality of the Internet connection, or even programs like Skype, Viber and WhatsApp. Cheap Chinese headsets and microphones on a stick, combined with the poor quality of the microphone input built into computers and laptops, cannot provide a comfortable volume and quality of communication.
What microphones are there
All microphones for computers are divided into three types:
- Conventional analog microphones with minijack
- Microphone built into the webcam
Among microphones "on a stick" with a 3.5 ″ minijack, you can find more or less sensitive models that are suitable for most of the built-in microphone inputs. Analog microphones are connected to a special socket on the computer, it is on the back and front panels, usually pink. For good audibility, you need a good microphone input in a sound card or in a laptop. Due to low sensitivity or high self-noise, the sound of the microphone will be quiet.
USB microphones have a built-in microphone amplifier, which is tailored to the microphone capsule and provides a comfortable sound level in most situations. Such microphones are also built into webcams, but only if the camera is without a wire with a minijack. For a normal sound, I am. But if you have a microphone with a minijack, then you will need to configure it.
In the previous article, I told. But unfortunately, many users complain that they are hard to hear. Sometimes you just have to yell right into the microphone so that you can be heard normally. But some people just don't know that the microphone needs to be configured in the Windows mixer. This usually only applies to analog microphones. Let's analyze the microphone settings using the example of common Realtek HD and AC'97 compatible codecs. With any other codecs, everything is exactly the same, by analogy.
Realtek HD Audio Codec in Windows 7/10
Depending on the driver, when a microphone is connected (by default, a pink socket), the realtek dispatcher will ask which device was connected to it:

We select "Microphone input", now it is available for use. You can access the microphone settings through the Windows Volume Mixer or through the Realtek HD Sound Manager.
Watch the video or read the article:
To open the volume mixer, click on the sound icon with the right mouse button and select "Recorders", and to launch the Realtek manager, click on its icon in the system tray (near the clock):

Sometimes the Realtek Manager icon is not present in the taskbar, then it can be opened from the Start menu -> Control Panel -> Hardware and Sound -> Realtek HD Manager

Let's configure the microphone through the Windows 7/10 mixer:

First, we need to find the microphone input. Depending on the socket (rear or front panel of the system unit), into which the microphone is connected, and on the settings of the Realtek HD manager (whether to combine input jacks or not), it is called slightly differently. This is usually “Mic in at jack name (color)” or other names with the word “Mic” or “Microphone”. The current input is marked with a green check mark.
If the microphone is not connected to any jack, the input will not be displayed in this window. To display all inputs, including disabled ones, right-click on any free space in the window and check the boxes "Show disabled devices" and "Show disconnected devices".

So, the microphone is connected, go into it and go to the "Levels" tab

Here we can set the input level from 0 to 100 and the microphone gain level from 0 to 20-30 dB. This is the main reason why the microphone works quietly - it's insufficient gain level. For most microphones, setting the level is sufficient. +20 dBu... Increasing up to +30 dB will increase the volume even more, but this will also increase noise. To combat noise, let's go to the "Improvements" tab.

To suppress unnecessary noise, check the "Disable all sound effects" should be removed and "Noise reduction"- included. If there is an echo effect, then you can put Echo cancellation... When you turn on noise suppression, the voice will noticeably change, it can take on a metallic hue - this is a payment for a cheap microphone or a built-in audio codec. By the way, it is not a fact that with the installation of any external sound card, the situation will greatly improve.
On the last tab "Communication" there is a useful setting with which the volume of system sounds and music will be reduced when talking on Skype.

Realtek HD Sound Manager
Launch Realtek HD Sound Manager and go to the tab with the microphone name

Here we can also adjust the recording level, microphone gain, and noise and echo suppression. In general, everything is clear in the picture. This setup method is the same for Windows 7/10 and Windows XP.
Pay attention to the button "Additional device settings" in the upper right corner. You can choose from two modes: classic and multi-stream:

In multi-streaming mode, the laptop's built-in microphone and plugged into the jack appear as two separate microphones and can be used simultaneously. In classic mode, they are combined into one. In this case, if an external microphone is connected, then it is used, and if not, then the built-in microphone is used.
Configuring the AC'97 microphone in Windows XP
We will configure an AC'97 compatible codec, in my case it is an Intel built-in audio device, but the principle of operation is the same for other codecs. Open Windows XP Sound Mixer by double-clicking on the speaker icon in the system tray.

If there is no such icon there, then go to "Start -> Settings -> Control Panel -> Sounds and Audio Devices" and put a checkmark "Show icon on the taskbar"

In the volume mixer window, go to the "Parameters" menu and be sure to check the "Additional parameters" checkbox, otherwise you will not be able to turn on the microphone gain.

Then we move on to setting up the recording mixer. Go to "Options -> Properties" and select "Record". In the list of displayed inputs, there should be a checkmark "Microphone" or "Microphone input".

Click "OK" and in the recording mixer window we find our microphone input. We can now adjust its input level and turn on the gain. It can be called by many different names, such as "Microphone boost", "+20 dB boost" or "Microphone boost", but this all means +20 dB boost.

In some Realtek drivers, there is no “Settings” button under the microphone volume level, and you might think that microphone amplification is not provided. But this is not the case, just Realtek engineers decided to screw people up and left this button only in the volume mixer. That is, in the volume mixer window, you do not need to go to the recording mixer, but find the "Settings" button under the microphone right there and turn on the gain.
What else can you do?
If these measures do not lead to a comfortable microphone volume level, then it is best to take a webcam with a built-in microphone. If you don't want to take the camera, then change the microphone for something more decent, or take a separate sound card with a good microphone input.
A good solution is to use a USB microphone. Also, as an option, this is a separate microphone amplifier, but I have not seen any suitable for sale. Usually, expensive professional microphone amplifiers are sold or inexpensive PCBs for making the amplifier yourself. You can buy them on radio markets or on the Internet. To assemble a ready-to-use device with such a board, you need to be at least a little radio amateur. Therefore, for the majority, the first three ways to improve the quality of communication remain.
How to check the quality of your Skype connection
For this purpose, the service in Skype "Echo / Sound Test Service" was specially invented. When you install Skype, only this service is present in the default contact list. To check the connection (voice only), we just call there and do what the girl says. We rejoice and communicate with friends and relatives if the sound quality suits us. By the way, their own.
If your friends are hard to hear on Skype, share the news with them via social networks.
Microphone setup
Go to Start -> Control Panel -> Sound (select icons).
Let's get into the "Sound" Window.
Select "Record" -> select the default camera microphone. You can select the microphone (highlighted in blue) Realtek if you intend to use a headset. But in this case we are trying to configure the microphone of the Logitech webcam (highlighted in red). We make it "Default".
In the "Properties" tab, you can tweak the settings.


Guys, I will not deceive you, but on Win7 I still could not configure the webcam microphone. Well, I don’t know what to do. I tried everything. Everything works on XP, but on 7 - well, not at all.
If you click on the speaker icon with the left mouse button in the tray, and then again at the top of the speaker icon, you will get to the next window. There are settings from Realtek here too. For some reason, the microphone is turned off here, although in other places it is turned on everywhere. Maybe dig into what?

You can see that the front panel microphone scale Front Pink In (value 100 in the previous screen) is tied to the scale setting in the main window of the Realtek sound driver settings (in the extreme right position).

If you turn on the ears with a microphone, then the microphone works, the sound goes on and I can be heard by my comrades in negotiations on the network. But there was no sound from the microphone of the webcam, and there is no sound. None of the tweaks will correct the situation.
The drivers are new. The same, it seems, crap, as with hibernation. Everything works great in XP, in Win 7 you have to solve a rebus and as a result nothing works. Maybe it somehow blocks the webcam microphone with its settings.
Before installing Realtek, there was a primary sound driver and I didn't try to check the microphone then. And now demolish Realtek to check the mick. webcams, do not want to. I'm talking about Win7 x64 right now. I remember exactly that without Realtek, but only in Win7 x32, I tried recording from a webcam microphone using the method below and the sound was.
Microphone check
In Skype, you can check the microphone, but my check scale is inactive there from the webcam. The headset is fine.
There is the following verification method. If we go along the path Start -> All Programs -> Accessories -> Sound Recorder, then we can check the sound from the microphone.

Press the red button, say something, stop recording. Immediately we will be given the opportunity to save the file in wma format to hard drive. We do this, and then open the file with Aimp or any program and listen. If your voice can be heard, then everything is fine.
It is easier to get into many of the windows mentioned above. In the tray, select the Realtek HD icon with the right mouse button and the following window will appear with a choice:

The popularity of webcams is growing every day more and more. They allow you to communicate with other Internet users, photograph objects in front of the computer. Nowadays, users often have various problems that are associated with setting up the microphone in the webcam. To fix this problem, you need to configure all the parameters in the system.
You will need
- Personal computer, Microphone
Instructions
You will need
- - computer;
- - Internet access;
- - microphone and camera.