Skype is one of the most popular VoIP programs. However, some people face various audio and video related problems. If your Skype screen sharing does not work, the Skype microphone on the computer does not work, the Skype camera on the computer does not work, or you are wondering why the Skype sound does not work, then we have prepared a detailed guide to solve these problems.
1. Check the audio driver on your computer
This is probably the first thing you should do if your Skype audio doesn't work. Sometimes the drivers can "fly off", or update unsuccessfully, which causes problems with the sound in Skype. If you have a problem with your audio driver, you can launch any other music or video player to confirm the error.
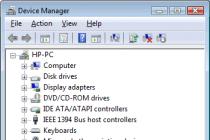
In this case, you need to reinstall or update the audio driver as soon as possible. Go to Device Manager, find your audio device, uninstall it, then restart your computer and Windows will automatically install the correct drivers. You can also use special programs to install drivers.
2. Check the microphone
If the Skype microphone on the computer does not work, you should read which is completely devoted to this problem.
3. Check the audio and video on Skype

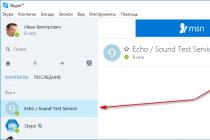
During a Skype conversation, the user can turn off and on the sound and video. If your Skype sound doesn't work, make sure you haven't clicked the Mute button. The video or audio icon must not be crossed out. If that's the case, just click on the icon to enable audio or video.
4. Make sure your webcam is working properly
Quite often it happens that the sound or microphone in Skype on the computer does not work due to a faulty webcam. You can take a picture through another program to make sure the camera is working properly. Also try reinstalling or updating your camera driver to fix the problem.
5. Check your microphone settings in Skype
If your Skype microphone does not work on your computer, you or your interlocutor cannot hear each other, you should check the sound settings in Skype. Open Skype, then click "Tools"> "Options"> "Sound settings". Here you need to select the audio source to be used and make sure that it is fully functional.

Also, if the automatic microphone settings are turned off, make sure the volume is set to maximum. Make sure you see a green bar when you speak into the microphone.
6. Check your Skype video settings
You can also check the video work in the Skype settings. To do this, open Tools> Options> Video Settings. Here you should see yourself right in the skype window. If you can't see it, you probably have a faulty webcam.
7. Check your Skype privacy settings
Skype allows users to control the webcam, including turning it off. For example, you can select “Any” in the settings so that anyone can call and see you through the webcam.

If your Skype camera on your computer does not work, make sure that the person you want to talk to is not added to the blacklist. If the "Nobody" option is selected in the settings, then nobody will be able to call you.
8. Check your internet connection
Sometimes a poor Internet connection and slow connection speed can be the reason that the sound in Skype does not work, or even the Skype camera on the computer does not work. In this case, you should close unnecessary programs, such as Torrent and your browser, to slightly increase the connection speed.
9. Reset Skype settings
If you cannot send or receive a message, document, image, then you need to reset your Skype settings.
- Close Skype first.
- Now open Explorer (or My Computer), and at the top in the address bar, enter the following address % appdata% .
- Find the Skype folder and rename it Skype-Old.
- Now in the address bar of the explorer, enter the following address in the address bar % temp% / skype ... Find the DbTemp folder and delete it. This will reset your Skype settings.
Please note: your old messages will be saved in the Skype-Old folder.
Our tips should help you when the sound, microphone, or skype camera on your computer is not working. If you still have questions, write in the comments below.
It often happens that when you first start Skype, you ignored all the settings that are offered at the beginning and quickly clicked the "next" buttons. The program started and at first glance everything is fine. But sooner or later the moment will come when you want to chat with a friend. Everything is fine if it were not for one "but" - you hear him, but he does not. Whatever you do, nothing helps. My guide will help you figure out how to set up a microphone in Skype, and what exactly you need to do in each case.
There can be many reasons, but I will tell you the most basic and effective ones for your friend or colleague to hear you on Skype. Before starting to read the article, I have one request for you - if you want to really solve this situation, then I ask you to be careful and do not miss more than one step in this article. Even if you have already watched this setting on the advice of your friend, then this does not give you a reason to skip the paragraph of the recommendations. Hope you follow my advice. So, let's figure out why the microphone in Skype does not work.
Microphone activation
First, check if your microphone is turned on.... Nowadays, very often, headsets have a special button with which the microphone is turned on and off. Very often the reason lies precisely in this.
Also, in some headsets, the microphone is activated when you bring the microphone to your mouth. For example, this option is present in my headphones and if I need to start a conversation, just put the microphone to my mouth. Before setting up the microphone, you need to do the above steps to be sure that the reason lies elsewhere.
So the microphone is on and you still can't be heard? Then take a close look at the Skype window that opens during a call. There is a microphone mute button. Perhaps you accidentally pressed it. Here's an example of what it looks like:
 Still not being heard? In this case, you should take a closer look at the settings.
 Multiple devices are connected to the computer or laptop
The most common reason why a microphone does not work in Skype is that there are several devices with microphones connected to your computer. For example: headphones and a webcam with a built-in microphone.
It can also happen when, at the time of Skype installation, the required microphone was not connected through which you want to communicate now. Skype has automatically set the microphone settings, for example, for the webcam. Time passed, you plugged in the headphones and turned off the camera. In order for the person on the other end of the screen to be able to hear you, you must specify the desired device in the Skype settings. I’ll talk about this in the next part of the article.
Skype setup
First, check your Skype settings: go to "Tools" - "Settings":
 On the left, click "Sound Settings", and then a menu with microphone settings will appear on the right.
 Click on the arrow (tongue) and in the menu select the microphone through which you are going to communicate via Skype. In the screenshot above, I have only one choice, since headphones are not connected at the moment, but if you have any headset connected to your laptop, then select the device you need. After that, do not forget to save the changes by clicking on the "Save" button in the lower right part of the open window.
Now let's consider the option in which you checked the above points. As a result, the correct parameters were specified in the Skype settings, or you changed them to the required ones. To celebrate, you recruit a friend and again wonder: why does the microphone in Skype not work?
In this case, it is worth checking the Windows system settings and which of the devices are currently active.
Windows setup
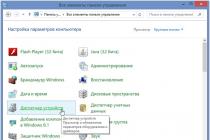
Go to "Start" - "Control Panel" - "Hardware and Sound" - find the "Sound" icon - and select the sub-item "Manage sound devices":
 You can also open this window faster by right-clicking on the speaker in the tray and selecting "Playback Devices".

You will see a window where, in the first Playback tab, you will see all the devices currently connected to the computer. I plugged in headphones so you can see what it looks like. If you have a headset in the list, right-click on it and select "Use as default" from the menu.

Then go to the "Recording" tab. All microphones connected to the computer will be displayed in the list. These can be: headset microphone, laptop built-in microphone, external usb camera microphone or separate usb microphone.
Select the one you need at the moment, right-click on its icon and select the "Enable" button in the context menu, if it is disabled. Also click on the desired microphone with the right mouse button and select "Use as default" and clicking again, select "Use default communication device".
Now try to contact the correct contact to check if the microphone is working. There is a 99% chance that your problem should be solved. But it will also not be superfluous to check the properties of the microphone, for this in the "Sound" window select the desired device with the left mouse button and click "Properties". In the window that opens, go to the "Levels" tab and move the level slider to the right.
 But there are times when in the "Sound" tab, your headset is simply missing. This means that the computer does not see it, and the answer to the question of how to set up a microphone in Skype is quite logical - to correctly connect headphones or an external webcam.
Why can't the system see your device?
Usually, a sound card immediately detects which connector certain devices are connected to, and the system automatically installs a driver for the detected device. But now, more and more often, along with the headphones, there is an installation disc with drivers and software designed specifically for this device.
Therefore, in order for your computer to see the headset, you first need to launch the included disk and install all the drivers and programs necessary for the operation. After that, the new equipment will be displayed and you can activate it. In order to reveal the topic to the end, please read the article: "".
But, if a program has been installed with the drivers, with which you can change the sound effects of your headphones, adjust the volume and other parameters, be sure to check that the microphone is activated in it.
Well, what can I do, the microphone in Skype does not work - you sigh again, having done all the above points. Everything is very easy and simple. If you just purchased a headset, then carefully pack it and quickly go to the store and exchange it for the exact same one for the obvious reason that you have 100% non-working on your hands. But on the other hand, if you exchange it, then not for the model that has proven itself in a negative way. It is better to consult with the seller and choose something more reliable.
You can also test this headset on another computer or laptop. Thus, you will know for sure if the headset works at all.
If you have Realtek software installed on your computer:
The popularity of webcams is growing every day more and more. They allow you to communicate with other Internet users, photograph objects in front of the computer. Nowadays, users often have various problems that are associated with setting up the microphone in the webcam. To fix this problem, you need to configure all the parameters in the system. You will need a Personal computer, Microphone Instruction 1 To install a webcam on your computer, you need to connect it through the connector and download the software that will be included in the kit. After installing the software, everything should work. But problems can arise as well. After you've installed your webcam, try checking the sound. 2 Go first to "Start". Select the "Control Panel" tab. There you will find an icon called Sounds and Audio Devices. Open it up. 3 Voice parameters should be set as “realtek hd audio output”. You can also see the microphone settings there. If something is missing, then reinstall the drivers. Delete the old ones, and load the new ones. 4 If you plan to use Skype, check that the microphone settings are correct there. The microphone built into the webcam always gives some glitches. If there is a driver with the camera, try to configure the microphone in it. If none of the above helps, you need to launch Skype using the UVC driver. 5 When you connect the webcam, download the drivers for it. Next, a camera icon should appear in the "My Computer" folder. Open this icon and you will be presented with a list of settings. Select anything related to sound and click Enable. 6 Adjust the sound in the program in which you communicate through the microphone. Set the volume, speakers. When you start Skype, you will see a welcome window. There you will need to set the headset and webcam settings. Click on "Check Sound". Three tabs should open in which you check and configure the device. 7 You can try to go to the "Device Manager" section. There, check to see if the exclamation mark is accidentally placed on the Host Bus Controls tab. Take it away. Helpful Hint Many users who installed Windows XP on their laptop complain about a problem with the microphone. The problem is that the microphone volume is very low and the interlocutors simply cannot hear them. Click on the Effects ... button and select ClearType in the box. That, perhaps, is all If something did not work out for you, then try these drivers for sound Tip 2: How to install a camera and microphone Modern communication technologies have progressed so far that nowadays there is no need to use a phone when making calls ... This is especially true for international calls, which until recently was a fairly costly procedure. Now it is enough to have a computer and Internet access with you. In order to provide a conversation, you need a webcam and headphones that can be integrated with special programs.
You will need - a computer; - Internet access; - microphone and camera. Instruction 1 First of all, buy a microphone that meets all the requirements of your computer and the program through which you will communicate. For example, Skype does not recognize all types of microphones when trying to talk. When using it, select the one that was released relatively recently, since the microphones released in the next 2-3 years take into account the popularity of the Skype program. 2 To connect a microphone to a computer, stock up on software for its operation. Despite the fact that the latest versions of operating systems (such as Windows 7) automatically find drivers for new devices via the Internet, it will be useful to have your own software with you. 3 Find the correct connector on your computer, and then insert the microphone cable into it. If the software is not automatically detected, insert the driver disc into your computer, then follow the instructions for installation. 4 To install the webcam, you will need to perform almost the same steps as when connecting a microphone to your computer. The procedure is the same. Most likely, the webcam should be connected via a USB connection through an appropriate free port. After connecting the camera to the computer, a window with the name "Found New Hardware Wizard" will appear on the monitor. Proceed in the same way here: if the software is not installed automatically, insert the driver disc that will activate the webcam. If there is no disk, look for drivers on the Internet.
Helpful Hint If your computer or laptop has a built-in microphone and camera, just test them before connecting for the first time. Tip 3: How to set up speakers Sometimes Windows XP users have problems with setting up audio input and output devices in the system, in particular - with adjusting the speaker volume.
Instruction 1 Look in the tray - in the lower right part of the screen. If you do not find the volume control indicator there, go to "Start", select "Accessories", then "Entertainment", and click on the "Volume" section. 2 An audio control window will open with controls for various audio parameters on your computer. By moving the pointer up or down, you thereby decrease or increase the volume of the sound. By putting a check mark on "Off", you turn off the sound altogether. 3 Adjusting the pointer labeled “Balance” will help you adjust the ratio of the sound in the right and left speakers. You can adjust the volume of parameters such as “Wave” - the volume of the digitized formats; volume of MIDI files, volume of CD playback, volume of line-in, microphone, PC speaker and other parameters. 4 To display all of the options available in the Sound Setting, open the menu and select Properties and Options. 5 Select a recording setting or a playback setting depending on whether you are adjusting the audio input or output, and then check all the options that you want to appear on the adjustment line. 6 By adjusting the audio input in recording mode, you can adjust the level and volume of audio from microphone, line-in, MIDI, CD, aux-in, and other audio ports. 7 If the icon for the sound settings menu is not displayed on the taskbar, move it there. To do this, open "Start" and "Control Panel", go to the "Sounds and Audio Devices" section. 8 Click the "Volume" tab and check the box next to the phrase "Show icon on the taskbar." Also in this tab you can manually edit some of the sound parameters. 9 At the bottom of the tab, you will see the speaker settings section. Here you can specify which speakers you are using (stereo speakers, headphones, etc.), and the system will select the optimal sound setting depending on your output device. Tip 4: How to set up a microphone in skype Skype is a program that is used to communicate between users on the Internet. On Skype, you can communicate via audio and video. Today this program is very popular, because it is free, convenient, allows you to communicate with any person, even if he is at a great distance from you.
Tip 5: How to set up sound on a webcam More and more people around the world communicate on the Internet using webcams. Such communication has no boundaries, for the most part is free of charge, and, among other things, allows you to see and hear the interlocutor who is on the other side of the globe. However, before starting a conversation, you need to set up the necessary equipment for it. In particular, you need the microphone built into the webcam to start working.
You will need a Computer, webcam, Skype, basic computer skills Instruction 1 Make sure the webcam microphone is connected to the computer. If its cable has a single USB connector, the microphone is connected via it. If the webcam cable has a junction at the end with a separate microphone plug, plug it into the microphone jack on your computer. As a rule, it is pink in color and a microphone is schematically depicted next to it. 2 Make sure the microphone is turned on in the system. To do this, open the Sounds and Audio Devices menu in the Control Panel and click the Advanced button to open the Device Mixer. In the strip with the microphone volume scale there is an item "off", if there is a check mark there, remove it, and also raise the slider on the microphone volume scale to the upper position. 3 Start Skype. On the menu bar, open the Tools tab and select Options. In the window that opens, select "Sound settings". The window on the right displays the available microphone and speaker settings. There is a device selection line in the microphone settings field. If the webcam microphone is connected via USB, you must select "USB Microphone" in this line. If the microphone is connected to the connector on the sound card, nothing needs to be changed. 4 The microphone volume scale is located under the device selection line. To increase or decrease the volume, uncheck the box next to "Allow automatic microphone settings" and move the slider to set the required volume level. You can check how the microphone works by using a test call from the Skype program. Tip 6: How to set up the built-in microphone on your webcam With the built-in microphones in your webcams, you can participate in video chats and conferences using MSN Messenger and other instant messaging programs. After installing the webcam, you need to specify the correct video and audio settings. The latter are often especially difficult. Fortunately, for example, the MSN Messenger app has an easy-to-use "Setup Wizard" to help you with this.
You will need - Webcam; - computer; - MSN Messenger app. Instruction 1 Start MSN Messenger by double-clicking on the shortcut on the desktop or select it from the list of Windows programs in the Start menu. Enter your username and password to login. Wait while the program loads your profile. 2 Select the "Tools" menu item, then "Audio / Video Tuning Wizard". To run it, in the dialog box that appears, click the "Next" button. 3 Specify your camera model in the drop-down list and click Next. Adjust the camera image until you see yourself in it. Click "Next". 4 Adjust the sound quality of the microphone. To do this, move the microphone 3-5 cm away from you and adjust the displayed settings until its sensitivity level reaches the middle mark. Speak into the microphone when prompted, continuing to move the microphone until you reach the desired results. When done, click Next, then Finish. If the microphone is located too close to your face, your voice will sound too harsh for the interlocutor, and if it is too far away, then there is a chance that you will simply not be heard. When finished, click Next. 5 Select a sound system from the list that appears and click the "Next" button again. Go to the Speaker Test section and move the audio slider up or down to set the sound quality of your speakers. To end testing, click the "Stop" button. Your microphone is now set up and ready to go.
Tip 8: How to test a webcam with a microphone The built-in or plug-in webcam with a microphone is not always equipped with LEDs that signal its operation. In this case, you can check the webcam using the operating system and special programs.
Tip 9: How to turn on the microphone in Skype Skype is a convenient and accessible form of communication. Using Skype, you can make audio or video calls, chat, write messages. This form of communication is becoming more and more popular among Internet users. But sometimes minor problems with Skype, such as a muted microphone, spoil the pleasant moments of communication with family or friends. You will need - a computer; - the Internet. Instruction 1 How to turn on the microphone in Skype? Usually, the microphone turns on automatically when you download Skype and install it on your computer. But if this did not happen, then it is necessary to do the following. First, make sure the headset is connected to your computer, that is, check if you've connected the microphone correctly. To do this, look at the back of your computer. The microphone plug must be plugged into the pink jack. 2 Secondly, check the microphone settings in Skype. To do this, turn on Skype. From the taskbar at the top, select Tools. In the list of tasks that opens, click on the "Settings" option. A new window will open where you need to configure the sound by checking the appropriate checkbox. All settings are made in manual mode, so read all menu items carefully. 3 If this does not help, then diagnose the equipment. Go back to the taskbar in Skype. Select the Calls task. In the pop-up list, click on Sound Quality Details. A new window will open where you can enable the Sound Check Wizard. Left-click on the "Microphone" tab. The program will ask you to check if the microphone is responding to sounds. That is, say a few words and see if the green bar is flashing. If it blinks, then the microphone is fine. 4 You can also test the microphone by making a test call. If you do not hear the playback of the words you said, then the microphone is defective. Then get a new one. As a rule, these devices are inexpensive, so go to a specialized computer store and consult a specialist. If you have a laptop, then you need to take it to a service center for technical inspection. Tip 10: How to set up the microphone in the camera The world is saturated with various advanced technologies that allow you to stay in touch with family and friends anywhere in the world. One of the methods of communication has become a webcam, which interacts with many special programs. Before starting a conversation, you need to configure the equipment, in particular the microphone.
Tip 11: How to turn on the built-in microphone Certain models of mobile computers are endowed with a large set of built-in devices. These include a webcam, card reader, microphone, and various wireless modules. The high-quality operation of this equipment is ensured by the availability of the necessary software.
You will need Internet access. Instruction 1 First, check the performance of the microphone. Open Control Panel and select the Hardware and Sound menu. Find the item "Manage audio devices", which should be in the "Sound" menu. 2 After launching the new menu, select the Record tab. Explore available audio capture devices. Select the desired microphone icon with the left mouse button and press the "Properties" button. Make sure this equipment is connected. 3 Place a check mark next to Play from this device. Click the Apply button. Now the sound picked up by the microphone should be reproduced in the speakers of the mobile computer. 4 If this microphone does not work, update the drivers for this device. Find out your laptop model. Please visit the website of the manufacturer of this mobile PC. 5 Open the downloads section. Enter the laptop model name in the search bar. Select a set of files for your motherboard or audio devices from the suggested driver kits. Download these archives. 6 Update the microphone drivers using Device Manager. It should be noted that for most sound cards there are special programs that allow you to control these devices. Using this software also allows you to fine-tune your microphone and sound card settings. 7 If you downloaded a similar utility, run the installer application. After updating the microphone drivers, restart your mobile computer. Follow the steps in the first three steps to make sure your device is working properly. Raise the microphone level if the volume of the transmitted signal does not match the desired value.
Tip 12: How to adjust the image on the webcam Adjusting the image on the webcam is performed using specialized programs that are usually supplied in one set along with the drivers for the device. Through the in-camera image management application, you can change the contrast, brightness and clarity of the video received during the broadcast. Instruction 1 To control the colors displayed by the webcam, run the program to control the image. For example, for devices from Microsoft, the LifeCam application is used, for Logitech - the Logitech WebCam. If you are setting up the camera on a laptop, you can also apply programs from the manufacturer of the specific device. If the application for working with the camera is not installed, go to the official website of your device manufacturer and find the required program in the section of technical support and driver downloads. 2 Go to the "Settings" or "Parameters" section of the running program. You will be presented with several sections to adjust, which may include brightness, contrast, sharpness. Depending on the software version, additional options may be applied to increase the image quality. 3 Adjust the suggested options using the sliders on the screen. You will be able to see the effect of applying each parameter in the window with the image currently entering the camera. You can also change the resolution of the captured images. For cameras with a high resolution matrix, you can choose the True Color option or a larger size of the broadcast image. 4 Save the changes made by clicking on the "Save" or "Apply" button. The camera is now set up and you can use it to make calls over the Internet. 5 You can also adjust the parameters in the program itself, through which you are broadcasting the image. So, if you are using Skype, go to the settings through the menu "Tools" - "Options" of the program. Click on the "Video Settings" button and click on the "Webcam Settings" link. Using the proposed sliders, adjust your image, and then save the changes by clicking on the "Save" button in the program window.
Today, in addition to landline and mobile phones, you can also communicate through a webcam. Such communication has no boundaries and is mostly free. You can not only hear, but see the interlocutor, even if he is on the other side of the globe. A webcam is convenient, because with its help you can not only talk with friends, but also travel around the world, many large companies arrange video conferences through a webcam. There are several options for such communication. The most popular are Skype, ISQ, Mail-agent. You can also communicate through a webcam through some social networks and special programs for communication through a webcam. ... It is worth starting such communication with the purchase of a webcam. But having bought it, sometimes the question arises, how to set up a microphone on a webcam or how to turn on a microphone on a webcam?
For this, of course, there is an instruction for the purchased webcam model, but it does not always have all the necessary information, you can rarely find there troubleshooting tips, a clear explanation of the settings. To properly configure the microphone in the webcam, you need to connect the camera to your computer and install the supplied software. Then, after installing the driver, it remains to check the operation of the webcam. Through programs for communication (Skype, ICQ) or standard Windows tools, through the control panel. You need to go to the control panel and select "sounds and audio devices" and sound parameters "realtek hd audio output". After installing all the necessary and available drivers, the Mile-Agent camera icon will appear in the "My Computer" folder. By clicking on this icon, you need to select everything related to the sound.
If problems still exist, you can go to the "Device Manager" and check for an exclamation mark on the "Bus Host Controllers" tab, you need to remove the icon. It is worth considering what software the webcam is designed for, for which windows 7 or 8, xp or vista. If the instructions say that the required software is windows 8, then it is likely that the device will not work correctly on windows 7. Another important parameter for the correct operation of the webcam is compatibility with the installed sound card. You can look at the settings on the Internet, but you need to know the exact model of the webcam, because there is no one universal setting. If the webcam will be used only in Skype, then you need to adjust the sound in the program itself, how to configure the microphone in the webcam?
To do this, Skype has a test call function, with which you can check the quality and availability of sound. When everything is correctly installed and configured, then a voice will be heard in the speakers. If something is wrong in the settings, then in the main window of the program you must click on the "Tools" tab, then "Settings". On the left there will be a button "Sound settings", you need to click on it. In the window that opens, you need to check the correctness of the settings, select the webcam from the list of microphones used. You can also note the automatic settings. After all the settings, you need to save the changes. If a person does not have basic PC skills, it is worth calling a computer wizard. A person with special skills will quickly cope with the problems that have arisen and will not aggravate the situation with non-working information input devices.
If, after all the possible options for configuring the webcam microphone, the sound still does not appear. It is possible that the problem is in the webcam itself. If the camera is still under warranty, then it is worth taking it to the store where the purchase was made, the problem of the lack of sound may be due to a factory defect. In this case, the seller is obliged to either replace this webcam with another one, or return the money. But in order to prevent such a situation from happening, when buying webcams, you should always ask sellers to check it for video and sound quality. Like any technique with a webcam, you should use it carefully so as not to damage the outgoing wires or the built-in microphone yourself. In the case of a breakdown of the webcam, it will have to be repaired at your own expense. And this is often more expensive than the cost of the webcam itself.
When buying a webcam, you need to pay attention to the matrix, resolution, matrix sensitivity and the number of frames per second. The main selection criterion, of course, is the budget. Today, even a schoolchild can buy a webcam. But of course, when buying a webcam, you should give preference to those companies that have been specializing in the production of webcams for more than a year. Such companies give a guarantee for their products for a year, or even two, and they have a better quality of their products. By choosing a reputable, specialized webcam manufacturer, many problems with poor performance and camera defects can be avoided. If there are problems with the operation of the webcam, then large manufacturers have a large number of service centers.
I am often asked how to check the webcam on the computer. It would seem a strange question, but there is nothing strange in it - it really is not so easy to do for an inexperienced user.
The fact is that if there is not a single program installed on the computer that directly works with a webcam (for example, Skype or Viber), then there is practically nowhere to turn it on to check its operability.
It's just that usually only the camera driver is registered in the system, for its operation, but it does not have a graphical interface.
Of course, some manufacturers supply special utilities with the driver, but firstly - not all, and secondly - a separate program in the system to check (once every hundred years) the performance of a webcam? I don’t know, I don’t know.
How to check a webcam programmatically
If you plan to participate in video chats or communicate with friends and family online - install the appropriate programs for communication. In such products, there is always a webcam configuration item where you can easily check its operation.
It so happened that you have no one to communicate with and there is no need for such programs - it doesn't matter, there is another way to check the camera programmatically.
Just yesterday, I described a wonderful free WebCam On-Off program, which increases the security of your computer connected to the Internet and at the same time can check your webcam for performance with just one click.
Also, this program will help those users who do not have an Internet connection (do they really still have those?).
How to check your webcam online
Without installing any programs on your computer, you can also check the operation of the webcam - using special services on the Internet.
There are a lot of similar sites - I will describe, in a nutshell, the top three from the search engine results.
http://ru.webcammictest.com/


... and that's it - you will see yourself on the screen (if, of course, the camera is working properly). You can also check the microphone on this site - the "Check microphone" menu item.

Click on "Play" and a heartbreaking sound will be broadcast from the speakers, which will be immediately recorded by the microphone - a straight line will turn into a nervous curve. This means that the microphone works wonderfully and is working properly.
http://webcamtest.ru/
The same algorithm of actions - allow access to the camera and microphone ...

... and look at yourself in the monitor. Here you can also check the built-in microphone ...

http://toolster.ru/cam_checker
We allow access to the camera again and get the result of the check ...