Pocket geolocation is a fairly common and familiar thing lately. Now all models of modern phones have a GPS system. But often users have questions about it. For example, they are interested in how to improve GPS reception on Android or IOS so that they can get more accurate location information or play games that require detailed geolocation more conveniently. Let's analyze this problem and find out what can be done.
GPS is a system that allows your smartphone to use navigation applications and determine your location in order to build the best possible route to your destination. It is based on receiving data from satellites located in outer space.
Why is he to me?
GPS navigation is used by navigation applications. Together they help to get to the right place without a detailed study of paper maps of the area and polling others on the topic "Where to go next and where to turn?"

The most famous free "Yandex.Maps" or "Yandex.Navigator", GoogleMaps and MapsMe. You can also find a pirated version of Navitel on the Internet. But the program may be an old release year. In this case, it is able to lead you to non-existent roads and under the "brick". In addition, the program may be infected with a virus. Then there is a possibility that it will "break" the system of your smartphone, and you will have to change not only the navigator, but also the phone, or at least its firmware.
Now the most common and modern phone models are the IOS-based IPhone and phones supporting a different system ("Android"). They use GPS in a more advanced form - A-GPS. This is a function that increases the speed of the application during cold and hot start, due to other communication channels (WI-FI, cellular), and also improves positioning accuracy.
A situation where the phone cannot connect to new satellites when the application is turned on. In this case, it works autonomously according to the data transmitted during the previous switch-on by those satellites to which it was connected. Hot start - when the satellites are immediately included in the work. They appear on the application screen or in a special tab for tracking their work and receiving data.

The first option to improve the signal
There are a lot of ways to improve GPS reception on Android or IOS. Let's take a look at 3 of the most famous. The first and easiest way to boost the GPS signal is to turn on the appropriate mode in your phone settings. To do this, we perform the following steps:
- Turn on GPS (geolocation) and go to the phone settings.
- We find the section "Geodata".
- Select the top button "Mode".
- A window titled "Detection Method" opens.
- Select "High Accuracy".
Your phone's performance will improve by turning on Accuracy. At the same time, its operating time without recharging can decrease several times. The thing is that the included navigator will simply "eat up" the battery.

The second way to improve GPS reception on Android
The second option is more complex. But it helps just as often as the first one. You need to download an app to clear GPS data. After updating the satellite information, the navigation system will work better than before. But this option may not be suitable for some phones due to app and model incompatibility, lack of space, etc.
The most difficult but reliable method
There is a third, most difficult solution to the problem, how to improve GPS reception on Android. It is more suitable for computer geniuses. Its essence lies in the alteration of the system file that controls the operation of the phone's GPS system. Let's take it in order:
- It is necessary to extract the GPS.CONF file, located in the system/etc/gps/conf folder, through special programs that give access to system files. Then we move it to the internal memory of the phone or to the SD card so that it can be opened on the computer in the future.
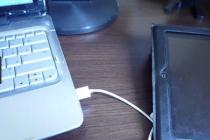
- Changing the GPS.CONF settings is carried out through the Notepad ++ program on a regular PC. And the phone is connected to the computer via a standard USB cable.
- Next, you need to change the settings of the NTP server, through which the time is synchronized. Usually they say something like this - north-america.pool.ntp.org. The entry must be rewritten - ru.pool.ntp.org or europe.pool.ntp.org. As a result, it should turn out like this: NTP_SERVER=ru.pool.ntp.org.
- It will also not be superfluous to enter additional servers without making any changes to them: XTRA_SERVER_1=http://xtra1.gpsonextra.net/xtra.bin, XTRA_SERVER_2=http://xtra2.gpsonextra.net/xtra.bin, XTRA_SERVER_3=http ://xtra3.gpsonextra.net/xtra.bin.
- Next, you need to decide whether the GPS receiver will use WI-FI to amplify the signal. When entering the ENABLE_WIPER= parameter, you must enter a number that will allow (1) or prohibit (0) the use of a wireless connection. For example, ENABLE_WIPER=1.
- The next parameter is connection speed and data accuracy. There your choice is the following: INTERMEDIATE_POS=0<—— (точно, но медленно) или INTERMEDIATE_POS=1 <—— (не точно, но быстро).
- In the type of data transfer use, knowledgeable people advise setting the User Plane, which is responsible for the wide transfer of subscriber data. Then DEFAULT_USER_PLANE=TRUE is written in the program line.
- The accuracy of GPS data is monitored through the INTERMEDIATE_POS= parameter, in the line of which you can set both taking into account all data without exception, and removing errors. If you put 0 (zero) after the "=" sign, then geolocation will take into account everything it finds, and if 100, 300, 1000, 5000, it will remove errors. Programmers recommend setting it to 0. But if you want to try, you can use debugging.
- The use of the A-GPS function, as mentioned above, is supported or automatically enabled on all modern devices. But if you still want the function to work exactly, then you need to set DEFAULT_AGPS_ENABLE=TRUE in the A-GPS enable line.
- The final version of the file must be saved and downloaded to the phone, and then reboot it.
An important point: if you do not want to do it all yourself for various reasons, for example, because of laziness, fear of breaking something in the system, etc., then you can find the GPS.CONF file with the parameters you need and simply copy it to your smartphone. It remains only to restart the phone and use the improved GPS.

Why is GPS still not working on Android?
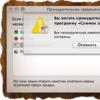
The problem has other causes as well. It happens that GPS does not work on Android at all (it does not turn on, it does not search for satellites, etc.). Resetting the system to factory settings can help with this problem. This is done through the phone settings. In addition, the gadget can be reflashed or given to service center employees who will “dig into” the electronics and correct the defect.
You don't like that the GPS on your Android takes too long to "search for and pick up satellites"? Location accuracy worse than 10 meters? Did you think "this is how GPS actually works"? Nothing like this. Your GPS can provide an accuracy of +-5 meters, at least more accurately. And I will tell you how to achieve this. And no more "patches" or third-party and "gemoral" in the use of "GPS utilities that speed up the search for satellites and increase accuracy." Everything you need is in your device. It's just that the manufacturer enters "calibrations" there "mid-light" - naturally, he will not calibrate each phone individually. And where is the manufacturer? In China, and you need to calibrate where you really use it. The instructions below are collected by me from various sources in parts and verified, except for the "maximizing accuracy" part, which I will check later and make an addition, but even without it, time " cold start "GPS, after rebooting the phone, it was possible to bring it to less than 20 seconds, instead of 1-2 minutes before calibration. At the same time, the capture of the first satellites takes less than 3-4 seconds, and "GPS capture" (localization by satellites, when the "GPS search" stops flashing and the body switches to work on satellites) - less than 10 seconds (sometimes up to 40 but less often - depending on the accuracy of your smart watch and the visibility of satellites).
Impressions from the work of both methods, in order to decide which one you prefer, can be read here:. I personally recommend the "Native GPS Calibration Method" (described below) - it gives the same results, and in my opinion is much more preferable and more convenient to use.
It should be noted that with the help of the program described here: , the activation speed from the "cold" state is still a little faster. but it's more heterogeneous, and due to its "deep penetration into the Android GPS system", it can "knock down" the calibrations of its "native system", which are discussed below. Plus, all you need to do with it, before each turn on, the GPS makes the launch using it really slower than in the version described in this note.
Added 30/08/2013. before starting the calibration, review this note and follow the procedures that are described in it: . This is especially true if you have serious problems with GPS, such as "keeps satellites very bad" and "lock" "drops" at the slightest weakening of the signal, plus after that, the GPS will "hold" more satellites at the same time, which will improve both stability and accuracy . Without these procedures, I could not "bring back" GPS under JB 4.1.1 Cink King. Then do the calibration according to the method. set out below in this post.
*italic font the points necessary to achieve the generally theoretically possible accuracy are highlighted. Items in italics may be omitted, this will slightly reduce the accuracy (actually 2 times), it will not affect the speed of the "cold start".
**Before the procedure, find out the code of the engineering menu of your device - you will need it.
- GPS accuracy, and especially the speed of "capture after a cold start", strongly depend on the accuracy of the time setting on your device. Usually everyone has in the "Date and Time" settings, "synchronize time over the network." I also stood. But as it turned out, in this case, the device uses the operator’s cellular signal to set the time, which in some cases can give the accuracy of setting the time worse than + - a few minutes, and in my case (Kyiv, Life operator) gave a difference from real time as much as 3 seconds. In general, feces, and not "signals of the exact time." There is also the opportunity to "determine the time by GPS", but if you do not live in the village, then it will eat up a lot of battery, and it will be a little bit useless - neither in the apartment, nor in the subway, nor in the minibus, nor in the office ... Well, you understand.
Therefore, we will first take care of setting the most accurate possible time. To do this, I installed the free ClockSync program, from here: https://play.google.com/store/apps/details?id=ru.org.amip.ClockSync&hl=ru, you can also get it from here: http://4pda. ru/forum/index.php?showtopic=171610 . You can also use the technique that I described here: - it does not require the installation of additional programs, but requires manual editing of several system configuration files.
Next, we determine the reference exact time server that we will use. It is important that it is as close to you as possible, and that the ping time to it is minimal. For starters, the addresses of "pools" - for Ukraine it is ua.pool.ntp.org, for Russia ru.pool.ntp.org. If you are in another country, look here: http://www.pool.ntp.org/ru/.
Now we start the terminal, and in it the command "ping ua.pool.ntp.org", and look at the response time. We do this 10 times - each time it will contact a random "pool" server, and usually a different one. Even for Ukraine, the "response" time for different servers ranges from 5 to 60ms (on the ground), to say nothing about Russia with its size. Accordingly, we write out the IP address of the server, the response time from which is minimal. We will use it.
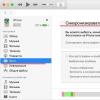
We launch the installed ClockSync program, Menu> settings. The first item is "NTP server". Enter the selected IP address there. Next, check the box "automatic synchronization", then select "Interval". The shorter the interval, the more often synchronization will take place, and this is "a little traffic and a lot of battery", on the other hand, my device "leaves" as much as 160-180 milliseconds in 3 hours ... I stopped at 3 hours for now. Next tick "exact interval" - you can not set it - it will save the battery a little, I personally set it. "High accuracy mode" - check it, especially since synchronization will sometimes go through cellular data transfer at a very unstable speed (you can not set it - the accuracy will drop, but battery consumption during synchronization will be significantly reduced).
We exit the settings menu, press "menu", and select "synchronize" - how far your device goes "past the time" can be seen on the screen. Yes, in the settings menu in a day you can see how much the clock of your device is "hurried / late" per day (my Fly IQ 450 is 9.21 seconds per day).
PS Automatic time synchronization is possible only on a "rooted" device. If you are not rooted, there is a "manual mode" in the program, but the accuracy will not be the same at all.
Note - added later. There is also a second way to accurately synchronize the time, without installing an additional program, I described it here:. After comparing the results, I chose this method, but it requires some editing of the configuration files.
It is also advisable, if you have a rooted device, to edit the /system/etc/gps.conf file. Namely, in the first line, after "NTP_SERVER=", replace the "default" specified there with one more suitable for your country - for example, for Ukraine on ua.pool.ntp.org, or even with a previously defined IP address, but it will be less generic and sometimes prone to failure if a particular server is down, so ua.pool.ntp.org is more generic, but the IP address in this field can further speed up the initial cold start. Editing can be done using "Root Explorer".
Over time, they figured it out. Further. - We go to the phone settings. Location. We mark the items: "By network coordinates", "GPS satellites", "Auxiliary data", "AGPS", the rest is "to taste". now go to the item "EPO Settings". Turn off "EPO" for the duration of the calibration. Everybody is here.
- Launching Google Earth , in the settings, switch it to show the coordinates in the format of degrees and fractions. We are looking for a place nearby where we will calibrate. It should be a fairly open place, such as a square. We select the point where we will stand during the calibration (select signs to become exactly at it later), hover over it, and write down the displayed coordinates to the last character. Preparation is over - let's go "to the field" :) with the phone.
- If used p3- we become EXACTLY at the point that we have previously chosen. We launch "root explorer", go to the / data / misc folder, delete the mtkgps.dat file. Load the latest AGPS data - for example, through the GPS Status program (menu>tools>AGPS data>Download). We check the time, for example, with the ClockSync program (we check several times, look at the typical deviation, and then click synchronize - how to use the program and where to get it - see earlier in the article on time calibration). We go into the engineering menu, LocationBasedServices, select "GPS" in the menu, and press the "GPS" button (the inscription on it will change from OFF to ON). Go to "View". We wait until a "fix" appears (the GPS indicator stops flashing), and then at least 2 minutes more. Then click RefPosition, and in the windows that appear, enter the coordinates previously written out from Google Earth "for the point where you are calibrating (there will be zeros). Click" OK ". Go back to the View screen, and wait after the "fix" for at least 2x minutes, better than 5 minutes. We go back to the engineering menu. If p3 was not performed, we simply choose any sufficiently open place. Taking out- do not even try to do the calibration on the balcony or "from the window" - you will only make it worse.
- **** Before calibration, you can also check the correct choice of the SIM card for AGPS - if your cellular operator is "buggy", and there are two and two operators, then you can choose a less buggy one, if "buggy" was selected, it can significantly speed up the work of GPS, atoms and "revive" the "non-working completely GPS" procedure is described at the very end of the note.
- We go to the "Engineering menu"(for my FLY IQ 450 and many Chinese clones, this is the code * # * # 3646633 # * # *, which we dial where you usually dial the phone number when calling, you may have a different one). Find "YGPS location", and run. Hold your phone upright.
- Go to the Information tab. Click the "Full" button.
- Go to the "Satellites" tab, wait until at least 5 satellites appear (better more - I had 11 of them when setting up), and after they "appear and turn green", we wait at least 2 more minutes, holding the device motionless (it can be longer - it won't get worse - only better ). This is the initial calibration. It took me 3 minutes, but for some devices, according to reviews, it can take up to half an hour.
- Go to Information", click "Cold". Further, as in paragraph 8. Repeat paragraph 9 3 times. Can be more.
- Back in Information. Click "Warm". further as in paragraph 8. It is no longer necessary to repeat.
- Back in Information". Click "Hot". Continue as in paragraph 8.
- If you followed step 3, go to the engineering menu, select "LocationBasedService", go to the "View" tab (remember to activate the GPS as described in step 4), and wait until the maximum satellites are determined. At least 7, more is better (the more, the more accurate the calibration), and after the maximum is determined, we wait another 2 minutes. Then go to the tab GPS, and click "RefPosition". You will have two numbers, from the one that you previously recorded using Google Earth, they will most likely differ in thousandths. Correct both to those that you wrote down earlier in p3. Click "OK". Now go to the GPS tab and wait 5 minutes while holding the phone motionless. Here in this place - the longer - the better. The GPS program, having received real coordinates, compares them with those that "are obtained from it" and makes corrections. clarifying them. Below in the window you will see the "process" counter and data that changes from time to time.
- We exit the engineering menu, reboot the phone.
- Everything. We rejoice at the smart and accurate GPS.
PS If you are also going to use the program described here: then please note that you need to calibrate after installing it. And in the case of its uninstallation - calibrate again - throws off the calibration data during uninstallation, and the GPS again starts to "search for satellites for several minutes." Loading her "acceleration" data DOES NOT seem to affect the calibration, but it also makes no sense - the difference in speed is "within the statistical error." But it seems that the real accuracy is slightly better, with its freshly loaded data (by 20 percent, but also within the statistical error in essence). Also keep in mind that the downloaded data of the above program quickly become outdated, and after a day or two, on the contrary, they will slow down GPS and reduce accuracy (compared to just a normally calibrated native one according to the method described above in this article). Plus, I demolished it nafik :) Firstly, it is not needed, and secondly, with it you can get a "GPS that does not determine anything" if you forgot to upload new data. Even if you pressed the "reset downloaded data" button and do not start the program itself. At least it happened to me once - I didn’t check the rake again.
PPS There are rumors on the net that "enabling EPO data" (specific GPS data for MTK chips), which gives some acceleration of the "cold start", reduces the number of "captured satellites". This is unlikely. The number of captured satellites is determined by their "number of overhead at the moment" and the height above the horizon (in the city, those that are above the horizon are usually not visible). But even so, when calibrating it is better to turn it off. And use it only if you are going to a place where the Internet may not be available. Then it will give you a real launch acceleration (it loads data for a month in advance). In a normal situation, it is better to use only AGPS - its data is fresher, and therefore more accurate, so the speed of "start" with it is typically higher.
PPPS Below is the "reference information" for those who got the device, with a completely non-working GPS. It is worth checking it - the reason may be that you have entered something different from the following in the settings:
In the engineering menu, in the LocationbasedService item, in the AGP tab S:
Enable A-GPS, MSB, User Profile, SLP Template - GOOGLE, supl.google.com, 7275, TLS Enable, RRLP, IMSI, K-Value must be enabled.
Horizontal Accuracy - 22, Vertical Accuracy - 0, Location Age - 0, Delay - 0. Location Estimate selected.
*********SIM card selection for AGPS
We go to the NET tab - select - click on the map (Map tab), the address at which you are located, or close to it, should appear there. We do the same with . We compare what is more accurate to your real situation, and on the AGPS tab, select your preferred SIM card.
On the AGPS tab, click
Yes, if something listed in this PS differed from the settings of your device, or if you changed the SIM card to which you have AGPS attached, you need to calibrate it again.
PS About the impact of clock accuracy on the "cold start GPS" time.
From the "uncomfortable place" - a balcony, everything is covered with concrete from above, a courtyard-well - houses from 4 sides, a "piece from above" to the sky, 4 satellites are barely visible (3 are barely visible later, and the 4th appears then disappears). the phone is calibrated according to the method described above (before calibration, there was no capture at all under these conditions). The clock "lags" by ~160ms (2 hours have passed since the clock was calibrated by the ClockSync program). Cold start time ~250-300 sec. After forced calibration of the time by the ClockSync program, the "cold start" time is ~ 100 sec. However, these are conditions. in which GPS is usually not functional at all, but well illustrate the impact of clock accuracy on cold start times.
PPS To force the download of AGPS data, for example, if you are far from the place where they were downloaded - for example, you traveled 200 kilometers for fishing / recreation, etc., and the AGPS data downloaded at home became irrelevant, which may adversely affect the "cold start" time.
You can use the "GPS Status" program from here: https://play.google.com/store/apps/details?id=com.eclipsim.gpsstatus2&hl=en . Run this program. At the bottom left under the "coordinate circle" is the age of the AGPS data in hours. Press Menu > Tools > A-GPS Data. Then "download".
After purchasing any GPS navigator, even the latest model, the screen calibration can go wrong at any time. This is a feature of this equipment. And many people face it. But not everyone knows how to solve this problem.
Depending on the model and manufacturer, you can calibrate the navigator both independently and with the help of specialists.
How to calibrate the navigator yourself?
Depending on the model, you need to perform several manipulations:
- Hold the upper left corner with your finger until the device turns off completely. If you hold the angle for 30 seconds, the calibration menu will appear. With the stylus, in turn, touch the black dots that appear. Confirm execution and turn on the device.
- When turning off the navigator, hold your finger in the center of the screen, move the power lever in parallel to the right side and lock it until it is completely locked. Hold your finger in the center of the screen for 1 minute (until the menu for calibration appears). Use the stylus to touch the black dots that appear in turn, confirm the end of the procedure. In order to unlock the screen, just switch the power button to the middle.
If these options did not help calibrate the GPS navigator, you need to contact the experts. A professional in his field will launch "heavy artillery", special programs designed for this procedure. If they do not help solve the problem, you will have to reflash the operating system of the device.
Calibrating the screen of the navigator is necessary when the image that appears on the display becomes fuzzy, and often blurs.
According to the statistics of GPS-navigators released for sale, almost half of them may have problems with screen calibration. You should not be afraid of this, each equipment has technical flaws. The main thing is that in case of a problem with the calibration of the navigator, it can be solved. Often, it is enough to perform one of the actions described above. Electronic equipment specialists will help not only to solve the problem, but also to equip the device with new, convenient maps and other necessary software that will help the user feel more confident on the road.