Each user of a mobile gadget at least once faced with the need to take a screenshot from the screen of his phone. This is the easiest way to visualize the processes in the phone. Regardless of the brand and model of the device and its operating system, the screenshot option is available on every mobile device.
What is a screenshot on a phone
A screenshot is a snapshot of the screen that shows the exact content on the display at a specific point in time. Such images allow you to illustrate in detail the operation of applications, any program, files or processes in your mobile phone.
Screenshots are used in such cases:

How to take a screenshot on your phone
The screenshot option is available on all mobile phones, however, the method of capturing the screen varies depending on the operating system of the devices. Consider the basic techniques that will allow you to simply and quickly take a screenshot.
Screenshot for Android
The developers have provided this option on all models of mobile gadgets, for which you do not need to download third-party applications or programs.
So, you can take a screenshot of the phone screen using the following combinations:
- For HTC Desire S, press the Home button and the power button at the same time. In this case, the screenshots will be saved in the shared folder with photos.
- For Samsung Galaxy - hold down the Home and Back keys. All captured images will be saved in the ScreenCapture folder.
- For Sony Ericsson Xperia - simultaneously holding the power and volume down buttons.
- For Samsung Galaxy S II - holding down the "Home" and "Lock" keys.
- For all devices on the Android 3.2 platform, the screenshot is activated by long holding the "Recent Programs" key.
- For mobile phones based on Android 4.0, a screenshot is taken using a combination of the power and volume down buttons.
Screenshots for Apple iOS
You can take a picture on any mobile gadget with the iOS operating system from Apple with a simple combination. To do this, simultaneously hold down the "Home" key for 2-3 seconds. Screenshots for Microsoft Windows Phone Similar to the above method, owners of Windows Phone 8 phones can take a screenshot of the screen by holding the "Start" button. All images are stored in the "Photos" folder.
However, for the Windows Phone 8.1 software version, the steps are slightly different. To capture the screen, you will need to simultaneously hold down the volume up + power button. What should I do if I can't take a screenshot on my phone? If the above methods do not bring the desired result, you can take a screenshot using third-party applications. You can find and install such programs on your gadget in the Google Play service.
The most popular are the following:
- Screenshot Ultimate
- Screenshot
- screenshot
- No Root Screenshot It
Screenshot Easy App
This program allows you to take instant pictures from the screen of your phone or tablet. The functions of the application allow you to view the screenshot taken, edit it and directly share via social networks, messages, mail messengers, for example, Skype.
Instructions for using the application:

The main menu of the program will describe methods for capturing the screen, as well as the “Start Capture” key, using which the application will take a picture and save it in the ScreenCapture folder. Screen 7 The functions of this program allow you to set the file extension, specify the storage, rotate the image, switch the color, etc.
It turns out to save the image, and in some cases the graphics take up a lot of memory. Therefore, screenshots on Android will be a rational and practical solution. This is true for the Instagram application, from which photos are not saved.
Such pictures show everything that is visible on the screen. At the same time, the user is subsequently given the opportunity to view, edit and send to any person.
But the universal option still exists. A screenshot on Android 4.0+ is done by pressing two keys. The first is the power button. The second is sound reduction. The keys are pressed at the same time and held for one or two seconds.
The result of the work done will be a characteristic sound and a temporary whitening of the screen. The status bar will also notify the user about a successfully completed action. The picture is saved to the phone in the corresponding section of the gallery.

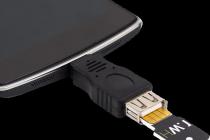
Further, the screen on Android can be edited, changed and sent to other people. In other words, the user does whatever they want with the snapshot. If necessary, this image is transferred to or using a special cable, via a wireless connection.
For users of smartphones with such an operating system, another option is available. The user must hold down the power key. After that, a menu is displayed on the monitor, which includes some actions. As a rule, this is:
- power off;
- restart;
- flight mode;
- screen screenshot.
The last point is what you need. This option is selected and the desired photo is taken.
Screenshot on Samsung smartphones and tablets
Method number 1
Taking a screenshot on Android is done differently. The first option is used for most models of this brand. At the same time, the window minimization key and the power button are pressed. After that, the corresponding icon is displayed in the status bar on the screen that the screenshot has been taken. How this is done is shown below with an example.

The button does not need to be pressed for more than two seconds. If this method does not work, then you need to use one of the following.
It will be useful to know « ».
Method number 2
The second method is used if there is no mechanical key on the front panel of the device, which is responsible for minimizing windows. In this case, the power and volume down buttons are pressed. Actions are shown in .

The result is saved in the gallery, and the corresponding icon is displayed on the display, as in the previous case. If this option is not suitable, then the next one applies.
Method number 3
This method is used for modifications released earlier. To take a screenshot of the phone screen, for example on the Galaxy S, you also need to hold down two buttons. These are the windows minimization and back keys. The result will be notified by an icon in the left corner of the monitor.

Method number 4
If the above options are not suitable, then the last one applies. In this case, the screenshot on Android is done with the palm of your hand. This option is only suitable for flagships. This is the Galaxy S line, Galaxy Note. For example, Galaxy S6 Edge. To do this, the following steps are performed:
The menu opens.
- The settings section is selected.
- The motion category is pressed, followed by palm control, gesture control, or auxiliary options (depending on the device).
- The option to take a picture with the palm of your hand is turned on.
- Swipe your hand across the screen from one side to the other.

When performing an action, the palm must be in contact with the display.
How to take a screenshot with ADB
There is also an option to do it in a different way. How to take a screenshot on Android using ADB? To do this, the developer mode is initially turned on on the phone, for example, on. Also, the gadget is connected to a PC or laptop. Actions are:
- A set of a special algorithm that involves moving to the root of the device's SD card. It looks like this: adb shell screencap -p /sdcard/screen.png.
- Downloading the resulting image. For this, the traditional pull option is used. The image is then saved to the PC. If you do not specify a storage location, the picture will remain in the location where the user was at the time of the call.
- Deleting an image from the device. This action is done when necessary to free memory.
After that, the process ends.

The steps may vary depending on the smartphone model and manufacturer. In any case, these operations are accompanied by a characteristic sound and a notification in the left corner of the display. If none of the options listed above fit, then you need to try holding the key combination longer. When this does not work, then the problem lies in the device. Alternatively, the software platform is installed incorrectly or the operating system is non-original. It is worse when the smartphone is a fake.
See also the video "How to take a screenshot on android devices".
Sooner or later, any owner of an Android device needs to take a screenshot. As an experienced PC user, you know that there is a special key on the computer for this - PrintScreen. You open the virtual keyboard, and there ... nothing like that.
Just don't panic! Everything is much simpler than it seems at first glance. There are no less ways to take a screenshot on Android than on a PC, they are just not so obvious. We invite you to learn more about them.
Universal way for all Android versions starting from 4.0
To capture the contents of the screen of a smartphone or tablet, it is enough, just like on a computer, to press certain keys. But not on the virtual keyboard, but on the body of the gadget. This " power” (power button) and “ volume down” (lower half of the volume rocker). Press both buttons exactly at the same time and hold them in this position for a while. After 1-2 seconds, you will hear the sound of the camera shutter - this means that the screenshot is ready. After that, the system will automatically save it to the /Pictures/Screenshots or /Pictures/ScreenCapture directory of the device's internal memory.
The method works on phones and tablets of any manufacturer - Nexus, Fly, Motorola, Sony Xperia, ZTE, Huawei, etc. The only condition is that the device must have a not too old version of Android installed, the rest is not important.
Proprietary Methods
Some manufacturers of mobile devices, in an effort to make life easier for their users, are developing additional ways to get screenshots. Let's look at a few examples.
Samsung
To take a screenshot on an older smartphone of this brand, such as the Samsung Galaxy S with Android 2.3, just press and hold the Back and Home buttons for 1-2 seconds.
On models released no more than 4 years ago, for example, on the Samsung Galaxy s2 phone and on the Galaxy Tab 2 tablet, the universal method described above is used - simultaneously pressing the "Power" and "Volume-" buttons. 
On the most modern devices, such as the Samsung Galaxy a3, Samsung Galaxy j3 and others that left the assembly line no earlier than a year or two ago, the third method is used. This is the simultaneous pressing of the "Power" and "Home" buttons.

By the way, both options work on some devices - both this and the previous one. And on others - only the last.
For modern Samsung gadgets, there is another way to get screenshots - gesture. To capture a picture on the screen, it is enough to swipe it with the edge of your palm from right to right or vice versa. By default, the option is disabled. To use it, open the settings menu - section "Control" - "Palm control" and select "Screenshot".
The finished screenshots are saved in the Pictures/ScreenCapture folder.
HTC
HTC smartphones allow screen capture in two ways:
- Universal - by simultaneously pressing "Turn on" and "Volume-".
- By pressing the "Power" and "Home" buttons. This option is not supported by all devices. If it doesn't work on yours, use the first one.
Xiaomi
Xiaomi smartphones and tablets also support additional methods for taking screenshots. This is the simultaneous pressing of the “Volume-” and the keys in the form of three stripes (menu), as well as the “Screenshot” icon, which is located behind the curtain of the notification panel.
LG
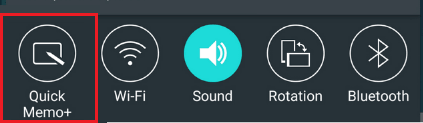
The software shell of LG Android smartphones contains a proprietary application Quick Memo (QMemo +), which not only takes screenshots, but also allows you to process them in the built-in editor. For example, trim around the edges, add inscriptions, etc.
To launch Quick Memo, pull down the notification shade and tap on the icon shown in the picture below.
In addition, a universal method works on LG devices.
Lenovo
The proprietary Lenovo VIBE UI shell also contains a built-in screenshot function. It is called:
- From the drop down menu.
- From the menu, the power button and lock the device.

And of course, the traditional way works on Lenovo smartphones and tablets - pressing the combination of the "Power" and "Volume Down" buttons.
Asus Zenfone
Asus Zenfone and Zenfone 2 also have their own signature features, which are provided by the ZenUI shell.
To take screenshots with one touch, make small changes to the Asus ZenUI settings:
- Go to the gadget's options menu, open the Asus Personal Settings section and select the Recent Apps Button. Assign the action to the button as "Press and hold to take a screenshot". After that, it (the button shown in the picture below), when pressed for a long time, will “photograph” the image on the display.
- For Zenfone 2: From the home screen, open the quick settings menu. Next, go to the "Advanced Settings" section and select the "Screenshot" option. Confirm saving. After that, the "Take Screenshot" icon will appear in the quick settings.
Meizu
Chinese Meizu gadgets, depending on the model, allow you to capture the screen in two different ways:
- The first one is universal.
- The second is by simultaneously pressing the "Power" and "Home" buttons.
On Android 3.2 and older
To take a picture of the display in Android 3.2, press and hold the Recent Apps button (like on the Asus Zenfone). But here you do not need to make any preliminary settings.
The ancient versions of Android - 1 and 2, unfortunately, do not have this function at all. To make up for the shortcoming, you will have to install a third-party application.
On devices with custom firmware
Custom firmware gives Android devices many useful additions, and one of them is the convenient creation of screenshots. The "Take Screenshot" option is right in the power button's menu.

On Android 6 and 7 versions
Images taken using Google Now on Tap differ from those taken in the standard (universal) way in that they do not have notification and navigation bars. This is convenient: if you take a screenshot, for example, for a blog post, you don't have to crop it.
Via computer
A lot of programs have been written with the help of which the user can control the phone from a computer. Most of them are created by device manufacturers, but only for devices of their own brand. However, there are also universal ones. One of the best applications of this class, in our opinion, is the free MyPhoneExplorer. In addition to remote content management on a smartphone or tablet of any model, it allows you to take screenshots and save them to your PC.
The program consists of two modules: a server one, which is installed on a Windows-based computer, and a client one, designed to be installed on an Android gadget. The interaction of the modules provides pairing of the phone and PC in three ways: via a USB cable (do not forget to enable USB debugging on your phone), via Wi-Fi (if both devices are on the same network) and via Bluetooth.
MyPhoneExplorer will allow you to manage your mobile device just as if you were holding it in your hands. But now we will not study its possibilities. Our task is to figure out how to take a screenshot:
- Let's establish a connection first. The desired method is set in the program settings on the PC.
- After the data of the mobile device appears in MyPhoneExplorer, go to the "Miscellaneous" menu and select "Phone Keyboard".

- When the picture from the last screen is displayed in the window on the PC, click the save button.

Using programs from Google Play
Screen capture

The Screen Capture application takes pictures both with the help of buttons - software and hardware, and by shaking the device. Like the previous program, it includes simple tools for editing the finished picture. Does not require mandatory root rights, but if they are, it provides a little more options.

The functionality of the application is practically the same as the previous two: the same soft button and a built-in mini-editor with the function of cropping the frame and drawing. Requires mandatory root.
Android 4.0 and above
Owners of gadgets with the fourth or more recent versions of Android can take a screenshot by simultaneously pressing the power and volume down buttons. We hold this combination for a fraction of a second, after which we observe a characteristic picture on the screen.
You can find the screenshot taken in the system application that functions as a photo gallery on your device. For example, on Nexus, Pixel, Google Play Edition, and other on-board series, screenshots appear in the Screenshots folder in Google Photos.

Older versions of Android
Unfortunately, the Android system before version 4.0 did not have a native screenshot function. The problem was solved by smartphone manufacturers. For example, in some even older Samsung devices, screenshots can be taken by simultaneously pressing the power and home buttons.
If this combination does not work in your case, then you should contact Google: your device may also be able to take screenshots out of the box, but with its own tricky combination.
If your search doesn't return any results, try third-party apps like Screenshot (for Android 2.3 and later) or No Root Screenshot It (for Android 1.5 and later).
In addition, if you have, you can install any modified Android firmware (for example, LineageOS) with the screenshot function implemented.
iOS
To take a screenshot on any iPhone or iPad, hold down the power key for a second, and with it - "Home". The screenshot created in this way can be found in the standard Photos application.
How to take a screenshot on a computer
Windows and Linux
Eat . One of the easiest is to press the PrtSc key, then open the Paint program and use the Ctrl + V combination. The screenshot will appear in the editor window. You can save the image to your hard disk through the "File" menu.
The PrtSc key will work on Linux too. Immediately after clicking, a dialog box will appear that will ask for the path to save the screenshot.
These methods are suitable for both desktop computers and laptops.
macOS
To take a screenshot on any Apple computer, use the key combination Cmd + Shift + 3. The finished screenshot will be saved to the desktop.
Smartphone users often need to take a screenshot. There can be many reasons for this - send a screenshot to a friend, show a message, a photo, and so on. As with any action with the operating system, there are many ways to take a screenshot. You can take screenshots using standard tools, third-party software, and using a program on your computer. In this article, you will get acquainted with all the methods. You will learn how to take a screenshot on Android.
In many situations, it is required to transfer an image from the screen of a mobile device in image format. To do this, unknowing users will immediately take up another device with a camera to take a picture of the screen. But there are more convenient options.
Screenshot - Capture an area of the screen or the entire screen and display what is on it in graphic file format. With its help, it is convenient to share information, visually show the actions performed, introduce users to the functionality, etc. When writing this manual, screenshots were also used for a visual explanation, as you can see below.
How to take a picture on Android?
Unlike the iOS operating system, on Android, the keyboard shortcuts for capturing the screen varied depending on the versions and generations. If Apple has not changed the combination for creating a screenshot since the first generations, then Android (for example, Meizu) is more difficult. Let's figure out how to take a picture from the display on different versions of the operating system.
Version 2.2, 2.3 and below
At the time of the release of the first generations of the OS, the developers from Google had not yet built this feature into the standard set of features. Therefore, smartphone manufacturers added it on their own.
For example, old Samsung or Alcatel devices could create screenshots by pressing keys simultaneously "Home" And "Back". Therefore, to clarify the combination, you can enter the exact name of your model (for example, Dexp Ixion or Samsung A5) in a search engine and find information regarding the device.
After the release of the 3rd generation of the operating system, screen capture was added to the standard set of features. Now with a long press on the button "Recent Programs" a picture of the desktop was taken and saved to the phone's gallery. This method is no longer used in modern devices, but it will be useful to owners of old smartphones that are no longer updated to modern OS versions.
Prior to the release of Android 6, a common algorithm for creating screenshots was used using the volume down and "Enable/Lock". Most Chinese manufacturers (Huawei, Meizu, etc.) decided not to change the established traditions, so the print screen is created in them using the volume and power buttons.
All the above methods work for the standard operating system shell. If the smartphone manufacturer uses custom launchers, then he has the right to change the way the system is managed.
Now let's go through the individual manufacturers that are most in demand among users:
Samsung often changes OS management in its devices. For example, in the new Samsung Galaxy, you can take a screenshot with the edge of your hand from one edge of the screen to the other.
Samsung j3, j1, j7 and similar models have a mechanical button "Home", so the screenshot is created via "Home" + "Inclusion", or "Home" + "Back".
The creators of the Sony Ixspiria model line decided not to limit themselves to key combinations and added the corresponding item to the menu, which can be called up by long pressing the power key.
Chinese manufacturers, known for the Xiaomi Redmi and Meizu M3 series, chose not to change the standard control and left "Volume down" + "Block". On Asus Zenfone smartphones, you can use the function in the menu. Asus also supports snapshots using the system keys.
Depending on the shell, all screenshots appear in different locations and folders. In most cases, saved screenshots can be found in the Gallery on the phone in the appropriate folder:
If you use services from Google that are preinstalled on your smartphone, then you will need an application "Photo". In it you should open the menu.
Third Party Applications
Standard combinations are convenient and fast. But not in all situations they can be used. A banal example is a broken button "Home", volume or power key, and there is no function to take a screenshot from the menu on your device. What to do then?
In this case, the Android system will not offer you anything. You will have to use third party tools. Enter "screenshot" in the Google Play store and select one of the applications in the list:
So that you do not have to search and select a working application for a long time, we offer several convenient programs for creating screenshots. Most of them require Root rights to capture the screen. This will require some time, skills and software.
If you already have root access for your smartphone, you can use OK Screenshot, Drocap 2 for root users or Screenshot ER. But we need to take screenshots quickly and as simply as possible, so let's move on to describing other applications.
Screenshot Capture
You can download this program from the Play Market for free, and it does not require root rights. Let's try to take a screenshot in Viber:
- Allow access to media files on your device. Next, open the side menu and go to the tab
- Click to start the background service.
- The application icon will appear on the screen. The widget can be moved as you like.
- Open Viber. Click on it to open the option to take a picture (2) or record a video (1).
- After creating the screen, the editing menu will open. You can crop the picture (1), draw on it (2) or add stickers (3).
- To view, open the application and go to the side menu. In it, select "Video"(1) or (2) depending on which screen capture you did.
All screenshots taken via Screenshot Capture will be displayed here.
So you can take a picture with correspondence in Viber, WhatsApp or any other messenger, and then send it to a dialogue or group.
An application with a simple name is also free to download from the Play Market. After launching "Screenshot", you will see the following menu:
Let's analyze the interface:
- start of shooting;
- go to the screenshot gallery;
- go to settings.
In the app settings you can:
- change the path for saving images;
- enable/disable notifications;
- change the shell of the program.
How to take a screenshot on a computer?
And, finally, if none of the above methods helped you, we turn to the help of a personal computer. For this you will need:

- computer and USB cable;
- smartphone;
- installed drivers for smartphone;
- ADB Run program or similar.
With this program, you can automatically create a screenshot. The utility can be downloaded for free from the link. After starting the program, you will see the following menu.