A small amount of internal memory on cheap Android smartphones and tablets, the main problem is the inability to install applications in such cases, replacing the internal Android memory with a memory card can help.
For those who do not understand what this article is about from the title: suppose you have 400 MB of Android internal memory, which is very small (about 12-20 installed applications), then you might think to take and replace the main memory with a memory card.
Before you start!
Do you have Android version 5.1 or later? Great! Then perhaps on your smartphone you can increase or!
Method 1
way 2
If you do not have such settings? Then read the article below!
Risks and what you need to know
Replacing the internal memory of Android with a memory card occurs only with installed root rights (no root, method does not work)! For those who do not know what Root is and how to get it:
In addition to this, you obliged know the Android file system structure.
Memory substitution is possible only if your Android device has a system file vold.fstab along the way /system/etc , if you do not have one, then this method unfortunately not for you! Use alternative methods (link 1, link 2, link 3). Also if Android does not have its own memory, then this article also not for you. The article is more for devices with a Mediatek (MTK) or Rockchip processor.
Since the system file will be edited there is a risk that you can make a mistake and device won't boot, in order to fix this you need to reflash the device, and the memory card may fail and you will encounter the same problem, the firmware will also help.
With the replacement of internal memory on a memory card, the latter has a very short service life (due to frequent reading / writing), and the speed of Android may also drop if the class is very low microSD cards.
Attention!
Before you start making any changes, use the official opportunity to replace the memory card -.
Instructions for replacing the internal memory of Android with a memory card
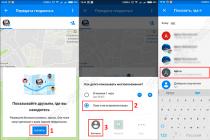
1. Install the Root Browser file manager (if you choose another one, then do not write “smart” questions “I don’t see” “I don’t edit” in the comments)
2. Run the Root Broswser file manager and follow the path:
/system/etc/
3. Looking for a file vold.fstab and open it (click on the file and select Edit)
4. In file vold.fstab see approximately such a picture:
## Vold 2.0 fstab ## # Regular device mount ## ##Format: dev_mount
In this example, pay attention to two lines highlighted, if you carefully read the Android file system structure before that, then you already know that /sdcard or /sdcard0 is the internal memory /extsd or /external_sdcard, /sdcrad1, /sdcrad2, /external_sd this is external memory, that is, microSD.
All you have to do is replace these two lines:
dev_mount extsd /mnt/extsd auto /devices/virtual/block/XXXXX dev_mount sdcard /mnt/sdcard auto /devices/platform/XXXXX/XXXXXAnother example, on another device:
Dev_mount sdcard /storage/sdcard0 emmc@fat /devices/platform/goldfish_mmc.0 /devices/platform/mtk-msdc.0/mmc_host dev_mount sdcard2 /storage/sdcard1
We change to the following:
Dev_mount sdcard /storage/sdcard1 emmc@fat /devices/platform/goldfish_mmc.0 /devices/platform/mtk-msdc.0/mmc_host dev_mount sdcard2 /storage/sdcard0 auto /devices/platform/goldfish_mmc.1 /devices/platform/mtk-msdc.1/mmc_host
Do you still have additional questions? Ask them in the comments, tell us what you did or vice versa!
How to replace the internal memory of Android with a memory card. A small amount of internal memory on cheap Android smartphones and tablets, the main problem is the inability to install applications in such cases, replacing the internal Android memory with a memory card can help.
For those who do not understand what this article is about from the title: suppose you have 400 MB of Android internal memory, which is very small (about 12-20 installed applications), then you might think to take and replace the main memory with a memory card.
Risks and what you need to know
Replacing the internal memory of Android with a memory card occurs only if you have installed root rights (no root, the method does not work)! For those who do not know what Root is and how to get it:
In addition, you must know the structure of the Android file system.
Memory substitution is possible only if your Android device has a vold.fstab system file along the path / system / etc, if you don’t have one, then this method is unfortunately not for you! Use alternative methods (link 1, link 2, link 3). Also, if Android does not have its own memory, then this article is also not for you. The article is more for devices with a Mediatek (MTK) or Rockchip processor.
Since the system file will be edited, there is a risk that you may make a mistake and the device will not boot, in order to fix this you need to reflash the device, and the memory card may fail and you will encounter the same problem, the firmware will also help.
With a replacement internal memory for a memory card, the latter has a very short service life (due to frequent reading / writing), and the speed of Android may also drop if the class of the MicroSD card is very low.
Instructions for replacing the internal memory of Android with a memory card
1. Install file manager Root Browser
2. Run the file manager Root Broswser and go along the path:
/system/etc/
3. Looking for a file vold.fstab and open it (click on the file and select Edit)
4. In file vold.fstab we see something like this:
## Vold 2.0 fstab##
# Regular device mount
##
##Format: dev_mount
## label - Label for the volume
## mount_point - Where the volume will be mounted
## part - Partition # (1 based), or ‘auto’ for first usable partition.
##
####################################### # Mounts the first usable partition of the specified device
#/devices/platform/awsmc.3/mmc_host for sdio
dev_mount sdcard /mnt/sdcard auto
dev_mount extsd /mnt/extsd auto
/devices/platform/sunxi-mmc.0/mmc_host
dev_mount usbhost1 /mnt/usbhost1 auto /devices/platform/sw-ehci.1 /devices/platform/sw_hcd_host0 /devices/platform/sw-ehci.2 /devices/platform/sw- ohci.1 /devices/platform/sw- ohci.2
In this example, pay attention to two lines highlighted, if you carefully read the structure of the Android file system before these, then you already know that /sdcard or /sdcard0 is the internal memory /extsd or /external_sdcard, /sdcrad1, /sdcrad2, /external_sd this is external memory, that is, microSD.
All you have to do is replace these two lines:
dev_mount extsd /mnt/extsd auto /devices/virtual/block/XXXXXXdev_mount sdcard /mnt/sdcard auto /devices/platform/XXXXXX/XXXXXXX
Another example, on another device:
dev_mount sdcard /storage/sdcard0dev_mount sdcard2 /storage/sdcard1
We change to the following:
dev_mount sdcard /storage/sdcard1 emmc@fat /devices/platform/goldfish_mmc.0 /devices/platform/mtk-msdc.0/mmc_hostdev_mount sdcard2 /storage/sdcard0 auto /devices/platform/goldfish_mmc.1 /devices/platform/mtk-msdc.1/mmc_host
Save your work and restart Android! After the reboot, the device will be with an increased amount of memory!
The problem of lack of memory is one of the fundamental problems for both PCs and mobile devices. With a small amount of free memory, the system usually starts to slow down, freeze, work unstably and unreliably. This is especially true for Android devices, many of which initially have a rather small amount of main memory (the so-called "Internal Storage"). In such a situation, some users may have the idea to try using an external SD card as the main storage on their Android device. In this article, I will tell you how to make an SD card the main memory on Android gadgets, and what methods will help us with this.
We analyze how to make an SD card the main memory on Android
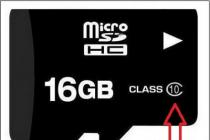
To accomplish this task, you will need a high-speed SD card (preferably class 10 or faster). Cards 6, and especially 4 and 2 classes are not suitable for such purposes, your system will significantly slow down its work due to their use, which is unlikely to please any of the users.
It is also important to understand that the validity period of such an SD card, due to the active load on it, will be significantly less than if the card was loaded in standard mode.

Method number 1. Change the contents of the Vold.fstab file
The first of the described methods involves changing the contents of the system settings file "Vold.fstab". After making these changes, the Android OS will consider your SD card as the internal memory of the device, while keeping in mind that a number of previously installed applications may stop working.
It is important to know that this method only works on rooted devices running Android OS below (!) than version 4.4.2. In Android OS versions 4.4.2 and above, most likely you simply will not find the specified file.
Also note that an error in the implementation of this method (in particular, adding extra characters to the necessary lines) can most sadly affect the performance of your device. Therefore, carefully weigh the possible risks, and if, nevertheless, you have made a decision, then proceed with its implementation.
So, to implement this method, do the following:

For example, these lines could be:
- dev_mount sdcard/storage/sdcard0 emmc@xxxxxx
- dev_mount sdcard2/storage/sdcard1 auto/xxxxxx
To make the necessary changes, we need to change the path in the specified lines, that is, in other words, instead of 0, put one in the first line, and in the second, put 0 instead of 1.
After the changes, these lines will look like:
- dev_mount sdcard/storage/sdcard1 emmc@xxxxxx
- dev_mount sdcard2/storage/sdcard0 auto/xxxxx
Save your changes and then reboot your gadget.
Another option on how to make a memory card the main one on android:

Method number 2. We use the settings of Android OS 6.0 and higher
In addition to the first method, in which I looked at how to switch the phone's memory to a memory card, there is another method that works only on Android 6.0 (Marshmallow) or higher OS settings and allows you to use the SD card as the main one for saving files and working with them . To implement it, I recommend making a copy of the data from your SD card (if any), since this card will be formatted by the system.
The capabilities of the device can be seriously expanded if you replace the internal memory of Android with a memory card. This will allow you to install many more applications on your tablet or other gadget, but the main requirement for this update is that you have root rights on the device. Let's look at the ways that you can use an SD card as the device's system memory, as well as the conditions associated with this.
Risks and conditions of replacing the internal memory of the gadget with an SD card
Before repeating the steps described below, the user should consider several important points:
- The life of the SD card will be greatly reduced due to frequent read/write cycles when running applications.
- The speed of the gadget can drop noticeably if you use a low-class MicroSD card.
- If you make a mistake when editing the system file, the phone may not boot next time - you will have to reflash it.
In general, the procedure (especially for inexperienced users) is quite risky, so it makes sense to carry it out exclusively for old gadgets with a small amount of their own memory.
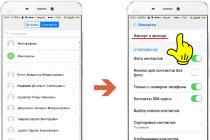
Using the Root Browser utility and editing the vold.fstab file
To swap memory, you will need to install Root Browser from Google Play.
We repeat that you can fully work with it only on rooted devices. After running the above application:

In Android, sdcard stands for internal memory, and extsd stands for external, i.e. SD card. By replacing these lines, we have actually swapped these types of memory. On some systems, these pieces of code may look different, for example, like this:
You need to replace them like this:
After completing the described procedure, restart the gadget. Before doing this, be sure to check for errors in the modified code so that in the future there is no need for a flashing.
The second way to increase memory using Link2SD

The application is available in the Play Market and works only on devices with root rights. This file manager does not physically replace the internal memory of the device with an external drive, but it is able to transfer any utilities to an SD card, significantly saving gadget resources.
The peculiarity of the application in question is that the MicroSD itself will have to be broken and properly formatted. Therefore, copy everything valuable from your card to your computer and start dividing the drive into sections.
Dividing the device card into sections with custom Recovery
Each Android device has a recovery mode, but the method described below is only suitable for devices not with the standard one, but with. If you've never heard of CWM, move on to the second drive partitioning option. Next, we will tell you how to solve the task, if there is a Partition SD Card item in your device recovery mode:

Partitioning a microSD card through a computer
Connect the card to a laptop or PC. To do this, you can use a card reader or other equipment, most importantly, it should be defined as a drive, and not an MTP media device. Further: