GT-S5660 user manual ...
Samsung Galaxy Gio - page 2
Using this manual 2 Using this manual Thank you for pur chasing this Samsung mobile device. This device will provide y ou with high quality mobile co mmu nic at ion a nd en tert ain men t bas ed on Sa msu ng's exceptional technology and high standar ds. This user manual has been specially designed to guide you through the functions and features ...
Samsung Galaxy Gio - page 3
Using this manual 3 Note -notes, usage tips, or additional information Refer to -pages with relat ed information; for example: p .12 (represents “see page 12”) → Follo wed by -the order of options or menus you must select to perform a step; for example: In Idle mode, open the application list and select Settings → About pho ...
Samsung Galaxy Gio - page 4
Using this manual 4 Bluetooth ® is a registered tr ademark of the Bluetooth SIG, Inc. worldwide. and are trademarks of SRS Labs, Inc. CS Headphone and WOW HD technologies are incorporat ed under license from SRS Labs, Inc. Wi-F i ®, the Wi-F i CERTIFIED logo, and the Wi-Fi logo are registered tr ademarks of the Wi-Fi Allian ...
Samsung Galaxy Gio - page 5
Contents 5 C onten ts Assembling ............................................ . 9 Unpack ............................................... ................... 9 Install the SIM or USIM card and battery ...... 9 Charge the battery ............ ............................... 1 1 Insert a memor y card ............ ........................... 1 3 Attach ah ...
Samsung Galaxy Gio - page 6
Contents 6 P ersonal information .......................... 64 Contacts ................. ............................................. 6 4 Calendar .. .................................................. .......... 6 8 Memo ..................................... .............................. 6 9 V oice recorder ............... ........................... ...
Samsung Galaxy Gio - page 7
Contents 7 T ask manager ............................................. ....... 9 4 ThinkF ree Oce .................................... ............ 9 4 V oice Search ................................. ...................... 9 6 Settings ......................... ......................... 97 Acc ess the Settings menu ................... ............ nine ...
Samsung Galaxy Gio - page 8
Contents 8 Privacy ............................................... ............... 10 3 SD card and phone storage ......................... 10 3 Search .................................................. ............. 10 3 Language and keyboard .............................. 10 4 V oice input and output ................................ 10 6 Acc essibi ...
Samsung Galaxy Gio - page 9
Assembling 9 Assembling Unpack Check your product box f or the following items: Mobile device Battery T ravel adapter (charger) User manual Use only Samsung-approved software. Pirated or ill egal softwa re m ay ca use d amage or m alfun ctions that are not cov ered by your manufacturer "s warranty. The items supplie ...
Samsung Galaxy Gio - page 10
Assembling 10 Inser t the SIM or USIM card. 3 Place the SIM or USIM card into the devic e with the gold-colored contacts facing down. If you do not insert a SIM or USIM card, you can only use your device's non-network services and some menus. T o install the SIM or USIM card and battery, If the device is on, press and hold [1] ...
Samsung Galaxy Gio - page 11
Assembling 11 Charge the batt er y Before using the device f or the rst time, you must charge the battery. Y ou can charge the device with the pro vided travel adapter or by connecting the device to a PC with a PC data cable. Use only Samsung-approved char gers and cables. Una uthor ise d cha rger s o r cab les c an ca use b atte rie s to explod ...
Samsung Galaxy Gio - page 12
Assembling 12 Plug the large end of the trav el adapter into a power 2 outlet. Y ou can use the device while it is charging, but it may take longer to fully charge the battery. While the device is charging, the touch screen may not funct ion d ue t o a n uns table pow er su pply. If this happens, unplug the trav el adapter from th ...
Samsung Galaxy Gio - page 13
Assembling 13 Plug the other end of the PC data cable into a USB port 2 on a PC. Depending on the type of PC data cable you are using, it may take some time bef ore charging begins. When the battery is fully charged (the battery icon is 3 no longer moving), unplug the PC data cable from the device and then from the PC. Inser t a memor y card T o st ...
Samsung Galaxy Gio - page 14
Assembling 14 Ope n the cov er t o the memo r y c ard slo t on the s ide o f 1 the device. Ins ert a memo r y c ard wit h the gold -colou red cont acts 2 facing down. Push the memory card in the memory card slot until it 3 locks in place. Close the cover to the memory card slot. 4 Samsung uses approved industry standards for memory cards, but some ...
Samsung Galaxy Gio - page 15
Assembling 15 F ormat the memory card ›Formatting y our memory card on a PC may cause incompatibilities with your device. Format the memory card only on the device. In Idle mode, select → Settings → SD card and phone storage → Unmount SD card → OK → F ormat SD card → Forma t SD card. Before formatting the memory card, r emember to ...
Samsung Galaxy Gio - page 16
Assembling 16 Attach a hand str ap (optional) Remove the back cov er. 1 Slide a hand strap through the slot and hook it over 2 the small projection. Replace the back cover. 3 ...
Samsung Galaxy Gio - page 17
Getting started 17 Getting star t ed T urn your devic e on and o T o turn on your device, Press and hold [1]. If you turn on your device for the rst time, follow the 2 on-screen instructions to set up your device. T o turn o your device, press and hold and select Pow er o. Follo w all posted warnings and directions from o ...
Samsung Galaxy Gio - page 18
Getting started 18 Keys ›Key F unction Pow er / Lock T ur n on the device (press and hol d); A cce ss the q uick menus (press and hold); Lock the touch screen. Menu Open a list of options available on the current screen. Home Return to the idle screen; Open the list of r ecen t ap pli ca tio ns (press and hold). Back Return to the previous screen ...
Samsung Galaxy Gio - page 19
Getting started 19 Icon Denition Call in progress Call on hold Speakerphone activated Missed call Synchronized with the web Uploading data Downloading data Call diverting activated Connected to PC USB tethering activated Indicator icons ›Icons shown on the display may vary depending on your region or service provider. Icon Denition No sig ...
Samsung Galaxy Gio - page 20
Getting started 20 Icon Denition Music playback in progress Music playback paused FM radio turned on in the backgr ound Error occurred or caution requir ed Battery power level 10:00 Current time Use the touch scr een Y our device 's touch screen lets you easily select items or perform func tions. Learn basic actions to use the touch screen. Ic ...
Samsung Galaxy Gio - page 21
Getting started 21 Control y our touch screen with the following actions: T ap: T ouch once with your nger to select or launch a menu, option, or application. T ap and hold: T ap an item and hold it for more than 2 seconds to open a pop-up option list. Drag: T ap and drag your nger up, down, left, or right to move to ite ...
Samsung Galaxy Gio - page 22
Getting started 22 ›Add items to the idle scr een Y ou can customize the idle screen by adding shortcuts to applications or items in applications, widgets, or folders. T o add items to the idle screen, Press [1] → Add or tap and hold the empty area on the idle screen. Select the item category 2 → an item: Widgets : Add widgets. Wid ...
Samsung Galaxy Gio - page 23
Getting started 23 Use the shortcuts panel ›In Idle mode or while using an application, tap the indicator icons area and drag y our nger down to open the shortcuts panel. Y ou can activate or deactivate wireless connection features and access a list of notica tions, such as messages, calls, even ts or processing status. T o hide the list, ...
Samsung Galaxy Gio - page 24
Getting started 24 Ac cess applications T o access your device's applications, In Idle mode, select 1 to access the application list. Scroll left or right to another application screen. 2 Select an application. 3 When you use applications pro vided by Google, you must have a Google acc ount. If you do not have a Google account, sig n up ...
Samsung Galaxy Gio - page 25
Getting started 25 Drag the application icon to the location y ou want. 3 Y ou can move an application icon t o another main menu screen. Press [4] → Save. T o change the order of the main menu screens, In the application list, place your two ngers on the 1 screen and pinch. T ap and hold the thumbnail of a screen and drag it to 2 the locat ...
Samsung Galaxy Gio - page 26
Getting started 26 Cust omise your devic e Get more from your device b y customizing it to match your preferenc es. Set the current time and date ›In Idle mode, open the application list and select 1 Settings → Date and time. Set the time and date and change other options. 2 T urn on or o the touch tone ›In Idle mode, open the applicati ...
Samsung Galaxy Gio - page 27
Getting started 27 Activate animation f or switching ›windows In Idle mode, open the application list and select Settings → Display → Animation → Some animations or All animations. Select a wallpaper for the idle screen ›In Idle mode, press [1] → W allpap er → an option. Select an image. 2 Select 3 Save or Set wallpaper. Sams ...
Samsung Galaxy Gio - page 28
Getting started 28 Set an unlock pattern In Idle mode, open the application list and select 1 Settings → Location and security → Set screen lock → Pa ttern. See th e on- scre en instr uction s and exa mpl e p atte rns 2 and select Nex t (if necessar y). Draw a pattern by dragg ing your nger to connect at 3 least 4 dots. Select 4 Continue ...
Samsung Galaxy Gio - page 29
Getting started 29 Lock your SIM or USIM car d ›Y ou can lock your device by activating the PIN supplied with your SIM or USIM card. In Idle mode, open the application list and select 1 Settings → Location and security → Set up SIM card lock → Lock SIM card. Enter your PIN and select 2 OK. Once the PIN lock is enabled, you must ent er th ...
Samsung Galaxy Gio - page 30
Getting started 30 Pause on the second char acter for a moment and drag 2 the nger to the next character. Continue until you ha ve nished the word. 3 Enter te xt Y ou can enter text by selecting characters on the virtual keypad or by inputting handwriting on the screen. Y ou cannot enter text in some languages. T o enter text, you should ch ...
Samsung Galaxy Gio - page 31
Getting started 31 Number F unction 3 Inser t a space. 4 Delete characters. 5 Start a new line. 6 Enter text by voice; This icon is available only when you activate the voice input f eature for the Samsung keypad. This featur e may be unavailable depending on the selected input language. T o hide the Swype keyboard, press []. T o view help ...
Samsung Galaxy Gio - page 32
Getting started 32 Number F unction 1 Change case. 2 Switch between Number / Symbol mode and ABC mode. 3 Enter text by voice; This icon is available only when you activate the voice input f eature for the Samsung keypad. This featur e may be unavailable depending on the selected input language. 4 Clear your input. 5 Start a new line. Enter text using ...
Samsung Galaxy Gio - page 33
Getting started 33 Copy and past e text ›While you are ent ering text, you can use the copy and paste feature t o use text in other applications. Place the cursor where you w ant to start. 1 T ap and hold the text input eld. 2 Select 3 Select text from the option list. T ap on the place where you want to end. 4 T ap and hold the highlighted ...
Samsung Galaxy Gio - page 34
Getting started 34 Select an item category 3 → an item. Select 4 Install (for free items) or Buy. If you select Install, select OK to download the item immediately. If you select Buy, you need to enter your credit car d information. F ollow the on-screen instructions. Uninstall an application ›Fr om the Android Market home screen, press [...
Samsung Galaxy Gio - page 35
Getting started 35 Synchr onise data Y ou can synchronize data with various web servers and back up or restore y our data. Onc e th e s ync hron isation is c omp let ed, your devi ce st ays connected to the web. If any change is made on the web, the updated information will appear on your devic e and will automatically begin synchronization, and ...
Samsung Galaxy Gio - page 36
Getting started 36 Synchronize da ta manually ›In Idle mode, open the application list and select 1 Settings → Ac counts and sync. Select an account. 2 Press [3] → Sync now. Y our device will start synchronizing the data you set f or synchronization. Follo w the on-screen instructions to complete the 3 account setup. For online with ommuni ...
Samsung Galaxy Gio - page 37
Communication 37 C ommunication Calling Learn to use calling functions, such as making and answering calls, using options available during a call or customizing and using call-related f eatures. Make and answer a call ›Y ou can use the buttons or the touch screen when you make, accept, end, or reject calls. When you hold the device near your fa ...
Samsung Galaxy Gio - page 38
Communication 38 T o place a call on hold or retrieve a held call during a call, press and hold the headset button. T o end a call, press the headset button. Use options during a call ›Y ou can use the following options while a call is in progress: T o adjust the voice volume, press the Volume key up or down. T o place a ca ...
Samsung Galaxy Gio - page 39
Communication 39 Vie w and dial missed calls ›Y our device will display calls you hav e missed. T o dial the number of a missed call, open the shortcuts panel and select the missed call notication. Use additional fea tures ›Y ou ca n use various o ther call rela ted fe at ur es, s uch as Fix ed Dialing Number (FDN) mode, or call divert ...
Samsung Galaxy Gio - page 40
Communication 40 Set call waiting Call waiting is a network featur e to alert you of an incoming call while you are on a pr evious call. In Idle mode, open the application list and select Settings → Call settings → Additional settings → Call waiting. Y our setting will be sent to the network. Vie w call logs ›Y ou can view logs of your ca ...
Samsung Galaxy Gio - page 41
Communication 41 Select 2 Contacts. Y ou can enter a number manually or select one from the logs or contact groups by selecting another option. Select contacts and selec t 3 Add. Select 4 T ap to compose and enter your message text. T o insert emoticons, press → Insert smiley. Select 5 Send to send the message. Send a multimedia message? ...
Samsung Galaxy Gio - page 42
Communication 42 Select a contact. 2 Select a text or multimedia message from the message 3 thread. Listen to voic e mail messages ›If you have set missed calls to be div erted to the voice mail server, callers may leave v oice messages when you do not answer incoming calls. T o access your voice mail inbo x and listen to voice mail messages, ...
Samsung Galaxy Gio - page 43
Communication 43 Enter a name or address in the recipien t eld. 3 Enter a subject and message. 4 T o attach an image le, press [5] → A ttach → a le. Select 6 to send the message. Vie w email messages ›In Idle mode, open the application list and select 1 Google Mail. Select an email message. 2 Fr om the message view, use the foll ...
Samsung Galaxy Gio - page 44
Communication 44 Add a star to a message Fr om the Inbox screen, tap and hold a message. 1 Select 2 Add star. Th e sta r ic on next t o th e m essag e is activated. Filter messages Fr om the Inbox screen, press [1] → Go to labels. Select the label of the messages you want to view. 2 Email Learn to send or view email messages via your persona ...
Samsung Galaxy Gio - page 45
Communication 45 Select 3 Contacts. Y ou can enter an email address manually or select one from the logs or contact groups by selecting another option. Select contacts and selec t 4 Add. Select the Cc / Bcc eld and add more recipients. 5 Select the subject eld and enter a subjec t. 6 Select the text input eld and enter your email text. 7 S ...
Samsung Galaxy Gio - page 46
Communication 46 T o move the message to another folder, press [] → Move to. T o load images from the message, press [] → Show pictures. T o view an attachment, select the attachment item. T o save it to y our memory card, select. T alk Learn to chat with friends and family via Google T alk ™. This featur e m ...
Samsung Galaxy Gio - page 47
Communication 47 Social Hub Learn to access Social Hub ™, the integrated communication application for Social Network Service (SNS), email, messages, instant messages (IM), con tacts or calendar information. Visit socialhub .samsungmobile.co m for more details. In Idle mode, open the application list and select 1 Social Hub. Check and use conte ...
Samsung Galaxy Gio - page 48
Entertainment 48 Entertainment Camera Learn how to capture and view phot os and videos. Y ou can take phot os a t r esol uti ons u p to 20 48 x 153 6 pix els (3.2 megapixels) and videos at resolutions up t o 320 x 240 pixels. T o use the camera, you must rst insert a memor y card. The camera interface appears only in the landscape orienta ...
Samsung Galaxy Gio - page 49
Entertainment 49 Press the Volume key to zoom in or out. 4 Select 5 to take a photo. The photo is saved aut omatically. After taking photos, select to view the taken photos. T o view more photos, scroll left or right. T o zoom in or out, tap the screen and select or. Y ou can also double tap the screen to zoom in or out. T o send ...
Samsung Galaxy Gio - page 50
Entertainment 50 Capture a photo in Smile shot mode ›Y our camera can recognize people's faces and help you take photos of their smiling faces. In Idle mode, open the application list and select 1 Camera. Rotate the device anti-clockwise to landscape view. 2 Select 3 → Smile shot. Make any necessary adjustments. 4 Select 5. Aim the c ...
Samsung Galaxy Gio - page 51
Entertainment 51 Capture a panor amic photo ›Y ou can take wide panoramic photos using P anorama shooting mode. This mode is convenient for photographing landscapes. In Idle mode, open the application list and select 1 Camera. Rotate the device anti-clockwise to landscape view. 2 Select 3 → Panorama. Make any necessary adjustments. 4 Sele ...
Samsung Galaxy Gio - page 52
Entertainment 52 Option F unction Metering Select a type of exposure meter. Image quality Set the quality level for your photos. Adjust Adjust contrast, sa turation, and sharpness. Before taking a photo, select → to access the following settings: Setting F unction Guidelines Display the guidelines on the preview screen. Review Set the camera to ...
Samsung Galaxy Gio - page 53
Entertainment 53 Record a video ›1 In Idle mode, open the application list and select Camera. Rotate the device anti-clockwise to landscape view. 2 Select 3 to switch to the camcor der. Aim the lens at the subject and make any necessary 4 adjustments. 5 6 7 1 2 3 4 Setting F unction GPS Set the camera to include location information for y our ...
Samsung Galaxy Gio - page 54
Entertainment 54 Press the Volume key to zoom in or out. 5 Select 6 to start recording. Select 7 to stop recor ding. The video is saved automatically. The camera may not be able to pr operly record videos to a memory card with a slow transfer speed. After recording videos, select to view the recorded videos. T o view more videos, scroll left or ...
Samsung Galaxy Gio - page 55
Entertainment 55 Before rec ording a video, select → to access the following settings: Setting F unction Guidelines Display the guidelines on the preview screen. Audio recorder ding Turn the audio on or o. Review Set the camera to display the recorded video. Reset Reset menus and shooting options. Galler y Learn to view photos and play videos s ...
Samsung Galaxy Gio - page 56
Entertainment 56 T o change the view mode, select 3 or at the top right of the screen. Select a photo (with no icon) to view. 4 While viewing a photo, use the following options: T o view more photos, scroll left or right. T o zoom in or out, select or. Y ou can also tap the screen with two ngers and spread them apart (move your ...
Samsung Galaxy Gio - page 57
Entertainment 57 T o use the music player, you must rst insert a memor y card. Y ou can also play music les in the following formats if you open them from My les, multimedia messages, or on the web bro wser: mid, xmf, r tttl, imy, r tx, ota, amr, wav, mxmf. Some le formats are not supported on the software ...
Samsung Galaxy Gio - page 58
Entertainment 58 Number F unction 1 Pause pla yback; Selec t to resume playback. 2 Skip backward; Scan back ward in a le (tap and hold). 3 Move to a point of the le by dragg ing the bar. 4 Open the playlist. 5 Activate Shue mode. 6 Change the repeat mode (o, repeating one le, or repeating all les). 7 Skip forward; Scan forward i ...
Samsung Galaxy Gio - page 59
Entertainment 59 Press [3] → Add to playlist → New. Enter a title for your new pla ylist and select 4 Save. T o add more music les to the playlist, play a le and 5 press → Add t o playlist → the new playlist. Use the party shue feature ›When you turn on the party shue feature, your device selects and plays music l ...
Samsung Galaxy Gio - page 60
Entertainment 60 FM Radio Learn to listen to music and new s on the FM radio. T o listen to th e F M r adi o, yo u m ust c onne ct a he adset, wh ich se r ve s as the radio antenna. Listen to the F M radio ›Plug a headset into the device. 1 In Idle mode, open the application list and select 2 FM Radio. The FM radio scans and sa ves available ...
Samsung Galaxy Gio - page 61
Entertainment 61 Number F unction 4 Add the current radio station t o the favorites list. 5 Adjust the volume. Save a r adio station automatically ›Plug a headset into the device. 1 In Idle mode, open the application list and select 2 FM Radio. Press [3] → Scan → a scanning option. The FM radio scans and sa ves available stations automa ...
Samsung Galaxy Gio - page 62
Entertainment 62 Add a radio station to the favs ourites list ›Plug a headset into the device. 1 In Idle mode, open the application list and select 2 FM Radio. Select 3 to turn on the FM radio. Scroll to the radio station you wan t. 4 Select 5 to add to the favorites list. Y ou can add a name for a radio station or remo ve a radio station; T ...
Samsung Galaxy Gio - page 63
Entertainment 63 Option Function Alternative frequency Set whether or not the FM radio attempts to retune a radio station when the current signal is weak. FM auto o Set the FM radio to automatically tur n o aft er a spe cied leng th of time. ...
Samsung Galaxy Gio - page 64
Personal information 64 P ersonal information Con tacts Learn to creat e and manage a list of your personal or business contacts. Y ou can save names, mobile phone numbers, home phone numbers, email addresses, birthdays and more for your contacts. ›Create a c ontac t In Idle mode, open the application list and select 1. Select 2. Select a mem ...
Samsung Galaxy Gio - page 65
Personal information 65 Select a location number 3 → a contact. Y ou can quickly dial this number by touching and holding the location number from the dialling screen. Create y our namecard ›In Idle mode, open the application list and select 1. Press [2] → My prole. Enter your own personal details. 3 Select 4 Save. Y ou can send you ...
Samsung Galaxy Gio - page 66
Personal information 66 In Idle mode, open the application list and select 1 → Groups. Press [2] → Create. Enter a name and select a ringtone for the group. 3 Select 4 Save. Copy c ontac ts ›T o copy contacts from the SIM or USIM card to y our device, In Idle mode, open the application list and select 1. Press [2] → Import / Expor t ...
Samsung Galaxy Gio - page 67
Personal information 67 Select an option for importing a single contact le, 4 multiple contact les, or all contact les, and select OK. Select contact les to impor t and select 5 OK. T o export contacts from your device to a memory card, In Idle mode, open the application list and select 1. Press [2] → Import / Expor t → Export to ...
Samsung Galaxy Gio - page 68
Personal information 68 Create an e vent ›In Idle mode, open the application list and select 1 Calendar. Press [2] → More → Create. Enter the details of the event as r equired. 3 Select 4 Done. Vie w events ›T o change the calendar view, In Idle mode, open the application list and select 1 Calendar. Press [2] and select Day, W e ...
Samsung Galaxy Gio - page 69
Personal information 69 Memo Learn to recorder d impor tant information to save and view at a later date. Create a memo ›In Idle mode, open the application list and select 1 Memo. Select 2 Create memo or pr ess → Create. Enter your memo text. 3 Press [4] to hide the keypad. Select a color to change a background color. 5 Select 6 Save. ...
Samsung Galaxy Gio - page 70
Personal information 70 Select 2 Record to start recording. Speak into the microphone. 3 When you are nished r ecording a memo, select 4 Stop. Y our memo is saved automatically. T o record more v oice memos, select 5 Record from the bottom of the screen. Play a v oice memo ›In Idle mode, open the application list and select 1 V oice recorder ...
Samsung Galaxy Gio - page 71
Web 71 We b Web services requir e a data connection. Contact your operator to choose the best data plan. Internet Learn to access and bookmark your fav ourite web pages. Y ou may incur additional charges for ac cessing the web and downloading media. F or details, contact your service provider. The web bro wser menu may be labelled di ...
Samsung Galaxy Gio - page 72
Web 72 T o reload the current web page, press [] → Refresh. T o go to the next page in history, press [] → F orward. T o bookmark the current web page, press [] → Add bookmark. T o add a shortcut to the current web page to the idle screen, press → More → Add shortcut to Home. T o add the RS ...
Samsung Galaxy Gio - page 73
Web 73 Fr om the bookmark list, tap and hold a book mark and use the following options: To open the web page in the current window, select Open. T o open the web page in a new window, selec t Open in new window. T o edit the bookmark details, select Edit bookmark. T o add the bookmark shor tcut to the idle screen, select ...
Samsung Galaxy Gio - page 74
Web 74 between buildings, in tunnels or undergr ound passages, or inside buildings in poor weather around high voltage or electromagnetic elds Do not tou ch the i ntern al an tenn a ar ea or c ov er this area with your hands or other objects while using the GPS functions. This featur e may be unavailable depending on your re ...
Samsung Galaxy Gio - page 75
Web 75 Enter a keyword for the location and select 4. T o search for a location by v oice, select . T o zoom in or out, select or. T o add layers to the map, selec t . T o view your current location, select . T o add a st ar t o t he lo catio n, se lect t he ba lloon of the location name →. Get directions to a spe ...
Samsung Galaxy Gio - page 76
Web 76 Select friends you want to add or enter an email 3 address, and select Add friends → Ye s. When your friend accepts your in vitation, you can share locations. Press [4] → See map. Y our f riend s "lo catio ns ar e ma rke d wit h the ir ph otos on the map. Search for a place ar ound you› This featur e may be unavailable depend ...
Samsung Galaxy Gio - page 77
Web 77 T ype Destination : Enter your destination with the virtual keypad. Contacts : Se lect y our desti natio n fr om ad dres ses of your contacts. Starred Places : Select your destination from the list of your starred places. Select 4 Install to use voice-guided navigation. T o end the navigation, press [5] → Exit Naviga ...
Samsung Galaxy Gio - page 78
Web 78 Control playback with the f ollowing keys: 5 1 2 Number F unction 1 Move to a point of the le by dragg ing the bar. 2 Change the quality of the display. Y ou T ube Learn to view and upload videos via Y ouT ube. This featur e may be unavailable depending on your region or service provider. W atch videos ›In Idle mode, open the applic ...
Samsung Galaxy Gio - page 79
Web 79 Upload videos ›In Idle mode, open the application list and select 1 Y ouT ube. Press [2] → Upload and select a video. Skip to 8. If you want to upload new videos, select to turn on the camera. Rotate the device anti-clockwise to landscape view. 3 Aim the lens at the subject and make any adjustments. 4 Select 5 to start recording. Sel ...
Samsung Galaxy Gio - page 80
Web 80 Read news articles ›In Idle mode, open the application list and select 1 News & W eather. Select a news topic at the top of the screen. 2 Select an ar ticle to open. 3 T o add news topics, press → Settings → News settings → Select news topics. Samsung Apps Samsung Apps allows you to simply and easily do wnload an abundance ...
Samsung Galaxy Gio - page 81
Web 81 Market Y ou ca n do wnl oad g ames, r ing tone s, or othe r app licat ions from the Android Market. This featur e may be unavailable depending on your region or service provider. In Idle mode, open the application list and select 1 Market. Search for a le and download it to the devic e. 2 p. 34 ...
Samsung Galaxy Gio - page 82
Connectivity 82 C onnec tivity Bluetooth Blu etoo th is a sho r t- ran ge wi rele ss comm uni catio ns technology capable of exchanging inf or mation over a distance of about 10 m without requiring a physical connection. Y ou do not need to line up the devices to beam information with bluetooth... If the devices are within range of one another, you ...
Samsung Galaxy Gio - page 83
Connectivity 83 Send data using the Bluetooth wireless ›featur e Select a le or item, such as a contact, memo, or media 1 le, from an appropriat e application or My les. Press [2] → Share, Send via, or Send namecard via → Bluetooth. Search for and pair with a Bluetooth-enabled device. 3 ›Receive data using the Bluet ooth ...
Samsung Galaxy Gio - page 84
Connectivity 84 ›Activate the WLAN feature In Idle mode, open the application list and select Settings → Wireless and networks → Wi-F i settings → Wi-F i. An active WLAN running in the background will consume battery power. T o preser ve battery power, activate the WLAN only when needed. Find and c onnect to a WLAN ›In Idle mo ...
Samsung Galaxy Gio - page 85
Connectivity 85 C us to mis e DL NA s et ti ng s fo rs ha ri ng ›media les T o all ow o the r DLN A-enab led d evic es to ac cess me dia les on your device, y ou must activate media sharing. Some les may not play on the DLNA-enabled devices depending on the devices. In Idle mode, open the application list and select 1 AllShare. Selec ...
Samsung Galaxy Gio - page 86
Connectivity 86 Select a player-the one that will play the media le. 5 Playback begins at the selected play er. Control playback using ic ons of your device. 6 Playback may be bu ered, depending on the network connection and the connected ser ver. Pl ay les of one d ev ic e o n th e ot he r ›device In Idle mode, open the application ...
Samsung Galaxy Gio - page 87
Connectivity 87 ›Share y our device" s mobile network via USB Us ing a PC da ta c abl e, conn ect t he mul tifun ction jack 1 on your device to a PC. In Idle mode, open the application list and select 2 Settings → W ireless and networks → T ethering and portable hotspot.Select 3 USB tethering to activate the USB tethering feature.Y o ...
Samsung Galaxy Gio - page 88
Connectivity 88 PC connections Learn to connect your device to a PC with a PC da ta cable in various USB connection modes. By connecting the device to a PC, you can transf er data to and from your device directly and use the Samsung Kies program. ›Connect with Samsung Kies Ensure that Samsung Kies is installed on your PC. Y ou can download the p ...
Samsung Galaxy Gio - page 89
Connectivity 89 When you are nished, select 7 T urn o USB storage. T o disconnect the device from the PC, click the USB device icon on the Windows task bar and click the option to safely remo ve the mass storage device. Then remove the PC data cable from the PC. Other wise, you may lose data st ored on the memory card or damage the memory c ...
Samsung Galaxy Gio - page 90
Connectivity 90 Option Function Ena ble L 2TP secret Set to use the L2TP secret password. Set L2TP secret Enter the L2TP secret passwor d. Set user certicate Select a user cer ticate that the VPN server uses to identify you. Y ou can import cer ticates from the VPN server or download from the web. Set CA certicate Select a cer ticat ...
Samsung Galaxy Gio - page 91
Connectivity 91 Connect to a private netw ork ›In Idle mode, open the application list and select 1 Settings → Wireless and networks → VPN settings. Select a private network to connect. 2 Enter the user name and password and select 3 Connect. ...
Samsung Galaxy Gio - page 92
T ools 92 T ools Clock Learn to use clock display on the Idle scr een, and set and control alarms for important events. Use the clock display ›In Idle mode, open the application list and select 1 Clock. While using the clock display, use the following 2 features: T o create or delete an alarm, select . T o access Gallery, select ...
Samsung Galaxy Gio - page 93
T ools 93 In Idle mode, open the application list and select 1 My les. Select a folder. 2 T o move up one level in the le directory, select Up. T o return to the Home directory, select Home. Select a le to open. 3 In a folder, press to use the following options: T o send a le to others via multimedia message, ema ...
Samsung Galaxy Gio - page 94
T ools 94 Use the following options: 2 Active applications : View the list of all the applications currently running on your device. Package : Vi ew the p ackage si ze o f a ppl icat ion s installed on your device. RAM : Check and manage the RAM memory for your device. Summary : View the used and a vailable memory on yo ...
Samsung Galaxy Gio - page 95
T ools 95 View a nd e di t a do cu me nt on you r ›device In Idle mode, open the application list and select 1 ThinkFr ee Oce. Select 2 My Docs → a document. View and edit the document as desired. 3 T o zoom in or out, use the two nger zoom; Place your two ngers on the screen and slowly pinch or spread apart. T o open the to ...
Samsung Galaxy Gio - page 96
T ools 96 V oice Search Learn to use the voice with ommand feature to dial a number, send a message, or search f or locations and information by voice. This featur e may be unavailable depending on your region or service provider. In Idle mode, open the application list and select 1 V oice Search. Select 2 Speak now. Say a keyword into the microp ...
Samsung Galaxy Gio - page 97
Settings 97 Settings Ac cess the Settings menu In Idle mode, open the application list and select 1 Settings. Select a setting categor y and select an option. 2 W ireless and networks Change the settings for wireless network connections. Flight mode ›Disable all wireless functions on your device. Y ou can use only non-network services. Wi-F i s ...
Samsung Galaxy Gio - page 98
Settings 98 Mobile networks ›Use packet da ta : Set to allow packet switched data networks for network services. Data roaming : Set the device to connect another net wo rk whe n yo u a re r oamin g or your home netw ork is not available. Acc ess Point Names : Set up access point names (APNs). Use only 2G networks : Se ...
Samsung Galaxy Gio - page 99
Settings 99 Call forwarding ›Divert incoming calls to another number. Additional settings ›Caller ID : Display your caller ID to other parties for outgoing calls. Call waiting : Allow incoming call alerts when a call is in progress. Sound Change the settings for various sounds on your device. Silent mode : Activate the ...
Samsung Galaxy Gio - page 100
Settings 100 Display Change the settings for the display. W allpap ers Home screen wallpaper -: Select a background image for the idle screen. Lock screen wallpaper -: Select a background image for the screen lock. Font style : Change the font type for the display t ext. Y ou can download fonts fr om Android Market by selecting Get ...
Samsung Galaxy Gio - page 101
Settings 101 PIN -: Set a PIN (numeric) to unlock the screen. Passwor d -: Set a password (alphanumeric) to unlock the screen. Use visible pattern : Set the unlock pattern to be visible as you draw it. Use tactile feedback : Set the device to vibrat e when you touch and draw the unlock patt ern. Set up SIM card lock : Lock SI ...
Samsung Galaxy Gio - page 102
Settings 102 Running services : View the services you are using and access them to manage. Development : USB debugging -: This is for application dev elopment. When your device is connected to a PC with a PC data cable, the USB debugging mode will be activated and Samsung Kies will launch automatically. Stay aw ake -: Set the devic ...
Samsung Galaxy Gio - page 103
Settings 103 SD card and phone stor age Check memory information of memor y cards and your device, and format a memory card. Search Change the Google Search settings. Google search : Show web suggestions -: Set the device to display suggestions while you are entering a keywor d. Use My Location -: Set the device to use your current locatio ...
Samsung Galaxy Gio - page 104
Settings 104 W ord prediction : Set the devi ce t o p redi ct w ord s according to y our input and display word suggestions. Audio feedback : Set to alert you when there are no alternative wor ds for your input if you double-tap a word. Enable tip indicator : Set to aler t you to quick help by blinking the tip indicator. Auto ...
Samsung Galaxy Gio - page 105
Settings 105 XT9 : Activate XT9 mode to enter text using Pr edic tive input mode. XT9 advanced settings : A ctiv ate the a dvan ced feature s of XT9 mode, such as auto completion, auto corr ection, or auto substitution, and set up your own wor d list. Keypad sw eeping : Enable or disable the keypad sweeping featur e for the te ...
Samsung Galaxy Gio - page 106
Settings 106 T ext-to-speech settings ›Listen to an example : Listen to the spoken text for an example. Install voice data f or using the text-to-speech feature. Alway s use my settings : Set the device to use the settings you specify in applications rather than the default settings. Default engine : S et the speech synthes ...
Samsung Galaxy Gio - page 107
Settings 107 Select time zone : Set your home time zone. Set time : Set the current time manually. Use 24-hour format : Set to the time to be displayed in 24-hour format. Select date format : Select a date format. About phone Ac cess in form ati on ab out y our devic e, c heck the d evic e's status, and learn how to ...
Samsung Galaxy Gio - page 108
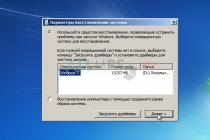
T roubleshooting 108 T roubleshooting When you turn on y our device or while you ar e using the device, it pr ompts you to enter one of the following c odes: Code T ry this to solve the problem: Passw ord When the device lock featur e is enabled, you must enter the passwor d you set for the device. PIN When using the device for the rst time or ...
Samsung Galaxy Gio - page 109
T roubleshooting 109 Y our device freezes or has fa tal errors If your device freezes or hangs, you may need to close programs or reset the devic e to regain functionality. If your device is frozen and unr esponsive, press and hold for 8-10 seconds. The device will reboot automatically. If this does not solve the problem, perform a factor y d ...
Samsung Galaxy Gio - page 110
T roubleshooting 110 Audio quality is poor Ensure that you ar e not blocking the device "s internal antenna. When you are in ar eas with weak signals or poor reception, you ma y lose reception. Move to another ar ea and try again . When dialling from con tacts, the call is not connected Ensure that the correct number is stored in t ...
Samsung Galaxy Gio - page 111
T roubleshooting 111 Error messages appear when launching the camera Y our Samsung mobile device must have sucient available memory and battery power to operate the camera application. If you receiv e error messages when launching the camera, try the following: Charge the battery or replace it with a battery that is fully charged. Fr ee s ...
Samsung Galaxy Gio - page 112
T roubleshooting 112 Error messages appear when opening music les Some music les may not play on your Samsung mobile device for a variety of reasons. If you r eceive error messages when opening music les on your device, try the following: Fr ee some memory by transferring les to a PC or deleting les from your device. Ensure t ...
Samsung Galaxy Gio - page 113
T roubleshooting 113 Another Bluetooth device is not loca ted Ensure that the Bluetooth wireless f eature is activated on your device. Ensure that the Bluetooth wireless f eature is activated on the device you wish to connect to, if necessar y. Ensure that your device and the other Bluet ooth device are within the maximum Blue ...
Samsung Galaxy Gio - page 114
Safety precautions 114 Safety precautions T o prevent injury to yourself and others or damage to your device, read all of the following information bef ore using your device. W arning: Prevent electric shock, re, and explosion Do not use damaged power cor ds or plugs, or loose electrical sockets Do not touch the power c ord with wet hands, or di ...
Samsung Galaxy Gio - page 115
Safety precautions 115 Do not use your device near a pac emaker Avoid using your devic e within a 15 cm range of a pacemaker if possible, as your device can interfere with the pacemaker. If you must use your device, keep at least 15 cm aw ay from the pacemaker. T o minimize the possible inter ference with a pacemaker, use your? ...
Samsung Galaxy Gio - page 116
Safety precautions 116 Use a hands-free device. Get to know your device and its convenienc e features, such as speed dial and redial. These features help you reduce the time needed to place or receive calls on y our mobile device. Position your device within easy r each. Be able to access your wireless device without removing y ...
Samsung Galaxy Gio - page 117
Safety precautions 117 Do not use or store your devic e in dust y, dir ty areas Dust can cause your device to malfunction. Do not store your devic e on slop es If your device falls, it can be damaged. Do not store your devic e in hot or cold areas. Use your device at -20 ° C to 50 ° C Y our device can explode if left inside a closed vehicle, as th ...
Samsung Galaxy Gio - page 118
Safety precautions 118 Ensure maximum battery and charger life Avoid charg ing batteries for more than a week, as over charging may shorten battery life. Over time, unused batteries will discharge and must be recharged before use. Disconnect chargers from power sourc es when not in use. Use batteries only for their intended pur ...
Samsung Galaxy Gio - page 119
Safety precautions 119 Do not carry your device in your back pockets or ar ound your waist Y ou can be injured or damage the device if you fall. Do not disassemble, modify, or repair your device Any changes or modications to your devic e can void your manufacturer’s w arranty. F or ser vice, take your device to a Samsung Service Center ...
Samsung Galaxy Gio - page 120
Safety precautions 120 Handle SIM cards or memory cards with care Do not remove a card while the device is tr ansferring or accessing information, as this could result in loss of data and / or damage to the card or device. Protect cards from str ong shocks, static electricity, and electrical noise from other devices. Do not touch gold-c ...
Samsung Galaxy Gio - page 121
Safety precautions 121 Correct disposal of this product (Waste Electrical & Electronic Equipment) (Applicable in the European Union and other Eur opean countries with separate collection systems) This marking on the product, accessories or literature indicates that the product and its electronic accessories (eg charger, headset, USB cable) ...
Samsung Galaxy Gio - page 122
Safety precautions 122 Disclaimer Some content and services accessible through this device belong to third parties and are protected by copyright, patent, trademark and / or other intellectual property laws. Such content and services are provided solely for your personal noncommercial use. Y ou may not use any content or services in a manner that ha ...
Samsung Galaxy Gio - page 123
Safety precautions 123 CONNECTION WITH, ANY INFORM A TION CONT AINED IN, OR AS A RESUL T OF THE USE OF AN Y CONTENT OR SERVICE BY YOU OR ANY THIRD P ART Y, EVEN IF ADVISED OF THE POSSIBILITY OF SUCH DAMA GES. ”Third party services may be terminated or interrupted at any time, and Samsung makes no representation or warranty that an y content or ...
Samsung Galaxy Gio - page 124
Index 124 Index access codes 10 8 alarms creating 92 stopping 92 AllShare 85 battery charging 11 installing 9 Bluetooth activating 82 nding and pairing with devices 83 receiving data 83 sending data 83 brightness, display 27 calculator 93 calendar creating events 68 viewing events 68 call forwarding 40 call log 40 calls answering 37 forwarding 4 ...
Samsung Galaxy Gio - page 125
Index 125 Google T alk 46 idle screen adding items 22 adding panels 24 internet see web browser latitude 76 memory card formatting 15 inserting 13 removing 15 memos creating 69 viewing 70 menu screen accessing 24 organizing applications 25 email sending 45 setting accounts 44 viewing 46 le manager 93 xed dialling number mode 39 ight mode 1 ...
Samsung Galaxy Gio - page 126
Index 126 accounts and sync 10 3 applications 10 2 call settings 98 date and time 10 7 display 10 0 language and keyboard 10 4 location and security 10 1 privacy 10 3 SD card and phone storage 10 3 search 10 3 sound 99 voice input and output 10 6 wireless and network 97 silent mode 27 SIM card installing 9 locking 29 social hub 47 phonebook creatin ...
Samsung Galaxy Gio - page 127
Index 127 Y ou T ube uploading videos 79 watching videos 78 video player 56 videos capturing 53 playing 56 voice mail 42 voice rec order playing 70 recording 70 VPN connections connecting to 91 creating 90 web brow ser adding bookmarks 73 browsing web pages 71 WLAN activating 84 nding and connecting to networks 84 synchronization with web accoun ...
Samsung Galaxy Gio - page 128
Samsung Galaxy Gio - page 129
The conformity assessment procedural referred to in Article 10 and detailed in Annex of Directive 1999/5 / EC has been followed with the involvement of the f ollowing Notied Body (ies): BABT, Forsyth House, Churcheld Road, Walton -on- Thames, Surrey, KT12 2TD, UK * Identication mark: 0168 The technical documentation kept at: Samsung Ele ...
Samsung Galaxy Gio - page 130
Some of the contents in this manual may di er from your device depending on the software of the device or your service provider. www .samsungmobile.com English (EU). 02/201 1. Rev. 1.0 T o install Kies (PC Sync) Download the latest version of Kies from the Samsung 1. website (www.samsungmobile .com) and install it on your PC. Using a PC data ...
Estimates - 4, average: 4.8
()
User manual Samsung, model GT-S5660
Fragment of instructions
Get started 23 ›Add and remove panels from the idle screen To organize widgets, you can add or remove panels to the idle screen. 1 In Idle mode, press the key> Edit. To enter editing mode, place two fingers on the screen and pinch them together. 2 Add or remove panels in one of the following ways. To remove a panel, touch and hold the panel thumbnail, then drag it to the trash can at the bottom of the screen. Select to add a panel. To change the order of the panels, touch and hold the panel thumbnail, then drag it to the desired location. 3 When finished, press the key. Working with applications To access applications on your phone, follow these steps. 1 From standby select to open the application list. 2 Scroll the image left or right to select a different application screen. You can also select a point at the top of the screen to go directly to the corresponding main menu screen. 3 Select an application. You must have an account to use Google apps. If you don't have a Google account, you should create one. To add a link to an app, press and hold the app icon in the app list. You can move the icon to the desired location on the idle screen. 24 Getting started 4 Press the key to return to the previous one 3 Drag the application to the desired location. screen; press the Home key to return to the idle screen. Your phone has a built-in motion sensor that detects its orientation. If you turn your phone over while using a feature, the screen will automatically change orientation to landscape. To turn off the auto-reorientation feature, select Settings> Display> Auto-rotate screen. ›Organize applications You can organize applications in the application list by rearranging them or grouping them by category. 1 Open the application list and press the key> Edit. 2 Select and hold an application icon. The application icon can be moved to another screen of the menu mode. 4 Press the key> Save. Change the order of the main menu screens. 1 Tap the application list screen with two fingers and pinch them together. 2 Touch and hold a screen thumbnail, then drag it to the desired location. ›Go to recently used applications 1 Press and hold the Home key to open a list of recently used applications. 2 Select the desired application. Getting started 25 ›Task manager Your phone has a multitasking operating system that allows you to run multiple applications at the same time. However, multiple applications running at the same time may freeze, stop, memory problems, or high power consumption. To avoid these problems, shut down unnecessary programs using the task manager. 1 In Idle mode, open the application list and select Task manager> Active. A list of running applications will appear. 2 Select Quit to close the application. To close all running applications, select Close All. Personalizing your phone Take full advantage of your phone by customizing it to suit your preferences. ›Set the current time and date 1 In Idle mode, open the application list and select Settings> Date and Time. 2 Set the date and time, and change other settings. ›Turn tones on or off In Idle mode, open the application list and select Settings> Sound> Sound on touch. ›Adjust the call volume To adjust the call volume, press the volume key up or down. 26 Getting started ›Switch to Silent profile To mute or unmute your phone, do one of the following. In Idle mode, open the application list and select> Dial, then press and hold. Open the link bar at the top of the screen and select Vibration. Press and hold the key and then select Silent profile. In Silent mode, you can set up alerts for specific events. In Idle mode, open the application list and select Settings> Sound> Vibration> Always or Only in silent mode. When you switch to Silent mode, appears instead of the icon. ›Select a ringtone 1 In Idle mode, open the application list and select Settings> Sound> Phone ringtone. 2 Select a melody from the list and then Yes. ›Activate animation to switch between applications In Idle mode, open the application list and select Settings> Display> Animation> Animation part or All animation. ›Set a wallpaper for the idle screen 1 From standby press the key> Wallpaper> option. 2 Select an image. 3 Select Save, Select ...
GT-S5660 User Manual About This Manual Thank you for purchasing this Samsung mobile phone. It provides access to high-quality mobile services and entertainment based on Samsung's cutting-edge technology and the highest standards. This manual is intended to help you understand the features and specifications of your device. Please read the following information first Careful reading of all safety instructions and this user manual will ensure correct and safe use of your phone. The descriptions in this guide are based on the default phone settings. 2 About this manual The images and pictures shown in this manual may differ from the actual product. The content of this user guide depends on the phone model and software supplied by your mobile operator or service provider, and is subject to change without notice. For updated user guides, see www.samsungmobile.com. Features and additional services available vary by phone model, software and carrier mobile communications ... The format and distribution method of this user manual are based on Google Android OS and may vary depending on the user's OS. Apps and their capabilities vary by country, region, and hardware specifications. Samsung is not responsible for phone malfunctions caused by third-party applications. Samsung is not responsible for phone or compatibility problems caused by changes to registry settings. For phone software updates, go to www.samsungmobile.com. Sounds, wallpapers, and images that come with your phone are licensed for limited use by Samsung and device owners. Copying and using these materials for commercial purposes is an infringement of copyright. Samsung is not responsible for any copyright infringement by users. Retain the user manual for future reference. Symbols Used in This Manual Before you start, familiarize yourself with the symbols used in this manual. Caution — Situations that could result in injury to you or someone around you. Attention! - situations that could damage the phone or other equipment. Note - notes, tips, or additional information. See - links to pages with relevant information, for example: p. 12 (means “see page 12”). About this manual 3 → [The next step is a sequence of selecting options or menu items to perform a specific action; for example: “In Idle mode, open the application list and tap Settings → Phone info (means' select Settings then select Phone info). ] Square brackets - these brackets are used for the names of the phone keys, for example: (means the power / lock key). Copyright 2011 Samsung Electronics This user manual is protected under international copyright laws. You may not reproduce, distribute, translate or transmit any part of this user manual in any form or by any means, electronic or mechanical, including photocopying, recording, or storing in any information storage and retrieval system, without the prior written permission of Samsung Electronics. Trademarks SAMSUNG and the SAMSUNG logo are registered trademarks of Samsung Electronics. Android logo, Google search ™, Google Maps ™, Google Mail ™, YouTube ™, Android Market ™ and Google Talk ™ are trademarks of Google, Inc. 4 About this manual Bluetooth® is a registered trademark of the Bluetooth SIG, Inc. worldwide. and are trademarks of SRS Labs, Inc. CS Headset and WOW HD Technologies are registered under license from SRS Labs, Inc. Wi-Fi®, the Wi-Fi CERTIFIED logo, and the Wi-Fi logo are registered trademarks of the Wi-Fi Alliance. All other copyrights and trademarks are the property of their respective owners. About this manual 5 Contents Assembling your phone ... 9 Package Contents ... .............................................. 9 Install SIM- or USIM card and battery ............................................ ............... 9 Charging the battery ................................ ....... 11 Inserting a memory card ................................... 13 Attaching a hand strap (optional). ................................................. 16 Getting started ....................................... 17 Turning the phone on and off ... ........ 17 General information about the phone ........................... 17 Touch screen ....... .......................................... 20 6 Contents Locking and unlocking the touch screen and keys .................................... Getting to know the standby screen .............. .................................................. Working with applications .................................... Customizing your phone. ....... Entering text ......................................... .................... Downloading applications from Android Market .... Downloading files from the Internet. ...................... Data synchronization. ................................... 22 22 24 26 29 33 34 35 Communication ...... .................................................. .37 Calls ............................................... ..................... 37 Messages ........................... .................................. 41 Google Mail ............. ................................................ Email .............................................. Google Talk .. .................................................. .......... Social Hub ...................................... .......................... 43 44 46 47 Entertainment ................... ......................... 48 Camera ....................... ........................... ................... Gallery .............................. ...................................... Music........... .................................................. ....... FM radio. .................................................. ............. 48 56 57 61 Personal data ............................... ....... 64 Contacts ......................................... ........................ Calendar. .................................................. ........... Notes. .................................................. ................ Voice recorder................................. ............................... 64 68 69 70 Internet. ................................................. 71 Internet................................................. ................ Maps. .................................................. .................... Search............................. ........................................... YouTube. .................................................. ................ News and weather ............................... .................. Samsung Apps .............................. .......................... Market ....................... .............................................. 71 74 77 77 79 79 80 Communication capabilities ........ 81 Bluetooth .................................. ............................... Wi-Fi. .................................................. ....................... AllShare .......................... .......................................... USB tethering and portable hotspot. .. PC connection ............................................. .. VPN connections ............................................. ...... Contents 81 83 84 86 87 88 7 Tools. ......................................... 91 Clock ....... .................................................. ................. Calculator. .................................................. ....... My files......................................... .................... SIM menu. .................................................. ............. Task Manager. ................................................. ThinkFree Office ................................................. .... Voice Search ............................................ ....... 91 92 92 93 93 93 95 Settings ................................... ............. 96 8 Operating the setup menu ............................... ...... Wireless networks.......................................... ... Challenges. .................................................. ................. Sound................................ ........................................... Display ...... .................................................. ........... GPS and security .................................... ......... Contents 96 96 97 98 98 99 Appendices. .................................................. ..... 100 Accounts and Synchronization ............... 101 Privacy. ..................................... 101 Phone memory. .............................................. 101 Search .. .................................................. .................. 102 Language and keyboard ............................ ................. 102 Voice input and output ............................ ...... 104 Accessibility ........................... 105 Date and Time .......... .............................................. 105 Phone information ... ...................................... 105 Troubleshooting ......... .............. 106 Precautions. ................ 112 Index ...................... 123 Assembling the phone Package Contents Package includes : mobile phone; battery; Charger; user guide. Use only Samsung-approved accessories. The manufacturer's warranty does not cover damage or malfunction of the phone resulting from the use of pirated or illegal software. The items supplied with your phone may vary depending on the accessories and software available in your region and supplied by your mobile operator. Additional accessories are available from your local Samsung dealer. We recommend using the supplied accessories with your phone. Optional accessories may not be compatible with this phone. Installing a SIM or USIM card and battery When you connect to a cellular service, you will receive a SIM card containing a PIN code and a list additional services... To use UMTS services, you need to purchase a Universal Subscriber Identity Module (USIM card). Assembling your phone 9 To install the SIM or USIM card and battery, follow these steps. 3 Insert a SIM or USIM card. 1 If the phone is on, press and hold, then select Power off to turn it off. 2 Remove the battery cover. The SIM or USIM card should be inserted into the phone with the golden contacts facing down. Without a SIM or USIM card inserted, be careful not to injure your fingers when removing the cover. 10 Build your phone to use the phone's non-network features and some menu features. 4 Install the battery. Charging the battery Before using your phone for the first time, you must charge the battery. The phone can be charged either with a charger or by connecting it to a PC using a data cable. 5 Close the battery cover. Use only Samsung approved chargers and cables. Using incompatible chargers and cables can cause the battery to explode or damage your phone. When the battery level is low, a warning beep sounds and a low battery message appears. The battery icon becomes empty and turns red. If the battery level is too low, the phone switches off automatically. To turn on your phone, you need to charge the battery. Assembling your phone 11 ›› Charge with the charger 1 Insert the plug of the charger into the multifunction jack. Connecting the charger incorrectly can seriously damage your phone. The warranty does not cover any damage resulting from improper use of the phone and accessories. 12 Assembling your phone 2 Connect the charger to AC power. You can use your phone while charging the battery, but the charging process will slow down. While charging your phone touch screen may not respond to touch. This is due to an unstable power supply. In this case, disconnect the charger from the phone. The phone may become warm while charging. This is normal and will not affect the phone's lifespan or performance in any way. If your phone or charger malfunctions, contact a Samsung service center. 3 When the battery is fully charged (the battery icon is full), disconnect the charger from the phone first and then from the AC power source. Disconnect the charger before removing the battery. Otherwise, the phone may be damaged. To save energy, unplug the charger when not in use. The charger does not have a power switch and must be unplugged to interrupt the charging process. The charger should fit snugly into the outlet when in use. ›› Charge with the data cable 2 Connect the other end of the data cable to a USB port on your PC. Depending on the type of data cable used, the phone may take a while to charge the phone. 3 When the battery is fully charged (the battery icon is full), disconnect the data cable first from the phone, then from the PC. Insert a memory card To store a large number of multimedia files, insert a memory card into your phone. Your phone supports microSD ™ and microSDHC ™ memory cards with a maximum capacity of 32 GB (depending on the manufacturer and type of card). Make sure your PC is turned on before charging your phone. 1 Connect one end of the (micro USB) data cable to the multi-function jack. Assembling Your Phone 13 Samsung provides industry standard support for memory cards; however, cards from some manufacturers may not be compatible with your phone. Using an incompatible memory card may damage your phone, the card itself, or the data stored on it. 1 Open the cover of the memory card slot on the side of the phone. 2 Insert the memory card with the gold-colored contacts facing down. The phone only supports the FAT file system. If you insert a memory card with a file system other than FAT, you will be prompted to format the card. Frequent writing and erasing of data will shorten the lifespan of the memory card. When you insert a memory card, the files contained on it will be located in the sdcard folder. 14 Assembling your phone 3 Gently push the card until it clicks into place. 4 Close the cover of the memory card slot. ›› Removing the memory card To avoid losing data, unmount the memory card before removing it. 1 In Idle mode, select → Settings → Phone storage → Unmount storage card → OK. 2 Open the cover of the memory card slot on the side of the phone. 3 Gently push the card in until it clicks. 4 Remove the memory card from the phone connector. 5 Close the cover of the memory card slot. Do not remove the memory card while transferring and receiving data, as this may result in loss of data and / or damage to the card or phone. ›› Formatting a memory card After formatting on a PC, memory cards may not work properly when inserted into a phone. Format memory cards using your phone only. In Idle mode, select → Settings → Phone storage → Unmount storage card → OK → Format storage card → Format storage card. Before formatting the memory card, we recommend that you back up any important data stored in the phone memory. The manufacturer's warranty does not cover data loss caused by user action. Assembling your phone 15 Attaching the wrist strap (optional) 1 Remove the battery cover. 2 Pass the strap through the hole and hook onto the small tab. 3 Close the battery cover. 16 Assembling your phone Getting started Turning your phone on and off General information about your phone ›› Phone appearance To turn on your phone, do the following. Proximity Sensors 1 Press and hold the key. 2 When you turn on your phone for the first time, follow the instructions for Volume key on the screen to get your phone ready for use. To turn off the phone, press and hold, then select Power off phone. Follow all posted warnings and directions from personnel in areas where the use of wireless devices is prohibited, such as on an airplane or hospital. To use only non-network phone features, switch to offline mode. Press and hold, then select Offline mode. Home key Menu key Microphone Earpiece Touch screen Back key Multipurpose jack Getting started 17 ›› Keys Key Headset jack Power / Lock key Memory card slot Built-in antenna 18 Getting started External speaker Camera lens Battery cover Power / Lock function Menu Home screen Turn on the phone (press and hold); call up the quick access menu (press and hold); touch screen lock. Displays a list of options available on this screen. Return to standby screen; display a list of recently used applications (press and hold). Back Returns to the previous screen. Volume Adjust the volume of phone sounds. ›› Status icons The icons shown on the display may differ depending on the country or service provider. Icon Description No signal Signal strength GPRS connected UMTS connected WLAN enabled Bluetooth enabled Bluetooth headset connected GPS enabled Downloading data Call forwarding enabled PC connected USB tethering enabled WLAN hotspot enabled Getting started 19 Icon Description Icon Description Missing SIM or USIM card Music playing New SMS or MMS message Music playback paused New message Email FM radio is running in the background New voicemail An error has occurred or user intervention is required Alarm activated Event notification Roaming (outside of home network coverage) Silent profile activated Offline mode activated Vibration mode activated 20 Getting started Battery level 10:00 am Time of day Touchscreen Your phone's touchscreen allows you to easily select items and perform various functions ... This section describes the basic steps required to operate the touchscreen. Do not use sharp objects to operate the touch screen: scratches may appear on its surface. Do not allow the touch screen to come into contact with electronic devices. The resulting electrostatic discharge can cause the touch screen to malfunction or malfunction. Do not allow liquid to come into contact with the touch screen. Excessive moisture and liquid ingress can cause the touch screen to malfunction. Remove the protective film from the touchscreen for easy operation. The touchscreen of your phone is coated with a coating that is sensitive to weak electrical charges from the human body, so it is best to operate the touchscreen directly with your fingers. The touch screen may not respond to sharp objects such as a stylus and pen. The touch screen can be operated in the following ways. Touching. One touch selects menu items or options, and launches applications. Touch and hold. Select and hold an item for two seconds to bring up a pop-up menu. Drag and drop. Touch the screen and scroll up, down, right or left to select items in the list. Drag and drop. Touch and hold the selected item, and then drag it across the screen. Double tap. A quick double tap on the screen allows you to zoom in and out when viewing photos or web pages. If the phone is not used for a certain period of time, the touch screen turns off. You can also adjust the backlight time for the touch screen. In Idle mode, open the application list and select Settings → Display → Screen timeout. Getting started 21 Locking and unlocking the touch screen and keys The touch screen and keyboard can be locked to prevent accidental key presses. To lock the touch screen and keys, press the key. To unlock them, turn on the screen and right to the point. drag and drop the idle screen introduction This screen appears when the phone is in idle mode. On it, you can view the status of the phone and access applications. There are several panels on the standby screen. Scroll left or right to select the desired panel on the idle screen. 22 Getting started ›› Adding items to the idle screen You can personalize the idle screen by adding shortcuts to applications or application items, widgets or folders. To do this, follow these steps. 1 Press → Add, or press and hold an empty area on the screen in idle mode. 2 Select the item category and item. Widgets: add widgets. Widgets are mini-applications that allow you to perform certain actions or display information on the screen in idle mode. Keyboard shortcuts: Add links to items such as apps, bookmarks, and contacts. Folders: Create a new folder or add a folder for contacts. Wallpaper: Select a background image. The available items depend on the current idle screen. ›› Moving items to the idle screen 1 Select and hold the item you want to move until it turns gray. 2 Drag the item to the desired location. ›› Remove items from the idle screen 1 Select and hold an item. A trash can icon appears at the bottom of the screen. 2 Drag the item to the trash can. 3 When the item turns red, release it. ›› Link bar In idle mode or while using an application, touch the indicator area and slide your finger downward to open the link bar. You can enable or disable the wireless functionality and open a list of notifications (for example: messages, calls, events, or processing status). To hide the list, drag the bottom of the list up. The following functions can be used in the link bar. Wi-Fi: Turn the WLAN function on or off with. 83. B / T: Turns Bluetooth wireless communication on or off with. 81. GPS: Activate or deactivate the GPS function. Silent: Turns the Silent profile on or off. Auto Rotate: Turn the auto rotate feature on or off. The options available may vary depending on the region or service provider. Getting started 23 ›› Adding and removing panels from the idle screen To organize widgets, you can add or remove panels to the idle screen. 1 In Idle mode, press the key → Edit. To enter editing mode, place two fingers on the screen and pinch them together. 2 Add or remove panels in one of the following ways. To remove a panel, touch and hold the panel thumbnail, then drag it to the trash can at the bottom of the screen. Select to add a panel. To change the order of the panels, touch and hold the panel thumbnail, then drag it to the desired location. 3 When finished, press the [24 Get Started] key. Working with applications To access applications on your phone, follow these steps. 1 From standby select application list. to open 2 Scroll the image left or right to select a different application screen. 3 Select an application. You must have an account to use Google apps. If you don't have a Google account, you should create one. To add a link to an app, press and hold the app icon in the app list. You can move the icon to the desired location on the idle screen. 4 Press the key to return to the previous screen; press the Home key to return to the idle screen. Your phone has a built-in motion sensor that detects its orientation. If you turn your phone over while using a feature, the screen will automatically change orientation to landscape. To turn off automatic orientation change, tap Settings → Display → Auto-rotate screen. ›› Organize applications You can reorder applications in the application list by rearranging them or grouping them into categories. 1 Open the application list and press the key → Edit. 2 Select and hold an application icon. 3 Drag the app to the desired location. The application icon can be moved to another screen of the menu mode. 4 Press the key → Save. Change the order of the main menu screens. 1 Tap the application list screen with two fingers and pinch them together. 2 Touch and hold a screen thumbnail, then drag it to the desired location. ›› Go to recently used applications 1 Press and hold the Home key to open a list of recently used applications. 2 Select the desired application. Getting started 25 ›› Task manager Your phone has a multitasking operating system that allows you to run multiple applications at the same time. However, multiple applications running at the same time may freeze, stop, memory problems, or high power consumption. To avoid these problems, shut down unnecessary programs using the task manager. 1 In Idle mode, open the application list and ›› Setting the current time and date 1 In Idle mode, open the application list and select Settings → Date and Time. 2 Set the date and time, and change other settings. ›› Turn tones on or off, select Task manager → Active. A list of running applications will appear. In Idle mode, open the application list and select Settings → Sound → Press sound. To close all running applications, select Close All. To adjust the call volume, press the volume key up or down. 2 Select Finish to close the application. ›› Adjust the call volume Personalize your phone ›› Switch to the Silent profile Get the most out of your phone by customizing it to suit your preferences. 26 Getting started To mute or unmute your phone, do one of the following. In Idle mode, open the application list → Dial, then press and select hold. Open the shortcut bar at the top of the screen and select Mute. Press and hold the key and then select Silent profile. ›› Select a ringtone 1 In Idle mode, open the application list and select Settings → Sound → Phone ringtone. 2 Select a melody from the list, then OK. ›› Turn on animation to switch between applications In Idle mode, open the application list and select Settings → Display → Animation → Use animation sometimes or Use animation always. ›› To set the wallpaper for the idle screen 1 In idle mode, press [Option. ] → Wallpaper → 2 Select an image. 3 Select Save or Set Wallpaper. Samsung is not responsible for the use of images and wallpapers supplied with your phone. ›› Adjust the display brightness 1 In Idle mode, open the application list and select Settings → Display → Brightness. 2 Drag the slider to adjust the brightness level. 3 Select OK. The brightness level of the display affects the amount of battery power consumed by the phone. Getting started 27 ›› Locking the screen You can protect your phone against unwanted use by locking the screen with an unlock pattern or password. After setting up the screen lock, the phone will ask for a pattern or password every time it is turned on. If you forget your PIN or password, contact a Samsung service center to reset it. Samsung is not responsible for lost passwords or confidential information or any other damage caused by illegal use of any software. To create an unlock pattern 1 In Idle mode, open the application list and tap Settings → GPS and security → Set screen lock → Pattern. 28 Getting Started 2 Read the instructions and sample patterns on the screen, then tap Next (if necessary). 3 Create a pattern by connecting at least four dots with your finger. 4 Select Next. 5 Repeat the pattern to confirm. 6 Select Yes. To create a screen unlock PIN 1 In Idle mode, open the application list and tap Settings → GPS and security → Set screen lock → PIN. 2 Enter your numeric PIN and select Next. 3 Enter the PIN again and select OK. To create a screen lock password 1 In Idle mode, open the application list and tap Settings → GPS and security → Set screen lock → Password. 2 Enter an alphanumeric password and select Next. 3 Enter the password again and select OK. ›› Lock your SIM or USIM card You can lock your phone using the PIN supplied with your SIM or USIM card. 1 In Idle mode, open the application list and select Settings → GPS and security → Set up SIM card lock → Lock SIM card. If you enter the wrong PIN code multiple times, the SIM or USIM card is blocked. In this case, you need to enter the PIN Unblocking Key (PUK) to unblock the SIM or USIM card. If the SIM or USIM card is blocked after entering an incorrect PUK, you need to contact your mobile operator to unblock it. Entering text You can enter text either using characters on the keyboard or by hand on the touch screen. For some languages, text input is not supported. To enter text, you must change the input language to one of the supported languages from. 102. 2 Enter your PIN and select OK. After activating this feature, you will need to enter your PIN each time you switch on your phone. Getting started 29 ›› Changing the keyboard type 3 Continue until you have typed a word. You can change the keyboard type if necessary. Press and hold the text input field and select Input mode → a keyboard type (Swype or Samsung). ›› Enter text using the Swype keyboard 1 Touch the first letter of a word and, without lifting your finger, slide it to the next letter. 2 Hold for a second on the second letter and drag your finger to the next. 4 Remove your finger from the last letter. The word will be inserted into the text input field. 5 Repeat steps 1–4 to enter the entire text. Touch and hold a letter to enter the corresponding additional character. 30 Getting Started You can also use the following keys. 1 2 3 4 5 6 Number Function 5 Move to a new line. 6 Voice text input; the icon appears only after you have enabled the voice text input feature on the Samsung keyboard. The availability of this function depends on the input language. Function To hide the Swype keyboard, press the 1 Change case key. 2 Switch between number and symbol modes and ABC mode. To view usage help 3 Insert a space. 4 Delete entered characters. Number . Swype keyboard, tap and hold it. and Getting started 31 ›› Enter text using the Samsung keyboard 1 Tap → Keyboard types and select a text input method. You can select one of the keyboard types (QWERTY or traditional) or handwriting. 2 Enter text by pressing the appropriate alphabetic Number 2 3 numeric keys or by drawing characters on the screen. You can also use the following keys. 1 2 3 Number 1 Function Change case. 32 Getting Started 4 5 6 7 Function Switches between number and symbol mode and ABC mode. Voice text input; the icon appears only after you have enabled the voice text input feature on the Samsung keyboard. The availability of this function depends on the input language. 4 Deletes the entered text. 5 Move to a new line. 6 7 Go to keyboard parameters; change the text input method (press and hold). Insert a space; point insertion (double tap); change the writing language (scroll left or right). The actions assigned to this key are carrier-dependent. You can also download different keyboard types from the Internet and change the keyboard type. Press and hold a text input field, then select Input mode → a keyboard type. ›› Copy and paste text When you enter text, you can use the copy and paste function in other applications. 1 Move the cursor to the desired position. 2 Select and hold a text input field. 3 Select Select Text from the options list. 4 Touch the end of the text to be copied. 5 Select and hold the highlighted text. 6 Select Copy to copy, or Cut to cut the text to the clipboard. Downloading applications from the Android Market Since the phone OS is based on the Android platform, its functionality can be expanded with downloadable applications. With Android Market, you can easily and quickly connect to the store for downloadable games and applications. This feature may not be available depending on the region or service provider. User files of downloaded applications will be saved to the built-in memory. ›› Install an application 1 In Idle mode, open the application list and select Market. 7 Go to another application, then tap the field 2 When the agreement screen appears, select 8 3 Select an application category and an application. enter text and hold it. Select Paste to paste the text from the clipboard into the text input field. Accept to accept its terms. Getting started 33 4 Select Install for free apps or Buy for paid apps. If you selected Install, select OK to download the application immediately. If you selected Buy, you must enter information about credit card... Follow the instructions on the screen. ›› Uninstall an application 1 On the Android Market home screen, press [→ My apps. 2 Select the application to be uninstalled. 3 Select Delete → OK. Downloading files from the Internet Files you download from the Internet or web applications are saved on the memory card. 34 Getting Started] Files downloaded from the Internet may contain viruses that can damage your device. To reduce the risk of virus infection, use trusted sources to download files. Some media are protected by digital rights management (DRM) for copyright purposes. This protection prevents some files from being downloaded, copied, modified, or transferred. To download files from the Internet, follow these steps. 1 In Idle mode, open the application list and select Internet. 2 Find desired file or an app and download it. To install applications downloaded from a source other than Android Market, select Settings → Applications → Unknown sources. Synchronizing data You can synchronize data with various web servers, and back up and restore data. After synchronization is complete, the phone remains connected to the network. If the data on the web server changes, the updated information appears on the phone and automatic synchronization starts, and vice versa. This feature may not be available depending on the region or service provider. ›› Setting up a server account 1 In Idle mode, open the application list and select Settings → Accounts and sync. 2 Select Add Account. record and specify the type 3 Follow the instructions on the screen to set up the account. To access social networks such as Facebook or MySpace, enter your username and password and select Login. ›› Sync automatically 1 In Idle mode, open the application list and select Settings → Accounts and sync. 2 Select Auto sync. 3 Select an account. 4 Select the apps you want to sync. To exclude apps from automatic syncing, uncheck the boxes next to them. account. Getting started 35 ›› Sync data manually 1 In Idle mode, open the application list and select Settings → Accounts and sync. 2 Select an account. 3 Press the key → Synchronize now. The phone starts syncing the selected data. 36 Getting started Communication Calls This section describes how to make and answer calls using the features available during a call, and how to set up and use related features. ›› Make or answer a call You can use the keys or the touch screen to make, accept, end, or reject a call. During a call, the phone's touch screen is automatically locked to prevent accidental input. Making a call 1 In Idle mode, open the application list and select phone number. → Dial, then enter the country code and 2 Select to call. 3 Select End to end the call. Frequently called numbers can be stored in the phone book from. 64. For quick access to the recent call history, tap → Logs. Answering a call 1 When a call comes in, drag to the right to point. To mute the incoming call ringtone, press the volume key. 2 Select End to end the call. Communication 37 To put a call on hold or retrieve Reject a call When a call comes in, drag to the left to point. The caller hears a busy tone. held call, press and hold the headset key. To end the call, press the headset key. Call internationally ›› Options available during a call 1 From standby select → Dial, then touch and hold 0 to insert the + symbol. 2 Enter the full number (country code, area code, and phone number), then select Dial number. to ›› Headset By connecting a headset to your device, you can answer and control calls with the headset. Press the headset button to answer the call. To reject a call, press and hold the headset key. 38 Communication You can use the following functions during a voice call. To adjust the volume, press the volume key up or down. To put the call on hold, select Hold. To take the call off hold, select Retrieve. To place a second call, select New Call and dial a new number. To answer the second call, drag to the right to the point while the waiting tone sounds. You will be asked to end or put the first call on hold. To use this feature, you must subscribe to a call waiting service. Select Keyboard to open the dialing screen. To transfer the call from the phone to the headset, select Headset. To mute the microphone (and the other person will no longer hear you), select Mute. To activate the speakerphone function, select Speaker. In a loud noise environment, it is sometimes difficult to distinguish the voice of the interlocutor when using the speakerphone. In such cases, it is recommended to use the normal talk mode. ›› View and dial missed calls Missed calls are shown on the phone display. To dial a missed call, open the shortcut bar and select the alert you want. ›› More Features This section describes how to use call features such as FDN mode or call forwarding. FDN Mode (Permitted Dialing) To switch between calls, select In FDN mode, the phone restricts outgoing calls except for numbers stored in the FDN list. To enable FDN mode, follow these steps. To make a multiparty call (conference call 1 In Idle mode, open the application list and Swap call), make or answer a second call, and when connected, select Join. To use this feature, you must subscribe to a multiway calling service. select Settings → Calls → FDN numbers → Enable FDN. Communication 39 2 Enter the PIN2 supplied with your SIM or USIM card and select OK. 3 Select FDN List and add the contacts you want to use in FDN mode. Call Forwarding Call Forwarding is a network feature that allows incoming calls to be diverted to another specified number. Call forwarding can be configured for situations when you are already on a call or are out of range. Call waiting Call waiting is a network feature that notifies you of an incoming call while you are on a conversation with another person. In Idle mode, open the application list and select Settings → Calls → Advanced options → Call waiting. The settings will be transferred to the network. ›› Viewing the call log 1 From standby, open the application list. You can sort your calls by type and view them in the log. 2 Select an option. 3 Enter the number to which calls will be forwarded and 2 Press [and select Settings → Calls → Call forwarding. select Enabled. The settings will be transferred to the network. 40 Communication 1 In Idle mode, open the application list and select → Logs. ] → View → and sorting option. In call logs, you can directly call or send a message to a contact by sliding your finger along the contact entry to the right or left. 3 Select a log to view the details. From this menu, you can call the subscriber or send him a message, as well as add the number to the phone book. Messages This section describes how to create and send SMS and MMS messages, as well as view and manage sent or received messages. Additional charges may apply for sending and receiving messages outside of your home network. For more information, contact your mobile operator. ›› Sending SMS messages 1 From standby select message. 2 Select Contacts. The number can be entered manually, and by choosing another option, you can select it in journals or groups. 3 Select a contact and then Add. 4 Select Tap to compose and enter your message text. To add a smiley, press the [Insert smiley. ] → 5 Select Send. to send a message. ›› Sending MMS messages 1 From standby select message. → New 2 Select Contacts. → New Number can be entered manually, and by choosing another parameter, select it in journals or groups. When you enter an email address, the phone will automatically translate the SMS message into an MMS message. Communication 41 3 Select a contact and then Add. 4 Select Tap to compose and enter your message text. To add a smiley, press the [Insert smiley. 5 Select] → → and select an option and an attachment. You can select from a list of existing files, or take a new snapshot, video or sound file. 6 Press [message subject. ] → Add subject and add 7 Select Send. to send a message. ›› Viewing SMS and MMS messages 1 In Idle mode, open the application list and select. Messages are grouped into threads by contact, just like in the messaging service. 42 Communication 2 Select a contact. 3 Select an SMS or MMS message from the message flow. ›› Listen to voice messages If you have missed calls forward to your voicemail server, callers can leave you voice messages. To go to your voicemail and listen to these messages, follow these steps. 1 In Idle mode, open the application list → Dial, then press and and select hold 1. 2 Follow the instructions from the voicemail server. To access the voicemail server, you need to store its number. This number can be obtained from your mobile operator. Google Mail You can download new email messages from Google Mail ™ to your phone's inbox. When you go to Google Mail, an Inbox folder appears. The header bar displays the number of unread messages. They are in bold. If the message has been flagged, the mark appears in a colored rectangle on the message. This feature may not be available depending on the region or service provider. Some mobile operators may have different names for the Google Mail menu items. ›› Sending an email message 3 Enter a name or address in the recipient field. 4 Enter the subject and body of your message. 5 To attach an image file to the email, press the key → Attach file and select a file. 6 Select the item to send the message. ›› Viewing email messages 1 In Idle mode, open the application list and select Google Mail. 2 Select an email message. The following options are available while viewing a message. 1 In Idle mode, open the application list and Select to reply to a message. To reply to the message to all recipients, select 2 Press [To forward the message to other recipients, select Google Mail. ] → New message. item → Resp. everyone. select → Forward. Communication 43 To add a star to the message, select. To view the attachment, select View. To save it to your memory card, select Download. To archive the message, select Archive. To delete the message, select Delete. To go to the next or previous message, tap or. ›› Organize email messages by tags You can organize email messages by tagging them or adding asterisks to emphasize their importance. You can sort messages by tag filter. To add a tag to a message 1 On the inbox screen, press and hold the message. 44 Communication 2 Select Edit Shortcuts. 3 Select a mark and then OK. To add a star to a message 1 On the inbox screen, press and hold the message. 2 Select Flag. A star icon appears next to the message. Filter messages 1 On the Inbox screen, press [Go to shortcuts. ] → 2 Select the tag of the messages you want to view. Email This section describes how to send and view email messages using your personal or work account. ›› Setting up an email account 1 In Idle mode, open the application list and select Email. 2 Enter your email address and password. 3 Select Next (for setting up regular e-mail accounts) or Manual setup (if you are using other e-mail services). 4 Follow the instructions on the screen. After you finish setting up your account, it will start downloading emails to your phone. If you have more than two email accounts, you can switch between them. To do this, press the key → Account. records and select the one from which you want to receive messages. ›› Sending an email message 1 In Idle mode, open the application list, select Email and an account. 2 Press the key → Create. 3 Select Contacts. You can enter the email address manually, or you can use another option to select the address in journals or groups. 4 Select a contact and then Add. 5 Select the Cc / Bcc field to add recipients. 6 Go to the subject field and enter a subject for the message. 7 Go to the text input field and enter your message text. 8 Select Attach and attach a file. You can select from a list of existing files, or take a new snapshot, video or sound file. 9 Select Send to send the message. Offline or out of coverage, the message will remain in the message flow until it connects to the Internet or detects a mobile network. Communication 45 ›› Viewing an email message When you open an email account offline, the screen displays previously received email messages. To view new messages, you need to connect to the mail server. After downloading messages from the server, you can view them offline. 1 In Idle mode, open the application list, select Email, and specify an account. 2 Press the [message list. ] → Refresh to refresh 3 Select an e-mail message. The following options are available while viewing a message. To reply to a message, press the key → Reply. To forward the message to other recipients, press the key → Forward. 46 Communication To delete a message, press the key → Delete. To move the message to another folder, press the key → Move. To download images, press the key → Output Pictures. To view an attachment, tap it. Select to save the attachment to your storage card. Google Talk This section describes how to communicate with friends using the Google Talk ™ application. This feature may not be available depending on the region or service provider. ›› Adding friends to the list 1 In Idle mode, open the application list and select Google Talk. In the friends list, you can quickly view the interlocutors. 2 Press the key → Add friend. 3 Enter your friend's email address and select Send invitation. When your friend accepts this invitation, they will be added to your friend list. ›› Start a conversation 1 From Idle mode, open the application list and select Google Talk. 2 Select a friend from the list. The chat screen will open. 3 Enter your message text and select Send. To add a smiley, press [Options → Insert smiley. Social Hub This section describes how to use the built-in Social Hub ™ application for email, social networking, messaging, chat, contacts, and calendar. For details, visit socialhub.samsungmobile.com. 1 In Idle mode, open the application list and select Social Hub. 2 Check out the content of the Social Hub app. ] → 4 To switch between active chat windows, press [Chat. ] → Open another 5 To end the conversation, press [Close Chat. ] → Communication 47 Entertainment ›› Taking a photo Camera 2 Turn your phone counterclockwise to This section describes the basic functions for taking and viewing photos and videos. The camera can take photos with a resolution of 2048 x 1536 pixels (3.2 megapixels) and videos with a resolution of 320 x 240 pixels. To use the camera, you first need to insert a memory card. 3 Point the camera at the subject and adjust The camera interface is enabled only in landscape display mode. Tap the screen to show or hide the control icons in the viewfinder. If the phone is not used for a certain period of time, the camera turns off automatically. The phone memory capacity depends on the mode and shooting conditions. 48 Entertainment 1 In Idle mode, open the application list and select Camera. set the landscape display mode. image. 1 2 3 4 5 6 7 8 Number 1 Function Check the status and settings of the camera. : Resolution: Metering type: Number of photos that can be saved (depending on available memory space): Photo storage location 2 Change the shooting mode. 3 Change the scene. 4 Brightness adjustment. 5 Change camera settings. 6 Switch to video recording mode. 7 Taking pictures. Number 8 Function View the photo you just took. 4 Press a volume key to zoom in or out. 5 Tap to take a photo. The photo will be saved automatically. After taking a picture, tap the captured photos icon. to view Scroll left or right to view other photos. To zoom in on the photo, tap the screen, then tap or. You can also double-tap the screen to zoom in and out. To send the photo to others, select Share. Entertainment 49 To set a photo as a wallpaper or a caller's image for a contact list entry, select Set as. To delete the photo, select Delete. ›› Take pictures using, select Camera. The camera has several presets for different scenes. You can simply select the mode you want according to the conditions and subjects. For example, if you are shooting at night, choose night mode with an increased exposure. 1 In Idle mode, open the application list and select Camera. 2 Turn the phone counterclockwise to set the display to landscape mode. 50 Smile Fun The camera can detect the faces of people in the frame and automatically take a photo when they smile. 1 In Idle mode, open the list of applications and options for different scenes → select a scene. 3 Tap 4 Change the settings as needed. 5 Tap ›› Take a photo in recognition mode to take a photo. 2 Turn the phone counterclockwise to set the display to landscape mode. 3 Select → Smile detection. 4 Change the settings if necessary. 5 Tap the icon. 6 Point the camera lens at the subject. The phone detects faces in the frame and recognizes their smiles. When the person smiles, the phone will automatically take a photo. ›› Take a series of photos With your phone camera, you can take a series of photos of a moving object. This function is especially useful when taking pictures of children at play or sports. 1 In Idle mode, open the application list and ›› Take a panorama In panorama mode, you can take wide-angle photos. This mode is best for landscape photography. 1 In Idle mode, open the application list and select Camera. select Camera. 2 Turn the phone counterclockwise to set the display to landscape mode. 3 Select → Panorama. 4 Change the settings if necessary. 5 Tap to take the first photo. 6 Slowly move the phone in the selection 2 Turn the phone counterclockwise to 3 Tap → Continuous. 4 Change the settings if necessary. 5 Touch and hold the icon. The camera will take pictures until you release the icon. set the landscape display mode. ... direction, connecting the edges of the green frame to the viewfinder. When the green frame and viewfinder are connected, the camera will automatically take the next shot. 7 To add another photo to the panorama, repeat step 6. Entertainment 51 ›› Setting up the camera Before shooting, tap the options icon. Options Focus Mode Timer Resolution White Balance Effects 52 Entertainment → for Description Close-up subjects, automatic human face detection. Sets the time delay before taking a picture. Change resolution. Change the color balance according to lighting conditions. Apply special effects such as sepia or black and white tones. Options Description Metering Selects the metering type. Image quality Adjusts the quality level of the images. Adjust Adjusts the contrast, saturation, and sharpness of the image. Before shooting, tap the icon for next settings. Setting Grid View → for Description Displays the grid on the preview screen. Set up your phone to view the picture you just took. GPS Setting Shutter Sound Reset Description Set the phone to add location information to photos. To ensure a reliable GPS signal, avoid taking photographs in poor weather conditions, or where obstacles may arise in the signal path (spaces between buildings, lowlands). Select the sound accompanying the photo. Reset menu and shooting options. 3 Tap 4 to switch to video recording mode. Point the camera at the subject and adjust the image. 1 2 Select Camera. 2 Turn the phone counterclockwise to set the display to landscape mode. 6 3 7 4 Number ›› Record a video 1 In Idle mode, open the application list and 5 1 Function Check the status and settings of the camcorder. : Resolution: The length of the video (depending on the available memory space): The location where the videos are stored Entertainment 53 Number 7 Tap the Function icon 2 Change the video recording mode (for attaching to an MMS message or saving normally). 3 Adjust brightness. 4 Change camera settings. 5 Switch to photo mode. 6 Record video. 7 View the video you just captured. zoom out. 54 Entertainment To view the video after taking it, tap. Scroll left or right to view more videos. To share the video with others, select Share. 5 Press the volume key to increase, or 6 To start recording, tap to stop recording. The video will be saved automatically. Problems may occur when recording video to a memory card with a low bit rate. ... To play the video, select Play. To delete the video, select Delete. ›› Customize video recording options Before shooting, tap to access the following options. → for Option Description Timer Set the time delay before recording a video. Resolution Change the resolution. White Balance Effects Video Quality Adjust Adjusts the color balance to match the lighting conditions. Apply special effects such as sepia or black and white tones. Adjusts the quality level of video recordings. Adjusts the contrast, saturation and sharpness of the image. Before shooting, tap the icon for next settings. → for Setting Description Grid Displays the grid on the preview screen. Sound recording Turn sound on or off. View Set up your phone to view the video you just captured. Reset Reset menu and shooting options. Entertainment 55 ›› Viewing Photos Gallery Learn how to view photos and videos stored on your memory card. ›› Supported file formats Type Format Picture Video Extension: bmp, gif, jpg, png, wbmp, agif Extension: 3gp, mp4 Codec: MPEG4, H.263, H.264 Some file formats are supported depending on the device software. If you try to open a file that is larger than the available memory, an error may occur. 56 Entertainment 1 In Idle mode, open the application list and select Gallery. 2 Select a folder. 3 To change the view mode, tap or in the upper right corner of the screen. 4 Select a photo to view (no icon). The following functions are available while viewing an image. Scroll left or right to view more photos. To zoom in or out, tap or. You can also touch the screen with two fingers and spread them apart to zoom in (bring your fingers together to zoom out). To start a slide show in the current folder, select Slide Show. Tap the screen to stop the slideshow. ›› Play videos Music 1 In Idle mode, open the application list and select Gallery. 2 Select the video you want to watch (with the 3 icon Turn the phone counterclockwise to). set the landscape display mode. 4 Control playback with the virtual keys. ›› Share pictures and videos 1 In Idle mode, open the application list and select Gallery. 2 Select a folder. 3 Select an image or video. 4 Tap Menu → Sharing and a sending option. This section describes the possibilities for listening to music. The music player supports the following file formats: mp3, ogg, aac. To use the music player, you need to insert a memory card. When you open a music file in My files, MMS or web browser, the following file formats are available: mid, xmf, rtttl, imy, rtx, ota, amr, wav, mxmf. Some file formats are not supported depending on the device software. If you try to open a file that is larger than the available memory, an error may occur. Entertainment 57 ›› Download music files to a memory card 3 Use the following keys to control playback. First, copy the files to the phone memory using one of the following methods. 4 5 6 Download from the Internet using a wireless connection p. 71. Download from a PC using the optional Samsung Kies p. 87. Receive files via Bluetooth p. 82. Copying to a memory card p. 88. 1 2 3 ›› Play music After transferring music files to your phone or memory card, follow these steps. 1 In Idle mode, open the application list and select Music. 2 Select a music category and a music file. 58 Entertainment Number 1 2 7 Function Pause playback; touch the icon to continue playback. Go to the previous file; skip backward within a file (press and hold). Number Function 3 Move to a specific location in the file by moving the slider. 4 Access to the playlist. 5 Turns on the random play mode. Change the repeat mode (repeat off, repeat one file, repeat all files). Go to the next file; skip forward within a file (press and hold). 6 7 You can control file playback with the headset. To pause or resume playback, press the headset button. Press and hold the headset button to open the music player. When playing multi-channel content such as DVD movies, the SRS CS ™ headphones provide 5.1-channel surround sound compared to conventional headphones or drop headphones. WOW HD ™ technology dramatically improves sound quality, delivering dynamic 3D sound with deep, rich bass and clear treble reproduction. ›› Create a playlist 1 In Idle mode, open the application list and select Music. 2 Select a music category and a music file. 3 Press the key → Add to List → New. Entertainment 59 4 Enter a name for the new playlist and ›› Change music settings 5 To add a file to a playlist, 1 In Idle mode, open the application list and ›› Use Shuffle 2 Select a music category and a music file. 3 Press the key → Settings. 4 You can change the following music options select Save. play the file and press the key → Add to playlist → specify a new playlist. select Music. order (party) ”of the player. When you use the Shuffle (Party) function, the phone plays the files in random order. 1 In Idle mode, open the application list and select Music. 2 Press the key → Party shuffle. 3 Press [Disable Party shuffle. 60 Entertainment Options Description 5.1ch Sound Enables virtual 5.1ch sound system when a headset is connected. Selects the default EQ type. Equalizer] → FM Radio Learn how to listen to music or news from the FM radio on your phone. To do this, connect a headset to the device, which will act as a radio antenna. 3 The following keys can be used to operate the FM radio. ›› Listen to FM radio 1 Connect a headset to the device. 2 In Idle mode, open the application list and select FM radio. It will automatically search for and store available radio stations. When you start the FM radio for the first time, you will be prompted to automatically search for radio stations. 1 5 2 3 3 4 Number Function 1 Turn off FM radio; tap the icon to turn on the FM radio. 2 Step by step change of frequency. 3 Searches for an available radio station. Entertainment 61 Number Function 4 Add the current radio station to the favorites list. 5 Adjusts the sound volume. ›› Store a radio station automatically 1 Connect a headset to your device. 2 In Idle mode, open the application list and select FM radio. 3 Press the key → Search → and specify the scan option. It will automatically search for and store available radio stations. 62 Entertainment ›› Adding a radio station to your favorites 1 Connect a headset to your device. 2 In Idle mode, open the application list and select FM radio. 3 Select to turn on the FM radio. 4 Scroll to the desired radio station. 5 Select an item to add it to your favorites list. You can add the name of the radio station or delete it. To do this, tap and hold a radio station in the favorites list, then select Delete or Rename. ›› Customize FM radio settings 1 In Idle mode, open the application list and select FM radio. 2 Press the key → Settings. 3 Change the following FM radio settings. Options Station name Options Description REGION Select the region. Alternative Frequency Background Play Set the FM radio to run in the background while using other applications. When this function is on, you can control the FM radio from the link bar. Auto switch off FM radio Description Set the phone to display the name of radio stations on the FM radio screen; the function is available only for radio stations with names. Sets the FM radio to search for a station again when the current signal strength is low. Set to turn off the FM radio automatically after a specified time. Entertainment 63 Personal information 4 Enter the contact information. 5 Select Save to save the contact to Contacts You can also save the contact from the dialing screen. memory. This section describes how to create and manage personal and work contacts. In the phone book, you can save the names of subscribers, their mobile and home numbers, email addresses, dates of birth and much more. ›› Create a contact 1 In Idle mode, open the application list and select. 2 Select an item. 3 Select a memory area. If you have multiple accounts, select the one where the contact will be saved. 64 Personal information 1 From standby select → Dial. 2 Enter the phone number. 3 Select Add to Contacts →. 4 Select a memory area. If you have multiple accounts, select the one where the contact will be saved. 5 Enter the contact information. 6 Select Save to save the contact to memory. ›› Search for a contact 2 Press → Options → Speed dial. 3 Select the bin number and contact. 1 In Idle mode, open the application list and select. You can quickly call that person by touching and holding a cell number on the dialing screen. 2 Scroll up or down the list of contacts. 3 Select a contact. ›› Create a business card Once you have selected a contact, you can do the following. 1 In standby mode, open the application list and make a call to a subscriber by selecting his number; send a message by selecting the Message item; send an e-mail by selecting select e-mail; change contact information, press [Change. ] → ›› Assign speed dialing keys. 2 Press the key → My profile. 3 Enter your details. 4 Select Save. You can forward your business card by attaching it to a message, by e-mail, or sent using Bluetooth wireless technology. numbers 1 In Idle mode, open the application list and select. Personal information 65 ›› Retrieving contacts from a social media account You can select a contact from a list of social media accounts and add it to your phone book. 1 In Idle mode, open the application list and select. 2 Press the key → Find Friends. 3 Select an account. ›› Create a contact group After creating groups, you can manage multiple contacts at the same time, and send SMS, MMS or e-mail messages to all members of the group. First you need to create a group. 1 In Idle mode, open the application list and select 2 Press [→ Groups. ] → Create. 3 Enter a name for the group and select a ringtone for it. 4 Select Save. ›› Copy contacts To copy contacts from your SIM or USIM card to your phone's memory, follow these steps. 1 In Idle mode, open the application list and select 2 Press [. ] → Import / Export → Import from SIM card. 3 Specify contacts to copy and select Import. To copy contacts from your phone memory to a SIM or USIM card, follow these steps. 1 In Idle mode, open the application list and select 2 Press the [to SIM card. ... ] → Import / Export → Export 3 Specify contacts to copy and select Export → Yes. 66 Personal information ›› Importing and exporting contacts To import contacts in VCF format from a memory card to your phone's memory, follow these steps. 1 In Idle mode, open the application list and select 2 Press [. ] → Import / Export → Import from SD card. 3 Select a memory area. If you have multiple accounts, select the one where the contact will be saved. 4 Select between copying one, several or all contacts, then select OK. 5 Select the contacts to import, then OK. To export contacts from phone memory to memory card, follow these steps. 1 In Idle mode, open the application list and select 2 Press [. to the SD memory card. ] → Import / Export → Export 3 Select Yes to confirm. ›› Viewing the Communication Log You can view the communication log of calls, messages, emails, and social media conversations. 1 In Idle mode, open the application list and select → Log. 2 Select the item you want to view. Personal information 67 ›› View your social media activities ›› Add an event 1 In Idle mode, open the application list and 2 Press the key → Options → Create. 3 Provide the required event details. 4 Select Done. You can view the latest activity of your contacts on social networking services such as Facebook, MySpace, and Twitter. select → History. 2 Select the item you want to view. Calendar This section describes how to create daily, weekly and monthly events and set alarms to remind you of them. 1 In Idle mode, open the application list and select Calendar. ›› View events To change the view of your calendar, follow these steps. 1 In Idle mode, open the application list and select Calendar. 2 Press the [or Month. 68 Personal Information] and select Day, Week To view events for a specific date, follow these steps. 1 In Idle mode, open the application list and select Calendar. 2 Select a date from the calendar. If set to display by month, dates with scheduled events will be marked with a green bar. To go to the current date, press the key → Today. 3 Select an event to view its details. ›› Turn off the event alarm If an alarm is set for an event reminder, an alarm icon will appear on the screen at the specified time. Notes This section describes how to enter important information to save and view later. ›› Create a note 1 In Idle mode, open the application list and select Notes. 2 Select Memo or → Create. 3 Enter your note text. 4 Press the key to hide the keyboard. 5 Select a background color. 6 Select Save. 1 Open the link bar at the top of the screen. 2 Select a reminder to view the details of the event. 3 To snooze or turn off the reminder, select Pause all or Reject all. Personal information 69 ›› Viewing notes 1 In Idle mode, open the application list and 3 Speak into the microphone on your phone. 4 When you finish recording, select Stop. 2 Select a note to view its details. 5 To record another voice note, select Notes. To send the note to others, touch and hold the note, then select Send via → and an option. Voice recorder This section describes how to use the voice recorder. To use the voice recorder, you must first insert a memory card. ›› Record voice memos 1 In Idle mode, open the application list and select Voice recorder. 2 Select Record to start recording. 70 Personal information The memo will be saved automatically. the Record item at the bottom of the screen. ›› Play a voice memo 1 In Idle mode, open the application list and select Voice recorder. 2 Select List. 3 Select the voice memo to play. To send the note to others, press the key → Share. Internet Web services require a data connection. Check with your mobile operator for the best data plan. Internet This section describes how to connect to the Internet and bookmark your favorite web pages. ›› Browse the web 1 In Idle mode, open the application list and select Internet to open the preset home page. To go to a specific web page, enter its URL in the input field and tap. 2 The following icons are used to browse the web. 1 2 Additional charges may apply for Internet access and file downloads. For more information, contact your mobile operator. Some mobile operators may have different names for browser menu items. The presence of certain icons depends on the region or service provider. Internet 71 Number 1 2 Function Enter the address of a web page to go to. Access the list of saved bookmarks and frequently visited pages, as well as the history of the web browser. The displayed image may differ depending on the country and service provider. While browsing the web, use the following options. To zoom in on a webpage, double-tap the screen. You can also zoom a web page with two fingers: just touch the screen with them and spread or pinch together. To open a new window, press the key → New Window. To view open windows, press the key → Windows. You can open multiple web pages and switch between them. 72 Web To refresh the current web page, press the key → Refresh. To go to the next page in the web browser log, press → Forward. To bookmark the current web page, press the key → Add bookmark. To add a shortcut to the current web page to the idle screen, press the key → More → Add to desktop. To add an RSS feed, press the key → Options → Add RSS Feeds. To search for text on a web page, press the key → More → Find on page. To view the details of a web page, press the key → Options → Page properties. To send the URL of the web page to others, press the key → Options → Send page. To view the download history, press the key → Options → Downloads. To change the browser settings, press the key → Options → Settings. In the bookmark list, press and hold a bookmark to access the following options. To open the webpage in the current window, select Open. ›› Bookmark web pages To open a web page in a new window, select If you know the address of the web page, you can manually bookmark it. To do this, follow these steps. To edit bookmark information, select 1 In Idle mode, open the application list and To add a bookmark link to the mode screen 2 Select → Bookmarks. 3 Select Add or [To send the URL of the web page to others, select Internet. bookmark for the last page. 4 Enter the page title and address. 5 Select OK. ] → New Open in a new window. Edit bookmark. waiting, select Add to Desktop. users, select Send Link. To copy the URL of the web page, select Copy Link URL. To remove a bookmark, select Remove Bookmark. To use a web page as the start page in your web browser, select Set as home page. Internet 73 ›› Access your frequently visited pages and web browser history 1 In Idle mode, open the application list and select Internet. 2 Select → Most visited or Magazine. 3 Select the desired web page. You can add a web page to your bookmark list by clicking the star icon to the right. Maps Application Google Maps™ allows you to find maps of streets, cities and countries, as well as determine driving directions. For reception best signal GPS Do not use your phone in the following environments: between buildings, in tunnels and underground passages, or inside buildings; 74 Internet in bad weather; in areas of high voltage or electromagnetic radiation. When using the GPS functions, do not touch the external antenna area with your hand or cover it with other objects. This feature may not be available depending on the region or service provider. ›› Turn on location services for use with Google Maps To find your location and perform a map search, you must turn on location services. 1 In Idle mode, open the application list and select Settings → GPS & security. 2 To enable location services 4 Enter a location keyword and select change the following options. Options Wireless & networks Use GPS location. To search for a location by voice, select. Select or to change the scale. To add layers to the map, select. Select to view your current location. To add a star to a location, select the location balloon and tap. Function Setting to determine your location using a WLAN and / or mobile network. Turns on the function of determining your location using the GPS satellite. ›› Find a specific location 1 In Idle mode, open the application list and ›› Get directions to 2 When starting an application for the first time, select OK for 1 In Idle mode, open the application list and select Maps. Your current location will be shown on the map. confirmation. 3 Press → Search, or select a preset destination and select Maps. ... 2 Press the key → Routes. Internet 75 3 Enter the addresses of the starting and ending destinations. To enter an address from your contacts, or to specify → Contacts a location on the map, select or Point on map. 4 Select a travel method (by car, bus, or walking), then Done. 5 If you want to view detailed travel information, select a route. 6 Select On Map. 7 When finished, press the key → Clear card. ›› Posting Your Location with Google Latitude This section describes how you can use the Google Latitude ™ app to find out where your friends are and they know yours. 76 Web 1 In Idle mode, open the application list and select Latitude. The phone will automatically connect to the Google Latitude feature. 2 Press the key → Add friends → Select from contacts or Add by email address. 3 Select the friends you want to add, or enter an email address and select Add friends → Yes. When your friend accepts this invitation, you can send them your whereabouts information. 4 Press the key → Map. The location of your friends is marked with their photos on the map. ›› Find places around your location This feature may not be available depending on your region or service provider. 1 In standby mode, open the application list and YouTube 2 Select a category. This section describes how to watch and upload videos to YouTube. select Places. The phone searches for places in the area where you are located in the selected category. 3 Select a place name to view its details. To view the location on the map, tap. Search You can search for applications in your phone memory or specific data on the Internet. 1 In Idle mode, open the application list and select Search. 2 Enter a letter or word to search for data. 3 Select the name of the item you want to open. This feature may not be available depending on the region or service provider. ›› Watching a video 1 In Idle mode, open the application list and select YouTube. 2 If you are launching this application for the first time, select Accept to accept the terms of the agreement. 3 Select a video from the list. 4 Turn the phone counterclockwise to set the display to landscape mode. Internet 77 5 Use the following keys to control playback. 2 2 Press → Add and select a video. Go to step 8. If you want to send another video, tap to turn on the camera. 3 Turn the phone counterclockwise to set the display to landscape mode. 4 Point the camera lens towards the subject and 1 Number adjust the image. Function 1 Go to a specific location in the file by moving the slider. 2 Change the display resolution. ›› Sharing a video 1 In Idle mode, open the application list and select YouTube. 78 Web 5 Select to start recording. 6 Select to stop recording. 7 Select Save to upload the video you just took. 8 Enter your username and password, then select Sign in. News and Weather This section describes how to view the weather forecast, breaking news, and newspaper articles. ›› Viewing the weather forecast 1 In Idle mode, open the application list and select News & Weather. 2 Tap Weather at the top of the screen. The phone will detect your current location and display the relevant weather information. You can change your location to view the weather in a different region. Press the key → Settings → Weather settings and uncheck the box next to My location. Then choose a location from the Customize Location menu. ›› Read articles 1 In Idle mode, open the application list and select News & Weather. 2 Select a news category at the top of the screen. 3 Select an article to open it. To add a news category, press the key → Settings → News settings → Select news topics. Samsung Apps Samsung Apps offers many useful mobile applications. These include games, news, reference materials, social media, maps, health apps, and more. With Samsung Apps, your phone can be expanded to accommodate a wide variety of tasks. Find out more about the capabilities of your phone! The availability of this feature depends on the region or service provider. For more information, visit www.samsungapps.com. Web 79 1 From Idle mode, open the application list and select Samsung Apps. 2 Search for the applications you want and download them to your phone. Market You can download games, ringtones, and other applications from Android Market. This feature may not be available depending on the region or service provider. 1 In Idle mode, open the application list and select Market. 2 Find the file you want and download it to your phone from. 33. 80 Internet Data transfer capabilities Bluetooth Bluetooth is a technology for wireless data transmission over short distances (up to 10 m) without physically connecting devices to each other. With Bluetooth, you don't need to place devices opposite each other. Even if the devices are located in different rooms, but in a common area, you can exchange data between them. Samsung is not responsible for the loss, interception, or unauthorized use of data sent or received via Bluetooth. Make sure you are communicating with a reliable device that has an appropriate level of security. If there are obstacles between communicating devices, the range may be reduced. Some devices, especially those not tested or approved by Bluetooth SIG, may not be compatible with your phone. ›› Turn on Bluetooth wireless technology 1 In Idle mode, open the application list and select Settings → Wireless & networks → Bluetooth settings. 2 Select Bluetooth to turn on Bluetooth wireless technology. Connectivity 81 ›› Search for and connect to devices ›› Send data using 1 In Idle mode, open the application list and 1 Select the desired file or item, for example 2 Select a device. 3 Enter the PIN code of the Bluetooth function of the device (if 2 Press the [Bluetooth enabled key, select Settings → Wireless & networks → Bluetooth settings → Scan for devices. Required) and select OK. Alternatively, select Accept to create the same PIN for pairing devices. When the owner of the other device enters the same code or agrees to establish a connection, the connection will be established. After successful connection, the device will automatically search for available services. Some devices (usually headsets and speakerphones) may have a fixed Bluetooth PIN, such as 0000. In this case, you need to enter this code. 82 Wireless data capabilities Bluetooth contact, note, or media file from the related application or My files. ] → Send, Access, Send via, or Send contact → Bluetooth. 3 Search for and connect to a Bluetooth-enabled device. ›› Receive data using Bluetooth wireless technology 1 In Idle mode, open the application list and select Settings → Wireless & networks → Bluetooth settings → Opened. The phone becomes visible to other Bluetooth devices for 120 seconds. 2 When prompted, enter the Bluetooth wireless PIN and select OK (if necessary). 3 Select Accept to allow the device to receive data (if necessary). The received data is saved in the Bluetooth folder. Wi-Fi This section describes the wireless network function that allows you to connect to any wireless local area network (WLAN) that conforms to the IEEE 802.11 b / g / n standard. You can connect to the Internet or any network device wherever there is a wireless access point. The phone uses a non-harmonized frequency and may work normally in all European countries. Indoor wireless LAN use is allowed without restriction in all European Union countries. Outdoor wireless LAN use is prohibited in France. ›› Turn on the WLAN function In Idle mode, open the application list and select Settings → Wireless & networks → Wi-Fi settings → Wi-Fi. When the WLAN function is on, the battery is used more intensively even in the background. To save battery power, we recommend that you turn off the WLAN function when not in use. Connectivity 83 ›› Search for wireless network and connect 4 Select Save. 1 In Idle mode, open the application list and AllShare 2 Select a network from the Wi-Fi networks menu. 3 Enter a password to access the network (if required). 4 Select Connect. ›› Configure DLNA settings for sharing, select Settings → Wireless & networks → Wi-Fi settings. The phone will automatically search for available WLANs. ›› Add a WLAN network manually 1 In Idle mode, open the application list and select Settings → Wireless & networks → Wi-Fi settings → Add Wi-Fi network ... This section describes the DLNA (Digital Living Network Alliance) service, which allows you to exchange media files with devices that support this service over a WLAN. First you need to enable the WLAN function and add a WLAN profile from. 83. Media files In order for other DLNA devices to access files on your phone, you need to enable the media sharing function. 2 Enter the SSID for the network and select the type Some files may not play on DLNA devices. 3 Set the security settings depending on the 1 In Idle mode, open the list of applications and security. the selected type of protection. 84 Connectivity, select AllShare. 2 Select Settings. 3 Configure the following DLNA settings. Option Description Media Server Name Enter the name of your phone as the media server. Permission to share videos, pictures, or music files with other DLNA devices. Select WLAN access point for DLNA function. Media Sharing Access Point Download from Other Devices Set whether to accept or deny downloads from other devices. ›› Play files on another DLNA device 1 In Idle mode, open the application list and select AllShare. 2 Select Play file on another 3 Select the media category and files to play. 4 Select Add to List. 5 Select the player to play the files. This player starts playback. 6 Control playback using the phone icons. Depending on the server and network connection, playback may be buffered. ›› Play files from one device to another 1 In Idle mode, open the application list and select AllShare. 2 Select Play file from server on another player. The phone will automatically search for DLNA devices. 3 Select the media server device that contains the media files. turntable. Connectivity 85 4 Select a media category and files for ›› Mobile network access 5 Select Add to list. 6 Select the player to play the files. 1 Connect your device to your PC via 7 Control playback with icons 2 In Idle mode, open the application list and USB tethering and portable hotspot 3 Select play to turn on the USB tethering function. This player starts playback. phone. This section describes how to turn your phone into a wireless modem or hotspot for PCs and other devices and open up your mobile network connection. 86 Data transfer options USB multi-function jack with data cable. select Settings → Wireless & networks → Tethering and hotspot. USB modem. Your phone will give the PC access to the mobile network connection. To block access to a network connection, uncheck the box next to USB tethering. How you grant access to a connection depends on the operating system you are using. ›› Access your mobile network ›› Connect using an application 1 In Idle mode, open the application list and make sure Samsung Kies is installed on your PC. This software can be downloaded from the Samsung website (www.samsungmobile.com). 2 Tap Mobile AP to enable the hotspot 1 Connect your device to a PC via a WLAN connection, tap Settings → Wireless & networks → Tethering and hotspot. WLAN access. The phone searches for and connects to the WLAN network. 3 On the other device, find the phone's name in the list of available connections and connect to the network. Your phone will give the other device access to the mobile network connection. Connect to PC Samsung Kies multifunction jack with data cable. Samsung Kies will launch automatically. If it doesn't, double-click the Samsung Kies app icon on your computer. 2 Copy files from PC to phone. For more information, see the Samsung Kies Help. This section describes the different ways to connect your device to a PC via USB port using a data cable. By connecting your phone to your PC, you can directly communicate with your PC and use Samsung Kies. Connectivity 87 ›› Connecting as a removable disk You can connect your phone to your PC as a removable disk and access its file system. If you have a memory card inserted in your phone, you can also access its file system by using the phone as a memory card reader. The file system of the memory card will be displayed as a removable disk, independent of the built-in phone memory. 1 If you want to exchange files with a memory card, insert it. 2 Connect the device to the PC via the multifunction jack using a data cable. 3 Open the link bar. 4 Select an item USB connection → Connect USB stick → OK. 5 Open the folder to view the files. 6 Copy files from PC to memory card. 88 Connectivity 7 When finished, select Turn off USB storage. To disconnect your phone from your PC, click the USB device icon in the Windows taskbar and select Safely Remove Hardware. Then disconnect the data cable. Otherwise, you may lose all data stored on the memory card, or damage the card itself. VPN connections You can create a virtual private network (VPN) connection and connect securely to a private network over a public network, such as the Internet. The phone must already be configured for Internet access. If you have problems with Internet access, you need to change the settings. If you are not sure if the information you entered is correct, contact your service provider. ›› Setting up a VPN connection 1 In Idle mode, open the application list and select Settings → Wireless & networks → VPN settings → Add VPN. 2 Select the type of VPN connection. 3 Configure a connection profile. The options available depend on the type of VPN connection. Options Description VPN Name The name of the VPN server. VPN Server Setting Enable Encryption Set Shared IPsec Key Enter the IP address of the VPN server. Enabling data encryption on the VPN server. Entering a pre-installed key. Options Description Enable L2TP secret Configure L2TP secret Configure to request an L2TP password. Set user certificate Set certificate from certificate store DNS lookup domains Enter L2TP password. Select the custom certificate used by the VPN server to identify you. Certificates can be imported from a VPN server or downloaded from the Internet. Select the certification authority (CA) used by the VPN server to identify you. Certificates can be imported from a VPN server or downloaded from the Internet. Entering the address of the DNS server. Connectivity 89 ›› Connecting to a private network 1 In Idle mode, open the application list and select Settings → Wireless & networks → VPN settings. 2 Select a private network to connect. 3 Enter your username and password, then click the Connect button. 90 Connectivity Tools ›› Setting a new alarm Clock 2 Press the key → Add alarm. 3 Configure the signal parameters. 4 When finished, select Done. select Clock. This section describes how to display the clock on the idle screen and how to set up and manage important event alerts. ›› Display the clock 1 In Idle mode, open the application list and select Clock. 2 Then you can do the following. Select to create or delete an alarm. To go to the "Gallery", select the item. To open the music player, select 1 In Idle mode, open the application list and ›› Turn off the alarm When the alarm sounds, do the following. To turn off the alarm, select Cancel. Select Pause to pause the alarm for the period between repeats. ... Select to return to the idle screen. Tools 91 Calculator 1 In Idle mode, open the list of applications and This section describes how to use a calculator, which is similar in function to a pocket calculator or desk calculator. 2 Select a folder and file. 1 In Idle mode, open the application list and select Calculator. 2 Use the calculator keys shown on the display to perform basic arithmetic operations. 3 Press the key → Additional panel to switch to the technical calculator mode. My files This section describes how to quickly access pictures, videos, music, sound and other files stored on the memory card. 92 Tools select My files. To go to the parent directory, select Up. Select Home to return to the main directory. 3 Select a file to open. While in a folder, press [the following options. ] to access To send the file to others via MMS, e-mail, or Bluetooth, select Send. To create a new folder, select New Folder. To delete a file or folder, select Delete. To change the view mode, select View. on. To sort files or folders, select Sort By. To perform additional actions on the file, such as moving, copying, or renaming, select Options. SIM menu Use of additional services offered by your mobile operator. The availability and labeling of this menu item depends on the SIM or USIM card. In Idle mode, open the application list and select SIM menu. Task Manager With the Task Manager, you can view running applications, their size, memory usage, and capacity random access memory... 2 Change the following options. Active: View a list of running applications. Package: View the size of the applications installed on your phone. RAM: Check and manage your phone's RAM. Summary: View the used and available memory on your phone and memory card. Help: View help information for extending battery life. ThinkFree Office This section describes how to create and view documents on your phone. If you have a ThinkFree web service account, you can do this online. The phone supports the following file formats: txt, doc, docx, xls, xlsx, ppt, pptx, pdf. 1 In Idle mode, open the application list and select Task manager. Tools 93 ›› Create a new document 1 In Idle mode, open the application list and ›› View and edit documents on your phone, select ThinkFree Office. 1 In Idle mode, open the application list and Accept to accept the terms of the agreement. 2 Select My Documents → select a document. 3 View and edit the document according to 2 When starting the application for the first time, select 3 To activate ThinkFree Office, select Activate now → Close. 4 Select My Documents. 5 Press the key → New → specify the type of document. 6 Enter a name for the document and select OK. 7 Create document content using the tools at the bottom of the screen. 8 When you are finished editing, select the toolbar item or [on] → File → Save. select ThinkFree Office. with your preferences. You can also zoom in on the document by touching the screen with two fingers and spreading them apart or bringing them together. To open the toolbar for editing documents ( Word files , Excel, or plain text files), press the key → Edit. To search for a specified phrase in the text of the document, press the key → Search. 4 When finished, save your document. 94 Tools ›› Manage documents with Voice search 1 From Idle mode, open the application list and Use voice recognition to dial a number, send messages, or search for location and information using your voice. online, select ThinkFree Office. 2 Select Internet. 3 Enter your username and password to access This feature may not be available depending on your region or service provider. account and select Sign in. 1 In Idle mode, open the application list according to your preference. 2 Select Talk. 3 Speak the keyword into your phone microphone. 4 View and edit the document on the server, select Voice Search. Tools 95 Settings Using the settings menu 1 In Idle mode, open the application list and select Settings. ›› Wi-Fi settings Wi-Fi: Activate or deactivate the WLAN function with. 83. Network Notification: Notification of an available open network. Add Wi-Fi network: Manually add WLAN hotspots. 2 Scroll to the category you want and select one of the ›› Bluetooth settings Wireless & networks Device name: Select a name for your phone. Open: Allow other settings to discover your phone. This section describes how to change the wireless network connection settings. ›› Offline mode Disable all wireless phone functions. Only non-network phone features can be used. 96 Bluetooth settings: Turns Bluetooth wireless technology on or off p. 81. Bluetooth devices. Search for devices: Search for available Bluetooth devices. ›› Tethering and hotspot USB tethering: Set up your phone as a wireless modem for your PC and share your mobile network connection using USB. When connected to a PC, the phone acts as a wireless modem with. 86. Mobile AP: Set up your phone as a portable WLAN hotspot for PCs and other devices and share your mobile network connection using the WLAN function c. 87. Mobile AP Settings: Configure the settings for the WLAN hotspot. ›› VPN settings Set up and connect to virtual private networks (VPNs) from. 88. ›› Mobile networks Packet data: packet data transmission. Set to enable packet data transmission. Data roaming: Connect your phone to another network when you are roaming or when your home network is unavailable. Access Points: Set access point names (APNs). 2G networks only: Connects your phone to 2G networks only. Network operators: Search for available networks and select a network for roaming. Calls Configure call settings. ›› FDN Numbers Enable FDN: Activate or deactivate FDN mode to restrict outgoing calls to numbers other than those on the FDN list. You will need to enter the PIN2 code supplied with the SIM or USIM card. Change PIN2: Change the PIN2 used to protect the main PIN. FDN List: Set up a contact list for fixed dialing numbers. ›› Service Provider Select your mobile operator's voicemail service. You can also select other voicemail services if you've downloaded the apps that support them. Settings 97 ›› Voicemail number Enter the number to access your voicemail. This number can be obtained from your mobile operator. ›› Call forwarding Forward incoming calls to another number. ›› More options Caller ID: Display your photo to other people on an outgoing call. Call waiting: Allow an incoming call to ring during a call. Sound Change the settings for phone sounds. Silent profile: Mute all phone sounds except media and alarms. Vibration: Set your phone to vibrate to alert you to various events. 98 Settings Volume: Adjust the volume for ringing tones, music, videos, alarms and notifications, and system sounds on your phone. Phone ringtone: Select a ringtone for incoming calls. Notification ringtone: Select a ringtone for notifications, such as incoming messages and missed calls. Dial tone: Set the phone to sound when you touch a key on the dialing screen. Tap sound: Set a tone to sound when you select an application or option. Screen lock: Set the phone to beep when you lock or unlock the touch screen. Display Adjust display settings. Wallpaper - Home screen wallpaper: Select a background image for the idle screen. - Lock Screen: Select a background image for the locked screen. Font Style: Select a font for displaying text. Additional fonts can be downloaded from the Android Market by selecting Get Fonts From The Web. Brightness: Adjust the brightness of the screen. Auto-rotate screen: Set your phone to automatically change orientation when rotated. Animation: Activate animation when switching between applications. Screen Timeout: Set the time to wait before turning off the display backlight. Horizontal Calibration: Calibrate the geomagnetic sensor if the compass or augmented reality app provides incorrect information. GPS and security Change the settings for securing your phone, SIM or USIM card, and the GPS function. Wireless & networks: Set to detect your location using a WLAN and / or mobile network. Use GPS: Activate GPS satellite to determine your location. Set screen lock: Set the phone unlock code. After setting the unlock code, the parameter changes to Change lock. screen. - No: Unlock the screen. - Pattern: Set the unlock pattern to unlock the screen. - PIN: Set a numeric PIN to unlock the screen. - Password: Set an alphanumeric password to unlock the screen. Use Picture: This option controls whether the picture will be shown at the time of drawing. Tactile Link: Activate vibration when creating an unlock pattern. Settings 99 SIM card lock settings: - SIM card lock: Activate or deactivate the PIN code request when the phone is switched on. - Change SIM PIN: Change the PIN required to access data on the SIM or USIM card. Visible passwords: Set your phone to show your password as you type. Select Administrators: View the administrators installed on the device. You can enable administrators to apply new policies to phone behavior. Safe storage: use certificates and credentials to securely work with various applications. Install from SD card: Install encryption certificates from the memory card. Set Password: Create and confirm a password for accessing credentials. Clear storage: Remove identity content from your device and reset your password. 100 Application Settings Change the settings for managing installed applications. Unknown Sources: Allows downloading applications from any source. If this option is not selected, apps can only be downloaded from the Android Market. Manage applications: Access the list of applications installed on your phone and view their details. Running services: View and navigate to the services in use. Development: - USB debugging: this is necessary for developing the application. When you connect your device to a PC with a data cable, USB debugging mode is automatically enabled and Samsung Kies is launched. - Disable Sleep Mode: Turns on the display backlight while charging the battery. - Location emulation: Send mock location data and service information to location service for verification. This is required for application development. Samsung Apps: Select a network connection method (WLAN or packet data network) to receive app update notifications from Samsung Apps. This feature may not be available depending on the region or service provider. Accounts and sync Change the auto sync settings and manage accounts for sync. Background data: Turn on the automatic function. Privacy Change options for managing settings and data. Data backup: Back up your phone settings to a Google web server. Auto-recovery: Set to restore application data if it is installed on your phone again. Factory data reset: Reset the settings to the factory default values. Phone storage View information about memory cards and device memory, and format the memory card. synchronization. Data will automatically sync in the background without opening any applications. Auto sync: Set to automatically sync contacts, calendar events, and email. Settings 101 Search Language & keyboard Change the Google search settings. Change text input options. Google search settings: - Search hints: Set the phone to be output ›› Select a language for prompts when entering a keyword. - Send to Google: Set your phone to use your current location for search and other Google services. - Search History: Set your phone to display the search history of your Google account. - Search History Management: Manage the search history of your Google account. Search Sources: Select the type of items to include in your search. Remove Search Shortcuts: Removes recent searches. Select the display language for all menus and applications. ›› Swype Language: Select a language for text input. For some languages, text input is not supported. To enter text, you must change the input language to one of the supported languages. Word Suggestion: Set your phone to show word suggestions as you type and suggest suggestions. Audio Response: Set to alert you when there are no other word suggestions after double-tapping. Incl. ind. hints: Set your phone to alert you by flashing the indicator. Autospace: Set your phone to automatically insert a space between words. 102 Auto settings. title. Letters: Set the phone to automatically capitalize a letter after punctuation marks such as a period and question or exclamation marks. Full Curve Display: Displays the path of your fingers across the keyboard. Word selection window: Sets the frequency of the word list display. Speed and Accuracy: Adjust the balance between speed and accuracy. Help: Go to Help for using the Swype keyboard. Tutorial: Help to quickly type words on the Swype keyboard. Version: View version information. ›› Samsung Keyboard Keyboard Types: Select one of the keyboard types (QWERTY or traditional) or handwriting. Input language: Select a language for text input. For some languages, text input is not supported. To enter text, you must change the input language to one of the supported languages. XT9: Activate XT9 mode for easier typing. XT9: enable additional opportunities XT9 modes such as autocomplete, autocorrect and autocorrect words, and create your own word list. Swipe: Activate or deactivate the keyboard swipe feature. To switch the text input mode, swipe left or right on the keyboard. Capital letters: Set the phone to automatically capitalize a letter after punctuation marks such as a period and question or exclamation marks. Handwriting: Set the recognition time for handwriting. Voice input: Activate the voice input feature on the Samsung keyboard. Settings 103 Auto point insertion: Inserts a point when you double-tap the spacebar. Help: Help typing words on the Samsung keyboard. Voice input and output Change the settings for the voice recognition and text-to-speech features. ›› Voice service options Language: Select a language for the Google voice recognition feature. Safe Search: Set up filtering for taboo words or images in voice search results. Obscene filter. Words: Remove offensive words recognized by your phone from voice search results. Show suggestions: Set to display suggestions for words or phrases for the voice search function. 104 Settings ›› Text-to-speech Listen to an example: Listen to a sample of text. To convert text to speech, you need to install voice data. Always use my settings - the phone will use the settings you specified for applications instead of the default ones. Default module: Select a voice module for speaking text. Install Voice Data: Download and install voice data for text-to-speech. Speech Rate: Select the reading speed for text-to-speech. Language: Select a language for the text-to-speech feature. Modules: View text-to-speech modules downloaded from the Android Market. Accessibility 24-hour format: Display the time in 24-hour format Configure accessibility settings. Date format: Select a date format. Accessibility: Turn on accessibility apps, such as Talkback or Kickback, that let you customize feedback such as voice comments, ringing tones, or vibrations. Certified. call key. Power off: Set your phone to end a call when you press a key. format. Phone information View information about your device, check its status, and give tips on how to use it. Date & Time Change the following options to control the time and date format. Automatic: Automatically updates the time as you move through time zones. Set Date: Manually set the current date. Select time zone: Select a time zone. Set time: manually set the current time. Settings 105 Troubleshooting When you turn on your phone or use it, you are asked to enter one of the following codes: Code Password PIN Code Possible solution If the lock function is enabled, you must enter the phone password. When you switch on your phone for the first time, or if the PIN check function is enabled, you must enter the PIN received with the SIM or USIM card. This feature can be disabled in the SIM card lock menu. 106 Troubleshooting PUK code PIN2 code Possible solution Usually, the SIM or USIM card is blocked after you enter the wrong PIN code several times. In this case, you must enter the PUK code provided by your mobile operator. When accessing a menu that requires a PIN2 code, enter the PIN2 code supplied with the SIM or USIM card. For more information, contact your mobile operator. The display shows “Service unavailable” or “Network error” In some areas, the network signal is so weak that the phone's network functions cannot be used. Move to a place where the signal is more stable. Some features require activation to be used. Contact your mobile operator for more information. The touch screen is slow or does not respond well to touch If the touch screen does not respond properly to touch, try the following. Remove the protective film from the screen. The protective film can interfere with the correct recognition of the input. It is not recommended to use it with a touch screen. Keep your hands clean and dry when touching the touchscreen. Turn your phone off and on again to troubleshoot temporary software problems. Make sure your phone has the latest software. If the touchscreen is scratched or damaged, contact a Samsung service center. Your phone freezes or has fatal errors If your phone freezes, you need to close all applications or reset the settings. If the phone is not working and the application is not responding, press and hold the key for 8-10 seconds. The phone will automatically reboot. If the problem persists, reset your phone. In Idle mode, open the application list and select Settings → Privacy → Factory data reset → Restart phone → Erase everything. Calls are dropped In some places, the network signal is so weak that you cannot use your phone's network features. Move to a different location and try the call again. Troubleshooting 107 Outgoing calls do not go through Make sure you press the call button. Make sure your phone is connected to the correct network. Make sure that call barring is not activated for this phone number. Incoming calls do not go through Make sure the phone is turned on. Make sure your phone is connected to the correct network. Make sure that the call barring feature is not activated for this phone number. The other party cannot hear you. Check to see if the built-in microphone is blocked. Make sure you hold the microphone close enough to your mouth. If using a telephone headset, check if the connection is correct. 108 Troubleshooting Poor conversation sound Make sure the internal antenna of your device is not blocked. In some places, the network signal is so weak that it becomes impossible to use the network functions of your phone. Move to a place where the signal is more stable. Calling a number from the contacts list does not work Make sure that the correct number is stored in the phonebook. Enter and save the correct number if necessary. Make sure that the call barring feature is not activated for this phone number. The phone beeps and the battery icon flashes. The battery is low. Replace or charge the battery to keep using your phone. The battery does not fully charge or the phone turns off The battery contacts may be dirty. Wipe both yellow contacts with a clean, soft cloth and try charging the battery again. If the battery does not fully charge afterwards, dispose of the old battery properly and replace it with a new one (contact your local authority for disposal instructions). Your device heats up When you use applications that consume a lot of power for a long time, your phone may feel warm. This is normal and will not affect the performance of the phone or shorten its lifespan. Error messages appear when I turn on the camera To use the camera function, there must be sufficient free space in the memory of your Samsung phone and the battery must be fully charged. If error messages appear when turning on the camera, try the following. Charge the battery or replace it with a fully charged one. Free up space on your phone by copying files to your PC or deleting them. Reboot your phone. If this does not solve the problem, contact a Samsung Service Center. Troubleshooting 109 Error messages appear when activating the FM radio The FM radio application on your Samsung phone uses the headset cable as an antenna. Without a headset connected, the FM radio will not be able to receive the signal from radio stations. To use the FM radio, you first need to make sure the headset is properly connected. Then search for available radio stations and save them. If this does not solve the problem, try connecting to the desired radio station using a different radio. If it successfully receives the radio signal, the phone may need to be repaired. Contact Samsung Service Center. Error messages appear when playing music files Your Samsung phone may not play some music files for a variety of reasons. Try the following to fix them. 110 Troubleshooting Free up space on your phone by copying or deleting files to your PC. Make sure the music file is not DRM protected. Otherwise, you must have a license or reproduction key. Make sure your phone supports this file type. I can't find another Bluetooth device Make sure that Bluetooth wireless technology is turned on on your phone. If necessary, make sure Bluetooth wireless technology is turned on on the device you want to connect to. Make sure your phone and Bluetooth device are within 10 meters of each other. If this does not solve the problem, contact a Samsung Service Center. I cannot connect my phone to my PC Make sure the PC data cable you are using is compatible with your phone. Make sure your PC has the correct drivers and updates. Troubleshooting 111 Precautions Protect the charger and battery from short circuits. Do not drop or shock your phone or battery. The following information will help you avoid personal injury or damage to your phone. Do not charge your phone with any charger that has not been approved by the manufacturer. Warning: Preventing Electric Shock, Fire, or Explosion Your device may malfunction and increase the risk of electric shock. Do not use damaged power cords or plugs or sockets that are not firmly attached to the wall Do not touch the plug with wet hands or disconnect the phone by pulling the plug Avoid kinking or damaging the power cord Do not use the phone while charging or touch it with wet hands 112 Measures Precautions Do not use the device during thunderstorms. Do not use damaged or leaking lithium-ion batteries. For safe disposal of lithium-ion batteries, contact your nearest authorized service center. Handle and dispose of batteries and chargers with care. Use only Samsung-approved batteries and chargers. Incompatible batteries and chargers can cause serious injury and damage to your phone. Never dispose of batteries or the phone in a fire. Follow all local regulations when disposing of used batteries and devices. Do not place batteries or phones on top of or inside heating appliances such as microwave ovens, stoves, or radiators. The battery may explode if heated too hot. Never break or puncture batteries. Do not expose the battery to high external pressure, which may cause an internal short circuit or overheating. Protect your phone, batteries and chargers from damage Protect your phone and battery from extreme temperatures. Temperatures that are too high or too cold can damage your phone and negatively affect the capacity and life of the battery. Do not allow batteries to come into contact with metal objects, as this can create contact between the poles of the battery and cause it to be permanently or temporarily damaged. Do not use damaged chargers or batteries. Carefully! Observe all safety warnings and regulations when using your phone in areas where it is prohibited. Switch off your phone when prohibited. Read all regulations that restrict the use of your phone in certain areas. Do not use your phone near electronic devices Most electronic devices emit radio frequency signals. The phone may interfere with their operation. Do not use your phone near a pacemaker Keep your phone at least 15 cm away from your pacemaker when the phone is switched on. This distance should be observed strictly. To reduce the impact of the phone on the pacemaker, hold the phone to your right ear if the pacemaker is on the left side of your chest, and vice versa. Safety Precautions 113 To avoid interference with medical devices, do not use the phone in hospitals. If you use any medical device, check with the manufacturer to ensure that the device does not emit radio frequency signals. If you are using a hearing aid, please contact the manufacturer for information on how to interact with your phone When your phone is on, it may interfere with some hearing aids. To avoid causing damage to your hearing aid, please contact the manufacturer. Switch off your phone in a potentially explosive environment In a potentially explosive environment, switch off your phone without removing the battery. In a potentially explosive environment, strictly follow all directions, instructions and warning signs. Do not use your phone at a refueling point (service station), or near fuel or chemical containers or explosive objects. Do not store or carry flammable liquids, gases, or explosives in the same compartment as the phone, its parts, or accessories. 114 Safety Precautions Switch off your phone on board aircraft Using your phone on board aircraft is strictly prohibited. Your phone can interfere with electronic navigation equipment on an aircraft. Your phone can interfere with the electronic equipment of motor vehicles due to the radiated radio signals. Radio signals emitted by your phone can interfere with the electronic equipment of your vehicle. Contact your vehicle manufacturer for more information. Observe all warnings and guidelines for using mobile phones while driving. Safety is paramount when driving. Never speak on the phone while driving unless prohibited by law. For your safety and the safety of others, be careful and follow these guidelines. Use a speakerphone. Use phone features such as speed dialing and redialing. They will speed up making a call or receiving a call. Place your phone in an easily accessible place. Provide that the phone can be used without taking your eyes off the road. An incoming call at an inconvenient time can be answered by the answering machine. Tell your interlocutor that you are driving. In case of heavy traffic or bad weather conditions, postpone the conversation. Rain, sleet, snow, ice and heavy traffic can lead to accidents. Do not take notes or look through the list of phone numbers while driving. Browsing through a to-do list or phonebook entries distracts the driver from his primary responsibility - driving safely. Dial the number by touch without being distracted from driving. It is recommended to dial the number while stopping or before driving. Try to make calls when the vehicle is stationary. If you need an outgoing call while driving, dial only a few numbers, look at the road and in the mirrors, and only then continue dialing. Do not engage in important or emotional conversations that might distract you from the traffic environment. Tell people you are talking to that you are driving and postpone conversations that might divert attention from the traffic situation. Use your phone to call emergency services. In the event of a fire, traffic accident or health hazard, dial the local emergency number. If there is a threat to the lives of others, use the phone to call the emergency services. If you witness a road traffic accident, crime or other life-threatening incident, call the emergency services. If necessary, call the road transport service or the specialized technical assistance service. If you see a broken, non-hazardous vehicle, a damaged road sign, a minor traffic accident in which no one is injured, or a stolen vehicle, call the road transport service or specialized technical assistance. Safety precautions 115 Proper care and use of your phone Avoid getting wet on your phone Any type of moisture and liquids can damage parts or electrical circuits of your phone. If your phone gets wet, remove the battery without turning on the phone. Wipe the phone with a towel and take it to a service center. If water gets inside the phone, the moisture indicator will change color. Moisture will void the manufacturer's warranty. Do not use or store your phone in dusty or dirty areas Dust can cause your phone to malfunction. Do not place the phone on an inclined surface. If dropped, the phone may be damaged. Do not store your phone in hot or cold temperatures. Use your phone in temperatures between –20 ° C and 50 ° C Leaving your phone inside a car may explode, as the temperature inside a car can reach 80 ° C. Do not expose your phone to direct sunlight for extended periods (for example, place it on the dashboard of a car). Store the battery at temperatures between 0 ° C and 40 ° C. Avoid touching your phone with metal objects such as necklaces, coins or keys, otherwise it may deform or malfunction. If the battery contacts come into contact with metal objects, this could result in a fire. Keep your phone away from magnetic fields Exposure to magnetic fields can cause your phone to malfunction or drain the battery. Exposure to magnetic fields can also damage magnetic stripe cards such as credit and telephone cards, bank books, and boarding passes. Do not use cases or accessories with magnetic closures, and keep your phone away from prolonged exposure to magnetic fields. 116 Safety Precautions Keep the phone away from heaters, microwave ovens, hot kitchen equipment, or high pressure containers. The battery may leak. The phone may overheat and cause a fire. Do not drop the phone or apply force to it. The phone display may be damaged. If bent or deformed, the phone case may be damaged and circuitry may malfunction. If your phone is equipped with a flash or torch, do not use them too close to the eyes of people or animals. This may cause temporary loss of vision or damage to the eyes. Maximizing Battery and Charger Life Do not charge the battery for more than a week, as overcharging may shorten battery life. Unused batteries discharge over time and must be recharged before use. Unplug the charger when not in use. Use batteries only for their intended purpose. Use only manufacturer-approved batteries, chargers, accessories, and components. universal batteries and chargers can shorten the life of your phone and cause it to malfunction. Samsung is not responsible for the safety of users using accessories and components not approved by Samsung. Do not bite or lick your phone or battery. This could damage or explode your phone. If children use the phone, make sure they are using it correctly. Observe the following instructions when talking on the phone. Hold your phone upright, like a landline phone receiver. Speak directly into the microphone on your phone. Avoid touching the internal antenna of the device. Touching the antenna may reduce the signal strength or cause a stronger radio signal to be transmitted than necessary. Safety Precautions 117 Do not grip the phone, press the keys lightly, use accessibility features to reduce the number of button presses (such as templates or easy typing), and take regular breaks. Protect your hearing Prolonged exposure to sound at very high volumes can damage your hearing. High volume sound can be distracting while driving. Do not attempt to disassemble, repair, or modify the phone yourself. Any changes to the phone will void the manufacturer's warranty. If your phone malfunctions, contact a Samsung service center. Do not disassemble or poke the battery with sharp objects, as this may result in an explosion or fire. your attention and lead to an accident. Do not repaint or attach volume level stickers to the device. Set the volume to the lowest level at which you can maintain a conversation or listen to music. Paint and stickers can interfere with the normal operation of moving parts. If you experience an allergic reaction to paint or metal, such as itching, eczema, or swelling, you should immediately stop using the device and consult a doctor. Reduce each time you plug in headphones. Use caution when talking on the phone while walking or moving. Always assess your surroundings to avoid injury. Do not carry your phone in your back pocket or on your belt. Dropping onto the phone could result in injury or damage to the device. Follow these instructions when cleaning your phone. Wipe your phone and charger with a towel or rubber sponge. Wipe the battery contacts with a cotton swab or towel. Do not use chemicals or detergents. Do not use your phone if the display is damaged or broken Broken glass or acrylic paint can injure your hands and face. Take your phone to a Samsung service center for repair. 118 Precautions Use the phone only for its intended purpose. Protect the card from strong shocks, static electricity, and observe proper etiquette when using the phone in public places. Do not touch the gold-colored contacts on memory cards with your fingers. Do not allow children to use the phone. The phone is not a toy. Children can injure themselves or others, damage the phone itself, or make unwanted calls. Install mobile devices and equipment carefully Ensure that mobile devices or equipment installed in the vehicle are securely fastened. Do not place your phone and its accessories in or near an airbag deployment area. Improper installation of wireless equipment can result in serious injury if the airbag is deployed. Trust the phone to be repaired only by qualified specialists. Unqualified repairs may damage the device and void the warranty. electrical interference from other devices. metal objects. Wipe a dirty card with a soft cloth. Access to emergency services In some areas and circumstances, it is not possible to make emergency calls. If traveling to remote or unattended areas, consider a different method of contacting emergency services. Always back up important data Samsung is not responsible for lost data. Prohibiting the Distribution of Copyright Protected Material Redistribution of recordings that contain copyrighted material without the permission of the respective owners is prohibited. This is a violation of copyright law. The manufacturer is not responsible for any illegal use of copyrighted material. Handle SIM and memory cards with care Do not remove the card while transferring or receiving data, as this may result in loss of data and / or damage to the card or device. Safety Precautions 119 Specific Absorption Rate (SAR) certification information Your device has been manufactured to comply with the EU Council's guidelines for exposure to radio frequency (RF) energy. These standards prohibit the sale of mobile devices that emit radiation levels (called SAR) in excess of 2 watts per kilogram. The highest SAR value for this model phone is 0.791 watts per kilogram. In normal use, the SAR is much lower as the device uses only the radio frequency energy necessary to transmit a signal to the nearest base station. By automatically reducing radiation exposure, the device reduces the total amount of RF energy emitted. The EU Declaration of Conformity on the back cover of this user manual indicates compliance with the European Radio & Terminal Telecommunications Equipment (R & TTE) directive. For more information on SAR and EU standards, visit the Samsung website. 120 Precautions Correct Disposal of This Product (Waste Electrical & Electronic Equipment) (These regulations apply in the European Union and other European countries with separate waste collection systems) This symbol indicates that the product and its electronic accessories (e.g. charger, headset, USB cable) ) at the end of their service life must not be disposed of together with household waste. The product and its electronic accessories are kept separate from other waste. Information about where and how the product is disposed of in accordance with environmental regulations can be obtained from the retailer or the appropriate government agency. Business users should contact the supplier and review the terms of the purchase agreement. Do not dispose of the product and its electronic accessories with other industrial waste. Correct Disposal of Batteries for This Product (For the EU and other European countries with separate battery return systems) This marking on the battery, manual, or packaging indicates that the batteries used in this product should not be disposed of with other household waste. end of service life. The chemical symbols Hg, Cd or Pb indicate that the battery contains mercury, cadmium or lead in quantities exceeding the reference level in EU Directive 2006/66. If batteries are not disposed of correctly, these substances can harm human health or the environment. To protect natural resources and to reuse valuable materials, separate batteries from other waste and recycle them through your local free battery exchange system. Disclaimer Certain Content and Services this device are owned by third parties and are protected by copyright, patent, trademark and / or other intellectual property laws. Such content and services are intended solely for your personal, non-commercial use. You may not use any content or service in a manner other than that specified by the content owner or service provider. Without being limited to the foregoing, unless expressly approved by the owner of the relevant content or service provider, it is prohibited to modify, copy, republish, download, post, translate, sell, create derivative works, operate or distribute in any way or medium any content or service installed on this device. THIRD PARTY CONTENT AND SERVICES ARE PROVIDED "AS IS". SAMSUNG MAKES NO WARRANTY, EXPRESS OR IMPLIED, FOR THE USE OF SUCH CONTENT OR SERVICES FOR ANY PURPOSE. SAMSUNG EXPRESSLY DISCLAIMS ANY IMPLIED WARRANTY, INCLUDING, BUT NOT LIMITED TO, MERCHANTABILITY AND FITNESS FOR A PARTICULAR PURPOSE. SAMSUNG DOES NOT GUARANTEE THE ACCURACY, VALIDITY, TIMELINESS, LEGALITY, OR COMPLETENESS OF ANY CONTENT OR SERVICE MADE AVAILABLE THROUGH THIS DEVICE AND UNDER NO CIRCUMSTANCES, INCLUDING NEGLIGENCE, SHALL SAMSUNG BE LIABLE, WHETHER IN CONTRACT OR CIVIL Precautions 121 TORT, FOR ANY DIRECT, INDIRECT, RANDOM, SPECIAL or consequential damages, ATTORNEY FEES, COST OR ANY DAMAGES ARISING OUT OF ANY DATA (OR IN CONNECTION WITH) CONTAINED IN ANY CONTENT OR SERVICE OR AS A RESULT OF USE OF YOU OR OTHERS EVEN IF YOU OR THEY HAVE BEEN INFORMED ABOUT THE POSSIBILITY OF SUCH DAMAGES. Third party services may be terminated or suspended at any time, and Samsung makes no explanation or guarantee that any content or service will be available at any time. Content and services are transmitted by third parties using networks and communication media over which Samsung has no control. Without limiting the universality of this disclaimer, Samsung expressly disclaims any responsibility for the suspension or suspension of the content or services available on this device. Samsung is also not responsible for customer service related to this content or service. Any questions or service requests related to content or services should be directed directly to the respective content or service providers. 122 Precautions Index Offline mode 17 Battery Charging 11 Setting 9 Entering Text 29 Web Browser Bookmarking 73 Web Browsing 71 Video Playback 57 Recording 53 Video Player 57 Calls Making 37 Headset 38 International Calls 38 Waiting 40 Answering 37 Reject 38 Forwarding 40 viewing missed 39 functions available during a voice call 38 gallery video playback 57 viewing photos 56 file formats 56 voicemail 42 date and time, installation 26 voice recorder playback 70 recording 70 task manager 93 file manager 92 call log 40 application downloads 33 files 34 notes view 70 create 69 internet see web browser calendar add events 68 view events 68 calculator 92 Index 123 camera video 53 camera setup 52 adjust video settings 55 take photos 48 memory card eject 15 install 13 format 15 google maps 74 access codes 106 To Package Contents 9 Contacts Import 67 Copy 66 Assign a Speed Dial 65 Search 65 Create 64 124 Index Locator 76 Music Player Play Music 58 Download Files 58 Create Playlists 59 Send 41 Browse 42 GPS and Security Settings 99 Wireless 96 Calls 97 date and time 105 privacy 101 memory 101 search 102 apps 100 phone information 105 accessibility 105 accounts and sync 101 languages and keyboards 102 news and weather 79 call waiting 40 call forwarding 40 PC connection Samsung Kies 87 removable disk 88 Bluetooth connections 81 DLNA 84 PC 87 WLAN 83 Google search 77 PIN code check 29 Silent profile 26 FDN mode 39 touch screen lock 22 use 20 WLAN turn on 83 search for networks and connect to them 84 signal turn off the signal 91 create 91 sync with account 35 messages setting Account 45 Sending MMS 41 Sending SMS 41 Sending Email Messages 45 Go to Voicemail 42 Text Notes 69 Phone Turn On or Off 17 Appearance 17 Status Icons 19 Keys 18 Customization 26 Settings 96 Link Bar 23 Phonebook Search for Contacts 65 Create Business Card 65 creating groups 66 creating contacts 64 photos panoramic shooting 51 viewing 56 continuous shooting 51 shooting 48 shooting with smile detection 50 shooting with scenes 50 idle screen adding panels 24 adding items 22 menu screen navigating 24 organizing applications 25 email setting up an account 45 sending 45 viewing 46 language 102 brightness, display 27 AllShare 84 Bluetooth activation 81 transferring data 82 searching for and connecting to devices 82 receiving data 82 Index 125 DLNA see p. AllShare FM radio listening 61 saving radio stations 62 Google Mail 43 Google Talk 46 Samsung Apps 79 Samsung Kies 87 SIM card blocking 29 setting 9 SMS messages sending 41 viewing 42 Social hub 47 126 Index of ThinkFree Office 93 USIM card blocking 29 setting 9 VPN connections 90 creating 89 YouTube sending video 78 watching video 77 PRODUCT CERTIFICATION INFORMATION Wearable subscriber radio (mobile phone) Samsung GT-S5660 is designed to work in mobile radiotelephone networks of GSM 900/1800 and WCDMA 2100 standards Dimensions (W / W / D): 57.5 x 110.5 x 12.15 mm Weight: 102 g. 1 Battery *: Standard, Li-Ion, 1350 mAh up to 630 hours standby time up to 600 minutes talk time CERTIFICATE OF CONFORMITY Wearable subscriber station of GSM 900/1800 standard and WCDMA 2100 GT-S5660 manufactured by Samsung Electronics Co., Ltd. certified by the certification body "ALTTEST" Certificate of conformity: ROSS KR.AB57.N00703 Certificate of conformity issued: 2010-07-26 Certificate of conformity valid until: 2013-07-25 Subscriber radio stations type GOST R 51318.22-99 GT-S5660 GOST R 51318.24 -99 meet the requirements of regulatory documents: Certification system GOST R GOSSTANDART RUSSIA Product service life: 3 years Brief characteristics: ¾ Android platform. ¾ Working bands (GSM850 / 900/1800/1900, WCDMA 900/2100). ¾ 3.2 "touchscreen TFT-display 16.7 million colors (320x480 pixels). Camera, video recording. 33.22 megapixel camera ¾ FM radio, MP3 player. ¾ 3.5 mm audio jack. ¾ Card slot microSD memory (up to 32Gb). ¾ WiFi 802.11b / g / n / Bluetooth 2.1 / USB 2.0 / GPS. ¾ SMS / MMS / E-mail. ¾ GPRS / EDGE / HSDPA. * Battery life depends on network configuration, distance to the base station, type of SIM card, terrain, etc. DECLARATION OF CONFORMITY Wearable subscriber radio station of GSM 900/1800 and WCDMA 2100 standard GT-S5660 manufactured by Samsung Electronics Co., Ltd. complies with the "Rules for the use of subscriber stations ( subscriber radio stations) mobile radiotelephone networks of GSM 900/1800 and WCDMA 2100 standards "Declaration acceptance date: The declaration is valid until: Federal Communications Agency of the Russian Federation Registration number: hi \ ^ Importer: Samsung Electronics Rus Company LLC 125009 Russia, Moscow, Bol. Gnezdnikovskiy per., 1, bldg. 2 Manufacturer: Samsung Ele ctronics Co. Ltd. Samsung Electronics Co. Ltd. Manufacturer's address: 416, Maetan-3dong, Yeongtong-gu Suwon, Gyeonggi-do, 443-742, Korea 416, Maetan 3-Dong, Yongtong-Gu, Suwon, Gyenggi-do, Republic of Korea Samsung Main Building 250, 2-Ka , Taepyung-Ro Chung-Ku, 100-742, Seoul, Korea Samsung Main Building, 250, 2-Ha, Tepeng-Ro, Chung-Ku, 100-742, Seoul, Republic of Korea Addresses of factories: "Samsung Electronics Co. , Ltd. ", 94-1, Imso-Dong, Gumi-City, Kung-Bak, 730-350, Republic of Korea" Tianjin Samsung Telecom Technology Co., Ltd., Weiwu Road, Microelectronics Industrial Park TEDA, Xiquin District Tianjin 300385 , China Samsung Electronics Huizhou Co., Ltd., Chenjiang Town, Huizhou, Guangdong Province, China Samsung Electronics Vietnam Co., Ltd., Yenphong Ai Industrial Park, Yentrang Kom Yong, Yenphong County, Baekninh Province, Vietnam Declaration Compliance (R & TTE) Samsung Electronics has confirmed that this GSM, WCDMA, Wi-Fi: GT-S5660 mobile phone to which this declaration relates is in compliance with the following standards and regulations: Safety EN 60950-1: 2006 + A11: 2009 SAREN 50360: 2001 EN 62209-1: 2006 EMC EN 301 489-01 V1.8.1 (04-2008) EN 301 489-07 V1.3.1 (11-2005) EN 301 489-17 V2.1.1 (05-2009) EN 301 489-19 V1.2.1 (11-2002) EN 301 489-24 V1.4.1 (09-2007) Network EN 301 511 V9.0.2 (03-2003) EN 300 328 V1.7.1 (10-2006) EN 301 908 -1 V4.2.1 (03- 2010) EN 301 908-2 V4.2.1 (03-2010) This declares that [all significant radio engineering tests have been carried out and that] the above product is in compliance with the fundamental requirements of Directive 1999/5 / EC. The conformity assessment procedure referred to in Article 10 and detailed in the Annex of Directive 1999/5 / EC was carried out with the involvement of the following organizations: BABT, Forsyth House, Churchfield Road, Walton-on-Thames, Surrey, KT12 2TD, UK * Identification mark: 0168 Technical documentation is stored at: Samsung Electronics QA Lab. and available upon request. (EU Representative) Samsung Electronics Euro QA Lab. Blackbushe Business Park, Saxony Way, Yateley, Hampshire, GU46 6GG, UK * 2011.02.09 Joong-Hoon Choi / Manager (place and date of issue) (name and signature of authorized person) * This address is not an address service center Samsung. For Samsung service center addresses and phone numbers, see your warranty card or contact your retailer. Some of the information in this manual may not match your phone, depending on the software installed and / or your mobile operator. Design, specifications and other data are subject to change without notice. Installing Kies (PC Synchronization) 1. Download the latest version of the Kies software from the Samsung website (www.samsungmobile.com) and install it on your computer. 2. Using a PC data cable, connect your phone to your PC. Samsung Kies will launch automatically. If it doesn't, double-click the Samsung Kies app icon on your computer. Samsung Kies launches For more information, see the Kies Help section. www.samsungmobile.com Russian. 03/2011. Rev. 1.0
Our goal is to provide you with a quick access to the content of the user manual for Samsung GT-S5660. Using the online browser, you can quickly view the content and go to the page where you will find a solution to your problem with the Samsung GT-S5660.
For your comfort
If viewing Samsung manuals GT-S5660 directly on this website is not convenient for you, there are two possible solutions:
- Full-screen view - To conveniently view the instructions (without downloading to your computer), you can use the full-screen view. To start viewing the user manual Samsung GT-S5660 on full screen, use the button Fullscreen.
- Downloading to computer - You can also download user manual Samsung GT-S5660 to your computer and save it in your archive. If you don't want to take up space on your device, you can always download it from ManualsBase.
Manual Samsung GT-S5660
Advertisement
Advertisement
Print version
Many people prefer to read documents not on the screen, but in the printed version. The option to print instructions is also provided and you can use it by clicking on the link above - Print instructions... You do not need to print the entire manual of Samsung GT-S5660, but only some pages. Save your paper.