Why rooting an Android device is needed and what opportunities it gives is known to a fairly large number of users, which cannot be said about the hidden advanced menu of hardware settings, also called the engineering menu. Few people know about these settings, and even fewer mobile device owners know how to use them. What is the Android engineering menu and why is it needed?
The Android engineering menu is nothing more than a special subroutine designed for developers to test the operating system and device sensors. The interface of this program is represented by a set of options that allow you to change the hardware configuration of the mobile device. With its help, you can get comprehensive information about the hardware of the gadget, test the processor, RAM and physical flash memory, wireless connection modes, adjust the settings of the camera, display, microphone, speakers, and much more.
Entering the engineering menu
All this, of course, is good, but how to enter the engineering menu if there is no corresponding option in the Android interface? Entering the advanced hardware settings menu is carried out using a special code entered in the line for dialing a telephone number. The menu should open immediately after entering the last character of the combination, but in some cases it may be necessary to press the call button.
There is nothing complicated in the procedure itself, however, it should be borne in mind that there are codes for different models of mobile gadgets. Below we have provided a list of codes for the most popular manufacturers.
The engineering menu codes in Android are universal, however, their correct operation on phones with "left" firmware is not guaranteed. You can also use special programs to access Android hardware settings, for example, "MTK Engineering Menu" or "Mobileuncle MTK Tools".

Such applications are especially useful on tablets, the firmware of which does not provide for the presence of a “dialer”. The interface and the set of available options in these programs are somewhat different, however, it will not be difficult to deal with them.
Whichever method you use, you need to exercise maximum caution when working with the engineering menu. Before starting work, it is strongly recommended to write down all the values of the original parameters in order to be able to restore the settings. Experimenting with the engineering menu just to find out what will come of it is unacceptable, as you can render your device unusable!
To get a list of engineering codes for a specific phone model, you can use a special application Secret Codes available on Google Play. On some models of mobile devices, full access to the engineering menu may require superuser rights (root).
What can be changed using the menu
You know how to get into the engineering menu, now let's find out what settings you can make with it. The possibilities are more than wide. The menu subroutine supports changing the speaker volume and microphone sensitivity, built-in camera settings, audio settings, GPS, Bluetooth and Wi-Fi modules, turning off unused frequencies to save battery power. You can also test key components of your device and an external memory card, adjust I / O operations, determine the exact temperature of the processor and battery, and determine the level of harmful electromagnetic radiation.
Another useful feature is access to the recovery mode - an analogue of the BIOS on computers, which in turn contains a whole set of settings. Recovery Mode features include resetting the device to factory settings, updating the firmware, creating a backup copy of the operating system, gaining root access, deleting sensitive user data. It is not possible to list all the options of the engineering menu within the framework of one article, the more sensors and components in the phone or tablet, the more extensive it will be.
Increase the volume of the phone through the engineering menu
And now we will demonstrate how to work with hardware settings using the example of one of the most popular operations and find out how to increase the volume on Android through the engineering menu. So, go to the menu using Mobileuncle MTK Tools or by entering the “magic” code, then find and open the Audio subsection. If you entered the menu through the Mobileuncle Tools program, this subsection will be located in the Engineer Mode high-order section, in other cases it is usually located on the Hardware Testing tab.

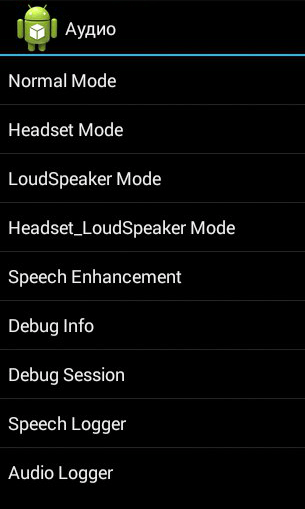
In the Audio subsection, the following options will be available to you:
- Normal Mode - the normal mode that works when a headset is not connected to the device.
- Headset Mode - headset mode, which is activated when headphones or speakers are connected to the smartphone.
- LoudSpeaker Mode - loudspeaker mode. Activated when the speakerphone is turned on, provided that a headset is not connected to the device.
- Headset_LoudSpeaker Mode - loudspeaker mode with a connected headset. The same as the previous one, but with headphones or speakers connected.
- Speech Enhancement - this mode is activated when talking on the phone without using the speakerphone.

There may be other settings in the section, for example, Debug Info and Speech Logger, but it's better not to touch them. Select the mode for which you want to change the volume level (let it be Normal Mode), select Type in the list that opens and indicate for which function we will change the volume. The following functions may be available:
- Ring - volume setting for incoming calls;
- Media - adjust the volume of the speakers when playing multimedia;
- Sip - sound settings for Internet calls;
- Sph - sound settings of the conversational speaker;
- Sph2 - sound settings of the second conversational speaker (option may not be available);
- Mic - change the sensitivity of the microphone;
- FMR - FM radio volume settings;
- Sid - it is better not to touch this parameter, otherwise there may be problems with the voice of the interlocutor.
Having selected a function, scroll through the current list, set the desired Value (from 0 to 255) and click to apply the new Set settings.

To change the volume level, you can also use the preset templates - the Level option. Most phones have seven levels, from 0 to 6. It is advisable not to touch the Max Vol setting, just as you should not set too high values for Value, otherwise the sound in the speakers will begin to wheeze. Other modes are configured in the same way in the Audio subsection.
Some models of smartphones and tablets require a reboot for the new settings to take effect.
Reset
And the last thing we'll look at today is resetting the engineering menu settings to factory defaults. It may be needed if, after making changes, the device began to work incorrectly. There are several ways to reset. If the system boots normally, go to the settings and open the "Recovery and Reset" subsection.


You can also reset the engineering menu by entering a special service code in the “dialer”. This is usually *2767*3855#, *#*#7780#*#* or *#*#7378423#*#*, but your phone model may require a different code.
Another option is to use the recovery mode, which was mentioned above. To get into it, use one of these combinations:
- Power button + volume down.
- Power button + volume up.
- Power button + Home button + volume up/down.
- Power button + volume up + volume down.
In the list of options that opens, select "wipe data / factory reset" → "Yes - delete all user data" → "reboot system now". The device will reboot and the settings will be reset.


There is another way to reset the engineering menu settings, but it requires superuser rights. Using any root-enabled file manager, navigate to the root directory of the system, and then delete all or part of the contents of the folder data/nvram/apcfg/aprdcl and reboot.

Files in a folder aprdcl just responsible for the settings of the engineering menu. It is not necessary to delete all files at once. If you screwed up, say, with the audio settings, to restore the original settings, it is enough to delete the files that have the audio string element in their names. And one moment. Regardless of how you reset it, always back up your personal data and apps as they can all be lost.
Not many people know about the existence of a menu with advanced device settings in the Android OS - engineering menu
. And someone knows, but does not know how to enter it and what to do with it.
In this article, we will show how to enter the engineering menu and some of its features.
You can enter the engineering menu simply by typing a special command (but I must add that this method does not work on all versions of Android and not on all devices)
The command to enter the engineering menu: *#*#3646633#*#*
Also, on some versions of Android, the command may work *#15963#* And*#*#4636#*#*
Immediately after entering, the command should disappear and the engineering menu will open. But on some devices, you still need to press the "Call" key
If this method does not work, you can use the alternative!
And it consists in installing the program (which, by the way, is freely available on Google Play) " Mobileuncle MTK Tools 2.4.0"

This program will open access to the engineering menu (that is, it will work similarly to a set of combinations*#*#3646633#*#*)
There are a lot of settings! The scope for experimentation is huge! You can debug and adjust almost EVERYTHING!
For clarity, let's briefly analyze the volume setting of the device:
We go into the program ---> select the section "Engineer Mode"


Because we are interested in setting the sound level, select ---> "Audio"

And voila, the menu of interest to us opens.

Max Vol - the same for the entire subsection, as a rule, it is set to 150 (you can change 0-160 - it changes if you select the Media item in the subsection).
If in some submenu, for example, Audio - Normal - Sph, the overall level is not available for adjustment, then enter another submenu, for example, Audio - Normal - Media - there you will be able to adjust the overall volume level.
Sub-points:
Sph - volume levels during a telephone conversation,
Mic - microphone sensitivity levels,
Ring - call volume,
Media - volume when playing music, movies, games.
Ring volume levels are set in Audio - LoudSpeaker - Ring
MaxVol=150
Levels: 120 130 145 160 180 200 (more starts wheezing)
Conversation volume levels in the phone speaker in Audio - Normal - Sph
MaxVol=150
Levels: 100 120 130 135 140 145 150
Microphone speaking volume levels in Audio - Normal - Mic
Levels: 100 172 172 172 172 172 172
Media volume levels are set in Audio - LoudSpeaker - Media
Levels: 110 130 160 190 210 230 250
All the same can be configured for the Headphone mode, by analogy:
Speaker volume levels are set in Audio - LoudSpeaker - Sph
Max Vol = 150 (it is the same for the entire section)
Levels: 80 100 110 120 130 140 150 (more starts wheezing)
Now all volumes are regulated in adequate ranges.
If you are not satisfied with the volume levels, you can set your own values (the larger the value, the greater the volume when adjusting the volume keys, or the greater the microphone sensitivity)
By analogy, you can customize most sections! Experiment!
And interesting features hidden from prying eyes.
Why are they hidden? Firstly, so that an inexperienced user does not break anything, and secondly, they are needed in especially rare cases and are not used regularly. Today we will talk about the engineering menu - a section for programmers, testers, geeks, experienced users and those who want to get into the very "heart" of the gadget's settings.
What is the engineering menu?
This is a special program or system partition that developers usually use at the final stage of configuring the software platform of a mobile device. With it, they make the latest changes to the operation of the device, check the functioning of various sensors and perform testing of system components. Also, the hidden functionality of the service menu is used to obtain a large amount of system information, conduct various tests (about 25 pieces) and configure any Android parameters - various sensors, mobile networks, equipment, etc.
The engineering, service or system menu is available on smartphones and tablets running on a MediaTek processor. On the Qualcomm chipset, it is either cut down or absent altogether.
Attention! This section is intended for advanced users who are fully responsible for the consequences. Careless actions can harm the file system and disable the smartphone.
How to enter the engineering menu?
To enter the engineering menu, you need to enter a special command in the dialing application: *#*#3646633#*#*. On some versions, the code *#*#4636#*#* or *#15963#* may work.
If the engineering menu code on Android did not work, or there is no dialing application on the phone (relevant for tablets that do not support calls), the MobileUncle Tools or MTK Engineering applications, which can be downloaded for free through Google Play, will help.
After entering the command or launching the application, the desired section will open. Perhaps it will immediately close - you need to have "Developer Mode" activated on your smartphone. To do this, go to the gadget settings, find the kernel version there and quickly click on it 5-10 times in a row.
Engineering menu functions
The engineering menu is divided into several categories, each of which will be discussed separately.
- Telephony. Here are all the settings related to mobile communications. For example, you can activate or deactivate certain BandModes (frequencies for 2G/3G/4G operation), check the operation of SIM cards, and even turn off mobile data transmission in the background.
- Connectivity: Configure Bluetooth, radio, Wi-Fi, and Wi-Fi CTIA settings. For example, in the radio settings, you can specify the radio wave, the type of antenna (you need to use headphones) and the sound format (mono or stereo). The radio will play directly from this section.
- Hardware Testing. In this section, you can configure the operation of various components of the device, in simple words, hardware: headphone and speaker sound levels, microphone sensitivity setting, various camera parameters (photo aspect ratio, ISO, HDR, focus adjustment and much more), touchscreen operation, sensors (calibration immediately) and so on. This category is very large and global, in each section you need to understand separately and have serious knowledge and skills.
- Location (Location). In this category, you can configure the GPS operation, see how many satellites the gadget has caught, and simply conduct tests.
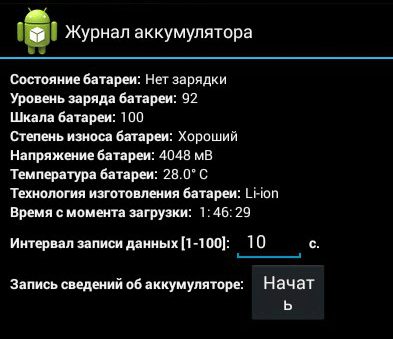
- Log and debugging (Log and Debugging). Here, logs (logs) of the battery (charge percentage, voltage, operating time, temperature) and other little-known functions are kept.
- Others. It contains two functions that are also unknown to the average user.
Engineering menu settings
The engineering menu opens up huge opportunities for setting up the phone, we will consider the most interesting ones in detail.
- SAR Test - determination of the level of harmful radiation from a smartphone or tablet.
- Connections - testing available types of wireless connection: Bluetooth, Wi-Fi, WLAN CTIA and FM receiver.

- Audio - control the sound in the speakers, microphone and headphones. How to increase the volume of Android through the engineering menu,.
- Camera - Set up various camera settings.

- Turning on the current camera - the indicator of the working current of the camera is displayed (in our tablet it is 2 mA).
- Load test of the CPU (central processing unit) - checking the stability of its operation, identifying errors in the operation of the processor-memory channel, testing the cooling system and power supply of the processor.
- Device Manager - Activate SMS auto-registration, manage configuration settings.
- Disable detection - setting the frequency of the signal.
- Display - Sets the Pulse Width Modulation rate cycle, which affects the perceived brightness of the screen by rapidly turning the backlight on/off; backlight setting; controller behind the vertical and horizontal lines of the display.

- Wake mode - activating it will not allow the device to "go" into sleep mode.
- IO - control of data input/output operations.
- Memory - detailed information about the RAM module.
- To the degree - detailed information about the battery (the strange title of the section is most likely due to errors in the automatic translation of names in the application, but there is no possibility to switch to English).
- SD card test - the name of the tab speaks for itself.
- Touch screen - test the sensitivity and reaction of the display when pressed, as well as set its additional settings.
- USB - testing the operation of the USB port.

- UART/USB switch - switching between two modes of data transfer.
- Sensor - calibration (setting the clarity and sensitivity) of the touch screen. Standard Methods.
- Location - Test GPS performance and determine the exact location.
- Battery log - Detailed information about the battery and the ability to activate the recording of information about the battery consumption.
- MTKLogger - collection of system logs (MobileLog, ModemLog and NetworkLog).
- Temperature gauge - shows the battery and processor.
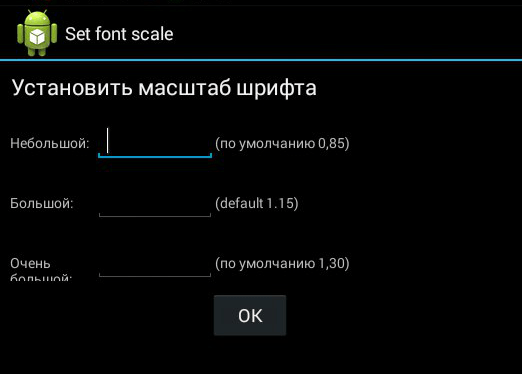
- Parameter font - change the font size.
When installing the application, some features may not be available without .
Xiaomi engineering menu
Despite the fact that our test Redmi 2 runs on a Qualcomm Snapdragon 410 processor, it also has the functionality we are interested in. To enter it, you need to tap on the "Kernel version" item several times in a row.

The menu is represented by five items:
- automatic test. Automatic test of all device parameters.
- Single Item Test. Each of the 25 tests is taken separately. We will discuss this in detail below.
- test report. Report on the passed texts and their results.
- SW add HW version. Information about the version of the smartphone, IMEI and other numbers.
- deviceview. Smartphone hardware data.

Of course, the most interesting point is the Single Item Test, where you can pass a huge number of tests.

Let's make a reservation right away that in the device we tested it was not possible to configure something - only a performance check. At the end of each procedure, its status should be noted: successful (success) or not (failed).
- Key - operability of physical buttons. It is interesting that it was not possible to pass it successfully, because when checking the power button, the smartphone goes out.
- Backlight - display brightness.

- touch panel. The touch screen test includes two procedures: "Crossed calibration" and "Touch panel calibration". The first checks the so-called "swipes", the second - single taps on the screen. An easy way to calibrate your display.

- TFlash. Testing a memory card with two results: either everything is in order, or the card is damaged.
- bluetooth. It searches for available devices.
- SIM card. SIM card test.

- vibration. The gadget vibrates - everything is ok.
- RTC (Real Time Clock) - operation of the built-in clock.
- Speaker. Conversational speaker testing. How to pass it, we did not understand. We will be grateful if you tell us in the comments.
- Receiver. It is translated as a receiver, recipient, but music plays during testing.
- Headset. Testing the 3.5mm jack for headphone detection, audio playback, and support for headset control buttons.

- LED. Notification indicator, everything is obvious here.
- FM (radio). We press the search for a wave (Search), and if noise is heard in the headphones, then everything is working properly.
- camera. Everything is obvious: a test of the main and front optics, as well as a flash.
- battery. An informative section with information about the correct operation of the USB cable (charging), battery status, its charge level and temperature. Similar data can be obtained more.

- WiFi. Detection of nearby access points. There are no settings.

- Torch (flashlight): shines / does not shine.
- The loopback test includes a speaking microphone test. First, click Recording (record), then Playing (playback).
- LCD. Screen colors.
- GPS. Finding available satellites.
- Gyro (gyroscope). Three parameters - X, Y, Z - change depending on the position of the device in space.
- G-sensor (Accelerometer). Twist the gadget in all planes and turn it over. Three parameters should take values ok.
- Proximity Sensor (proximity sensor). It is usually located near the speaker and is designed to turn off the screen of the gadget during a conversation, thereby eliminating accidental clicks.
- Optical and Magnetic Sensor (optical and magnetic sensors) - items that are incomprehensible to us, share your knowledge in the comments.
After passing all the tests, you can go to the Test Report section. As you can see, our "animal" is in great shape and passed all the tests, which is very pleasing.

conclusions
Above, we have listed the main sections of the engineering menu available on the tested devices. Now let's summarize what features the user gets during installation:
- Formatting, resetting to factory settings.
- Testing the operation of individual elements of a smartphone or tablet, such as sensors, touch screen sensitivity and calibration accuracy.
- Detailed information about the device and its parts. For example, you can track the battery consumption since the last charge and view the statistics of the programs used.
- Energy optimization. As an option, unnecessary frequency ranges are turned off. In Russia, the standard indicators for working in 2G and 3G networks are 900 and 1800 MHz, while in the USA - 850 and 1900 MHz.
Android smartphone manufacturers implement and use the engineering menu to test devices. It contains all kinds of tests and device settings that are not available to ordinary users. However, today, knowing the USSD command or downloading the application from PlayMarket, anyone can enter the engineering menu.
Why do you need a hidden engineering menu in Android
The Engineering Menu (Engineering Mode) is an inherently hidden application that developers use to test and set the optimal parameters for a mobile phone or tablet. Specialists check the operation of sensors and, if necessary, make adjustments to the functioning of system components.
When working with the Android technical menu, be careful - changing some of the functions leads to malfunctions of the device.
How to enter the menu
To open the menu set by the manufacturer, activate the dial pad on your smartphone and enter one of the USSD commands presented in the table. After entering the command, the numbers will disappear from the screen, and a menu will open instead.
Table: combinations to start Engineering Mode
| Device manufacturer | Team |
| Sony | *#*#7378423#*#* |
| *#*#3646633#*#* | |
| *#*#3649547#*#* | |
| Philips | *#*#3338613#*#* |
| *#*#13411#*#* | |
| ZTE, Motorola | *#*#4636#*#* |
| HTC | *#*#3424#*#* |
| *#*#4636#*#* | |
| *#*#8255#*#* | |
| Samsung | *#*#197328640#*#* |
| *#*#4636#*#* | |
| *#*#8255#*#* | |
| Prestigio | *#*#3646633#*#* |
| LG | 3845#*855# |
| Huawei | *#*#2846579#*#* |
| *#*#14789632#*#* | |
| Alcatel, Fly, Texet | *#*#3646633#*#* |
| Smartphones and tablets with a MediaTek processor (most Chinese devices) | *#*#54298#*#* |
| *#*#3646633#*#* | |
| Acer | *#*#2237332846633#*#* |
Video: how to work in Engineer Mode
If the code does not work, and you cannot start the service menu in the standard way, use third-party applications - you can download them on PlayMarket. Recommended programs - "Start the MTK engineering menu", Mobileuncle Tools, Shortcut Master.
Manufacturers menu does not work on some device models with Android 4.2 JellyBean (x.x.1, x.x.2) and Android 5.1 Lollipop. Also, the menu is invalid when the Cyanogen Mod firmware is installed. In Android 4.4.2, the changes made in the application are reset on reboot.
"Launching the MTK engineering menu"
The application allows you to open and configure the engineering menu without a set of digital commands. Works correctly on MediaTek processors (MT6577, MT6589, etc.) and Android 2.x, 3.x, 4.x, 5.x systems. According to user reviews, the program successfully performs its functions, but after rebooting the smartphone, the settings made using the application are reset.
Mobileuncle Tools
The functionality of the application is similar to the previous one, but, in addition to accessing the engineering menu, the user gets the opportunity to view information about the screen, sensor and memory of the device, as well as update the firmware, restore the IMEI number and improve GPS. Root rights are required for stable operation.
Shortcut Master Utility
The Shortcut Master program is designed to work with shortcuts and system applications: creating, searching, deleting. There is no direct function to enter the engineering menu. But with its help, you can view a list of secret commands that are active on your device. And by clicking on the name of the command, you will see a drop-down menu in which there will be an item "execute". Convenient and doesn't require any extra work.
Root rights to access the engineering menu
To get into the service menu on some versions of Android, the user must have superuser (root) rights. You can get rights using specialized applications: Farmaroot, UniversalAndRoot, Romaster SU and others. To root your device with Farmaroot:
- Install and run the program. Link in Google Play: //play.google.com/store/apps/details?id=com.farmaapps.filemanager&hl=en.
- If the application supports installing root rights on your device, then you will see a list of possible actions on the screen, among them - “Get root”. Select this item.
- Choose one of the preset root methods.
- The program will start installing.
- At the end of the procedure, you will see a message about the successful installation of root access.
Possible problems and solutions:
- the application closed in the middle of the installation - restart the device and try again;
- Root rights were not installed - try installing using a different method (choose a new exploit in the application).
What can be configured in the menu
The appearance of the engineering mode and the options for adjusting the parameters may vary depending on the model of the tablet or smartphone. In the menu, users most often adjust the sound, change the camera settings and use the recovery mode. The adjustment parameters and procedure are shown below. Be careful - the names of menu items may vary in different device models! You act at your own risk.
Audio: increase volume level
If your phone is not loud enough, find the Audio section in the engineering menu and go to LoudSpeaker Mode. Select Ring. For each signal level (level 1–6), change the values - set the numbers in ascending order, from 120 to 200. Increase the value in the Max. Vol - maximum 200. Press the SET button to save the settings.
Audio: increase the volume of a telephone conversation
To boost the tone of the speaker for conversations, in the Audio section of the service menu, select Normal mode and open the Sph. Set the values for the signal levels (level 1–6) from 100 to 150, and the number for Max. Vol. - up to 160.
To increase the sensitivity of the microphone, go to the menu Audio - Normal mode - Mic. For each level, assign the same microphone sensitivity values, for example, 200. Press the SET button, reboot and see if the other person hears you better.
Video: adjusting sound settings in the engineering menu
Battery: disable unused frequencies
Smartphones quickly use up battery life for running applications, maintaining cellular communications and network connections. Using the engineering menu, you can increase the battery life.
Modern devices scan several GSM frequencies - 900/1800 MHz and 850/1900 MHz. In Russia, a pair of 900/1800 MHz operates, which means that there is no need to scan the network at other frequencies. The radio signal for the second pair can be turned off, which will significantly save the charge level.
In Engineer Mode, open the Band Mode item. Disable unused frequencies by unchecking the corresponding items - PCS1900 and GSM850. If the device supports two SIM cards, open SIM1 and SIM2 in turn and follow the steps in each. Press the SET button to save the settings.
If your smartphone and SIM card work in 3G networks, disable networks that are not used in Russia: WCDMA-PCS 1900, WCDMA-800, WCDMA-CLR-850. Press the SET button again.
You can enable scanning of disabled networks by returning to the same menu and checking the boxes.
Camera: photo and video settings
By default, Android devices save pictures in JPEG format. Meanwhile, photographers tend to shoot and process their footage in RAW for more editing options. The technical menu allows you to select the desired image format.
Find Camera in the menu and select Capture Type. Set the photo format to RAW and press SET. Also in the Camera menu, you can increase the size of pictures, set the ISO value, enable shooting in HDR for higher photo detail, and set the frame rate for video. After changing each parameter, remember to press SET to save the settings.
recovery mode
Recovery Mode (Recovery Mode) - an analogue of Bios on a computer, allows you to manage the device without logging into the Android system. Recovery Mode Features:
- resetting the settings to standard;
- firmware update;
- access to root rights;
- creating a backup copy of the OS;
- removal of personal data from the system.
In Recovery Mode, do not perform an action if you are not sure what it will lead to. Some commands can harm the device and the system.
If the settings are not saved
Users who have access to the technical menu complain that the parameters changed in it are not activated or are reset when the device is restarted.
To activate the settings after changing the parameters, tap on the SET button at the bottom of the screen. If the parameters are reset after the device is rebooted, try entering the technical menu not through the application, but using a digital command.
Service codes for Android devices
In addition to the technical menu, secret USSD codes allow you to control the functionality of Android smartphones - combinations of numbers and symbols, by typing which the user performs an action. Secret codes for different devices are shown in the table.
Table: list of secret commands for Android
| Manufacturer | Digital team | Meaning |
| Codes for most manufacturers | *#*#7780#*#* | Rollback settings and uninstall user applications |
| *2767*3855# | Firmware change, total rollback of settings. | |
| *#*#232339#*#* *#*#526#*#* |
Checking Wireless Connections | |
| *#*#34971539#*#* | Detailed information about the camera | |
| *#*#232338#*#* | View Wi-Fi Address | |
| *#*#273283*255*663282*#*#* | Activate media backup on your phone | |
| *#*#1472365#*#* | Express GPS test | |
| *#*#0*#*#* | Screen check | |
| *#*#2663#*#* | Viewing touchscreen information | |
| *#*#2664#*#* | Touchscreen testing | |
| *#*#4636#*#* | General device and battery data | |
| *#*#0673#*#* *#*#0289#*#* |
Audiotests | |
| *#*#7262626#*#* | GSM reception test | |
| *#*#0842#*#* | Vibration and display brightness test | |
| *#*#3264#*#* | Information about RAM memory | |
| *#*#232331#*#* | Bluetooth communication test | |
| *#*#8255#*#* | Checking Google Talk | |
| *#*#232337#*#* | Bluetooth address information | |
| *#*#1234#*#* | Firmware data of the device | |
| *#*#44336#*#* | Device build date | |
| *#06# | Information about the IMEI number | |
| *#*#197328640#*#* | Service activity test | |
| *#*#1111#*#* | Version of free-to-air programs | |
| *#*#2222#*#* | Iron number for free-to-air | |
| *#*#0588#*#* | Proximity sensor test | |
| Sony (unified commands operate on devices) | **05***# | Unblocking a PUK code |
| Motorola | *#06# | IMEI |
| *#*#786#*#* | Roll back settings to original | |
| *#*#1234#*#* *#*#7873778#*#* | Opening apps as root | |
| *#*#2432546#*#* | Check for updates | |
| *#*#2486#*#* | Entering the service menu | |
| HTC | *#*#4636#*#* | Service menu |
| ##3282# | EPST System Application | |
| *#*#8255#*#* | G-talk monitor | |
| ##33284# | Network status | |
| *#*#3424#*#* | Functional test | |
| ##3424# | Device Diagnostics | |
| ##7738# | Protocol Diagnostics | |
| ##8626337# | Voice Coder | |
| Samsung (general codes effective) | ##778 (+call) | EPST menu activation |
| LG (work with codes replaces the technical menu) | 3845#*855# | International Devices |
| 3845#*400# | Chinese devices | |
| 5689#*990# | Sprint | |
| ##228378 (+ challenge) | Verizon Wireless | |
| 3845#*851# | T Mobile | |
| 3845#*850# | AT&T |
If for some reason the service code did not work, do not worry - install and run the Secret Codes application (Google Play link: //play.google.com/store/apps/details?id=fr.simon.marquis.secretcodes&hl= ru). The program will analyze the combinations valid in the device and offer you a list. You can activate the combination directly in the application with one click on the name.
Probably, many smartphone owners have faced the volume problem. For example, two things did not suit me. The first is a quiet speaker sound when an incoming call, and the second is a very loud sound in the headphones when an incoming call.
A little about how Android controls volume
If no headset is connected to your gadget (headphones, hands-free, etc.), then the volume settings will be the same, and as soon as you connect the headset, the settings will be different. For a general understanding, I will give a few examples.
Example 1 You listen to music on your phone, turn on the loud speaker at full volume, and when you connect a headset to it and turn on the loud speaker again, the volume may differ (it may be louder or lower, depending on which phone model or firmware version).
Example 2 You are watching a movie in headphones, the volume (meaning the volume of multimedia) is set to 40% and then after a while you have an incoming call, then the volume in the headphones will change to the general volume, in which case you can get a powerful sonic shock to the ears. Believe me, I have been blown up from the couch more than once in such cases, the fact is that the programmers have poorly adjusted the volume modes.
Example 3 You are on a phone call and need to switch to speakerphone mode, and you notice that the speaker is not as loud (or vice versa) as when listening to music; or the partner began to hear you badly, this is because in different modes the microphone may have different sensitivity. Also, when you connect a headset in the same situation and turn on the speakerphone mode, the settings are different again. This is how Android manages volume.
We learn the theory of the engineering menu
So let's look at what and how can be done if you play a little trick on the "Engineering Menu".
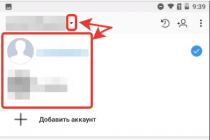
Before making any changes, we recommend that you read the article in full, and comprehend, and then experiment. Also take a piece of paper and write down all the default values in case something goes wrong. You can start the engineering menu using the telephone dialing: we prescribe the following combinations on it (Fig. 1):

picture 1
*#*#54298#*#* or *#*#3646633#*#* or *#*#83781#*#* - smartphones based on the MTK processor
*#*#8255#*#* or *#*#4636#*#* – Samsung smartphones
*#*#3424#*#* or *#*#4636#*#* or *#*#8255#*#* – HTC smartphones
*#*#7378423#*#* - Sony smartphones
*#*#3646633#*#* – Fly, Alcatel, Philips smartphones
*#*#2846579#*#* – Huawei smartphones
Congratulations, you have entered the engineering menu (Fig. 2). Keep in mind that the menu on different phones may differ slightly in structure. We find the section "Audio" and go into it. After entering, we see a bunch of unknown lines (modes) (Fig. 3). Here's what these modes mean in Android:


figure 2 figure 3
— normal mode(settings section in normal or normal mode) – this mode is active when nothing is connected to the smartphone;
— Headset mode(headset mode) - this mode is activated after connecting headphones or external speakers;
— Loud Speaker Mode(loudspeaker mode) - it is activated when nothing is connected to the smart, and you turn on the speakerphone while talking on the phone;
— Headset_LoudSpeaker Mode(loudspeaker mode when a headset is connected) - this mode is activated when headphones or external speakers are connected to the smart phone, and you turn on the speakerphone while talking on the phone;
— Speech enhancement(Talking mode) - this mode is activated in the normal talking mode on the phone, and nothing is connected to it (headset, external speakers) and the speakerphone is not turned on.
It’s better not to poke your nose into the last three sections:
— debug info- it is not clear why - info on the backup of information or its debugging;
— Speech logger- I didn’t fully understand, most likely, keeping a log during negotiations or recording chatter. If you check the box next to "Enable speech log", then after the end of the phone call, the corresponding files are created in the root directory of the memory card. Their name and structure takes the following form: Wed_Jun_2014__07_02_23.vm (Wednesday_July_2014__time07_02_23.vm).
What these files serve for and how they can be useful to us is not clear. The directory /sdcard/VOIP_DebugInfo (which is the location for storing files with information on the backup) is not automatically created, if you create it manually, then after the conversation it will remain empty.
— audio logger- good sound recording software that supports quick search, playback and saving.
If you approach these modes wisely, you can adjust the volume of Android smartphones or tablets the way you want. When entering any of the modes, various volume settings (Type) will become available to your gaze. Here is a list of the main settings you need to know (Fig. 4):

figure 4
—Sip– settings for Internet calls;
— Mic– microphone sensitivity settings;
— Sph- settings for the conversational speaker (the one that is applied to the ears);
— Sph2- settings for the second conversational speaker (I don’t have it);
— sid- we skip, when you change these parameters during negotiations on your smartphone or tablet, you can hear yourself instead of the interlocutor;
— media– setting the multimedia volume level;
— ring– setting the volume level of the incoming call;
— FMR– FM radio volume settings.
Further, under the item for selecting settings, we have a list of volume levels (Level) (Fig. 5). For a better understanding, there are 7 such levels, from level 0 to level 6. Each level corresponds to one “click” on the volume rocker of a smartphone or tablet. Accordingly, level 0 is the quietest level, and level 6 is the loudest signal level. Each level can be assigned its own values, which are in the Value is 0~255 cell, and should not go beyond the range from 0 to 255 (the lower the value, the lower the sound). To do this, you need to erase the old value in the cell, then enter the new (desired) value and press the “Set” button (the one next to the cell) to assign (Fig. 6). Be careful when using the maximum values, as the speakers may produce uncharacteristically unpleasant sounds in the form of rattling and other unpleasant effects.


figure 5 figure 6
Warning! Before making changes, overwrite all factory values (in case something goes wrong).
You must know!
Editing modes in the engineering menu
Example 1 How to increase the volume of an incoming call?
To do this, you need to go to the engineering menu, print the "Audio" section, go to the "LoudSpeaker Mode" mode and select "Ring" in the volume settings - the volume settings for the incoming call. Then sequentially change (increase) the values of all signal levels (level 0 - level 6). Also, for greater effect, you can increase the value of the Max Vol section. 0 ~ 160, if it is not the maximum (I set mine to 155, with a larger value, the speaker starts to “wheeze”).
Example 2 How to increase the volume when talking on the phone? (Increasing the volume level of a small speaker, the one that is applied to the ear).
Again we go into the engineering menu already known to us, print the “Audio” section, go to the special “Normal Mode”, select Sph in it - this parameter is responsible for changing the value of all signal levels in the range from level 0 to level 6. Set the one you need for us level. In the Max Vol. 0~160, can also be changed to a higher volume power setting.
Example 3 Increasing the volume and sensitivity of the smartphone's conversational microphone
To adjust and set the required volume level and also the sensitivity of the conversational microphone, you need to go to the “Engineering menu”> “Audio”> “Normal Mode”> select Mic - microphone sensitivity settings, and for all levels (level 0 - level 6) we assign one and the same value, for example 240. Now the interlocutor should hear you better.
Example 4 How to increase the sound recording volume while recording a video?
Suppose there is a need to increase the sound recording volume level during video shooting, then in the engineering menu for our loudspeaker (LoudSpeaker Mode) change the microphone sensitivity settings (mic), increase all values at all levels (level 0 - level 6), for example set to 240 at every level. I remind you of pressing the button (set) - we reboot our favorite gadget and rejoice.
By the way, do not forget to press the “Set” button after each editing of a certain parameter. This action should commit and accept your command for execution. Otherwise, the user-set parameters are not activated. In addition, a certain number of mobile devices require a reboot for the changes to take effect (turn off and on the device).
Good luck with your experiments, if something is not clear - write in the comments. We are waiting for your answers.
Table of codes for entering the engineering menu
| smartphones based on the MTK processor | *#*#54298#*#* or *#*#3646633#*#* or *#*#8612#*#* |
| Samsung | *#*#197328640#*#* or *#*#4636#*#* or *#*#8255#*#* |
| HTC | *#*#3424#*#* or *#*#4636#*#* or *#*#8255#*#* |
| Huawei | *#*#2846579#*#* or *#*#14789632#*#* |
| Sony | *#*#7378423#*#* or *#*#3646633#*#* or *#*#3649547#*#* |
| Fly, Alcatel, Philips | *#*#3646633#*#* or *#9646633# |
| Prestigio | *#*#3646633#*#* or *#*#83781#*#* |
| ZTE | *#*#4636#*#* |
| Philips | *#*#3338613#*#* or *#*#13411#*#* |
| TEXET | *#*#3646633#*#* |
| Acer | *#*#2237332846633#*#* |
| blackview | *#*#3646633#*#* or *#35789#* |
| cube | *#*#3646633#*#* or *#*#4636#*#* |
| Cubot | *#*#3646633#*#* |
| Doogee | *#*#3646633#*#*, *#9646633# , *#35789#* or *#*#8612#*#* |
| Elephone | *#*#3646633#*#*, |
| HOMTOM | *#*#3646633#*#*, *#*#3643366#*#*, *#*#4636#*#* |
Note: table is constantly updated