Hello dear webmasters, the article tells why it is dangerous to leave the register_globals option enabled. You may have heard that using it can make your program (script) run unsafe. But let's see how this option can be used for illegal purposes and how to protect yourself from it.
What is register_globals ?
This is an option in php.ini that specifies whether variables received by POST or GET should be registered in the $GLOBALS global array.
For clarity, I will give an example with register_globals=on .
There is a file "index.php" with the content:
In the address bar write: index.php?asd=123
As we can see, 2 variables have been created: one local (+ reference in $GLOBALS), the other in the $_GET array. Many people don't use the $_GET array at all, they continue to process the "$asd" variable after getting it from outside.
But let's think about why we need to "pollute" the $GLOBALS array? To do this, we have special arrays that store data transmitted by the GET ($_GET array) and POST ($_POST array) methods.
The same example, but with register_globals=off :
That. no local variable has been created and to manipulate "$asd" we must use the $_GET array.
You may have changed your mind about register_globals by now.
You will probably have to rewrite something in your programs, but it's worth it.
And now I will tell you how a cracker can use this option for his own purposes, i.e. with register_globals=on
I'll start from simple to complex.
Often we see warnings:
Notice: Undefined variable: asd(variable name) in ****
What does it mean? This means that the variable "$asd" has not been explicitly defined.
For example, some people indulge in this:
Those. without defining a variable, they immediately begin to use it. The above code is not terrible in theory, but think about it, what if this very “$asd” variable is subsequently written to a file? For example, we write the following in the address bar: "index.php?asd=LUSER+" and we get: "LUSER 0123456789". Well, would it be nice to see this? Don't think.
Suppose we are writing a user authentication system:
I brought a deliberately leaky system, we just need to write “index.php?valid_user=1” in the address bar and we will get the inscription “Hello user”
This wouldn't happen if we wrote like this:
Those. themselves defined the $valid_user variable as FALSE on failure.
Here is an example with sql injection:
In the address bar we write: "index.php? where=id=0+UNION+ALL+SELECT+login,+password,+null+FROM+admin+where+login='admin'" we get sql injection:
And the cracker gets your appearances and passwords :(
As you can see, all examples have security holes that can be exploited through the included register_globals.
You can deal with this if you always define a variable regardless of the conditions. Or use the encapsulation of variables in functions, i.e. when you define a function, then the variables inside it will be closed from the outside, for example:
Now if we write in the address bar: "index.php? where=123"
Will give: "$where does not exist"
But that's assuming you don't set the $where variable as global, i.e. "global$where"
I can think of many more examples, but I think that the ones I have given will be enough for you to understand.
I want to say that all these problems will disappear into summer when you set the register_globals=off option and try again all the above examples.
This can be done in php.ini, but most hosting providers will not allow you to do this, so you will have to use the “.htaccess” file
In order to divide site visitors into certain groups, a small registration system in php must be installed on the site. Thus, you conditionally divide visitors into two groups of just casual visitors and a more privileged group of users to whom you give out more valuable information.
In most cases, a more simplified registration system is used, which is written in php in a single register.php file.
So, we digress a little, and now let's take a closer look at the registration file.
register.php fileIn order for this not to take a lot of time from you, we will create a system that will collect users, taking minimal contact information from them. In this case, we will enter everything into the mysql database. For the highest speed of the database, we will create a users table in MyISAM format and in utf-8 encoding.
Note! All scripts should always be written in the same encoding. All site files and the MySql database must be in the same encoding. The most common encodings are UTF-8 and Windows-1251.
Why you need to write everything in one encoding, we'll talk sometime later. In the meantime, take this information as the strictest rule for scripting, otherwise there will be problems with the work of scripts in the future. It's okay, of course, but you'll just lose a lot of time searching for errors in the script.
How will the script itself work?
We want to simplify everything and get quick results. Therefore, we will receive from users only the login, email and password. And to protect against spam robots, we will install a small captcha. Otherwise, some boy from London will write a small robot-parser that will fill the entire database with fake users in a few minutes, and will rejoice at his genius and impunity.
Here is the script itself. Everything is written in one register.php file:
Registration script example register.php style.css" />
In this case, the script calls itself. And it is a form and a handler of the data entered in the form. I draw your attention to the fact that the file is compressed with a zip archive and contains the config.php configuration file, the users database dump, the functions.php file containing the auxiliary functions, the style.css style file and the register.php file itself. There are also several files that are responsible for the operation and generation of captcha characters.
Reg.ru: domains and hosting
The largest registrar and hosting provider in Russia.
Over 2 million domain names in service.
Promotion, mail for domain, solutions for business.
More than 700 thousand customers around the world have already made their choice.
*Mouseover to pause scrolling.
Back forward
Creating a simple user registration system in PHP and MySQLCreating a registration system is a lot of work. You have to write code that validates email addresses, sends a registration confirmation email, validates the rest of the form fields, and much more.
And even after you write all this, users will be reluctant to register, because. it requires some effort on their part.
In this tutorial, we'll create a very simple login system that doesn't require or store passwords at all! The result will be easy to modify and add to an already existing PHP site. Want to find out how it works? Read below.
Here's how our super simple system would work:
We will combine the authorization form and registration. This form will have a field for entering an email address and a registration button;
- When filling in the field with an email address, by clicking on the register button, a record about a new user will be created, but only if the entered email address was not found in the database.
After that, a certain random unique set of characters (token) is created, which is sent to the mail specified by the user in the form of a link that will be relevant for 10 minutes;
- By clicking on the link, the user goes to our website. The system determines the presence of the token and authorizes the user;
The advantages of this approach:
No need to store passwords and validate fields;
- No need for password recovery, secret questions, etc.;
- From the moment the user has registered/logged in, you can always be sure that this user will be in your access zone (that the email address is true);
- Incredibly simple registration process;
Flaws:
User account security. If someone has access to the user's mail, he can log in.
- Email is not secure and can be intercepted. Keep in mind that this question is also relevant in the case when the password has been forgotten and needs to be restored, or in any authorization system that does not use HTTPS for data transfer (login / password);
- As long as you set up the mail server as needed, there is a chance that messages with authorization links will end up in spam;
Comparing the advantages and disadvantages of our system, we can say that the system has high usability (maximum convenience for the end user) and, at the same time, has a low security indicator.
So it is proposed to use it for registrations on forums and services that do not work with important information.
How to use this system
In the case when you just need to use the system to authorize users on your site, and you do not want to take this lesson apart, here's what you need to do:
You need to download the source files attached to the lesson
- Find the tables.sql file in the archive. Import it into your database using the import option in phpMyAdmin. Alternative way: open this file with a text editor, copy the SQL query and run it;
- Open includes/main.php and fill in the settings for connecting to your database (specify the user and password for connecting to the database, as well as the host and name of the database). In the same file, you must also specify an email address that will be used as the original address for messages sent by the system. Some hosts will block outgoing emails until the form shows a real email address that was generated from the host's control panel, so enter the real address;
- Upload all index.php , protected.php files and assets and includes folders via FTP to your host;
- Add the code below to each PHP page where you want to display an authorization form;
Require_once "includes/main.php"; $user = new User(); if(!$user->loggedIn())( redirect("index.php"); )
- Ready!
For those who are interested in how it all works, read on below!
The first step is writing the HTM code for the authorization form. This code is located in the index.php file. This file also contains the PHP code that handles the form data and other useful features of the authorization system. You can learn more about this in the PHP code review section below.
index.php
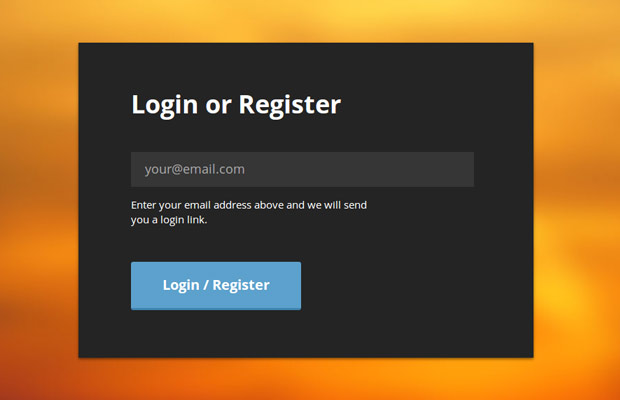
Tutorial: Super Simple Registration System With PHP & MySQL Login or Register
Enter your email address above and we will send
you login link.
In the head section (between the and tags) I included the main styles (they are not analyzed in this tutorial, so you can see them for yourself. assets/css/style.css folder). Before the closing tag, I included the jQuery library and the script.js file, which we will write and analyze below.
JavaScript
jQuery keeps track of the state of the "Sign Up/Login" button with a function e.preventDefault() and sends AJAX requests. Depending on the server's response, displays a particular message and determines further actions /
assets/js/script.js
$(function()( var form = $("#login-register"); form.on("submit", function(e)( if(form.is(".loading, .loggedIn"))( return false ; ) var email = form.find("input").val(), messageHolder = form.find("span"); e.preventDefault(); $.post(this.action, (email: email), function (m)( if(m.error)( form.addClass("error"); messageHolder.text(m.message); ) else( form.removeClass("error").addClass("loggedIn"); messageHolder. text(m.message); ) )); )); $(document).ajaxStart(function()( form.addClass("loading"); )); $(document).ajaxComplete(function()( form. removeClass("loading"); )); ));
was added to the form to display the current state of the AJAX request (this was made possible thanks to the methods ajaxStart()) And ajaxComplete(), which you can find towards the end of the file).This class shows a spinning animated gif file (as if hinting to us that the request is being processed), and also acts as a flag to prevent the form from being resubmitted (when the register button has already been clicked once). The .loggedIn class is another flag - set when the email was sent. This flag instantly blocks any further action on the form.
Database Schema
Our incredibly simple logging system uses 2 MySQL tables (the SQL code is in the tables.sql file). The first stores data about user accounts. The second stores information about the number of login attempts.

User table schema.
The system does not use passwords, which can be seen in the diagram. On it, you can also see the token column with tokens adjacent to the token_validity column. The token is set as soon as the user connects to the system, sets his email to send a message (a little more about this in the next block). The token_validity column sets the time to 10 minutes later, after which the token is no longer valid.

Table schema that counts the number of authorization attempts.
In both tables, the IP address is stored in a processed form, using the ip2long function, in an integer field.
Now we can write some PHP code. The main functionality of the system is assigned to the User.class.php class, which you can see below.
This class actively uses idorm (docs), these libraries are the minimum necessary tools for working with databases. It handles database access, token generation and validation. It is a simple interface that makes it easy to connect a registration system to your site if it uses PHP.
user.class.php
Class User( // Private ORM case private $orm; /** * Find a user by token. Only valid tokens are taken into consideration. The token is generated only for 10 minutes from the moment it was created * @param string $token. This is the one you are looking for token * @return User. Return the value of the User function */ public static function findByToken($token)( // find the token in the database and make sure the correct timestamp is set $result = ORM::for_table("reg_users") ->where ("token", $token) ->where_raw("token_validity > NOW()") ->find_one(); if(!$result)( return false; ) return new User($result); ) /** * Authorize or register a user * @param string $email.User's email address * @return User */ public static function loginOrRegister($email)( // If such a user already exists, return the value of the User function from the specified email address stored in the database if(User::exists($email))( return new User($email); ) // Otherwise, create a new user in the database and return the value of the User::create function from the specified email return User::create($email ); ) /** * Create a new user and save to the database * @param string $email. User email address * @return User */ private static function create($email)( // Register a new user and return the result of the User function from these values $result = ORM::for_table("reg_users")->create(); $result->email = $email; $result->save(); return new User($result); ) /** * Check if such a user exists in the database and return the boolean value of variable * @param string $email. User email address * @return boolean */ public static function exists($email)( // Does the user exist in the database? $result = ORM::for_table("reg_users") ->where("email", $email) ->count(); return $result == 1; ) /** * Create a new user object * @param instance $param ORM , id, email or 0 * @return User */ public function __construct($param = null) ( if($param instanceof ORM)( // ORM check passed $this->orm = $param; ) else if(is_string($param))( // Email check passed $this->orm = ORM::for_table ("reg_users") ->where("email", $param) ->find_one(); ) else( $id = 0; if(is_numeric($param))( // user id is passed the value of $param variable $id = $param; ) else if(isset($_SESSION["loginid"]))( // Otherwise see session $id = $_SESSION["loginid"]; ) $this->orm = ORM::for_table( "reg_users") ->where("id", $id) ->find_one(); ) ) /** * Generate a new SHA1 authorization token, write it to the database and return its value * @return string */ public function generateToken( )( // Generate a token for an authorized user and save it to the database $token = sha1($this->email.time().rand(0, 1000000)); // Store the token in the database // And mark it as only valid for the next 10 minutes $this->orm->set("token", $token); $this->orm->set_expr("token_validity", "ADDTIME(NOW(),"0:10")"); $this->orm->save(); return $token; ) /** * Authorize the user * @return void */ public function login()( // Mark the user as logged in $_SESSION["loginid"] = $this->orm->id; // Update the value of the last_login database field $this->orm->set_expr("last_login", "NOW()"); $this->orm->save(); ) /** * Destroy the session and log out the user * @return void */ public function logout ()( $_SESSION = array(); unset($_SESSION); ) /** * Check if user logged in * @return boolean */ public function loggedIn()( return isset($this->orm->id) && $_SESSION["loginid"] == $this->orm->id; ) /** * Check if the user is an administrator * @return boolean */ public function isAdmin()( return $this->rank() = = "administrator"; ) /** * Find user type, can be either administrator or regular * @return string */ public function rank()( if($this->orm->rank == 1)( return "administrator "; ) return "regular"; ) /** * A method that allows you to get the user's private information *as properties of the User object * @param string $key The name of the property that gets access * @return mixed */ public function __get($key)( if(isset($this->orm->$key))( return $this->orm->$key; ) return null; ) )
Tokens are generated using the SHA1 algorithm and stored in the database. I'm using MySQL's time functions to set a 10-minute token expiration limit.
When the token passes the validation procedure, we directly tell the handler that we are only considering tokens that have not yet expired, stored in the token_validity column.
Please note that I am using the magic method __get docs library at the end of the file to intercept access to the properties of the User object.
This makes it possible to access information stored in the database using the $user->email, $user->token, and other properties. In the following code snippet, we'll look at how to use these classes as an example.

Protected page
Another file that stores useful and necessary functionality is the functions.php file. There are several so-called helpers here - helper functions that allow you to create cleaner and more readable code in other files.
functions.php
Function send_email($from, $to, $subject, $message)( // Helper that sends email $headers = "MIME-Version: 1.0" . "\r\n"; $headers .= "Content-type: text /plain; charset=utf-8" . "\r\n"; $headers .= "From: ".$from . "\r\n"; return mail($to, $subject, $message, $headers ); ) function get_page_url()( // Get PHP file URL $url = "http".(empty($_SERVER["HTTPS"])?"":"s")."://".$_SERVER ["SERVER_NAME"]; if(isset($_SERVER["REQUEST_URI"]) && $_SERVER["REQUEST_URI"] != "")( $url.= $_SERVER["REQUEST_URI"]; ) else( $url. = $_SERVER["PATH_INFO"]; ) return $url; ) function rate_limit($ip, $limit_hour = 20, $limit_10_min = 10)( // Number of login attempts in the last hour at this IP address $count_hour = ORM: :for_table("reg_login_attempt") ->where("ip", sprintf("%u", ip2long($ip))) ->where_raw("ts > SUBTIME(NOW(),"1:00")") ->count(); // Number of login attempts in the last 10 minutes at this IP address $count_10_min = ORM::for_table("reg_login_attempt") ->where("ip", sprintf("%u", ip2long($ ip))) ->where_raw("ts > SUBTIME(NOW(),"0:10")") ->count(); if($count_hour > $limit_hour || $count_10_min > $limit_10_min)( throw new Exception("Too many login attempts!"); ) ) function rate_limit_tick($ip, $email)( // Create a new entry in the table counting number of login attempts $login_attempt = ORM::for_table("reg_login_attempt")->create(); $login_attempt->email = $email; $login_attempt->ip = sprintf("%u", ip2long($ip)); $login_attempt->save(); ) function redirect($url)( header("Location: $url"); exit; )
Functions rate_limit And rate_limit_tick monitor the number of authorization attempts for the elapsed period of time since the first attempt. The login attempt is recorded in the database in the reg_login_attempt column. These functions are called when the form data is being processed and submitted, as you can see from the following code snippet.
The code below is taken from the index.php file and it handles the form submission. It returns a JSON response, which is in turn processed by jQuery in the assets/js/script.js file we've already covered.
index.php
Try( if(!empty($_POST) && isset($_SERVER["HTTP_X_REQUESTED_WITH"]))( // Output a JSON header header("Content-type: application/json"); // Is this email address valid if(!isset($_POST["email"]) || !filter_var($_POST["email"], FILTER_VALIDATE_EMAIL))( throw new Exception("Please enter a valid email."); ) // Check. Is the user allowed to log in, has he exceeded the number of allowed connections? (functions.php file for more information) rate_limit($_SERVER["REMOTE_ADDR"]); // Record this login attempt rate_limit_tick($_SERVER["REMOTE_ADDR"], $ _POST["email"]); // Send an email to the user $message = ""; $email = $_POST["email"]; $subject = "Your Login Link"; if(!User::exists($email) )( $subject = "Thank You For Registering!"; $message = "Thank you for registering at our site!\n\n"; ) // Attempt to authorize or register a user $user = User::loginOrRegister($_POST[ "email"]); $message.= "You can login from this URL:\n"; $message.= get_page_url()."?tkn=".$user->generateToken()."\n\n"; $message.= "The link is going to expire automatically after 10 minutes."; $result = send_email($fromEmail, $_POST["email"], $subject, $message); if(!$result)( throw new Exception("There was an error sending your email. Please try again."); ) die(json_encode(array("message" => "Thank you! We\"ve sent a link to your inbox. Check your spam folder as well.")))); ) ) catch(Exception $e)( die(json_encode(array("error"=>1, "message" => $e->getMessage() ))); )
After successful authorization/registration, the code above will send the user a link for authorization. The token becomes available because it is passed as a variable in the generated link by the method $_GET with marker tkn
index.php
If(isset($_GET["tkn"]))( // Is this token valid for authorization? $user = User::findByToken($_GET["tkn"]); if($user)( // Yes , is. Redirect to the protected page $user->login(); redirect("protected.php"); ) // No, the token is not valid. Redirect to the page with the login/registration form redirect("index.php "); )
$user->login()
will create the necessary variables for the session, so that the user, viewing subsequent pages of the site, will remain authorized all the time.
Similarly, the processing of the function to exit the system is arranged.
index.php
If(isset($_GET["logout"]))( $user = new User(); if($user->loggedIn())( $user->logout(); ) redirect("index.php") ; )
At the end of the code, I again redirected to index.php, so the parameter ?logout=1 passed by URL is not required.
Our index.php file requires additional. protection - we do not want people who have ever logged into the system to see the registration form again. For these purposes, we use the method $user->loggedIn().
index.php
$user = new User(); if($user->loggedIn())( redirect("protected.php"); )
Finally, here is a piece of code that allows you to protect the pages of your site and make it available only after authorization.
protected.php
// To secure each page on your site, include a file // main.php and create a new User object. That's how easy it is! require_once "includes/main.php"; $user = new User(); if(!$user->loggedIn())( redirect("index.php"); )
After this check, you can be sure that the user was successfully authorized. You can also access stored information in the database using object properties $user. To display the user's email and status, use this code:
echo "Your email: ".$user->email; echo "Your rank: ".$user->rank();
Method rank() is used here because numbers are usually stored in the database (0 for a normal user, 1 for an administrator) and we need to convert this data into the statuses to which they belong, which is what this method helps us with.
To make a regular user an administrator, simply edit the user entry through phpMyAdmin (or any other program that allows you to manage databases). The administrator status does not give any privileges, in this example, the page will display that you are an administrator - and that's it.
But what to do with it - it remains at your discretion, you can write and compose code yourself that sets certain privileges and opportunities for administrators.
We're done!
With this incredibly super quasi simple shape, we are done! You can use it in your PHP sites, it's quite simple. You can also modify it for yourself and make it the way you want.
The material was prepared by Denis Malyshok specifically for the site site
P.S. Do you want to move further in mastering PHP and OOP? Take a look at premium tutorials on various aspects of website building, including PHP programming, as well as a free course on building your PHP CMS system from scratch using OOP:
Liked the material and want to thank?
Just share with your friends and colleagues!
Due to the fact that very often there are questions about global variables and problems associated with disabling the register_globals directive, we will try to cover this topic a little in this article.
First, let's define what external variables are. These are any variables that come into the program from the outside, i.e. not defined in the program itself. For a php script, all variables that are passed through the browser line or through the form are external.
Let's see how they are created.
If the directive register_globals = On is enabled on the server (in php.ini), then when passing variables through the form or through the browser line, in the script to which these variables are intended, they will be created automatically. Those. if your browser line says: www.server.ru/index.php?var=1, then the $var variable with the value equal to 1 will be automatically created in the index.php script.
CommentThe specified directive is one of the most controversial points in the PHP language. On the one hand, its use can really give rise to real problems with the protection of PHP scripts, with improper consideration of possible erroneous situations, and many developers rightly point out that writing scripts without using global variables reduces the vulnerability of scripts to various attacks by 90%. On the other hand, at the dawn of PHP, more than one thousand users trusted the developers of the language (before PHP 4.3 this directive was enabled by default), which is why there are currently millions of really functioning scripts written using global variables (It is worth noting that that for educational purposes it is sometimes quite useful to write scripts using global variables, since replacing them with superglobal arrays greatly impairs the readability of the code).
Most host providers have this directive enabled at the moment and will likely remain enabled for a long time to come, as code continuity may otherwise be broken.
With the register_globals directive disabled, access to such variables is possible in two ways:
- via HTTP_***_VARS associative arrays (HTTP_POST_VARS, etc.)
- via superglobal arrays ($_ENV, $_GET, $_POST, $_SERVER, $_COOKIE, $_FILES, etc.)
Superglobal arrays are available in any scope. PHP developers recommend turning off the register_globals directive on the server and working with variables through superglobal arrays. This recommendation is related to security issues that could arise with the register_globals directive enabled.
Although, until recently, the register_globals directive remained enabled on hostings. The situation began to change with the release of PHP 5, where this directive is turned off by default and hosters are in no hurry to turn it on (maybe right).
So, what exactly to do to get variables - you need to take them from superglobal arrays. For example, to get variables passed through the browser line, use the $_GET array. Let's say www.server.ru/index.php?var=1 is written in the browser line, then to get the var variable in index.php you need to write:
$var=$_GET["var"];
And, for example, to receive variables passed from the form by the POST method in the form handler script, you need to write:
$var=$_POST["var"];
In this article, you will learn how to create a registration and authorization form using HTML, JavaScript, PHP and MySql. Such forms are used on almost every site, regardless of its type. They are created for the forum, and for the online store and for social networks (such as Facebook, Twiter, Odnoklassniki) and for many other types of sites.
If you have a site on a local computer, then I hope that you already have a local server installed and running. Nothing will work without it.
Creating a Table in the DatabaseIn order to implement user registration, we first need a Database. If you already have it, then great, otherwise, you need to create it. In the article, I explain in detail how to do this.
And so, we have a Database (abbreviated DB), now we need to create a table users in which we will add our registered users.
How to create a table in the database, I also explained in the article. Before creating a table, we need to define what fields it will contain. These fields will match the fields from the registration form.
So, we thought, imagined what fields our form will have and create a table users with these fields:
- id- Identifier. Field id should be in every table from the database.
- first_name- To save the name.
- last_name- To save the last name.
- email- To save the postal address. We will use e-mail as a login, so this field must be unique, that is, have a UNIQUE index.
- email_status- A field to indicate whether the mail is confirmed or not. If the mail is confirmed, then it will have a value of 1, otherwise the value of 0.
- password- To save the password.

If you want your registration form to have some more fields, you can add them here as well.
That's it, our table users ready. Let's move on to the next step.
Database connectionWe have created the database, now we need to connect to it. We will connect using the MySQLi PHP extension.
In the folder of our site, create a file with the name dbconnect.php, and in it we write the following script:
This file dbconnect.php will need to be connected to form handlers.
Pay attention to the variable $address_site, here I have indicated the name of my test site, which I will work on. You accordingly indicate the name of your site.
Site structureNow let's take a look at the HTML structure of our site.
Move the site header and footer to separate files, header.php And footer.php. We will connect them on all pages. Namely, on the main (file index.php), to the page with the registration form (file form_register.php) and on the page with the authorization form (file form_auth.php).
Block with our links, registration And authorization, add to the header of the site so that they are displayed on all pages. One link will enter to the page with the registration form (file form_register.php) and the other to the page with the authorization form (file form_auth.php).
Content of header.php file:
The name of our site
As a result, our main page looks like this:

Of course, your site may have a completely different structure, but this is not important for us now. The main thing is that there are links (buttons) for registration and authorization.
Now let's move on to the registration form. As you already understood, we have it in the file form_register.php.
We go to the Database (in phpMyAdmin), open the table structure users and see what fields we need. So, we need fields for entering a first and last name, a field for entering a postal address (Email) and a field for entering a password. And for security purposes, we will add a captcha input field.
On the server, as a result of processing the registration form, various errors may occur due to which the user will not be able to register. Therefore, in order for the user to understand why the registration fails, it is necessary to display messages about these errors to him.
Before displaying the form, we add a block to display error messages from the session.
And another moment, if the user is already authorized, and for the sake of interest, he enters the registration page directly by writing in the address bar of the browser website_url/form_register.php, then in this case, instead of the registration form, we will display a title for it that it is already registered.
In general, the file code form_register.php we got it like this:
You are already registered
In the browser, the registration page looks like this:

With the required attribute, we have made all fields required.
Pay attention to the code of the registration form where the captcha is displayed:

We in the value of the src attribute for the image, specified the path to the file captcha.php, which generates this captcha.
Let's look at the code of the file captcha.php:
The code is well commented, so I'll just focus on one point.
Inside a function imageTtfText(), the path to the font is specified verdana.ttf. So for the captcha to work correctly, we must create a folder fonts, and put the font file there verdana.ttf. You can find and download it from the Internet, or take it from the archive with the materials of this article.
We are done with the HTML structure, it's time to move on.
Validating email with jQueryAny form needs validation of the entered data, both on the client side (using JavaScript, jQuery) and on the server side.
We must pay special attention to the Email field. It is very important that the entered email address is valid.
For this input field, we set the type email (type="email"), this warns us a little bit against incorrect formats. But, this is not enough, because through the code inspector that the browser provides us, you can easily change the value of the attribute type With email on text, and that's it, our check will no longer be valid.

And in that case, we have to make a more reliable check. To do this, we will use the jQuery library from JavaScript.
To connect the jQuery library, in the file header.php between tags , before the closing tag , add this line:
Right after this line, add the email validation check code. Here we add the code for checking the length of the entered password. It must be at least 6 characters long.
With the help of this script, we check the entered email address for validity. If the user entered the wrong Email, then we display an error about it and deactivate the submit button of the form. If everything is fine, then we remove the error and activate the submit button of the form.
And so, with the form validation on the client side, we are done. Now we can send it to the server, where we will also do a couple of checks and add data to the database.
User registrationWe send the form for processing to the file register.php, via the POST method. The name of this handler file, specified in the attribute value action. And the send method is specified in the attribute value method.
Open this file register.php and the first thing we need to do is write a session launch function and include the file we created earlier dbconnect.php(In this file, we made a connection to the database). And yet, immediately declare the cells error_messages And success_messages in the session global array. IN error_mesages we will record all error messages that occur during form processing, and in success_messages Let's write happy messages.
Before continuing, we need to check if the form was submitted at all. An attacker can look at the value of an attribute action from the form, and find out which file is processing this form. And he may come up with the idea to go directly to this file by typing the following address in the address bar of the browser: http://site_site/register.php
So we need to check if there is a cell in the global POST array whose name matches the name of our "Register" button from the form. Thus, we check whether the "Register" button was pressed or not.
If an attacker tries to go directly to this file, he will receive an error message. I remind you that the $address_site variable contains the name of the site and it was declared in the file dbconnect.php.
The captcha value in the session was added during its generation, in the file captcha.php. As a reminder, I will show once again this piece of code from the file captcha.php, where the captcha value is added to the session:
Now let's get to the test itself. In file register.php, inside the if block, where we check whether the "Register" button was pressed, or rather, where the comment " // (1) Place for the next piece of code"we write:
//Check the received captcha //Trim spaces from the beginning and from the end of the string $captcha = trim($_POST["captcha"]); if(isset($_POST["captcha"]) && !empty($captcha))( //Compare the received value with the value from the session. if(($_SESSION["rand"] != $captcha) && ($_SESSION ["rand"] != ""))( // If the captcha is not correct, then return the user to the registration page, and there we will display an error message that he entered the wrong captcha. $error_message = "
Error! You entered the wrong captcha
"; // Save the error message to the session. $_SESSION["error_messages"] = $error_message; // Return the user to the registration page header("HTTP/1.1 301 Moved Permanently"); header("Location: ".$address_site ."/form_register.php"); //Stop the script exit(); ) // (2) Place for the next piece of code )else( //If the captcha is not passed or it is empty exit("Error! There is no verification code, that is, the captcha code. You can go to the main page.
"); }Next, we need to process the received data from the POST array. First of all, we need to check the contents of the global POST array, that is, whether there are cells there whose names match the names of the input fields from our form.
If the cell exists, then we trim the spaces from the beginning and from the end of the string from this cell, otherwise, we redirect the user back to the page with the registration form.
Further, after the spaces have been trimmed, we add a string to the variable and check this variable for emptiness, if it is not empty, then move on, otherwise we redirect the user back to the page with the registration form.
Paste this code in the specified location // (2) Place for the next piece of code".
/* Check if the global array $_POST contains data submitted from the form and enclose the submitted data in regular variables.*/ if(isset($_POST["first_name"]))( // Trim spaces from the beginning and end of the string $first_name = trim($_POST["first_name"]); //Check if the variable is empty if(!empty($first_name))( // For safety, convert special characters to HTML entities $first_name = htmlspecialchars($first_name, ENT_QUOTES) ; )else( // Save the error message to the session. $_SESSION["error_messages"] .= "
Enter your name
Name field missing
"; //Return the user to the registration page header("HTTP/1.1 301 Moved Permanently"); header("Location: ".$address_site."/form_register.php"); //Stop the script exit(); ) if( isset($_POST["last_name"]))( // Trim spaces from the beginning and end of the string $last_name = trim($_POST["last_name"]); if(!empty($last_name))( // For safety , convert special characters to HTML entities $last_name = htmlspecialchars($last_name, ENT_QUOTES); )else( // Save the error message to the session. $_SESSION["error_messages"] .= "Enter your last name
"; //Return the user to the registration page header("HTTP/1.1 301 Moved Permanently"); header("Location: ".$address_site."/form_register.php"); //Stop the script exit(); ) )else ( // Save the error message to the session. $_SESSION["error_messages"] .= "Name field missing
"; //Return the user to the registration page header("HTTP/1.1 301 Moved Permanently"); header("Location: ".$address_site."/form_register.php"); //Stop the script exit(); ) if( isset($_POST["email"]))( // Trim spaces from the beginning and end of the string $email = trim($_POST["email"]); if(!empty($email))( $email = htmlspecialchars ($email, ENT_QUOTES); // (3) Place of code to check the format of the email address and its uniqueness )else( // Save the error message to the session. $_SESSION["error_messages"] .= "Enter your email
"; //Return the user to the registration page header("HTTP/1.1 301 Moved Permanently"); header("Location: ".$address_site."/form_register.php"); //Stop the script exit(); ) )else ( // Save the error message to the session. $_SESSION["error_messages"] .= " "; //Return the user to the registration page header("HTTP/1.1 301 Moved Permanently"); header("Location: ".$address_site."/form_register.php"); //Stop the script exit(); ) if( isset($_POST["password"]))( // Trim spaces from the beginning and end of the string $password = trim($_POST["password"]); if(!empty($password))( $password = htmlspecialchars ($password, ENT_QUOTES); //Encrypt the password $password = md5($password."top_secret"); )else( // Save the error message to the session. $_SESSION["error_messages"] .= "Enter your password
"; //Return the user to the registration page header("HTTP/1.1 301 Moved Permanently"); header("Location: ".$address_site."/form_register.php"); //Stop the script exit(); ) )else ( // Save the error message to the session. $_SESSION["error_messages"] .= " "; //Return the user to the registration page header("HTTP/1.1 301 Moved Permanently"); header("Location: ".$address_site."/form_register.php"); //Stop the script exit(); ) // (4) Place for the code for adding a user to the databaseThe field is of particular importance. email. We have to check the format of the received mailing address and its uniqueness in the database. That is, whether a user with the same email address is already registered.
At the specified location" // (3) Place of code to check the format of the postal address and its uniqueness" add the following code:
//Check the format of the received email address using the regular expression $reg_email = "/^**@(+(*+)*\.)++/i"; //If the format of the received email address does not match the regular expression if(!preg_match($reg_email, $email))( // Save the error message to the session. $_SESSION["error_messages"] .= "
You entered an invalid email
"; //Return the user to the registration page header("HTTP/1.1 301 Moved Permanently"); header("Location: ".$address_site."/form_register.php"); //Stop the script exit(); ) // Check if there is already such an address in the database $result_query = $mysqli->query("SELECT `email` FROM `users` WHERE `email`="".$email."""); If there are exactly one rows, then the user with this email address is already registered if($result_query->num_rows == 1)( //If the result is not equal to false if(($row = $result_query->fetch_assoc()) != false) ( // Save the error message to the session. $_SESSION["error_messages"] .= "User with this email address is already registered
"; //Return the user to the registration page header("HTTP/1.1 301 Moved Permanently"); header("Location: ".$address_site."/form_register.php"); )else( //Save the error message to the session .$_SESSION["error_messages"] .= "Error in database query
"; //Return the user to the registration page header("HTTP/1.1 301 Moved Permanently"); header("Location: ".$address_site."/form_register.php"); ) /* close the selection */ $result_query-> close(); //Stop the script exit(); ) /* close the selection */ $result_query->close();And so, we are done with all the checks, it's time to add the user to the database. At the specified location" // (4) Place for the code for adding a user to the database" add the following code:
//Query to add a user to the database $result_query_insert = $mysqli->query("INSERT INTO `users` (first_name, last_name, email, password) VALUES ("".$first_name."", "".$last_name." ", "".$email."", "".$password."")"); if(!$result_query_insert)( // Save the error message to the session. $_SESSION["error_messages"] .= "
Error request to add a user to the database
"; //Return the user to the registration page header("HTTP/1.1 301 Moved Permanently"); header("Location: ".$address_site."/form_register.php"); //Stop the script exit(); )else( $_SESSION["success_messages"] = " "; //Send the user to the login page header("HTTP/1.1 301 Moved Permanently"); header("Location: ".$address_site."/form_auth.php"); ) /* Complete the request */ $result_query_insert-> close(); //Close the database connection $mysqli->close();If an error occurs in the request to add a user to the database, we add a message about this error to the session and return the user to the registration page.
Otherwise, if everything went well, we also add a message to the session, but it is already more pleasant, namely, we tell the user that the registration was successful. And we redirect it to the page with the authorization form.
The script for checking the format of the email address and the length of the password is in the file header.php, so it will affect fields from that form as well.
The session is also started in the file header.php, so in the file form_auth.php the session does not need to be started, because we get an error.

As I said, the script for checking the format of the mail address and the length of the password also works here. Therefore, if the user enters the wrong email address or short password, he will immediately receive an error message. A button to come in will become inactive.

After fixing the errors, the button to come in becomes active and the user can submit the form to the server where it will be processed.
User authorizationTo attribute value action the authorization form has a file auth.php, which means that the form will be processed in this file.
So let's open the file auth.php and write the code to process the authorization form. The first thing to do is start the session and include the file dbconnect.php to connect to the database.
When you click on the exit link from the site, we get into the file logout.php, where we simply destroy the cells with the email address and password from the session. After that, we return the user back to the page on which the link was clicked exit.
File code logout.php:
That's all. Now you know how to implement and process user registration and authorization forms on your site. These forms are found on almost every site, so every programmer should know how to create them.
We also learned how to validate input data, both on the client side (in the browser, using JavaScript, jQuery) and on the server side (using the PHP language). We also learned how to implement the exit procedure from the site.
All scripts are tested and working. You can download the archive with the files of this small site from this link.
In the future I will write an article where I will describe. And I also plan to write an article where I will explain (without reloading the page). So, in order to be aware of the release of new articles, you can subscribe to my site.
If you have any questions, please contact, also, if you notice any mistake in the article, please let me know.
Lesson Plan (Part 5):