Acquaintance with the material of the article will help you figure out when (and how) you need to reset the SMC - settings for the Macbook system management controller built on Intel processors. Acquaintance with the material of the article will help you figure out when (and how) you need to reset the SMC - settings for the MacBook built on Intel processors .
Resetting the Macbook system control settings is reasonable only when any other methods of setting up the device do not help fix the problem.
If there are no changes in the operation of the device (defects are relevant), all that remains is to reset the SMC.
Sequence of actions before resetting the SMC
- Use the "Command-Option-Escape" button combination to force quit a hung application.
- Select "Sleep" mode from the Apple menu and activate it. Wait for a while (10-15 minutes), then wake up the MacBook from Sleep mode.
- Restart the computer using the appropriate main menu option.
- Shut down the computer from the main menu.
- When turning on the MacBook, do not release the power button for 10 seconds.
Power supply (charger) and battery
 Perhaps removing the MacBook battery for a short time will help fix the problem.
 If during the use of the computer arise due to defects in the power supply or battery:
- Disconnect the power supply adapter from the MacBook for a while (5 -15 minutes) and then reconnect.
- Remove the battery from the installation compartment for a while and then insert it again.
- Reboot the computer in each individual case of a power outage.
Only after performing all these actions in the specified sequence it is acceptable to proceed to the SMC reset process when none of the steps has corrected the problem.
System Reset Indicators
 It is not necessary to disassemble the computer case to reset the SMC settings.
 Indicators showing that the SMC needs to be reset
The following symptoms usually indicate the need to reset the SMC:
- The cooling fans spin at a high speed, but at the same time, the computer's load parameters are kept at a minimum level and the processor does not require intensive cooling.
- There is an incorrect operation of the keyboard backlight system.
- Incorrect indication of the SIL status indicator.
- The battery charge indicator is incorrect.
- The display backlight does not respond to changes in the ambient light level.
- There is no reaction from the computer after pressing the power button.
- Closing and opening the display panel has no effect.
- MacBook involuntarily goes into "Sleep" mode or turns off for no reason.
- There is not enough battery charge.
- The adapter's power indicator is inaccurate.
- The computer is extremely slow despite the light load.
- There is an effect of "jumping" desktop icons for a long time after starting the computer.
- There is no launch of applications or there are, but they do not perform their functions.
- The external display mode does not turn on, if it is supported.15. There is no activation of illumination of input-output ports.
Resetting SMC settings on Macbooks
 To reset the system settings, just use a certain key combination
 First of all, you need to determine the configuration of the battery installation in the device. There are two configuration options: the battery is removable and built into the case. If battery removal is supported then:
- Disconnect the charging module, remove the battery.
- Activate and hold the Macbook power key for 5 seconds.
- Connect the battery and start the device.
If the battery is built into the case
- Shut down computer.
- Connect your MacBook via MagSafe or via USB-C to an external power source.
- On the built-in keyboard (left), simultaneously activate and hold down the "Shift-Control-Option" + power button for at least 10 seconds.
- Turn on the MacBook in the standard way.
Reset on iMac, Mac Pro, Mac mini, Xserve
 Mac keyboard shortcuts for different reset options
 The system settings of the marked computers should be reset to the default values in the following sequence:
- Turn on the computer through a standard power supply.
- After 3-5 minutes after switching on, unplug the power supply plug from the socket.
- After 15-20 seconds, reconnect the power supply plug to the mains.
- Wait 5-10 seconds and turn on the MacBook in the usual way - with the button.
For Xserve computers (Intel CPU): turn off the power by activating the power button and holding it for 5-7 seconds.
Information for thought
User actions to reset the SMC do not change the contents of the PRAM-series memory (NVRAM) chips in Mac systems built for Intel microprocessors.
 Like any other computers, MacBooks also have service keys.
 Mac users should remember that the SMC (System Management Controller) provides the following low-level (and other) functions:
- battery capacity control,
- monitoring the temperature of working elements,
- activation / deactivation of the position of the display panel,
- tracking activation / deactivation of the power button,
- motion sensor control,
- enable/disable keyboard backlight,
- external light sensor control,
- connecting an external display.
Reset non-volatile RAM on Mac
A non-volatile memory chip (NVRAM) is present in the circuits of many laptop models. The memory chip is designed to store the so-called quick access settings. For example, the NVRAM chip area typically stores:
- set sound volume level,
- boot disk information
- screen resolution settings
- kernel error data.
The full list of settings stored in NVRAM depends on the system configuration, as well as on the number of devices connected as external modules to the MacBook.
 The appearance of such messages on the MacBook screen may indicate the presence of firmware errors.
 Resetting NVRAM is usually preceded by a brief “?” on the screen. when starting the computer. If such a sign appears, then there are all prerequisites for resetting the NVRAM memory settings.
Reset NVRAM MacBook
You must first turn off the running computer. Then turn on the device again with the start button and hold down the Option + Command + P + R keys at the same time.
The pressed combination is held for 20-25 seconds - until two computer beeps sound. After that, the keys should be released. The device should go into reboot mode.
After rebooting the Mac, you should open the system preferences panel using the user menu and set the settings reset to default as you see fit.
p.s. If a password was previously set for the firmware file of the NVRAM chip, the password must be disabled.
How to disable firmware password
- After starting the MacBook, hold down the key combination "Command + R" until the "Apple" logo appears and then the system utilities window.
- Select the Firmware Password utility from the menu
- Activate the option "Disable firmware password".
- Specify an existing password in the corresponding field and activate the "Disable password" option.
- Restart Mac.
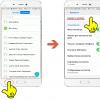
How to reset macbook system settings visually
Tags:
No matter how annoying it is, but sometimes there are times when you just need to completely reset your computer and clean it up. Personally, I do this periodically, and I bet you have to do it too. The good news is that backing up and restoring a MacBook isn't that hard to do, but not everyone knows how to do it. Well, as you probably already guessed, today we will tell you how to reset and restore an Apple MacBook.
Mac backup
So, before erasing your device, it's a good idea to back up your MacBook. To be honest, even if you don't intend to completely wipe files from your computer, it's a good idea to back up your laptop on a regular basis.

The best way to back up your data is to an external hard drive using Time Machine. First of all, I would recommend using a USB 3.0 hard drive or a compatible Thunderbolt box. The amount of memory should be at least twice the hard drive space of your MacBook.
If you have a hard drive, then connect it to your MacBook and go to the "Disk Utility" section. The easiest way to do this is to press the key combination Ctrl + Space, in the window that appears, type Disk Utility and press Enter. Here you will have to format the hard drive in order to use it with Time Machine.

Formatting a drive is a very simple process: just click on the external drive in Disk Utility and go to the "Remove" tab. After the done manipulations, a window will pop up in which you need to enter a new name for your disk, and then click Erase to format the disk. If you wish, you can split the disk into several partitions, for this you need to use the Partition button. The process of partitioning a hard drive is also simple, all you need to do is specify the size of each partition.

The next step is to launch Time Machine itself. To do this, in the upper left corner and click the System Preferences button (system settings), and then click the "Time Machine" button, then click the Select Disk button and point to an external hard drive or if you partitioned the disk, select the desired partition. Move the slider to the ON position and Time Machine will start backing up your MacBook data.
You should know this:
Data Recovery on Apple MacBook
There are times when you need to restore the system on your MacBook, say rollback a few days ago, or for some other reason completely restore the system. First, in order to rollback the system, the box for backups must be checked in the Time Machine settings, and the Apple MacBook must work fine.
Once you have verified this, click on the icon in the menu bar and press "Enter Time Machine" where all backups will be presented. Restoring a backup is very simple, you just need to select the day you want to restore to.

If your Apple MacBook is new or refurbished, then you will have the option to restore your MacBook from a Time Machine backup when you set up your computer for the first time. Just plug in an external hard drive and choose what you want to do, that's it! Apple has done a great job with the backup, I personally had no problems restoring my MacBook after the repair.
Reset MacBook
Here you will need to follow a few simple steps before you reset your Apple MacBook to factory settings. The first thing to do is back up your data!
Then turn off the computer, press the power button and hold Ctrl+R. The laptop will boot into Mac OSX recovery mode.
Here, click on the "Disk Utility" button, select your boot drive, and click on the "Delete" button to format it. Make sure "Mac OS X Extended (Journaled)" is selected, and then click the "Uninstall" button.
We continue, now there is nothing on your main partition, not even the operating system.
To reinstall OS X, you need to exit Disk Utility (CMD+Q) and then click "Reinstall OS X" in the main recovery window.
Results
Apple has made it much easier to back up, restore, and reset your MacBook. There are all sorts of troubles in life, but you can rest easy knowing that your data is safe. Now, it's easier than reinstalling Windows on your computer. Do you use a Time Machine backup? If not, then you should immediately start using it!
Learn how to reinstall your Mac operating system to built-in or external media from macOS Recovery, which makes it easy to reinstall your Mac operating system, even if you need to erase your startup disk first. All that is needed is an Internet connection. If a wireless network is available, you can select it from the Wi-Fi menu in the menu bar. This menu is also available in macOS Recovery Mode.
ATTENTION!
If the Find My Mac function was activated on the Mac, then after reinstallation, the system will ask you to enter the Apple ID to which the device is linked.
Run from the macOS Recovery Partition
To start from the macOS Recovery partition, immediately after turning on your Mac, press and hold one of the following keyboard shortcuts. In general, the Command+R keyboard shortcut is recommended, especially if you've never installed macOS Sierra 10.12.4 or later.
Cmd (⌘) + R - Install the latest version of macOS that was installed on this Mac.
cmd + Option (Alt) + R - Update to the latest version of macOS that is compatible with this Mac.
Cmd + Option (Alt) + Shift + R - Install the macOS that came with your Mac, or the closest version available (available since version 10.12.4).
Decide whether to erase (format) the drive.
The usual reinstallation option will keep all user data in place, updating only the OS. By choosing "Disk Utility", you can completely erase the boot volume. If the second system is Windows, the Boot Camp partition can be left unchanged.- Select Disk Utility and click Continue.

- Select your boot disk (usually Macintosh HD, which is at the very top left) and click on the "Erase" button at the top of the screen.
- In the window that appears, specify the name (optional) and the format APFS (for computers with macOS Sierra installed and an older version of the OS, select Mac OS Extended).
- Click « Erase » at the bottom right of the window.

Install macOS
- In the Utilities window, select Reinstall macOS (Reinstall OS X).
- Click the Continue button and follow the on-screen instructions to select your drive and begin installation. If the installer asks you to unlock the drive, enter the password you use to sign in to your Mac. If the installer does not see the disc or reports that it cannot install on this computer or volume, you may need to clean disk >

- Wait for the installation to complete without putting your Mac to sleep or closing its lid. During the installation process, your Mac may restart several times and display a progress bar, and the screen may remain blank for several minutes.
If the setup assistant appears after restarting, but you plan to sell or give away your Mac, press Command + Q to exit the setup assistant without completing the setup process. Then click Turn off. When the new owner starts the Mac, they can enter their information during setup.

Mac monoblocks are configured individually for each user. If you sell or transfer your device to another person, you will need to perform a factory reset or reinstall the operating system. Before doing these procedures, make sure you remember your Apple ID account information. Otherwise, you risk not going through Mac activation.
There are three ways to reset the settings: resetting data to factory settings, restoring and reinstalling the system. In all cases, before you begin the reset or reinstall process, make sure that Find iMac is active. If the function is activated, make sure that the authorization is passed under your ID, and you know the data from it (login, password).
Find the function along the path: "system settings", then "iCloud". If there is a check mark in the "search for Mac" field, the function is active. To uncheck the box, you will need to enter your ID password. If you have forgotten your password, please reset your password. After resetting the settings, restoring and reinstalling, the password is also requested.
How to factory reset iMac?
Connect your device to the internet with a good signal strength. To format user data, make a copy of the data to flash drives in advance. Use the reboot command in the menu. When booting, press the "Cmd" and "R" keys at the same time. This is the exit to the "bios". The computer will boot into recovery mode.
The next window displays "mac OS Utilities" on the iMac. Click Disk Utility, then Continue. Specify the disk located on the left side. Click "erase" in the upper area of the display. Click "format" in the menu section and select "Mac OS Extended". Click "erase". The data formatting process will start. When it finishes, click "finish" to go to the "disk utility" section. Now you need to reinstall macOS. Open the recovery section.
How to reinstall the system?
In the "OS recovery" section, click "reinstall". "Continue", specify the boot volume, "installation". When finished, the PC will reboot. If the boot volume for sale was cleared, press "Command" + "Q" to exit the assistant. Turn off your computer.
An easy way to reinstall is to reinstall OS X from the App Store. Installing Mac OS begins by disabling Find My Device and all company services. If you know the data from an authorized Apple ID, this is not necessary. Open the store and go to the shopping section. Find the OS name in the list and download/install it.
Next, in the recovery section, using various key combinations, carry out the desired method of installing the OS. "Command" + "R" puts the latest OS version on iMac without updates. "Option" + "Command" + "R" » The OS is updated to the latest version compatible with the PC. "Shift" + "Option" + "Command" + "R" to install the OS from the package and close to it.
Reset NVRAM
To restore your iMac to its original settings, reset the NVRAM. This is a special non-volatile memory that stores the startup parameters of the device. Resetting these options will restart the computer and reset the all-in-one to its original settings. If there are problems with the battery that powers the NVRAM board, you need to reset the SMC. Diagnostics is needed to identify such problems.
You need to go to the apple menu and reboot. A window will open showing a one-minute countdown. After the minute has elapsed, the computer will automatically restart the system. Simultaneously press and hold the "Option", "Command" keys and the "P", "R" buttons. Press them until a gray display appears. Keep the buttons pressed until the command is processed and the download starts. After that, release the buttons, the system should boot.
How to restore the system?

Connect your device to the internet with a strong signal. When we restore the system, user data is deleted, a fresh copy of OS X is installed and the settings are reset to factory settings. Go to the apple menu and click "restart computer". A window with a timer for one minute will be displayed, after the time has elapsed, the device will reboot. Hold down the "Command" and "R" buttons at the same time (while the gray display is lit). Press when "apple" is displayed.
When the next window loads, select "disk utility". Click Continue at the bottom of the display. A notification will appear that the device will send system data to the company's server to check that the iMac is compatible with the version of the OS that will be installed.
Click "continue". Specify "Disk Utility" in the set of options that appear after confirmation. Select the boot disk from the list. Click the "Erase" tab. Specify the Extended download form. Change the drive name if needed. Click "delete" to start the process. Enter your Apple ID username and password. Updating an iMac does not delete user data, but a restore does. To update the OS means to supplement the existing version with features modified by the developers.
Fair, not too high or too low. There should be prices on the Service website. Necessarily! without "asterisks", clear and detailed, where it is technically possible - the most accurate, final.
If spare parts are available, up to 85% percent of complex repairs can be completed in 1-2 days. Modular repairs take much less time. The site indicates the approximate duration of any repair.
Warranty and Liability
A warranty should be given for any repair. Everything is described on the site and in the documents. A guarantee is self-confidence and respect for you. A 3-6 month warranty is good and enough. It is needed to check the quality and hidden defects that cannot be detected immediately. You see honest and realistic terms (not 3 years), you can be sure that you will be helped.
Half the success in Apple repair is the quality and reliability of spare parts, so a good service works directly with suppliers, there are always several reliable channels and a warehouse with proven spare parts for current models so that you do not have to waste extra time.
Free diagnostics
This is very important and has already become a rule of good form for the service center. Diagnosis is the most difficult and important part of the repair, but you should not pay a dime for it, even if you do not repair the device after it.
Service repair and delivery
A good service values your time, so it offers free shipping. And for the same reason, repairs are carried out only in the workshop of the service center: it can be done correctly and according to technology only at a prepared place.
Convenient schedule
If the Service works for you, and not for itself, then it is always open! absolutely. The schedule should be convenient in order to be in time before and after work. Good service works on weekends and holidays. We are waiting for you and working on your devices every day: 9:00 - 21:00
The reputation of professionals consists of several points
Age and experience of the company
Reliable and experienced service is known for a long time.
If a company has been on the market for many years, and it has managed to establish itself as an expert, they turn to it, write about it, recommend it. We know what we are talking about, since 98% of incoming devices in the SC are restored.
We are trusted and passed on complex cases to other service centers.
How many masters in the directions
If you are always waiting for several engineers for each type of equipment, you can be sure:
1. there will be no queue (or it will be minimal) - your device will be taken care of immediately.
2. You give Macbook repair to an expert specifically in the field of Mac repairs. He knows all the secrets of these devices
technical literacy
If you ask a question, the specialist must answer it as accurately as possible.
To give you an idea of what you need.
Will try to solve the problem. In most cases, from the description, you can understand what happened and how to fix the problem.