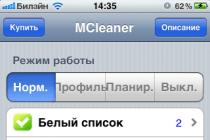
3 menu item Save - turn off (OFF).
Attention limitations in existing firmware!
Radios with firmware version BFB297 N5R-20 / N5R-30:
When "BEEP to OFF" and "VOICE to OFF" the radio stops receiving! If one of the items is ON, everything works.
There is more firmware BFS297:
When you turn on the "TDR ON" item in menu 34, it will not work to turn it off using the keys - only a PC and a cable will help.
After flashing or resetting to factory settings, does the radio stop working for receiving / transmitting?
Helps "filling" standard firmware. Posted in section.
When programming, do not create a new file, but change the existing frequencies in the radio. Perhaps the answer to the question " limitations in existing firmware"
in the same topic.
What is the range of radios in different conditions?
Range station-station on standard antennas:
city - 1.5-3 km,
rough terrain - 3-4 km.,
line of sight - 6-7 km,
forest - 1.5-2.5 km.
Depending on the selected range (upper/lower), the range may vary slightly.
Does the radio work on the frequency of truckers?
No.
How to find out the firmware version?
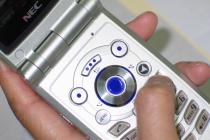
Turn off radio. Press button "3". Turn on radio. The firmware version in BFBxxx format will appear on the screen. real The firmware version can only be found by connecting to the radio from a PC using the programming cable.
How to start a frequency scan?
First you need to set the search step (STEP) in the menu, then enter the starting frequency and press "*". Use the up and down arrows to select the direction. Usually scanned in increments of 0.25.
NAGOYA NA-771 - 40 cm long, not always convenient. Nagoya 805 is short and only works in the 433 MHz band.
The programming cable does not connect to the radio. Writes "Connection time out".
You are probably trying to work with software that does not support radios in this firmware.Regular software for programming has 3 versions.
Use Chirp.
When you connect the cable, the walkie-talkie starts to heat up / work on transmission.
Install the driver before using the cable.
Tell me which of the baofeng uv-5 is better to take? (A, BC, A+, etc.)
There is not much difference, only appearance.
Can I update the firmware in the UV-5R?
No. The controller is programmed only once (OTP). Not to be confused with programming.
I have entered a frequency, but it is not saved to a specific channel.
Most likely the channel is busy or display B(lower) is in use.
The channel needs to be cleared. Actions:
1) Switch to VFO mode (frequency mode).
2) Display A (upper) must be selected.
3) The channel must be empty before writing a frequency to it (deleted using menu 28).
Can I listen to the air band?
Officially - no. Avia operates at frequencies below 136MHz and uses Amplitude Modulation (AM). UV-5R operates at frequencies from 136MHz only with frequency modulation (FM). Some firmware versions allow you to expand the frequency range of the radio station, thus receiving air frequencies is possible, but the radio, for example, when you click on the transmission, may freeze, turn off, etc. Therefore, if the radio has turned into a "brick" due to the opening of the range, then only your fault is .
Can I save FM radio stations 65-108MHz into memory?
No. It is also not possible to transmit on these frequencies.
I want to buy a larger battery.
With an increased battery, the walkie-talkie becomes heavier. It is inconvenient to wear a walkie-talkie. Cheaper and more practical buy another regular one.
Can the battery be charged separately from the radio?
Can.
I want to assign channel names myself (not CH-001, CH-002, etc.).
This is possible, but it will take
In the menu, the 14th item, set to OFF.
With which connector to buy antennas for Baofeng UV-5R?
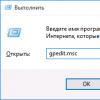
CHIRP won't start. Error reporting is enabled or in English error reporting is enabled.
Solution:
1. We look at the username and computer name.
2. If the computer name is in English. language - create a new user in English. Should earn.
3. If the computer name is in Russian: rename the computer and only then create a user.
When reading data from a walkie-talkie using a programming cable, it often fails.
When programming channels, try to set the frequencies on which transmissions are not conducted. Reception causes a read / write failure.
Which LED is out of order to buy a replacement?
3.7V comes to the LED, you can estimate the dimensions in the store. They say it fits well from Chinese lighters.
When programming the radio with the Chirp program, an error occurs - "radio refused to send block 0x0000"?
In channel mode, it does not scan programmed channels.
Channels must be programmed using a programming cable, if the frequencies are "packed" into the handheld radio, they will not be scanned.
Despite the weather cataclysms, summer this year nevertheless came into its own, and many easy-to-lift autotourists rushed to long-distance routes - some to the south, and some to the more curious and remote corners of vast Russia. At the height of the travel period, car owners traditionally increase their interest in CB radio stations operating on the “trucker channel”, which can be useful on a long journey. For those who want to purchase and install a walkie-talkie on their own - our briefing!
Connecting the Radio to Power
The following guide to installing a CB radio in a car is not for those who use radio daily and professionally, but for those who need it for occasional use, mainly on long trips. In this case, most drivers will prefer not to permanently mount the radio in the cabin, spoiling the interior and provoking parking thieves, but will want to attach it temporarily in a suitable place: between the seats, between the seat and the side pillar, or in the tray for small items under the dashboard, as it is done, for example, in the photo Chevrolet Lachetti:

Articles / Practice
Oh give me a soldering iron: the auto gadgets our dads made
It's no secret that in the Soviet and post-Soviet periods, any handy man easily made at least a charger for his garage. More advanced ones made non-contact ignition systems, ...
19080 3 3 18.05.2017
Attached a walkie-talkie - we connect power to it! There is an opinion that the radio station in the car must certainly be connected with a separate wiring from the battery, but this solution is more suitable for daily use. In our case of occasional use, this is absolutely not necessary - it is much more convenient to take power from the cigarette lighter socket. This is the simplest, fastest, and at the same time, we emphasize, a completely correct connection. Not hacky-compromising, as some people think, but meeting all the requirements - both in terms of the power unit, and in terms of the direct operation of the radio station on the air.
Such a connection is absolutely safe for electrical wiring and is carried out in half an hour. And most importantly, it is optimal in the case of a new car and harmful guarantors, who are only looking for a reason to refuse a guarantee for far-fetched reasons.
For a radio station with an output power of 4-5 watts, the maximum current consumption does not exceed 2-3 amperes, and for a radio station with an output power of 8-10 watts - less than 5 amperes, which is at least two to three times less than the current of the fuse that protects the cigarette lighter socket.
To connect the radio to the cigarette lighter, we extend the two power wires coming out of the radio station - black and red - by soldering or twisting to a length of 1-2 meters (depending on the intended installation location of the device). At the end of the attached wire, we solder (center - plus, side contacts - minus) a standard “male” connector into the cigarette lighter, which is sold in every car shop.
the plug of the radio power wire must be inserted exactly into the cigarette lighter in the dashboard, it is undesirable to use splitters, the quality of which is often disgusting!

If there is only one cigarette lighter socket, and you need to power the telephone, the recorder, and other gadgets on the road, and the warranty period has already ended, and your skillful hands are not afraid of having to drag the wire from the engine compartment to the passenger compartment, then you can connect the radio station directly to the battery. Although once again I note in brackets: such a connection does not have any advantages over power supply through the cigarette lighter - neither in terms of electrical safety, nor in terms of communication quality.
In this case, you will have to buy a three-meter (approximately) piece of a conventional power wire with a cross section of 2x1.5 mm, pack it along its entire length in a plastic corrugation and drag it from the battery into the passenger compartment through some kind of rubber motor shield seal. Terminals for M6 bolts and a 10 amp fuse are crimped or soldered to the ends of the wires near the battery (the fuse is placed in the positive wire next to the battery), and the power tail of the radio station is connected to the two opposite ends of the wires with polarity. The junction of the wires is carefully insulated with adhesive tape or heat shrink.
Antenna Installation
The station is installed and connected, now we mount the antenna. We will assume that we have a quick-detachable one on a magnetic sole, which will not require spoiling the body for installation.
Therefore, we will give only a few general theses - without deepening into an extra theory.
- Antennas with a length of about a meter or even less are efficient, but extremely inefficient. The dependence of efficiency on length is direct; when buying, you should prefer an antenna with a length close to two meters. However, as the length increases, the price also increases ...
- The optimal installation of the antenna is on the roof (in the center or on the edge - there is practically no difference). Somewhat worse - on the trunk, but also quite acceptable. In order not to spoil the paint on the roof, we put polyethylene under the magnet.
- The wire from the antenna to the station is passed between the door seal and the doorway or between the trunk lid and the trunk opening seal, and enters the passenger compartment. Make sure that the seals do not leave noticeable dents on the cable!
- The antenna cable on the magnetic sole cannot be arbitrarily shortened or lengthened - its length must remain unchanged, about 3.6 m. We hide the excess under the seats or rugs, without twisting into rings or bays.
- And now the most important thing: the antennas in the store are sold unconfigured, since the setting depends on the installation location on a particular car. Most often, adjustment is carried out by changing the length of the antenna pin (pulling out and pushing in), for which a small hex key is included. The place of adjustment will be indicated in the instructions for the antenna.
Antenna tuning
Actually, antenna tuning is the most important moment in our entire history. You might want to call in the pros for tuning: these services are inexpensive, take less than half an hour to complete, and are offered at truck stops and near major auto shops on the highways. But many prefer to sort out the issue on their own, profess the principle “if you want to do it well, do it yourself!” and want to have their own set of tools to monitor the condition of the antenna in the future. For them - the following master class. Again: only an algorithm, without delving into unnecessary theory and physics of ongoing processes, into which everyone, if desired, can immerse themselves.
To tune the antenna, we need a device called a SWR meter (standing wave ratio meter), which is easy to purchase - Google to the rescue. The cost of the simplest model is from 500 to 1000 rubles. The most common device that has been on sale for many years under different names (SWR-420, 430, KW-520, etc.), in fact, is the same Chinese SWR meter with the same principle of operation and the same designation of switches and connectors. The device, of course, is more than average, but for infrequent use it will do.
 |
 |
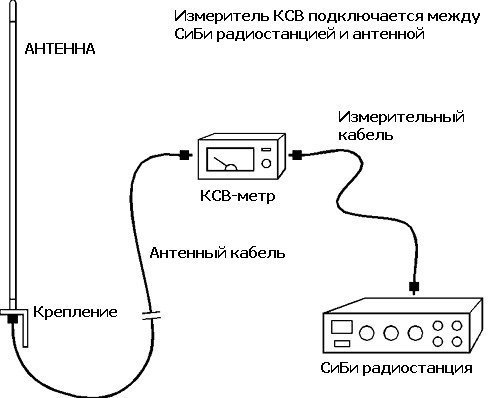
We will also need a high-frequency connector of the same standard as the socket on the radio and the plug on the cable. It is needed to include an SWR meter between the radio station and the antenna without significantly extending the antenna cable. A male-to-male barrel adapter (for a hard connection) or a short (10-20 cm) antenna cable, also with male connectors at both ends, will do. The connector standard is best known by the name "PL", which is how it should be asked in the store.
RTX , insert the antenna into the connector of the SWR meter marked as ANT.
(if the SWR meter connectors are not marked, insert as you like - the SWR meter, in principle, is a symmetrical device)
And that is all. As you can see, it's not that difficult. But now on the road you can have fun listening to the conversations of "long-rangers", sometimes useful, sometimes not so much. And do not forget that children can ride with you in the car, for whom it is too early to listen to these conversations.
The spread of cellular communications does not exclude the need for the use of radio stations in all spheres of life, from professional activities to home use. The advantages of this type of communication are more than it might seem.
This is the absence of a monthly fee, the ability to be in touch where there is no cellular coverage signal, as well as a number of operational amenities. Even a child can work with a radio station, but there are rules on how to use a walkie-talkie. They are recommended for everyone who goes on the air.
Frequency selection
The user needs to know which frequencies can be productively used. There are four types of radio frequencies used on the air:
- (Civil);
- LPD (Unlicensed);
- PMR (Universal);
- VHF (Professional).
MW radio stations are capable of transmitting a signal over short distances, but with frequent obstacles. They are convenient in the forest, in urban areas. The LPD and PMR bands operate in the frequency range from 400 to 500 MHz. This allows you to negotiate at a distance, obstacles will not interfere. To work on LPD frequencies in the Russian Federation, you do not need to obtain permission, the PMR band is equally legal in the West and in Russia. VHF frequencies are useful for providing closed communications over short distances.
Checking the radio for readiness for operation

- the operation of the control buttons is tested;
- outgoing power check;
- modulation control.
To make sure that the radio station is working, it is necessary to establish communication with another subscriber with a radio device.
What you need to know about radio communication
To send a message, you need to switch to the outgoing broadcast mode, for which the PTT button is pressed. When going on the air, you need to understand that everyone who is on the same channel with you will hear you. It is impossible to receive a signal and speak in synchronous mode.
Basic rules of communication
- First, the message must be named so that subscribers understand who it comes from.
- After completing the message, you must confirm that it was received.
- For long-term negotiations, it is recommended to use other channels so as not to occupy the general air.
How to technically organize the negotiation process
- Messages should be concise, so it is recommended to think over and formulate phrases in advance.
- Check that the air is not busy at the moment, and no other conversations can be heard on it.
- The radio station must be held in an upright position a few centimeters from the lips. If the device is placed horizontally, it will negatively affect the signal propagation range.
- After pressing PTT, you must pause for two seconds, and only then speak. The message should be clear, simple and legible.
- After the end of the voice signal, the button is not released immediately, but also after a couple of seconds. This will preserve the integrity of the message, the interlocutor will not need to clarify what he heard.
- It is necessary to speak after the completion of the replica by the partner.
Using the tips on how to use a walkie-talkie, subscribers will be able to correctly use radio equipment and get the most out of properly organized communication.
Today virtually every person owns one or more mobile phones. But, sometimes, there comes a moment when it is better to use a walkie-talkie. Another plus in favor of radio stations is that you can contact your interlocutor for free. An important advantage of this device over a mobile phone is also its constant work in the mode of receiving communication and you do not need to press any buttons to hear the interlocutor.
Types of radio frequencies.

Currently there are 4 classes:
- Professional VHF.
CB radios (civilian band) operate in the range from 26 to 30 MHz with a wavelength of about 11 meters, which allows you to overcome large obstacles. Radio stations LPD (433-434 MHz) and PMR (446-470 MHz) with a wavelength of 70 cm provide a good communication range on the ground, with a large number of various small obstacles. It should be noted that LPD is legal only on the territory of the Russian Federation, while PMR is allowed both abroad and in our country. VHF band (136-172 MHz) with a wavelength of about 2 meters allows you to organize communication within the city.
How to check the radio.
First you need to test the operation of the buttons and check the presence of output power using an SWR meter. After that, it is necessary to check the presence of modulation, which will require another radio or interlocutor.
How to communicate on the radio.
To switch to the message transmission mode, you need to press the PTT button. Remember that everything you broadcast will be heard by all walkie-talkies tuned to the same channel. You can't speak and listen at the same time. If several radios are switched on at the same time, either noise will be heard, or the one with a stronger signal. And do not forget that you should speak only after pressing the PTT button. But in no case before pressing or simultaneously.
Radio communication rules.
Before you begin to communicate, you should introduce yourself, from which it will become clear who is speaking. If you received any information from the interlocutor, confirm that you accepted it. If you have a long conversation with someone, ask the interlocutor to switch to another channel so as not to occupy the general one. If you take our advice and buy a good walkie-talkie from us, you will give yourself great pleasure and it seems to us that you will never regret this purchase.
Modern technologies allow us to always stay in touch, regardless of the place of stay, weather, the presence or absence of cellular networks. All this is possible thanks to radio communication - a type of communication that uses radio waves of different frequencies as a carrier of information. Today, most of the radio equipment market is represented by walkie-talkies and radio stations that can be used as a means of communication for motorists and the military, security guards and hunters, fishermen and skiers. A simple solution buy a walkie-talkie sometimes it saves in difficult situations when you need to call for help or convey particularly important information. But not always, it turns out, to achieve excellent signal quality for receiving and transmitting a walkie-talkie.
This is largely due to the fact that the selected radio must be tuned to the desired wave. That is, initially any walkie-talkie, whether amateur or professional, may not work at full capacity or work with interference. Modern digital walkie-talkies do not need to be tuned, as they have a built-in button that allows you to automatically adjust the device to the required radio wave. The remaining walkie-talkies can be conditionally divided into portable (wearable) and automobile (stationary). Setting up walkie-talkies These two types are similar in many ways, although they have their own characteristics.
Setting up walkie-talkies
Portable walkie-talkies in the amateur band (433-434 MHz) do not require registration with an RF center, so setting them up is a fairly simple process. Before buying, you need to find out if the radio supports interchangeable antennas, in case you want to increase the power of the radio. Also, an important point in the operation of portable radios is their adjustment to each other. To do this, on each radio you need to set the same channel number and subcode. Only in this case, the selected radios will work smoothly with each other. To send a message, just press and hold the start button. After releasing the button, the radio waits for reception from another device. An important element of setting up a portable radio is the choice of a call sign (identification of an individual signal). This can be any alphabetic or numeric alias that is unique to the selected radio system.
Further walkie-talkie setup includes setting up the radio antenna. We will consider in more detail the tuning of the radio antenna below for car radios. For now, just note that you will need an antenna analyzer to fine-tune the antenna. But in many cases, to set up a walkie-talkie as a first approximation, a device called an SWR meter is enough. With it, you need to tune the antenna to the minimum standing wave ratio. Usually, an SWR value of 1.5 or less is considered optimal. It is also important to understand that the higher the SWR value of the wave, the greater the percentage of power loss during signal transmission. But in practice, achieving SWR = 1 is almost impossible. If the standing wave ratio is greater than three, then operation in such conditions can disable the transmitter stage. Thus, an unconfigured walkie-talkie can easily fail.
How to set up a car radio

Before as set up a car radio, you need to perform some required steps. They will not only increase the efficiency of subsequent tuning, but also minimize the likelihood of a transceiver breakdown in the future. Usually, a car radio is a stationary unit that is fixed in the car and a remote antenna. It is the car radio antenna that plays a key role in signal quality in many ways. Therefore, you need to know the basic rules when installing a car antenna.
Rules for installing a car antenna
- It is not allowed to install the antenna on the supporting elements. Always try to install the car antenna on a load-bearing body. Thus, we will protect ourselves from possible losses in the efficiency of radio signal transmission.
- It is important to install the antenna on the highest part of the body, usually the roof. The higher the antenna is installed, the stronger the signal.
- The antenna web must be installed at a distance of at least 0.5 meters from any metal surfaces parallel to the emus. This will prevent possible reflections and absorption of the signal.
- The position of the magnetic antenna on the car roof has little effect on the standing wave ratio. Therefore, always try to fix the magnet in the same position after removing it.
After the antenna is properly installed, it must be tune. Only after tuning the antenna can you safely use the radio at full power.
Setting up a car antenna
The best way to tune your antenna is with a professional antenna analyzer. But since the prices for such devices are quite high, many motorists find an alternative in SWR meters. With this device, you can adjust radio antenna in the first approximation. This is how the simplest SWR meter SWR-430 looks like

So, antenna tuning must be performed on a flat and clean surface devoid of any interference: metal, wooden or concrete objects. It is also important that when setting up the antenna there are no other 27 MHz antennas nearby. Armed with an SWR meter, you can begin to tune the antenna. The first step is to connect the SWR meter between the station and the antenna in a special way (as shown in the figure below).
- It is important to take measurements on different channels and grids to see the big picture.
- We calibrate the SWR meter. To do this, set the toggle switch on the front panel to the FWD position. We set the AM modulation channel 20 on the radio. After that, we press and hold the button to start the conversation, while turning the CAL regulator clockwise, so that the arrow of the device becomes in the extreme right position SET.
- While holding the button on the tangent, switch the toggle switch on the front panel of the SWR meter to the REF position. We take readings of the device.
- We find the minimum SWR and tune the antenna to the desired frequency. If the minimum is below the required frequency, then the antenna is shortened. Conversely, if the minimum is higher than the required frequency, then the antenna is lengthened.
- All manipulations are performed before re-tuning the antenna.
- We repeat the measurements until the result is achieved (SWR is not more than 1.5)
As mentioned above, achieving SWR = 1 is largely problematic, precisely because of the characteristics of a particular antenna-body pair. But even if SWR = 2 in the desired section of the radio frequency range, the loss in efficiency will be no more than 10%. That is, for comfortable communication and transmission of messages without interference, SWR = 1.5 is quite enough.