“How can I format an HDD without deleting Windows” or “how to format an HDD from under Windows” are very popular queries in search engines that remain unanswered. In the article, we will figure out why there is practically no information on this topic on the network, and we will get to know the problem more closely.
What is formatting
To format a hard disk means to create a new file system on it, which means clearing the main MFT file allocation table. MFT is a database of files stored on disk, made in the form of a table, in which the rows are represented by file names, and the columns are their attributes. Attributes are metadata that describe a file. These include the date and time the file was created/modified, the directory where it was stored, and access rights.
Given the above, we can conclude that it is impossible to format a computer on which one HDD is installed. At least without resorting to tricks.
Who has not yet understood, when a special program or Windows starts to format the hard drive, they delete the main file table. In view of this, access to all files by the standard method becomes impossible, and the space occupied by them is marked as free. If you try to format a computer from under Windows, the operating system will display the informational message below, because the files it uses are located on the first partition of this disk.
We show ingenuity
We mentioned above a certain trick, thanks to which you can format your computer while maintaining the performance of Windows. Formatting a PC means cleaning a single hard drive.
If the computer only has one magnetic storage device, for whatever reason you want to format it but keep Windows with programs and settings, we'll need a few things:
- bootable flash drive with Acronis True Image;
- external hard drive or the ability to upload images to the cloud.
If user data is also placed on the HDD, they will have to be uploaded to the cloud or copied to another medium.
Getting Started
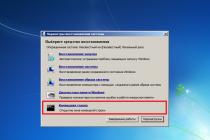
- We restart the computer and boot from the flash drive, whether it is bootable media with True Image or WinPE with this program included.
- In the main window, click on the button icons as shown in the screenshot to open the window for creating a new disk copy.

- Select the source type.

- We indicate the target disk that we will format, be sure to select the space reserved by the system.
If all the information has been transferred to another medium, uploaded to the cloud, or it is not valuable, select only the system volume.

- Decide where to store the image. Remarkably, the program allows you to save it in the cloud or transfer it over the local network, which is what we need.

- Click "Create Now".

- We are waiting for the finish line.

Keep in mind that when transferring an image, which can take up a couple of tens of GB, it will take a lot of time for a cloud service, in contrast to saving it to a computer on the same local network or to a portable HDD.
- We boot from a USB flash drive and run a program that allows you to format your computer.
The tool that can format hard drives can be DOS, WinPE, Acronis DiskDirector, Partition Manager, or another specialized utility.

- Again, boot from a flash drive with Acronis or WinPE and run True Image.
- We select "Backup" and our copy of the hard drive or its system partition. Click "Recover disks" that were able to format in the 8th step.

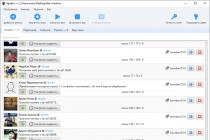
List of popular free programs for various types of formatting hard drives (HDD, SSD, RAID) and removable media (USB, Firewire, SD). In this article, you will learn how to properly format a hard drive, learn about various types of HDD formatting - including low-level. We will also choose a good program for partitioning a hard drive.
HDD formatting methods - from simple to complex
Formatting is a simple operation that can be performed by inexperienced users. Next, I will tell you how to format the HDD yourself - from simple to complex, depending on your skills and PC proficiency.
Using standard Windows tools for formatting
The Windows XP-10 operating system has built-in tools to perform this operation. Formatting a hard drive is done like this:
- Open "Explorer" (or another file manager),
- Go to the "My Computer" section
- Click on the desired disk
- Select "Format"
- Next, click on the “Start” button
This is the easiest way to format your computer without additional tools. For all its simplicity, however, all steps must be performed consciously, clearly understanding why you are doing this. Before giving your consent to formatting, carefully check whether the correct disk is selected.
Perhaps the video tutorial shows more clearly how to format the disk.
Alternative formatting method in Windows 7 / 8 / 10
- Different systems have different paths to Disk Management - the easiest way is to open the search for programs and enter "management". When the system gives you a search result, find "Computer Management" and open it
- In the menu on the left, go to "Disk Management"
- Right-click on the desired partition and select Format. Since the process takes place inside a running OS, the "Format" menu item will be inactive on the system partition
- Next, select a label for the new partition, the type of the future file system and the required cluster size (if you don’t know what size you need, leave “default”)
- For high-level formatting, you can leave the "Quick Format" checkbox active. If deep cleaning of the contents of the section is required, then uncheck this box.
- After pressing the "OK" button, the system will ask for confirmation - click "OK" again
Formatting a hard drive through the Windows command line
To start formatting, open a command prompt (console) on your computer. To do this, use the key combination WIN + R, in the Run window that appears, enter the CMD command, press ENTER.
Note. To format a drive through the command line, you will need administrator rights. Start - CMD - open the context menu by clicking on the application icon "Command Prompt" - Run as administrator. If you try to format the drive without administrator rights, you will fail: access will be denied. In general, watch the video where I show how to format as an administrator.
For formatting through the console, use the following commands:
Format drive letter
Press Enter. We carefully read what is written in the console, perform further actions with the hard disk according to the situation.
Full HDD Format via HDD Low Level Format Tool
Low-level formatting will optimize the HDD structure. This is useful in preparation for reinstalling the operating system. At the same time, you can solve problems with bad sectors of the hard drive.
HDD Low Level Format Tool is suitable for low-level formatting. The utility will help you format your computer hard drive, external HDD, tablet SD card and other storage devices.
In addition to the basic functions, HDD Low Level Format Tool can be used to read SMART scores, check for read errors, disk usage time, and more.
How fully format hard drive:
- After installation, run the program HDD Low Level Format
- In the Drive selection window, select the hard drive (if several HDDs are connected to the PC). The easiest way to distinguish one hard drive from another is by volume. Click Continue
- Go to the LOW-LEVEL Format tab
- For quick formatting (deleting partitions and MBR records), select the Perform quick wipe option.
- To completely format the hard drive, the above option must be ignored.
- Before completely formatting a hard drive, check that the correct drive is selected. Only after that press the Format this device button.
AOMEI Partition Assistant
AOMEI Partition AssistantThe program offers a number of useful features, including low-level formatting of hard drives and most types of removable media. The interface resembles standard Windows tools, so it will not be difficult to figure it out:
- The main window automatically displays the disk with the installed OS. If you need to format another device, select it by clicking the "Disk" item in the top menu
- In the lower block of the left menu, select "Erase Hard Drive"
- When you click this button, you will be prompted for the number of passes of the operation. If in the future it is planned to restore destroyed data, then select a value from 1 to 7. If you specify a parameter of 8 or more, it will be almost impossible to restore information from the device
- Confirm your choice by clicking "Yes"
- Formatting to start will require a system reboot - there is no turning back after clicking the Reboot Now button, so make sure you select the correct drive and the correct operation settings
After restarting the computer, the program will perform all the specified actions and you will have a clean hard drive at your disposal.
DiskWipe
DiskWipe is a great solution for situations where the data on the media needs to be destroyed beyond recovery. The program uses several proven algorithms (Dod 5220-22.M, US Army, Peter Guttman), and advanced settings allow you to choose the depth of formatting. According to the developers, the program does not contain hidden viruses, etc., and does not transfer user data.
DiskWipe
Formatting the desired device using DiskWipe is extremely simple:
- Run the program. In the block on the left you will see all devices available for formatting
- Select the desired device and click "Wipe Disk" in the top menu
- The advanced settings will open with predefined default values. For full and irreversible formatting, you can check all available fields with checkmarks, and in the right block, specify "Highest"
- After selecting the settings and clicking "OK", the formatting of the selected device will start
Paragon Partition Manager
A test period of 30 days allows you to evaluate the capabilities of the program and format the necessary devices in various modes. Since Paragon Partition Manager has several options for working with partitions (partitioning, restoring, and others), it is distributed shareware.
Paragon Partition Manager
The formatting process is intuitive:
- In the main window, click "Partition Manager" in the menu on the left, then select "Launch Partition Manager"
- From the proposed list of devices, select the one you need, open the context menu with the right mouse button, and click "Format Partition"
- Specify the type of future file system and volume name, then click "Format"
- The procedure will be queued - to apply the changes, you must click on the green checkmark in the top menu
- After confirming the operation (the “Yes” button), it will no longer be possible to stop its execution
Separately, it is worth noting the fact that Paragon Partition Manager not only formats the device, but also creates a new partition with the specified file system, so after the system boots, the disk can be used without additional steps.
reference Information
What is formatting?
Formatting a disk is the process of marking a storage device such as a hard disk drive (HDD), memory card, CD/DVD, or other storage medium. The formatting operation is equally useful for new and worn-out HDDs.
A disk that has no partitioning is absolutely useless. In addition to the fact that you apply markup to the disk, formatting almost permanently deletes all data (although there are many programs for recovering after formatting). Therefore, you need to be careful and prepare in advance for formatting the hard drive.
Over the years of operation of the operating system (Windows, Mac OS, Linux), the hard drive turns into a "garbage dump", since many programs leave their files on the disk, and after uninstallation, their "roots" still remain on the HDD. As a result, the system is slow and unstable. There are various freezes, slowdowns, the disk clicks, makes noise - it behaves inappropriately. After reformatting, the hard drive is optimized and starts working better. Many devices last a long time without this procedure. I advise you to insure and format your hard drive at least once a year.
Sooner or later formatting the drive is inevitable. However, before doing this, it is very important to update or reinstall the operating system on the computer. Along with the removal of unnecessary files, you get a completely clean environment without defects, harmful viruses, unused programs, data that lead to conflicts. Thus, before reformatting the hard drive, we reinstall the OS.
Before formatting, back up any important data to another drive. As already mentioned, during the execution of this procedure, various service information, labels are written to the disk, which allow further information to be written to the HDD without hindrance.
Steps to Format a Hard Drive
low level– at this stage, the base markup is applied to the disk at a low level. Typically, this is done by the hardware developer. In this case, special tracks, service data, are applied to the disk. This information remains on the hard drive almost forever - it can only be overwritten using proprietary utilities. These programs can only replace service data. By the way, if you perform a low-level formatting of the hard drive, then you will not be able to recover data later, unfortunately or fortunately. Therefore, if you aim to destroy information, then you can use this format. Read about low-level formatting
Section breakdown. It is clear that storing data on a disk without partitions is quite inconvenient. For some logical organization, the HDD is divided into special zones, disks - drive C:, drive D: and so on. For these purposes, both utility utilities built into the OS and external programs for formatting a hard drive, which I have written about more than once, can be used.
high level. In the process of this type of reformatting, boot sectors, file tables are created.
Types of disk formatting
You may know that the standard system tools provide 2 methods by which you can format a hard drive - external or internal:
quick format: takes less time, allows you to carry out the procedure as is. The bottom line is that with this type of computer formatting, the files in the file table are overwritten with zeros, while the data is stored as if nothing had happened, you can later restore it. Also, with this method, you do not optimize the file structure, and if there were defects on the hard disk, you will not fix them with the fast method.
regular formatting: Longer and deeper hard disk formatting. Data on an internal or external drive is completely destroyed, the file system is checked for possible errors, damage. bad sectors, bad blocks. Thus, with the usual way of reformatting, you kill two birds with one stone, although you lose a little more time.
When installing the operating system, as well as when changing files, redistributing space between partitions, it is necessary to format the hard disk. This is a fairly common operation performed by PC users. If you have not done anything like this yet, then let's deal with the theoretical part of the question.
Formatting process, what is it?
The marking of information storage areas, in which some of it is deleted, is called formatting. It creates a system for accessing stored information.
Typically run for:
- changing one file system to another;
- deleting files from the hard drive.
At the moment, there are a large number of different file systems. They are used on various equipment, including not only computers, but also mobile devices. The latest versions of Windows use the NTFS file system.
Video: How to format a hard drive
Why format a hard drive?
Formatting is done to remove files from the hard disk, as well as to change one file system to another.
In most cases, they resort to it:
- before installing a new operating system;
- to create a Windows installation image, for example, on a flash drive;
- due to the need to clean the disk from files, in case they are not needed.
Formatting with Windows tools
Despite the large number of various programs for working with a hard disk, the Windows operating system has its own set of utilities.
Consider the process of formatting disks using Windows:
- select the drive you want to format;
- press the right mouse button;
- select Format;
- in the window that appears, select the file system, cluster size, and formatting method;
- as a file system, it is recommended to set NTFS, and leave the cluster size by default - 4096;
- after setting the required parameters, click Start.

Windows also includes a more complete hard drive service.
To open this menu, do the following:
- right-click on My Computer;
- select Manage;
- open Disk Management;
- In this menu, the user can perform various operations on the hard disk, including formatting.

Formatting via command line
You can also perform this operation using the command line:
- press the key combination Win + R;
- enter cmd and press Enter;
- on the command line, write the format y: command, where y is the letter of your drive, maybe, for example, c or d;
- the system will ask you to confirm the operation by pressing the Y key;
- after confirmation, the system will start the formatting process;
- this message will appear when finished.


Format HDD in BIOS
If you need to format a hard disk partition from the BIOS, you will have to tinker a little. Unfortunately, the BIOS does not have tools for formatting a hard drive, so you should use third-party programs to perform these operations.
One of the most common is Acronis Disk Director. To work with it, you need to create a bootable media in the operating system with the files of this program. But before you start creating bootable media, you should consider one more option - formatting using the Windows Installer. This solution is a simpler option compared to Acronis Disk Director.

For this method, you only need a disk or flash drive with a recorded installation package for the operating system.
For formatting, follow these steps:

Attention! Drive partition letters may not match. To more accurately determine the required disk, use the wmic logicaldisk get deviceid, volumename, size, description command.
Creating a bootable flash drive Acronis Disk Director
To create a bootable flash drive you will need:

Action algorithm:
- insert a flash drive;
- install and open the program;
- in the application, open the Tools section and select Acronis Bootable Media Builder;
- click next;
- select the type of Windows PE bootable media;
- in the next menu, you should mark the necessary components for recording to a USB flash drive;
- after selection, you must select the media to which the recording will be made, and click Next. The flash drive should be formatted in FAT 32 format using the Windows utility;
- you can also create an image for later burning to a flash device or disk using the Ultra ISO program.
Working with a bootable flash drive Acronis Disk Director
To download a flash drive you need:

How to format an external hard drive to NTFS
The most convenient formatting method is to perform all actions using standard operating system utilities. This solution does not involve installing additional programs and creating additional boot disks.
If you do not have an operating system installed, then in this case you should use special programs, such as Acronis.
Steps describing how to format a hard drive as ntfs:

Utilities
In addition to the standard Windows program, there are various utilities used for the same purpose.
Among the most common options are the following:

What is the best program in ntfs to format drives?
Each program has its own characteristics, but the main direction for all utilities remains the same - working with disks, including creating partitions, forming into other file systems, etc. Therefore, choosing a program is a purely personal matter for each user, which depends on his preferences .

Problems and solutions when formatting
How to quickly format a disk without losing data?
Unfortunately this is not possible. All stored information will be deleted. Only part of the data can be recovered.
Which drive is better: remote or external?
Formatting external drives is done in the same way as for a regular hard drive. With this process, all information will be deleted, including windows, after execution, the disk is obtained as new without windows.

Unable to format hard drive
If you did everything according to the instructions, but did not achieve the result, you should not sound the alarm. It doesn't always mean something bad.
- format command - cannot be used for a system drive if it is in its environment;
- if the operating system is located on another partition of the hard drive, it cannot be deleted;
- the settings of the anti-virus program can block access to different sections of the hard drive;
- different applications and viruses can block access.
If you have removed the above factors, but you still cannot format the hard drive, you will have to resort to special programs. The most popular tool is HDDscan, which is easy to install and free of charge.

Action algorithm:
- download the utility;
- open and install;
- run as administrator;
- click on the icon in the form of a sphere located in the center of the interface;
- select Surface tests;
- check the box next to Erase;
- go to the Add test tab;
- click on Scan;
- in the right, lower corner, write down these errors;
- set the EraseWAITs option to ON and select Scan again;
- repeat until the error is gone.
You can also use Acronis Disk Director. If it is impossible to format a portable hard drive using this program, most likely the hard drive is partially out of order. And the whole procedure, sometimes it is possible to perform, only from bootable media, that is, not in the operating system.
How to force format a flash drive?
You can use the program to format flash drives HP USB Disk Storage Format Tool
- provide the necessary set of functions;
- have a fairly simple interface that will be easy for novice users to work with.
From time to time, users need to work with flash drives or other devices. But when it comes to the hard drive, a lot of questions immediately arise. That is why today we will touch on this sensitive topic, how to format the Windows 7 C drive through the BIOS, and also how to do it using the Windows 7 installation disc. Many users who have begun to study the computer on their own face this problem, so I will tell you as much as possible.
Attention! Windows 7 is taken as an example! If another system is installed on your computer or laptop, then there is nothing to worry about, since the program does not care which version is installed on a particular device.
The main reason to format the C drive is to reinstall Windows. Personally, when reinstalling Windows, I always format the C drive. Of course, before formatting, you must transfer all the necessary data to another drive, such as D: \ or to another medium where there is free space for this data.
The second reason may lie in malicious programs that are not cured. For example, many files on your C drive have become infected with viruses, what should you do then? After all, after treating these files, they can and will open, but most likely when you open them, you will see one or more errors on the screen that are associated with file damage.
Naturally, such viruses are dangerous, but novice users forget about simple precautions: antivirus, opening links from friends (fake), etc. Therefore, it is better to use the Internet with an active antivirus so that this does not happen to you. But if this still happened, then formatting the local disk with the subsequent installation of Windows will help.
Note: if you found a lot of viruses on your computer and your Windows freezes after treatment, then it is possible that this happened due to viruses that you removed. In this case, it is better to reinstall Windows to get rid of annoying system glitches:
About the cases that I mentioned above, it was a kind of introduction from which you can understand why you might need this procedure.
Formatting the C: / drive using the Windows 7 installation disk
There are many programs through which you can do this procedure, but in fact, you only need to know 2-3 ways, since situations are different, and only you can find a way out.
I must say right away that it will not work to format it directly from the system (meaning right-clicking on the disk and selecting "Format"). To format the disk, you need to boot from the installation disk, and use it to format the C: / drive or any other drive.
Now I will describe how to format the C drive in Windows 7, and to be more precise, we will do the formatting using the distribution. This principle is the same for all system versions! When you have started the installation and got to the step where you need to select the hard drive where you would like to install Windows, select the C drive to format. We click once on the C: / drive with the left mouse button, thereby highlighting it. Then click on the item: "Disk Setup" - "Format". All information will be deleted, including viruses, if they were there, of course.
Formatting drive C:/ with Acronis Disk Director
Now we will figure out how to format a disk using third-party software. There are many special programs designed for this, but I prefer Acronis Disk Director because it is intuitive and convenient in every sense. It is with this utility that I will give an example of how you can format a hard drive or its partition.
To make it work, you need to download AcronisdiskDirector BootISO- that's how you enter into search engines to download this program. After that, you need to burn this image to a CD or DVD.
There may be other Acronis products on your drive, but there is nothing wrong with that, as they may be useful to you in the near future. After you set the priorities in the BIOS, when booting from disk, select AcronisdiskDirector and wait for the program menu to appear on your screen.

The screenshot was taken in the old version of Acronis Disk Director, and the screenshots below were taken in the new 12th version of the program.
Before I start writing instructions on how to format drive C through BIOS, I want to say right away that this program has a very detailed help on using this software, which opens: "Help", then select "Help Topics".

Now it remains to right-click on the disk we need and select "Format". You can also select the disk with the left mouse button and select "Format" in the menu that appears on the left.

In the window that appears before formatting, you can leave everything as it is, with the exception of the “File system” item. Make sure that the NTFS option is set there, as that is what is needed for working in Windows.

We confirm the actions in the upper part of the program, where the menu is located, click on the checkbox - we start to perform our actions.

In the next pop-up window, click "Continue" and wait for the completion of this procedure.

After that, the system will reboot and, if you have selected the drive where Windows is installed, then after the procedure is completed, the computer will not be able to boot the system, since it simply does not exist on your hard drive. If you chose another drive, for example, D: /, then Windows will be able to boot successfully.
This program can not only format disks, it has other features that may be useful to you. Therefore, I recommend using it.
Formatting without software
If you do not have an installation disk or some software products at hand, then you can do the formatting operation without software. You can disconnect the drive from your computer and connect it to another computer that has a different Windows system.
You must boot not under your system (the disk that was just installed in the computer), but from the disk that was installed before. When Windows boots up, it will detect your hard drive with all partitions, then you can perform all the necessary steps that I mentioned above. Right click on it and select Format.

I also want to note that there are situations when it is not possible to format the C: / drive for a number of reasons. But this is a topic for a separate article.
It is usually recommended to format the hard drive before the direct operation of any computer equipment. This procedure must be performed by every PC owner. Due to the special quality and volume inherent in today's hard drives, they can be freely used throughout the entire period of use without resorting to additional reformatting.
Why formatting is required
In some cases and over a certain period of time, it is necessary to format the hard drive (hard disk), as this makes it easy to update it. Due to the fact that the Windows operating system sometimes becomes clogged, that is, it contains irrelevant, old and not used by current programs files on the disk, formatting will be very useful. It will help you get rid of such files that take up some amount of memory space and can have a negative effect on the productivity of the system.
For their convenience, PC owners periodically install and remove the applications they need from the computer. As a result, a file dump arises and grows intensively, provoking serious problems: each application, becoming part of the OS, affects the configuration of the entire environment. To effectively solve this problem in the most optimal way, the decision to format the HDD (hard disk) after certain time periods and reinstall the operating system will help.
Despite the radical nature of this method, it is the most effective, because not only useless files are destroyed, but also malware and viruses. For this reason, it is recommended that before formatting the hard disk, overwrite the main data on some other media so as not to lose it.
It should be noted that when formatting, service marks are created on the hard disk sectors, which are necessary for data search and correct work with them (reading, writing, deleting). In addition to this procedure, formatting creates service information intended for the file system. Since unpartitioned disks are useless for use, formatting is the first step in preparing a new "unbroken" disk for successful operation.
Thus, to reduce the risk of losing important data in the indefinite future, formatting will help achieve:
- guaranteed quick cleaning of the hard drive;
- effective detection of the presence of bad blocks (damaged disk sectors);
- high-quality monitoring of various defective zones.
Quick or Regular Formatting: Process Analysis
The user has two types of formatting according to the capabilities of Windows OS - quick (Quick Format) or normal (Format). An uninitiated user will see a difference in them only in the time spent on each of these processes. But besides the visible factor, there is a more significant difference.
Quick formatting is a special method of cleaning a disk that allows you to create a table of files without overwriting it, as well as deleting information on a hard drive. In terms of time, quick formatting is faster than regular formatting. As such, a quick format simply resets the file table: important data can be recovered - it is not destroyed. This method is appropriate when the user is sure that there are no damaged segments and the hard drive has not been formatted before.
Resorting to conventional formatting, the PC owner always completely empties the disk from files and checks it for the possibility of incorrect, damaged segments. That's just the check time and stretches, affecting the total duration of the entire process.
High-level formatting was discussed above, but practice shows that understanding the term low-level formatting is no less popular. When performing such an operation, a special marking is applied to the disk plane, which is necessary for the standard operation of the drive. Also, this allows not only to save data and have open access to them, but also to ensure the correct operation of the internal circuits of the drive, in addition to hiding the existing mechanical surface flaws.
Can data be recovered after formatting is completed?
Low-level formatting does not provide for the possibility of restoring the previous information.
High-level formatting, in turn, gives significant chances to partially restore the erased data. This is explained by the fact that at the time of formatting, new logical structures arise with selective overwriting of data.
Formatting Options: A Practical Guide
It will be better to format a hard drive yourself if you move from theory to practice. Let's look at a few methods, moving from the simplest and most understandable to the more complex.
Formatting options:
- The simplest formatting technique: opening "My Computer", right-clicking on the desired type of formatting, in the menu that appears, select "Format" and the "Start" button.

- Special path in Windows: Open "Start" and follow the "Control Panel" to the file "Administrative Tools", select "Computer Management", and then "Disk Management". We find the required disk and for formatting we perform the operations presented in a simple trick.
Important: there may be slight differences in the path depending on the version of Windows.
- Command line: by pressing "WIN + R" and in the pop-up window, writing CMD followed by pressing ENTER, open the command line.

- We write there: format d: or format c: to start the process relative to the D:\ or C:\ drive. After entering, by pressing ENTER you will see on the display: “ATTENTION, ALL DATA ON NON-REMOVABLE DISK C: WILL BE ERASED! Start formatting?
 When ready to delete the data, select Y and press ENTER.
 - When there is a removable media with an operating system installation file. Those who have an installation disc and are familiar with installing Windows will probably know when is the best time to format drives. Perhaps this approach is rarely used only for formatting. However, it is very convenient if the user is going to reinstall Windows after the procedure.