I welcome you to the pages of my blog. Today I will tell you some secrets. It is a rare case when someone creates something in design. Everything has already been done and invented. You just have to enjoy the benefits of civilization. I will show you the best way to create collages of unearthly beauty.
Well, if you want to superimpose a picture on a picture and use your creativity in the process, then I have a little advice for this. Let's not beat around the bush for a long time. Let's start right now.
The best way for beginners
Any novice designer wants to create, create something of his own. This is quite logical and understandable. It is for the realization of their own potential that people go into creativity. Although, frankly, this is not quite the right approach to business.
When a novice cook tries to come up with his own recipe, most of the time it doesn't taste good. We are well aware that we first need to practice on what someone has already created for us. You can find a million options on the Internet with varying degrees of complexity, the number of ingredients, and so on.

With design, in a good way, everything is exactly the same. The first way to create your own collage is ideal for beginners. This online service will help you understand the structure of the image, but also leave a little space for imagination. Its advantage is that it is quite difficult to screw up. I'm talking about the site now ru.photofacefun.com .
There are a lot of tools here for beginners or those who are not going to delve into this process at all, but just want to overlay one picture on another. I already talked about him when we did.
Here you can also add a beautiful frame, using several editors to stretch the quality of the photo or give it a unique chic, as well as to the template or add animation. All this is free, which gives the service a special charm.
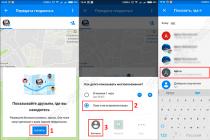
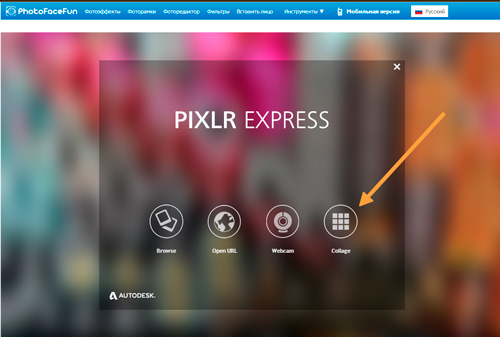
Now we are not interested in all this. Go to the site and immediately go to the "Tools" section and find the collage in the list.

The last of the proposed tools is just a collage. We select it.
In the Layout section (layout, template) you can choose the method for arranging pictures. Depending on their number.

When you hover over any of the squares, a blue cross appears on it. Click and add an illustration from the files on your computer.

Using the settings Spacing (distance) determine the width of the frame around the image. Color (color) determines its shade. To work with color, I suggest at first to use the service color scheme . It will help you choose the most advantageous combinations.

Roundness - rounding of rectangular shapes. Helps to make an object streamlined.

With such a setting as Proportions (proportions) everything is clear. It defines the width and height of the image.

There may be many options. The advantage of this service is that you do not need to think about how to make it beautiful. Use the existing templates and that's it.

For improvement, color combination schemes will help.
Online Photoshop - complex and not very
It is easy and simple to overlay a picture on a picture in Photoshop (). I already talked about working with the program, you can read about it. Today we will just work in the online version of this program. The app is also on ru.photofacefun.com , and on the official website pixlr.com . Please note that if you use the first option, you need to go to the "Editor" section and select this particular version. Others are not suitable for creating a collage.

This is what the official site looks like. In this case, you need an Editor. By the way, you can also download the result for free and without watermarks.

First of all, open the image. You can select and download both at once.

In the foreground, you put the picture that you will add to another. Next, use the keyboard shortcut - Ctrl + A will select the image, and Ctrl + C will copy it to the clipboard.

Now click on the second photo you want to add a picture to and press Ctrl + V - paste.

In my case, the picture blocked the bottom one. The fact that there are two of them is evidenced only by the "Layers" tab.

Highlighting means that you are working with the top photo. If you click on the bottom one, then the changes will be applied to it.

Unfortunately, in the online version, the favorite keyboard shortcut Ctrl + T (transform) does not work. Go to the "Edit" section and select Free transform.

You can safely work with the size.

If you are interested in pictures with transparency, you want to overlay an object on the background, then pay attention to the format in which you download the picture. He must be. This is a special extension, the edges of which are not visible.
If you want to learn how to create collages professionally, then I can recommend you the course " ". The real work of the designer involves the creation of collages. They are used in advertising, when working on covers, developing websites, postcards. Total.
The more professionally you work on overlaying pictures, the more likely you are to find not just a pleasant hobby, but also a side job. This skill can feed you constantly. Everyone needs beautiful, high-quality photos: both for websites and for private purposes.
Over time, you can come up with your own chip, and receive orders from customers via the Internet. Your work will be a great gift for anyone. Wish cards are now popular, these are drawings that depict everything that a person can dream of. Why not make money selling them?
Simple option - Paint
If you just need to overlay one photo on another, then you can use the standard windows application - paint.net. I do not really like this option, as there are few opportunities for working and editing. The decision must be made immediately, but everything will happen quickly and painlessly.
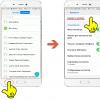
So, let me tell you about how to insert pictures in Paint. Open the "Start" menu and in the "Accessories" tab find this application. Then choose "Insert from".

You cannot open multiple photos at once. First comes the first (background), then "Paste from" again and add the second.

The most unpleasant thing, in my opinion, is that you need to work with dimensions immediately, until the selection of the object has disappeared.

If you want to apply this option again, then you can only transfer all layers at once. In place of the rearranged object, only a white background will remain.

OK it's all over Now. If you have been wanting to read an article on a specific topic for a long time, then leave your comments on this article or subscribe to the newsletter and my new publications will be sent immediately to your mail: how to start a career as a designer, understand that you are ready, how much you can on this earn money, where to look for orders and create a very beautiful website in simple ways.
Everything is easier than you think. Until we meet again and good luck in your endeavors.
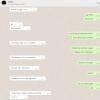
Hi all! Today I will talk about how to overlay one image on top of another with transparency in Photoshop. Of course, most people who at least somehow work in Photoshop know how to do it, since it's really the basics. But I have already received messages several times by mail and in a personal message on VK with a request to explain how to superimpose fragments on a separate photo. Someone wants to put on a beard and a suit, and someone just wants to transfer himself to Paris. You can download all the materials used in this lesson.
If you need to move an object to a different background, then this function will certainly help you. To do this, you will need a background image and an object on a transparent background in PNG format. If your subject is on a normal background, then you will have to, and after that you can merge the two photos.
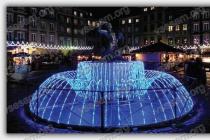
I decided to transfer the duck to the pond image.

How to cut a face in Photoshop and paste it into another photo
Naturally, you can not just superimpose one picture on another, but do it with faces. At the very least, you can transfer the face of a friend and girlfriend to a completely alien body, or see how you will look in a skirt. In fact, face swapping is also used in more professional areas.
For this we need photos of two different people. I decided to take a photo of two Hollywood actors Nicolas Cage and John Travolta. Together they starred in the movie Face Off. But there it looked very improbable, since not only the faces differ, but also the physique, the shape of the skull, and much more.


- Let's open two photos in different tabs. I most of all prefer the Drag and Drop method, that is, select the desired images and transfer them to Photoshop with the left mouse button pressed. After that, they will open in turn in different tabs.

- Now we take any selection tool, for example "", and begin to select the face of John Travolta, capturing the forehead and chin. But we don't need hair.

- Now take the Move tool, then hold down the left mouse button inside the selection, and then move it to the tab with Nicolas Cage until it opens. After that, we point our selected part somewhere on the picture and release the mouse button.

- When the photo of Travolta is on a new layer, reduce its opacity by at least 25-30 percent. to make it easier for us to work.

- Now let's start fitting. As you can see, the picture with John was bigger, and his head was slightly tilted. Therefore, we all need to adjust. To get started, call Free Transform by pressing the keyboard shortcut CTRL+T, and then drag the corners, remembering to press the key SHIFT to approximate the size.
- Now move the cursor just above the corner so that it changes to rotate mode. After that, hold down the left mouse button, and start rotating the transferred object in that direction so that the face is as straight as Cage.

- Now transfer Travolta's translucent face onto Cage to see if the nose, mouth and eyes match the correct size. Great, we did everything on the same level. after that you can press Enter to apply the transformation.

- Now we need to remove or cut off the rest of the skin that is protruding beyond the cranium. To do this, you can use the eraser tool and simply erase the unwanted area. It is only desirable to press the right mouse button and set the hardness to 0 percent so that the borders are as soft as possible.

- We managed to superimpose one photo on another and the face seems to be ready, but the shade of them does not match a little, so you have to change the tone a little. You can use the same method that we removed the redness from the face in Photoshop, or use the patch tool. To do this, select "Patch" and circle the frontal part, which belongs to Nicolas Cage. After that, hold down the right mouse button and drag it over a piece of travolta leather to replace that part.

- Basically everything. You can only run the healing brush over the forehead crease so that it does not duplicate the existing one.

Now we have a real John Cage or Nicholas Travolta. Yeah. Of course, they have a completely different type of faces, but I think you get the idea.

Cutting a face in Photoshop and pasting it into another photo is not at all difficult. It remains only to correctly adjust the size, match the nose, eyes, mouth, skin color and other factors. Unfortunately, we ended up with a very large forehead, but this is not surprising, looking at their head shapes.
How to overlay a suit in Photoshop
You can overlay one picture on another with transparency in Photoshop not only for fun. Today, this method is used in various photo salons and not only. This is especially true when you need to take a photo for documents. Yes, now you do not need to specially wear a suit or police uniform in order to be photographed for a passport or identity card. You can even come in a torn T-shirt, and you can easily impose a suit in Photoshop.

Now Justin Timberlake can be pasted into documents. We do the same with other costumes, with hairstyles, mustaches, beards or even scars. It is enough to find on the Internet in any search engine to ask something like "Cop Costume png" or "Men's hairstyles with a transparent background". The principle of operation is the same: open, transfer, adjust the size and deform.
For example, I'll take the same photo we just worked on, and then I'll add a new hairstyle, beard and scar to Timberlake.

Now, I hope that you understand how to overlay one image on top of another with transparency in Photoshop to add the necessary elements, and radically change the photo. With overlay, you can make collages, overlay suits for documents, change hairstyles, add fragments that were not there before, and much more. As you can see, there are many applications.
By the way, I remember one funny incident. A friend of mine 10 years ago had to load a truck with cargo by a certain time (some bags with no idea what). But by the appointed time, he did not manage to do anything. Then he photographed separately the empty body of the van and pallets with bags, after which he asked a friend to put them there using Photoshop. He did everything without any problems, after which the photo was sent to the authorities. The photo rolled and no one knew that they were late with the loading.
That's all for me. But if you do not know Photoshop well or do not know it at all, then I recommend that you look at these wonderful video tutorials. This is the best beginner course I have ever seen. All lessons are structured and go from simple to complex. The material is simply bombastic and is absorbed literally on the fly. And most importantly, everything is told in an accessible language for any category of users. Highly recommend.
Well, this is where I end. I hope my article was helpful to you. Therefore, be sure to subscribe to my blog updates, as well as to my social networks, the icons of which are located in the sidebar. I look forward to welcoming you again. Bye bye!
Sincerely, Dmitry Kostin.
When working with Photoshop, most often you will have to work with existing images. Either you need to fix something in them, or you want to take a part in the image to use in another image, or whatever.
Opening an image
First you need to open the image itself in Phoroshop. To do this, select the menu command File -> Open (File -> Open). In the window that opens, select the desired image.
Please note that in the File Type section there is a huge list of supported files. If you select a specific file type (for example, gif), then only files with that extension will be displayed in the selection box. Therefore, if you know for sure that this file is in this folder, but you do not see it in the image selection window, then you have selected the wrong file type.
Formulation of the problem
As always, let's look at an example. Suppose we have two photos like this:
And we want the horse to gallop along the seashore. What we need to do:
- Create a new file for a new image (horse on the seashore).
- Place on different layers of the new image file of the horse and the sea.
- Cut out the horse. To do this, it must first be selected.
- Add naturalness to the new image.
Let's go through all the steps step by step. You can pick up your photos or download these here.
Creating a new file
So, let's create a new file, 500 X 375 in size (these are the dimensions of the photo with the sea, although we could make a smaller image).
Let's create two new layers: one will be called "horse", the other - "sea", and the layer -Sea- should be under the layer -Horse-. To give a layer a name, right-click on the layer, in the context menu that opens, select -Layer Properties- (Layer Properties). The parameters window will open, where you need to set the name:
Now we have three files open in the program, that is, three windows with different files (with the sea, with a horse, and the one just created, which we will call the working window). And the active window (with which we work) is the last one.
In it, on the layer -Sea- we will place our sea. For this:
- Let's make the sea window active (just click on it).
- Select the entire image, to do this, select the menu command Selection -> All (Select -> All) or press the key combination Ctrl + A. A selection box in the form of running ants will appear around the image.
- Copy this image (Ctrl + C). Now let's make our working window active (click on it), make sure that the -Sea- layer is active (if not, then click on it) and paste the image (Ctrl + V). The sea is now displayed on the sea layer.
Do the same to place the image of a horse on the layer -Horse. Thus, we have both necessary components for the future image. Therefore, files with photographs of the sea and the horse can be closed.
Highlighting a knight
Photoshop provides several image selection tools, one of them (rectangular selection) we considered in the first lesson. But here it will not work, since our horse has a complex shape.
To select it, we will use two tools on the toolbar:
Click the left mouse button on the tool -quick selection-, the tool selection window will open:
Select the magic wand tool. If you click on any pixel of the layer with this tool, then adjacent pixels of the same shade will be selected. In the options bar of this tool, select the following values:
In the -Tolerance- (Tolerance) field, you can enter values from 0 to 255. If you set the value to 0, then only one shade will be selected, if you set it to 32, then the tool will select pixels in the range from color 16 units darker to color 16 units lighter than the one you clicked on. In our case, we set the value to 100.
We will also check the Anti-aliased checkbox to make the borders of the selected area smoother.
Checkbox -Adjacent pixels- (Contiguous) selects only those pixels that are adjacent to the selected areas.
Remove the checkbox -Sample All Layers- (Sample All Layers), because. it extends its action to all layers, and we work only with the layer -horse-.
Now click with the tool on the image of the horse, it will be selected.
The selection itself will not be perfect (we will finalize it later), at this stage the main thing is to select the outlines of the horse. If you don't like the selection, click again with the tool and the selection will disappear (or Ctrl+Z) and try again.
Now that our horse is selected, we need to remove everything else. To do this, in the menu, select the command Selection -> Inversion (Select -> Inverse). Now the entire area around the horse will be selected. Press Del on the keyboard and get our carved horse against the background of the sea:
Remove the selection (in the menu, select the command Selection -\u003e Remove Selection). Agree, it’s not bad, only the grass needs to be removed. To do this, first enlarge the lower part of the image (where the grass is). To do this, on the toolbar, take the tool -Magnifier-.
On the options bar of this tool, click on the magnifying glass with a plus sign.
Now click on the part of the layer where the grass is. This part of the image will increase, if you click again, it will increase even more. If you click on the magnifying glass with a minus, and then on the image, it will decrease. So you can zoom in and out of the image to make it easier to work with it.
So, you have increased the part where the grass is. Click the left mouse button on the tool -Lasso-, the tool selection window will open:
Select the magnetic lasso tool. This tool automatically creates a selection while you move or drag the cursor. The border of the area "sticks" to the nearest distinctive shade of color or shadow that defines the border of the shape.
Click on the image to create the first waypoint. Move the cursor along the border of the shape you want to select (in our case, the horse's limb). As you move the cursor, the selection line will "stick" to the border of the shape. Temporary points appearing while moving the cursor will disappear as soon as you close the path.
Again Del on the keyboard, remove the selection, reduce the size to normal (on the toolbar, take the tool - Magnifying glass - on the options bar, click on the magnifying glass with a minus).
For greater persuasiveness, let's add sand to the horse's hooves. To do this, create a new layer, make it the topmost one. Now grab the eyedropper tool from the toolbox
This tool selects a color from the active image or from any other area of the screen and assigns it as the foreground or background. We need the color of the sand, so click on the sand image. See the main color has changed.
Now grab the brush tool from the toolbox
In the options bar of this tool, select a brush that resembles sand (i.e. with jagged edges).
Make it one click on each hoof. It will turn out like this:
Everything, our image is ready, and the lesson is over. In the next tutorial, we will look at other selection tools, as well as learn how to resize images and their parts.
An example of overlaying a regular jpg image on another jpg image with all default settings:
+
 =
=

An example of overlaying a regular jpg image on another jpg image with resized and without transparency:
+
=

To do this, you need to set the following settings:
1) The transparency of the second picture is “0%”;
3) The size of the 2nd picture relative to the "width and height" of the 1st picture is "45%".
And the rest is unchanged, as it was set by default.
An example of overlaying a PNG image with a transparent background on a JPG image:
+
![]() =
=

To do this, in the settings you need to specify:
1) The type of overlay of the second image is “Overlay PNG, GIF, TIFF image with a transparent background”.
And leave the rest of the settings as they were set by default.
An example of overlaying a PNG image with manual resizing, positioning and padding:
+
![]() =
=

In order to do this, you need to set the following settings:
2) Automatic resizing of the 2nd picture - "use manual resizing in%";
3) The size of the 2nd picture relative to the "width and height" of the 1st picture - "30%";
4) Binding the location of the 2nd picture above the 1st - “bottom right”;
5) Offset or indent of the 2nd picture from the specified location - "along the X:30 and Y:30 axis in px (pixels)".
The rest of the settings remained unchanged.
For photo frame overlay, for example in PNG format with transparency, you can specify the following options:
1) Overlay type of the second image - "Overlay PNG, GIF, TIFF image with a transparent background";
2) Automatic resizing of the 2nd picture - “enabled, but vice versa, fit the 1st picture to the size of the 2nd”.
Leave the rest as it was by default.
The overlay picture is mandatory and should always be listed second in a row. Both original images are not changed in any way. You will be given another processed picture.
If you need to cut out an object from a photo and paste it onto another image or background, then there are various ways in Photoshop to do this. In the article, we will cut out a bouquet of flowers and paste it on a photo with a vase. We will also look at how you can cut out a person in Photoshop, and then replace the background for him.
In order to make it easy to cut out objects, you need to choose the appropriate selection method for them in Photoshop. It can be a simple selection, and with the help of Lasso, Magic Wand, Color Channels, Mask overlay. Read the detailed article by clicking on the link.
Selecting an object using Color Channels is described in detail in the article: how to cut and paste an image in Photoshop. As an example, I cut out the crown of trees.
So, we have two images: we will cut the desired object from the first one, and paste it into the second one. To select objects, use the Quick Selection tool.
How to cut an object in Photoshop
Open a photo with a bouquet: "File" - "Open" or "Ctrl + O".
In order to cut out an image from the background, you first need to select it. On the Toolbar, select the "Quick Selection Tool" (Quick Selection).

Now we click on the colors with the mouse, each time expanding, thus, the selection area: it will be highlighted with a dotted line. By selecting a brush with a plus sign in the tool settings, the area will be added, with a minus sign, it will be subtracted. The size of the selection brush is also changed here.
To subtract an area from the selection, you can also hold down the "Alt" button on your keyboard and click on the extra area with the mouse. You can change the size of the brush with the buttons "(" and ")" - one click reduces / increases by 1 px.

As a result, you need to completely select the object that we will cut.

Go to the palette "Layers" (Layers), create a new layer here. To do this, click on the icon "Create a new layer".

Select the layer with the main image and press the key combination "Ctrl + X". Thus, we will cut out the object from the background in Photoshop.

How to insert an image in Photoshop
The next thing to do is paste the cut object onto another image.
Go to the new layer we created, "Layer 1" and press "Ctrl + V". Next, you need to hide the layer "Background" (Background) - remove the eye in front of it in the layers palette. If you want, you can delete it: select the layer with the mouse and in the layers palette click on the trash can in the lower right corner.

Open the second image in Photoshop - with a vase, on which we will insert the cut out bouquet.
Select on the Toolbar "Move Tool" (Move). Then click on the window with the bouquet. On the layers palette, select the layer on which the bouquet was inserted - "Layer 1" (if you deleted the "Background" layer, then it will be there alone). Next, click on the flowers and, without releasing the mouse button, drag them onto the image with the vase.

Due to the fact that the images have different resolutions, the following happened.

Let's reduce the size of the bouquet. On the layers palette, select the layer with the bouquet, in the example it is "Layer 3", your name may differ. Now press the key combination "Ctrl + T". A frame with markers should appear around the image. If it is not fully visible, in the lower left corner, select the appropriate scale for the image. By clicking on the markers, change the size. To maintain the aspect ratio of the image when resizing, press and hold the Shift key. When you select the appropriate size, press "Enter".

Let's place a beautifully carved object on a new background. We select the appropriate scale and use the tool “Move Tool” (Move) to move the bouquet over the background image.

I will end with this. I think now you can cut the desired object from the photo and paste this object onto another image in Photoshop.
Rate article: