HDR effect is achieved by superimposing several (at least three) photographs taken with different exposures. This method gives more depth to colors and light and shade. Some modern cameras already have built-in HDR function... Photographers who do not have such equipment are forced to achieve the effect the old fashioned way.
Everything has limitations, and the technical evolution of photography over the past 150 years has mainly been to overcome the limitations of the craft. Dynamic range, though, is one of the limitations that hasn't succeeded in the unrelenting advances of technology over the years.
Caution before continuing to prevent normal flow emails that follows any first glance that comes up here and that some readers don't feel the answers to all of their questions or solve their particular problems.
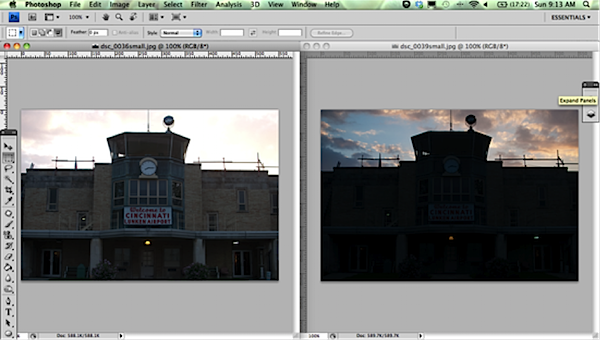
And what to do if you have only one photo, and it is beautiful and clear HDR snapshot still want to get? In this tutorial, I'll show you how to do this.
So let's get started. First, let's open our photo in Photoshop.

Dynamic range refers to the range of brightness levels that exist in a given scene - from the darkest to full and featureless black, to the lightest to full featureless white. For the sake of this discussion, suppose a typical color transparency film or digital camera sensor can record 6 stops dynamic range... Thus, somewhere between six and nine stops of the brightness level is what most photographic systems are capable of recording.
Namely, to capture more dynamic range. While most everyday scenes handle this dynamic range easily, there are situations, especially for the landscape photographer, where more is needed. There are now many ways to do this. The traditional method has been to use split ND filters. Place two to three freeze lock filters over the part of the scene that is too bright and you can now set an exposure that spans the brightness range.
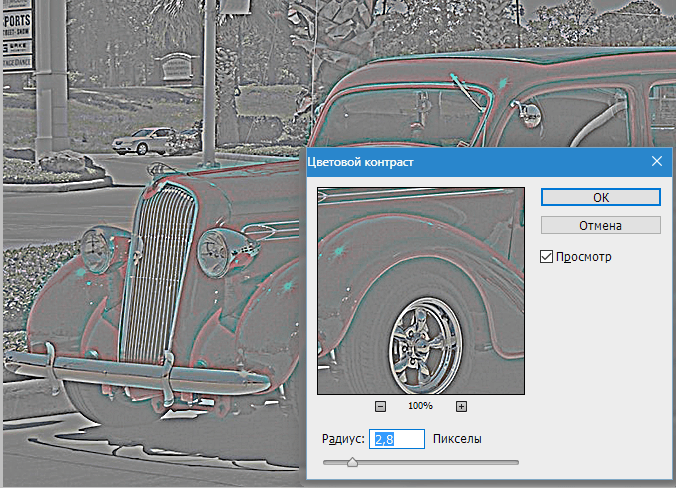
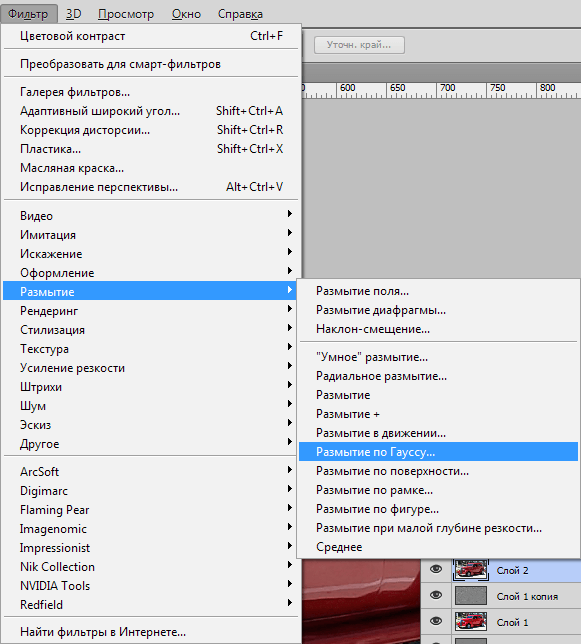
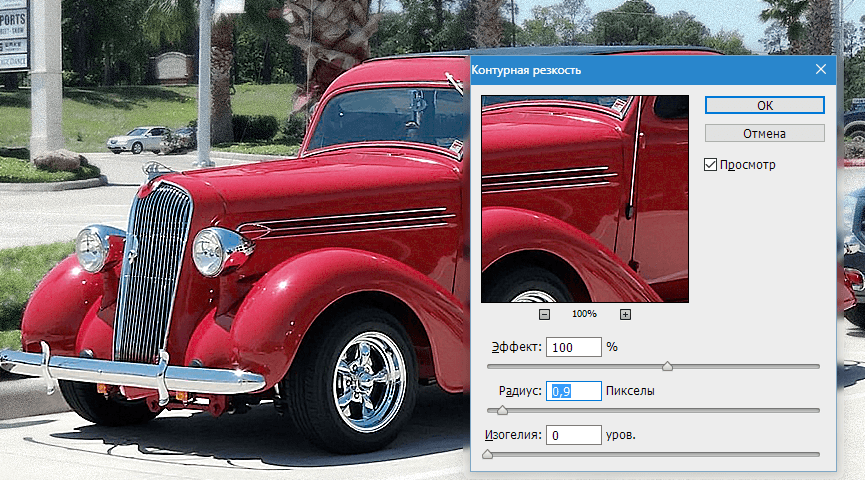
The next step will be the development of fine details and a general increase in the sharpness of the picture. To do this, go to the menu "Filter" and we are looking for a filter there "Colour contrast"- it is in the section "Other".
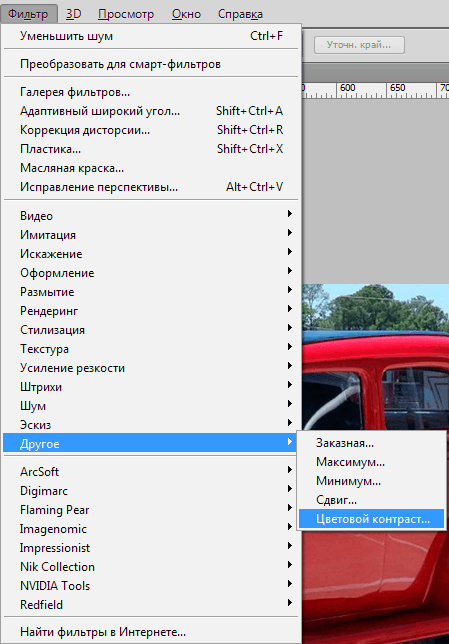
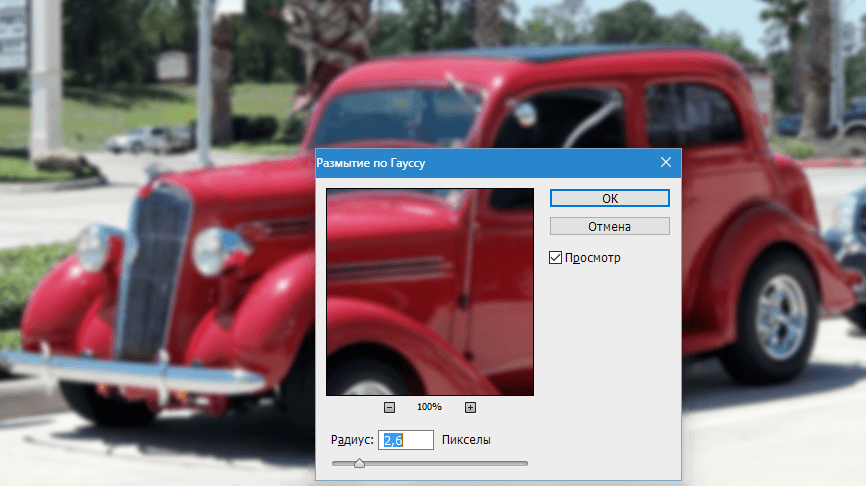
We set the slider in such a position so that small details remain, and the colors have just begun to appear.
In addition, they can be used slowly under rapidly changing lighting conditions at the beginning and end of the day. In addition, they really work unobtrusively when there is a well-defined luminance transition edge, such as a horizon line or a cliff edge.
A more modern approach is to make multiple exposures of the same scene, changing only the shutter speed. Take a "normal" exposure, and then take a few more stops for 1-2 stops and under this point. This can work very well, but convincing him to do it with some significant skill usually takes quite a bit of work with masks and brushes. My mixing tutorial covers this technique. Of course, this cannot extract information that is not in the actual file, but it can do better job than the use of conventional raw material processing tools currently available.
To avoid color defects when applying a filter, this layer must be desaturated by pressing the keyboard shortcut CTRL + SHIFT + U.
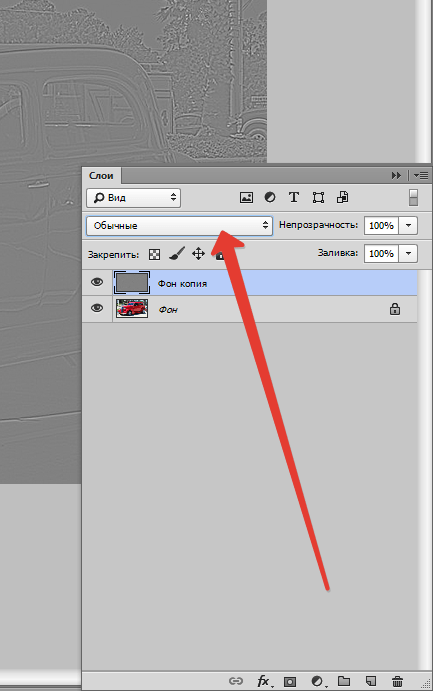
Now change the blending mode for the filter layer to "Bright light".
It also uses the same mixing techniques that are used to combine multiple influences, with similar problems. Since our screens and printers are mostly 8-bit devices and therefore not capable of displaying 32-bit images, to be useful, these images need to be compressed so that we can work with them and ultimately display them.
But when the technology works, and with some images it works very well, it can produce very remarkable results and can do so with little effort from the user. These shots should be taken one to two stops away. They should also be done by changing the exposure time, not the aperture, since changing the aperture also changes the depth of field. They should be separate exposures covering different parts of the available brightness levels available in the scene.
We get an increase in sharpness.
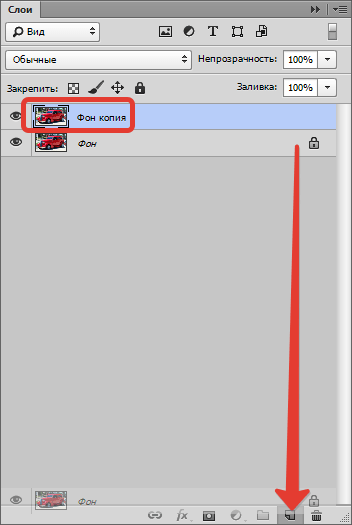
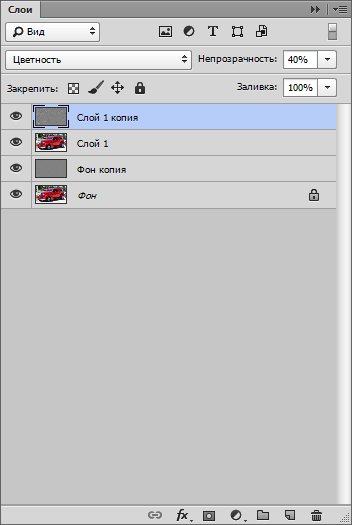
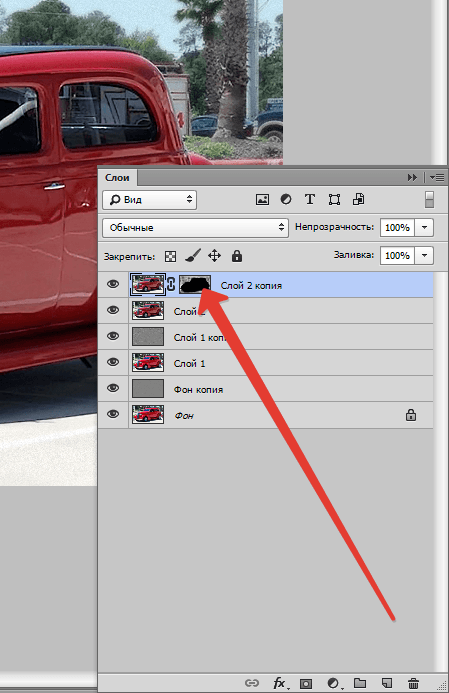
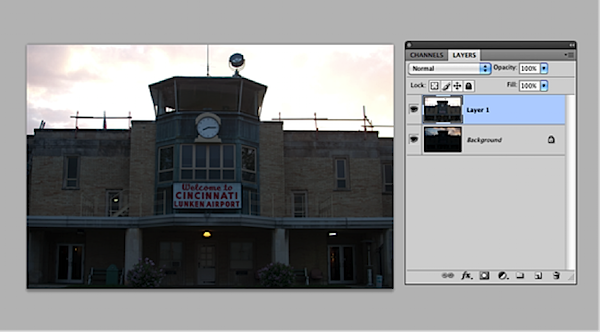
We continue to improve the photo. We need a summary copy of the layers of the finished photo. To get it, we hold down the key combination CTRL + SHIFT + ALT + E... (Train your fingers).
![]()
It is best to set the exposure in manual mode and autofocus off. Don't use your camera's auto-lock feature because they don't allow enough frames or enough range in bracketing. Just take a series of shots in 1 stop increments by changing the shutter speed. You can use the post-exposure histogram to judge when you've done enough to adequately capture the brightness range of a scene.
Red mountains at sunset
This is where you select the files you want to combine. Note the box in the lower left corner of the window, which, when selected, will try to align images if they were captured manually. One would normally be able to use. After you select the files, your computer will download each of these files.
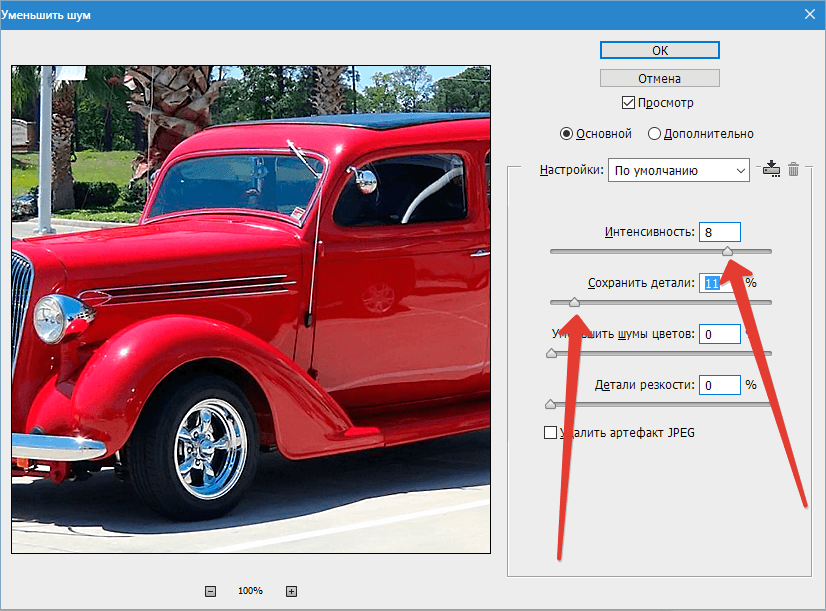
During our actions, unnecessary noise will inevitably appear in the photo, so at this stage it is necessary to get rid of them. Go to the menu "Filter - Noise - Reduce Noise".
Recommendations for settings: The intensity and preservation of details should be set so that the noise (small dots, usually of a dark color) disappears, and the small details of the image do not change their shape. You can look at the original image by clicking on the preview window.
The above window will cause you to see the merged version of the files along with thumbnails on the left, each showing additional dynamic range above and below the midpoint, adding to the final 32-bit image. You can delete any of these files if you like.
It's time to notice that there are 8 devices on your screen that can only show a limited dynamic range. You can adjust the screen image with the slider so you can see different parts of the dynamic range, but at this point, you can't hope to see it all at once.
My settings are like this:
Do not be too zealous, otherwise you will get a "plastic effect". This image looks unnatural.
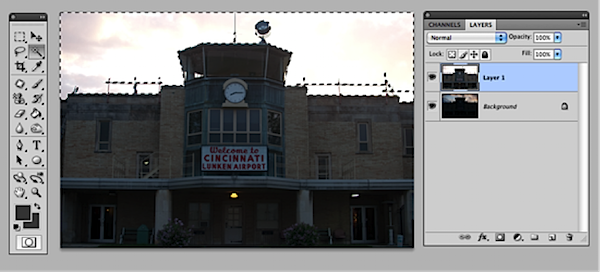
Then you need to create a duplicate of the resulting layer. We have already discussed how to do this just above.
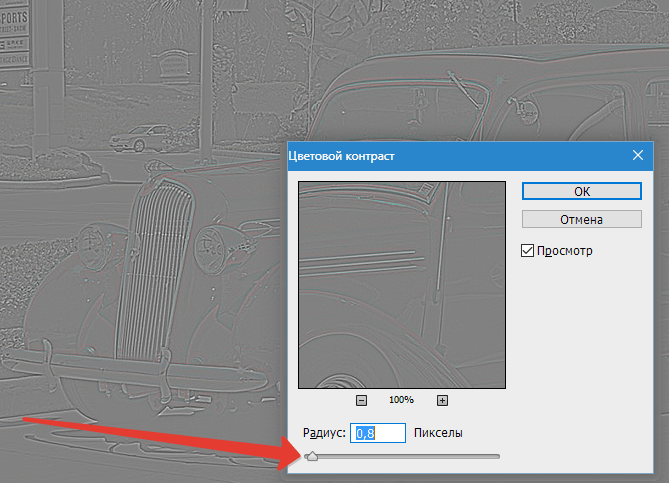
Now go back to the menu "Filter" and apply the filter again "Colour contrast" to the top layer, but this time set the slider in such a position to see the colors. Like that:
What is HDR in camera?
Now you can save the file in 32-bit mode. But to display it correctly, and more importantly to print it, you need to convert it to a 16-bit or 8-bit file. You are given 4 options to reduce the dynamic range to what you can work with as shown in the above screenshot.
No additional adjustments are required; this method is automatic. With the files properly captured and processed, it allows photographers to easily create images that were previously impossible, or at least very difficult to accomplish. But be that as it may, as a weapon or a nuclear power, it can be a force for both evil and good.
Desaturate the layer ( CTRL + SHIFT + U), change the Blending Mode to "Chromaticity" and reduce the opacity to 40 percent.
An open letter to camera makers
In fact, most of the photos look pretty good, thank you very much, with the 5-7 stops of dynamic range we're used to. But the automatic fastening function in modern digital cameras inadequate for this new opportunity.
Most cameras provide automatic bracketing for only 3 exposures. Now photographers require the ability to set auto bracketing at any increment and in a user-selected exposure range. Don't keep this setting under menu layers.
Create a merged copy of the layers again ( CTRL + SHIFT + ALT + E).
Let's look at the intermediate result:
When setting up a filter, we look not at the car, but at the background. Small details should disappear, only the outlines of objects should remain. Do not overdo it…
This can be selected by the user on both the front and rear control panels by simultaneously pressing the Bracket button. Think of a scene that has bright sunlight and dark shadows. First, it's important to turn off some of the auto exposure features so you have full control, because you don't want variation to be introduced when the camera automatically adjusts exposure between each shot. First, determine the correct exposure for the overall scene and set it manually.
If you're usually in program mode, point your camera at the scene and note the temperature and shutter speed, then turn the dial in manual mode and select those exposure values. Then turn off Auto White Balance by setting it to a specific temperature or icon such as Sun or Cloud.
For completeness, apply a filter to this layer. "Add noise".

Settings: 3-5% effect, Gaussian, Monochrome.
HDR editing screen
It also works better if you have more than 3 shots to combine, maybe up to 7 or 8. It would be great if camera manufacturers started offering auto-detect options for more than 3 photos, but for now that's what we're with. must work. Without a tripod or a rest camera, in order for the third performance to work well, it is very important to control your breathing and keep your hands well against your body while shooting.
If any of the auto-captured shots require a longer exposure time and you are still not using a tripod, consider placing your camera in a tree, wall, or bench. All images should now have their original exposures without any improvement. Render plot and histograms at the bottom, which cannot be changed in this view. In short, when using local adaptation, drag the bottom left end of the curve to the left edge of the histogram curve, then start massaging the curve lightly through the middle until you balance in the overall contrast of the image. Move the sliders around until you get the exposure you want. ... You can apply these settings manually or use presets if you want to save some time.

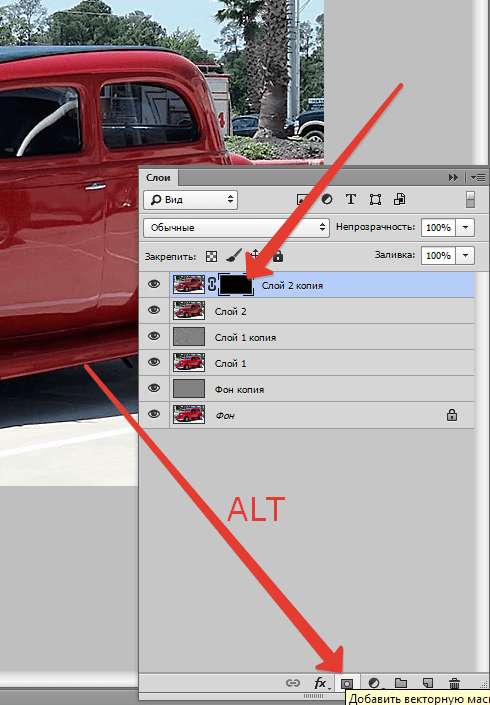
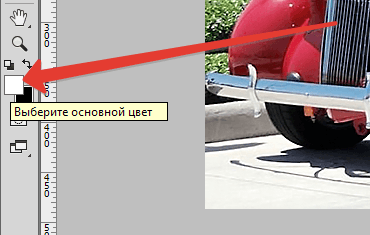
Hold down the key ALT and click on the mask icon in the layers palette.
As you can see, the blur and noise have disappeared completely from the entire photo, we need to "open" the effect on the background.
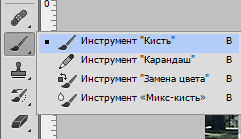
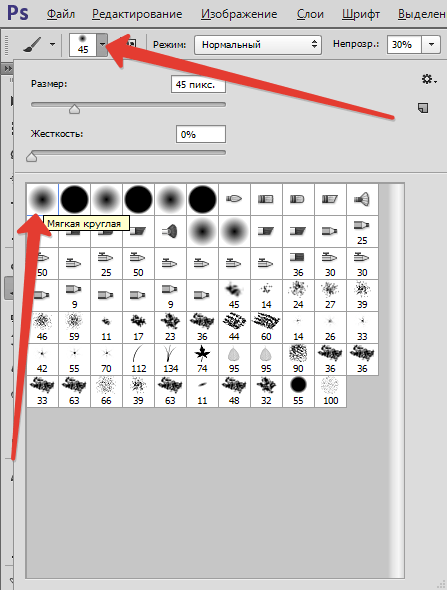
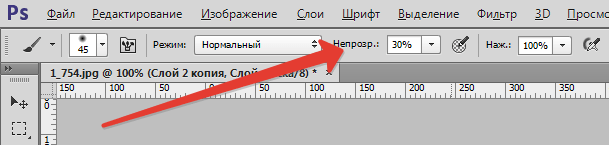
We take a soft round brush in white with an opacity of 30%(see screenshots).
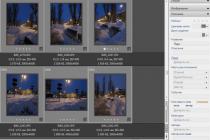
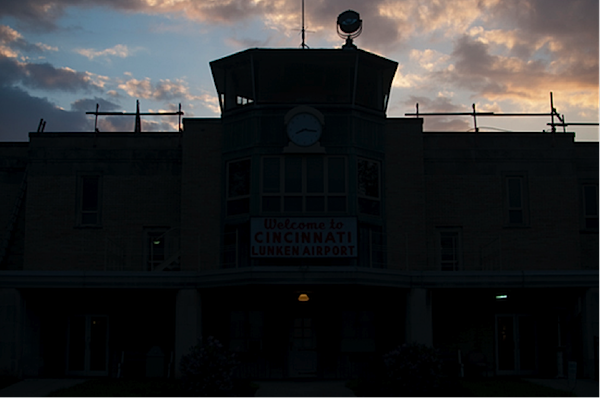
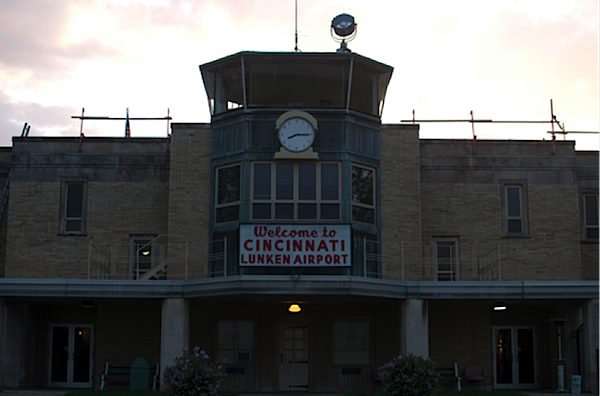
We will be working with this photo. First, we will edit the settings in the "General" section of the development module. Change the contrast to 25, highlights to -65, shadows to 70, whites to -35, and blacks to. Then set the Clarity to 75 and Vibration. These settings are pretty strong if they are too strong for your photo scale back a little.
But if you only have one exposure, you can increase the dynamic range by following the instructions below. The first step is to duplicate the photo layer. The reason for this is to avoid making any changes to the original level so that you can always go back to it if you don't like the changes. Then we transform the duplicated layer into a smart object. We'll make some changes to the shadows and highlights, and apply some sharpness, and by converting this layer to a smart object, we can go back and make changes to those settings later if needed.
Use the shadow and highlight settings shown in the screenshot below. This will reduce shadows to increase dynamic range. This will add some harshness to the photo.
- Fog, smoke or cloudy shots.
- Logarithmic brightness: This algorithm works with logarithmic brightness.
Be sure to click on the black mask in the layers palette in order to paint on it, and carefully paint the background with our white brush. You can make as many passes as your taste and intuition tell you. All by sight. I walked twice.
A special technique is detailed prediction: it tries to predict movements within the exposure series and thus remove more targeted ghost images. The result is additional detail that pays off, especially when shooting in difficult situations.
Any changes you make to the bracketed image will be applied to the entire series if the user wants to. The developed images should always be compared with the original image that the photographer saw with his own eyes, this comparison physically loses all the photos. The human eye can perceive thousands of luminance differences that are 200 times greater than the luminance differences - thus perceiving glint or image information than any camera sensor in the world.
Particular attention should be paid to the pronounced details of the background.
If a car was accidentally touched and blurred somewhere, you can fix it by switching the brush color to black (key X). Switch back to white with the same key.
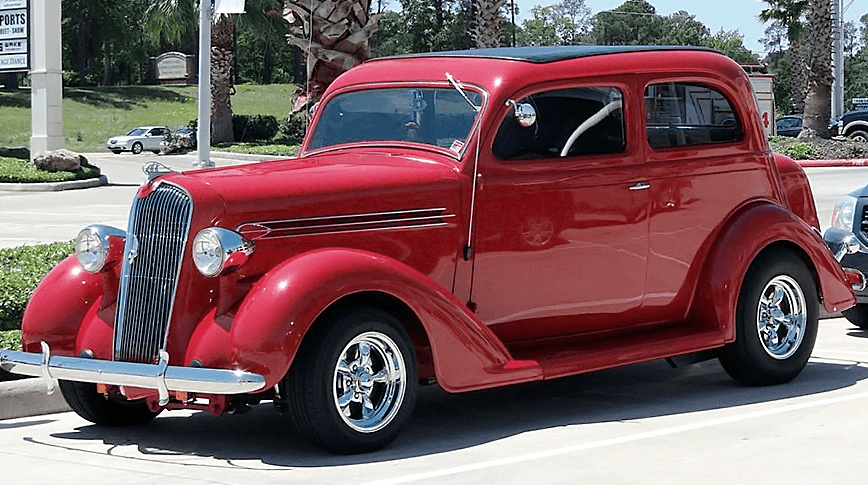
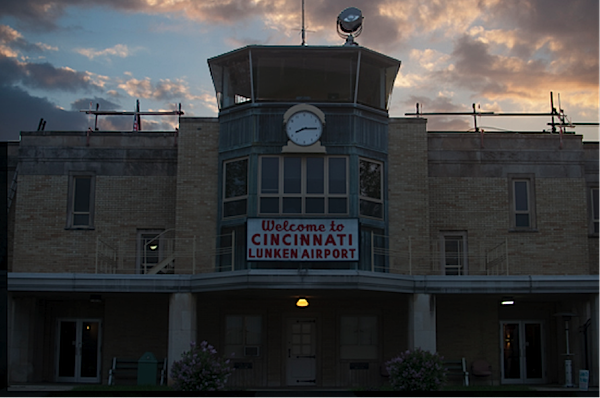
Result:

I'm in a bit of a hurry, I'm sure you will be more accurate and better.
Let's sharpen the photo a little more. Go to the menu "Filter - Sharpening - Unsharp Mask".
![]()
When setting up the filter, we carefully look at the boundaries of light and shadow, colors. The radius should be such that “extra” colors do not appear on these borders. This is usually red and / or green. the effect put no more 100% , Isogelia we remove.
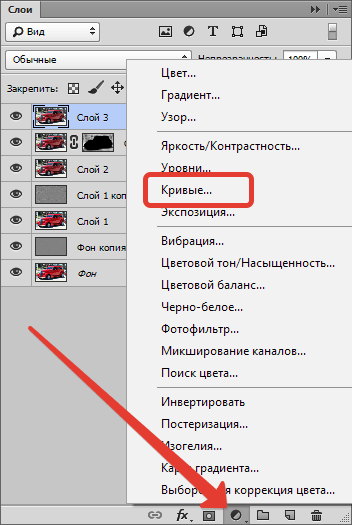
And one more touch. Apply an adjustment layer "Curves".
Creation technique HDR photos has existed for a very long time, since the days of film cameras. HDR stands for High Dynamic Range (high dynamic range). As you know, a camera is capable of transmitting a much smaller range and depth of colors and details in one frame than the human eye sees. HDR allows you to capture multiple photos of the same location, taken at different exposures, in a single shot. This allows you to expand the dynamic range and make the picture more detailed, juicy and realistic.
Most often, HDR is used to reproduce the details of the sky and the earth at the same time. Without HDR, you can take a photo that shows details on the ground, but the sky is too light, or show details of the sky, but objects on the ground are dark.
1. Bracketing
Bracketing is a camera function or shooting technique where the same shot is taken at different exposures. It is best to shoot with a tripod so that when you overlay frames, all objects remain in the same place. The picture is taken with a change in shutter speed or using exposure compensation. The step can be different, from fractions of steps, to several steps (EV). It is recommended to take three shots: normal, light to capture details in shadows, and dark to capture details in highlights.
Sometimes it is enough to take 2 pictures. This is done when two shots are enough to capture the entire dynamic range, but there are times when more than three shots are taken.
Having a sufficient number of images, you can proceed to merging them.
2. Merge photos
Photoshop is the most user-friendly and flexible tool for creating HDR photos.
Place the light image over the dark one in the layers tab.
The top image shows the ground well, but the sky is too bright. So you need to select the sky and delete it. V this example the easiest way to select the sky is with the magnetic lasso tool. It is worth carefully working on the selection so as not to miss any piece of the sky.
Having made a selection, press the delete key.
Further processing can be done in any convenient way.