Perhaps one of the most common iPhone problems is the frequently breaking glass that sits on top of the screen. Sometimes it breaks due to minor falls. After such damage, it is often impossible to use the phone any longer. If only because small fragments can cut your fingers or face. Sometimes, of course, it can break "successfully" - there will be only a few cracks and that's it. But more often than not, everything happens exactly the opposite.
Replacement process iPhone display 5
In order to understand how long such a repair can last, consider all this using the example of replacing glass in the iPhone 5. The iPhone 5 display repair work was carried out by UiPservice specialists, who identified such features.
Firstly, the display in the 5th model is made using the so-called in-cell technology. This means that the touchscreen and LCD-matrix are made as one piece and cannot be separated.
Secondly, on top of the display is glued safety glass... In addition to its protective functions, it also serves as a mounting base for all other parts: the in-cell display, the plastic frame and other parts that make up the iPhone's front assembly.
The glass replacement process in the iPhone 5 is as follows. The plastic frame is detached first if it is not damaged during the impact. Subsequently, this part will be useful to us when we assemble the display module with new glass. After that, you need to separate the remnants of the broken glass from the display and clean it, preparing it for gluing a new protective glass.
Broken glass fragments are removed using this technology. First, the damaged display is heated to a temperature of 50-60 ° C. During heating, the glue with which the protective glass is glued in the iPhone 5 loses some of its adhesive properties and thus it becomes easier to remove residues.
The fragments are removed with a plastic spatula. It will not be able to leave traces on the LCD matrix. In addition to this tool, you can also use a steel scalpel or a clerical knife. After the debris has been removed from the display, the remaining glue is removed and the surface is prepared to adhere the new protective glass.
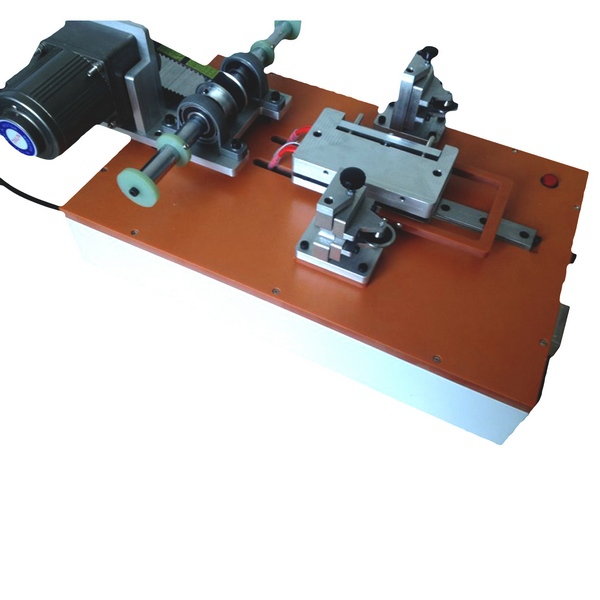
When the surface is cleaned, a layer of special glue-gel is applied, which hardens when exposed to ultraviolet radiation. For gluing, a form is used in which the display itself is fixed and a protective glass is placed on top. After all air bubbles and dirt have been removed between the glass and the screen, the above structure is placed under an ultraviolet lamp and remains there until the gel hardens.
After the new glass is glued to the display assembly, the plastic frame is attached and the remaining parts are installed: cameras, Home buttons, microphone, speaker, proximity sensor and so on. After that, the repaired part is installed in the iPhone.
It should be noted that the repair of replacing the protective glass in the iPhone 5 is very difficult and has its drawbacks. For example, when struck, fragments of a broken protective glass can damage the surface of the in-cell display and will be visible under certain conditions: for example, in bright sun or daylight illumination.
But in general, this is a great way to save on repairs, since replacing the protective glass in the iPhone 5 costs almost half the cost of replacing the front module.
In preparing the article, materials from the site were used
None of us is safe from dropping the phone on a hard surface, after which the glass of the device can be broken. Today, this is the most common phone breakdown and let's figure out how to replace the glass.
Below we will give instructions in pictures on how to replace the glass with, based on the fifth model, namely, based on the iPhone 5S. But according to the same principle, you can replace the glass on literally any phone from the company, the procedure is practically indistinguishable. We want to immediately focus on the fact that if you have the opportunity, it is better to immediately contact the service center, and do not do it yourself at home, since the glass replacement procedure requires some experience. For example, we can recommend this service center, which has helped out blog authors more than once.
- In order to disassemble the phone, we need a Pentalobe five-sided screwdriver, a Phillips screwdriver, a suction cup, a plastic spatula and the glass itself. If you do not have the necessary spare parts, you can buy in this store for a nominal fee. For example set of tools for glass replacement.
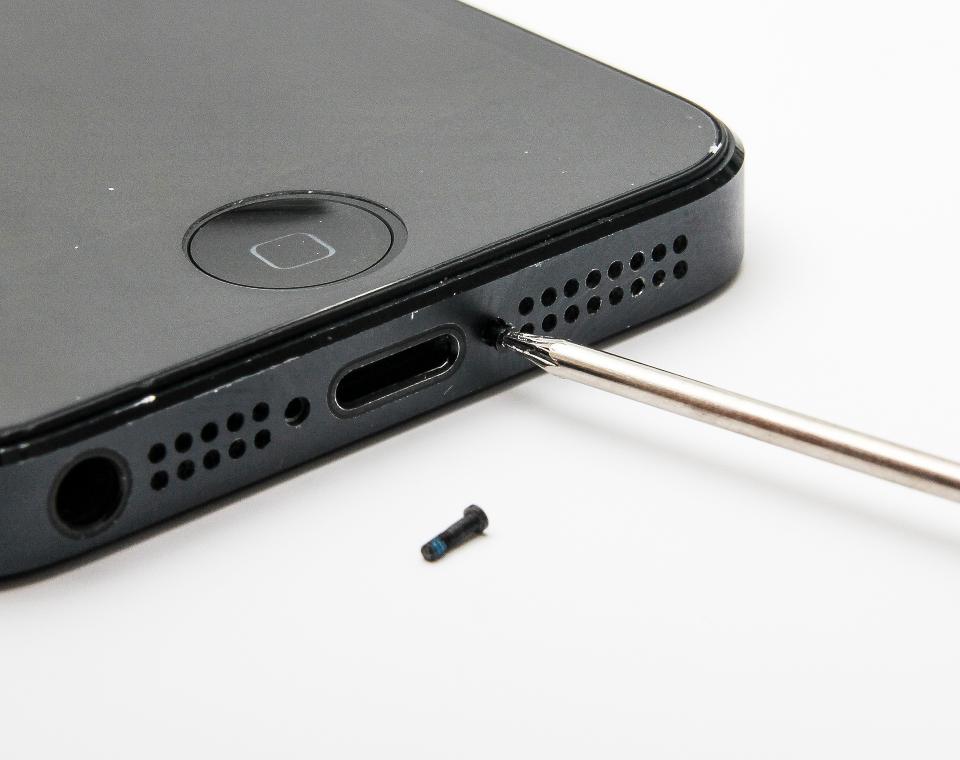
- First, we will need to unscrew the two screws on the bottom end with a Pentalobe five-sided screwdriver
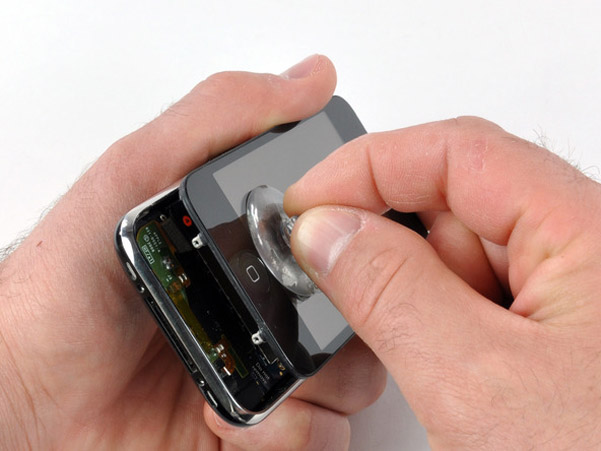
- We take the suction cup, and with its help, we raise the screen.
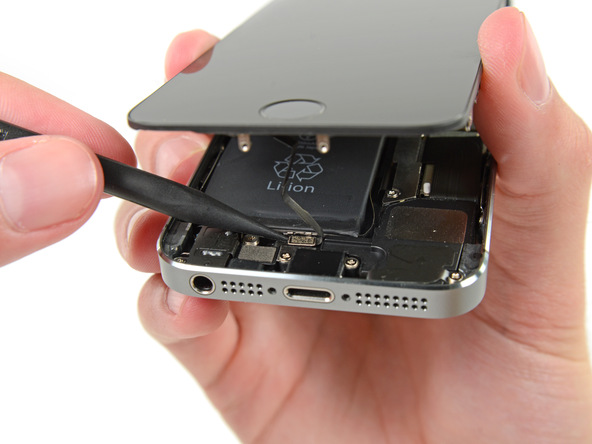
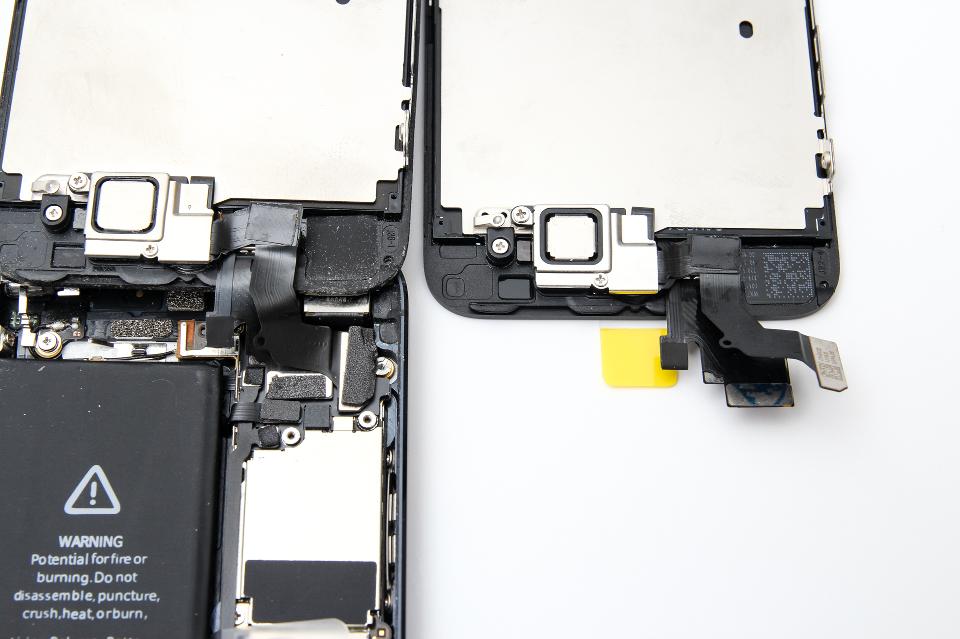
- Move aside the part of the module where the Home button is located to disconnect the cables from the Touch ID to the motherboard
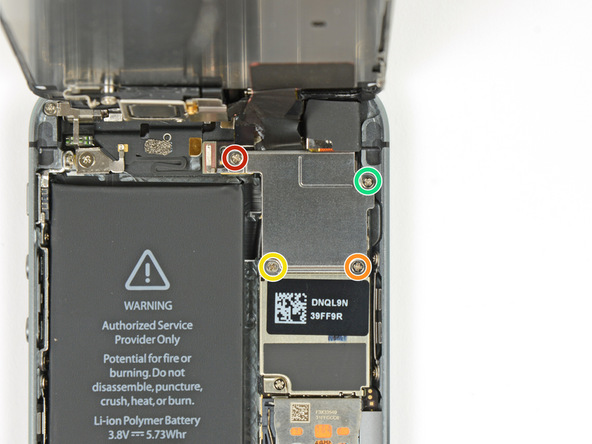
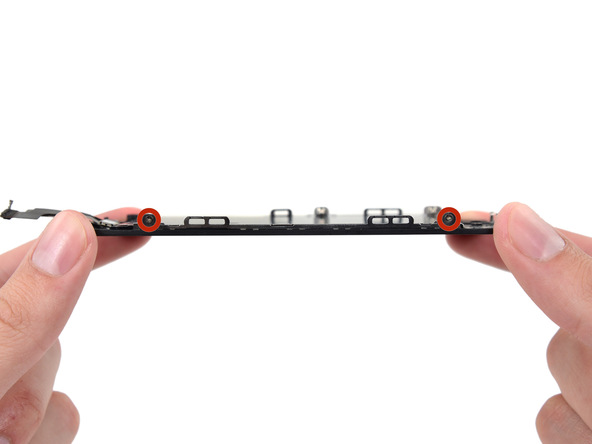
- The upper part of the screen remains connected by a ribbon cable. We put the module vertically and unscrew the screws that hold the cable mount.
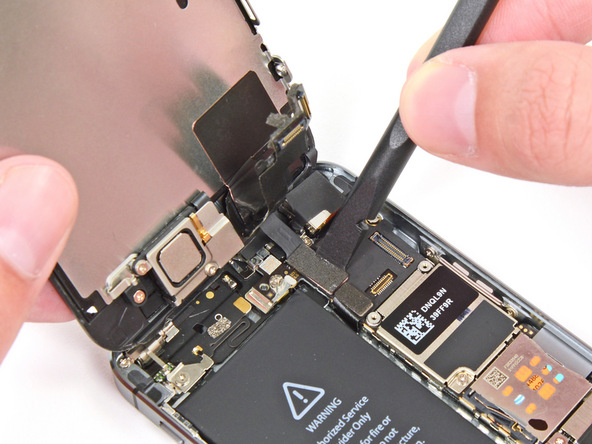
- Then we disconnect the cable with a plastic tool and get the disconnected module.
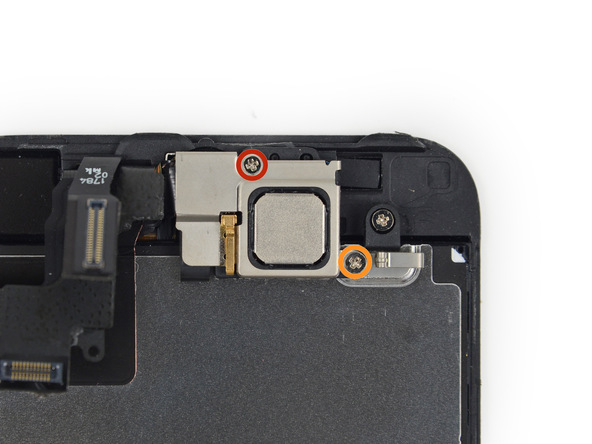
- Next, we need to parse the module itself. To do this, we first unscrew the 2 speaker screws
- Remove the aluminum plate holder
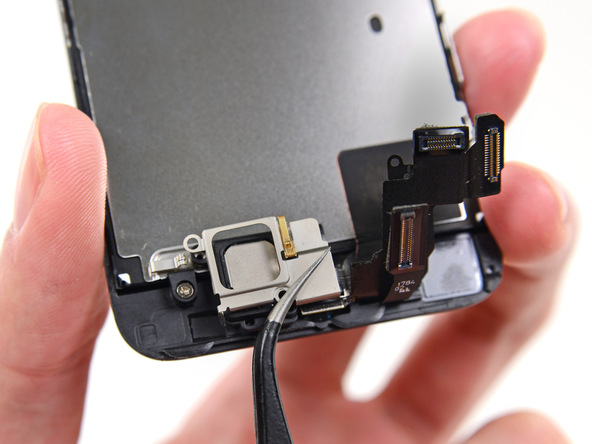
- And behind this we remove the speaker itself

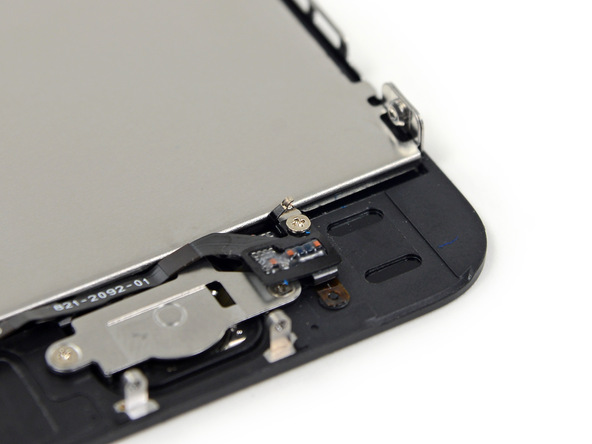
- Unscrew the three screws of the Home button with Touch ID
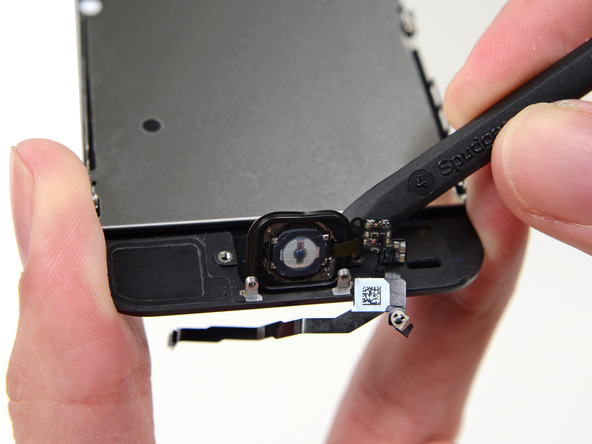
- Pry Touch ID in 5S with a rubber spatula and carefully remove it.
- After that, unscrew the screw of the metal base and remove it.
After disassembling, we get a display with cracked glass. Also, in order to better understand the disassembly procedure, we recommend watching the video below:
We now have two options. In the first case, to change the display assembly, this procedure is much easier but much more expensive than the second way - to replace only the top glass. We wrote more about the difference between replacing the module and glass in the iPhone in this one. So, to replace the glass you need:
That's all, but if you still have questions - write in the comments, I'll try to help you.
The iPhone 5 is the most popular phone model today. But even such a reliable technique can break if dropped or mechanical impact. Screen glass breakage is a common problem among users; it requires a competent approach and repair using original spare parts. You can carry out such repairs yourself, or you can contact the service center.
Despite the fact that the world has already seen the seventh model of the legendary phone, the most popular is still the iPhone 5. This is a high-quality and reliable device, but with careless use or mechanical stress on it, breakdown is possible.
The phone screen is at risk, it is the glass on the iPhone that most often breaks. Breakage of the screen glass entails more serious consequences, and the touchscreen on the iPhone may also fail. If the touchscreen is buggy, it becomes impossible to use the phone, so urgent repairs are required.
If you need to replace the iPhone 5 screen, the easiest way is to take the gadget to a service center. For an experienced specialist, changing the screen to an iPhone 5 will not be difficult - it is a simple and quick task.
![]() But if you have the skills, you can change the glass for an iPhone 5 with your own hands. To do this, you need the following tools:
But if you have the skills, you can change the glass for an iPhone 5 with your own hands. To do this, you need the following tools:
- Standard screwdriver 0.8 mm.
- Phillips screwdriver 0.8 mm.
- Thin metal spatula to remove glass.
- New screen.
- Antistatic mat.
- Tweezers with a thin curved tip.
Replacing the glass on the iPhone 5 requires accuracy, since very small screws are used in the design and it will not be easy to unscrew them.
Procedure for replacing display on iPhone 5
Armed with the necessary tools, you need to go directly to replacing the glass on the iPhone 5.
 1
To begin with, you need to not only remember, but also sketch the assembly diagram of the device in order to easily assemble it again. Then replacing the glass on the iPhone 5 involves unscrewing two screws from the bottom of the device. All parts are very small and fragile, therefore it is recommended to lay them out on an antistatic mat.
1
To begin with, you need to not only remember, but also sketch the assembly diagram of the device in order to easily assemble it again. Then replacing the glass on the iPhone 5 involves unscrewing two screws from the bottom of the device. All parts are very small and fragile, therefore it is recommended to lay them out on an antistatic mat.
Then, in order to repair the screen, you need to gently pry it off with a thin spatula from the side of the button. Be extremely careful, as right next to the button, under the screen, there is a loop - if you pull it sharply, you can damage it. Using a spatula, gently lift the glass on the five, and then hold it with tweezers. Gently move the spatula inside to disengage the pins. You should not do this abruptly, so as not to break the touchscreen controller and other elements. After all attachments are detached, slowly lift up the screen. 
To replace the glass on iPhone 5, you need to remove the protective board from the flex cable. It is attached with small screws that can only be reached with tweezers. You need to unscrew the screws with a Phillips screwdriver. Remove the plastic carefully so as not to touch the contacts front camera and do not break the touchscreen on the iPhone 5.
4When the plate is removed, you need to disconnect 3 connectors - first the right one, then the lower one, and then the upper one. It is easy to disconnect them - just pry each ribbon cable with a screwdriver.
Now that the old glass has been removed, it's time to change iPhone screen 5. To do this, you will need to disassemble your phone. First, remove the HOME button - unscrew the screws that secure it, they are on the right. Prying the module from the back side, pull out the button.
Replacing the display on an iPhone 5 now requires disconnecting the speaker and front camera modules. To do this, you need to unscrew the protective plate located on top of the modules. Unscrew all the screws one by one and remove this plate along with the camera and speaker.
 Now the replacement of the iPhone 5 glass is almost complete, it remains only to assemble the phone in the reverse order. To do this, we perform the following actions:
- Connect all loops in series.
- Attach the panel with the speaker and camera so that the edge of the cable rests on it and screw it down carefully.
- Replace the HOME button.
- Connect the touchscreen, screen and camera cables.
- Connect the button loop.
- Close the case.
Now that the screen replacement on the iPhone 5 is finished, you should check its functionality. To do this, turn on the phone and check if the screen, sensor is working, the touchscreen is not buggy. Only then should the screw be tightened at the bottom of the case. On the iPhone 5s, repairs are done in the same way.
Why are mistakes in work dangerous?
Replacing the display module on an iPhone 5 proved to be a daunting task, requiring rare tools that are not easy to get hold of, as well as being alert and focused. The slightest mistake will lead to serious consequences.
If, while changing the glass on iPhone 5, moisture (even in the form of steam), dust or small debris gets inside the case, the device will not work. That is why, if you do not have the appropriate skills, tools, or you doubt the success of your work, we recommend contacting professionals. For them, replacing the iPhone 5 touchscreen or simply replacing the screen will not be difficult.
Replacing the screen at the service center
So, if the glass on the iPhone is broken, and you do not know how to repair it yourself, you can contact the service center and not ask yourself the question "how to replace the glass on the iPhone 5 with your own hands."
In a professional service center, specialists will quickly diagnose and determine the breakdown in order to carry out repairs as soon as possible. Craftsmen are able to eliminate any, even the most complex breakdown, changing parts for new ones. Please note that only original iPhone parts should be used in the work - they are quite expensive, but only the installation of such parts will ensure a successful repair.
If the touchscreen does not work on your iPhone 5, contact only a specialized repair center. Perhaps the cost of services here will be higher, but the quality of work in such centers is always at its best. A guarantee must be issued for all work, the period is determined by the service center individually. The warranty usually extends not only to the screen, but also to the entire phone, since it is diagnosed before being repaired.
You need to contact the specialists if the sensor on the iPhone does not work and you need to repair the touchscreen for any iPhone of any model. And also, if the cable, button, speaker is broken, glass is broken and the phone has lost its attractive appearance.
Usually, repairing the screen and glass on an iPhone in a service center takes very little time, as a result of which you will get a working phone. The duration of repair and diagnostics is no more than an hour.
Is the sensor on your smartphone malfunctioning? Do not wait until it breaks down completely, take the phone to specialists. The cost of repairs is always determined individually, it depends on the timing and used spare parts, as well as the complexity of the breakdown. The highest cost of services is in specialized service centers for repairing iPhones, but there you are guaranteed to receive original and new components.
The global community is recognized for its dependence on Apple products. At the end of 2013, Yabloko was recognized as the brand with the highest customer loyalty index. The world is going crazy absorbing new items from Apple. Users are in no hurry to part with their iPhones, even if it becomes necessary to change the glass of the iPhone 5. By the way, this is the most frequent replacement of a part in iPhone service centers.
Each new model the company is progressing, therefore it becomes more and more difficult to replace an insignificant part. For example, in the latest iPhone 5 and 5s, the touchscreen is built into the display, and the glass in this model serves only a protective function. IPhone 5 glass replacement in Moscow is carried out in service centers Apple.
But before you give your iPhone to specialists, try to diagnose the degree of damage: pay attention to the drips on the screen. Blackouts under the cracks signal the need to visit a service center with the iPhone. You cannot cope with this problem on your own.
If an ordinary crack has gone across the screen, then try to provide "first aid" yourself. Remove the module completely from the device. For this procedure, it is necessary to unscrew the end screws, pry the part with a suction cup and disconnect the cables. 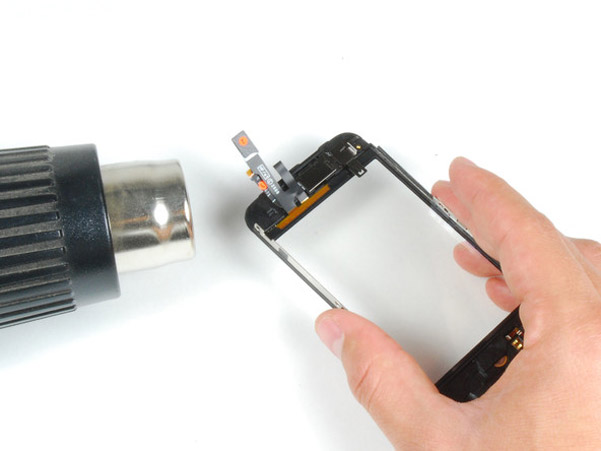
To remove the glass, you need a hair dryer, tweezers, and a razor blade. First, warm up the display frame with mounts and detach it from the glass. It will be possible to remove the broken glass from the display only with the help of hot air.
Heat the areas of broken glass with a stream of air to 140 degrees Celsius. After that, use a blade to cut the pieces of glass from the display without applying any extra effort. Movement should be light so as not to accidentally damage the matrix of the phone. Remove small fragments using tweezers. Clean the phone glue with an alcohol solvent. Be careful not to overdo it!
It is important that no liquid gets inside the display, otherwise stains will appear. The next step is to separate the film from the iPhone matrix. In the process of cleaning from the glue, the film will become cloudy. Pry a corner of it and peel it off the matrix. At the same time, dust should not get on the matrix of the iPhone 5S. The last step of the "first aid for iPhone" is to fix the display matrix. To do this, apply silicone glue to the display, gently spread it over the surface of the phone.
After this procedure, put in a new protective glass and spread the adhesive. Leave the iPhone for a few minutes to dry and the parts fall into place. The final step is to finally assemble your iPhone. If you are not confident in your abilities, then contact the nearest service center, where they will certainly help you.
In contact with
A broken iPhone is a serious nuisance, but fixable. We'll have to change the front panel. The easiest way is to give the device to the workshop: there, replacing the glass with an Iphone 5s will not cause any difficulties, after a short time it will be as good as new. But if you love puzzles and are ready to overcome difficulties, then we do everything with our own hands!Caution: sharp shards
The touch screen is an ingenious thing, a miracle of technology. But it is broken, and you can cut yourself corny on the fragments. During repair, the panel is deformed, fragments can fly apart. Protect yourself and others from injury: cover the screen with adhesive tape. If you want, stick two or more layers of tape.Obstacle number one: screws
The essence of the repair is simple: remove the bezel with the broken screen and install a new, good one. The second half of the job, installing the panel, appears to be very simple. Dismantling is more difficult, and the most difficult stage is opening the device. Having looked at the photographs, which show the stages of work, let us pay attention to the beautiful and unusual tools: a suction cup with a ring and an air intake valve; iSclack pliers-like tool with two suction cups.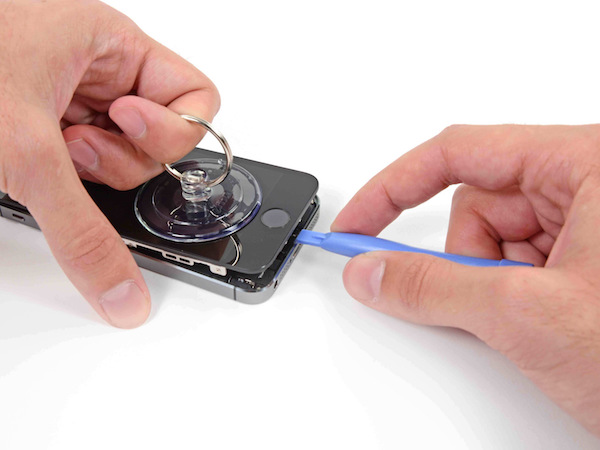 Alas, these tools won't come in handy if the glass is broken. But you need a five-blade screwdriver to unscrew the Pentalobe screws that guard the entrance to the device and are screwed next to the Light connector. Now such a screwdriver can be obtained by asking friends or browsing the Internet. Found a screwdriver? Unscrew the screws and go to the next step.


