Good afternoon, dear readers and guests of the portal, surely each of you wondered how to clear history on a Windows computer, by history, of course, everyone understands that something is their own, someone has a history of visiting a browser, someone has correspondence or open files , all this can be called activities on the computer, and we will clean and delete them.
Types of clearing history on a computer
If you analyze this issue, and figure out what types you can divide the cleaning of activities on a computer, then there are two types:
- Complete deletion of the entire history without the possibility of recovery, but with the safety of the operating system (example when you want to cover up your tracks or prepare your computer for sale)
- This is a partial removal of certain activities to optimize your computer (speed up your PC)
Of course, the fastest and most reliable way to clear all browsing history on a computer is a complete reinstallation of the system 🙂
How to clear browsing history on a computer
- Launching programs
- Opening files and other actions with them
- Network activity
We clean up with the sysprep utility
This method is ideal for those people who want to sell their computer or laptop and do not want their browsing history on the computer to be restored and read by third parties, but wants to leave their operating system and ideally clean, as if it was installed right now.
For such purposes, Windows has a built-in sysprep utility. I told you what it is, but in a nutshell, this is a program for anonymizing Windows from personal user data. The principle was simple there, you start the audit mode there, as a result, the system reboots and the next time you log in under the built-in Administrator account, thanks to this you can now go to Control Panel \ All Control Panel Items \ System (or properties of my computer), where you click Advanced System Settings> Advanced tab> User Profiles> Settings. You get a list of accounts that you can and should delete.

If you are paranoid and want to be one hundred percent sure that you have completely cleared the history on a Windows computer and it cannot be restored with special programs, then below I will show you a way to zero your hard drive with garbage data.
Clearing history with the PrivaZer utility
You can, of course, clear your browsing history on a computer with special programs created specifically for these things, and one of them is called PrivaZer, I already told you a detailed story about it, and showed its capabilities, here are just a small fraction of them:
- Clear traces of internet activity
- Clean up leftover traces of old files
- Clear traces of program use

In extended mode PrivaZer cleans the history of Messengers, Cookies. You can download the privazer program from the link on the left.

We continue to study the issue how to clear history on computer with Windows and the next utility we will have Ccleaner.
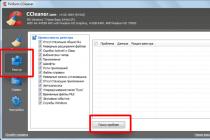
Clearing history with the Ccleaner utility
I also told you how to use the ccleaner program, I will just remind you of its capabilities in the context of our article topic, namely, it can:
- Clear browsing history of sites on the Internet (clearing browser history)
- Recent documents> what you have opened
- Cookies
- Windows event logs
- A lot of rubbish from other utilities
- Saved browser passwords

Here is a cleanup example

Clearing history with Glary Utilities
For me, Glary Utilities is a new thing, but it is very solid and useful in my software kit, supplementing the utilities described above, I will tell you about it in detail, now we need the Disk Cleanup button.

As a result, you will see on the left side of the program what can be removed, here is an example of browsers.

Additionally
Here I also want to show a couple of tricks on how to clean something:
- how to clear history in skype on a computer> I also told you in a separate article, so there is no point in repeating
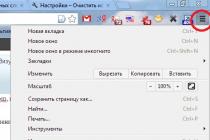
- how to clear the history of visiting sites on a computer> it's very simple if you don't want to use the utilities, then in your browser press the keyboard shortcut CTRL + H, and depending on the browser, click the desired button, in Google Chrome it looks like this
As you know, timely cleaning of Windows will guarantee the high performance of your computer and the multifunctionality of its software resources. We have reviewed the best programs that can fully clean the system. Which of the above utilities should you choose?
The undisputed leader among programs for cleaning the computer system is Computer Accelerator. This program has amazing features that are only partially available for other analogues. Manage the cleaning process, optimize the Windows registry as efficiently as possible, and permanently get rid of any software glitches and problems that have been bothering your computer for a long time. Computer Accelerator is able to quickly raise the performance of all computer resources, ensuring reliable stability and versatility of the performance of all its important system resources!
System Mechanic can be recommended for both beginners and professionals, however, specialists will like the product more. Its reliability and quality conquer, only the English language in the menu interferes slightly. In the West, the utility package is widespread and popular, development has been going on for over 20 years, so all functions are perfected.
An inexpensive alternative is Wise Care 365. The software is distinguished by the most convenient controls in comparison with analogs, powerful means of getting rid of the system from computer garbage, as well as the optimal ratio of the cost of the license and the high quality of the productivity tools offered by the developer.
CCleaner is one of the most widely used computer junk and junk cleaning tools in the world. The utility has gained its popularity due to its user-friendly interface and rich built-in capabilities. Owners of CCleaner get virtually the entire list of most paid modern counterparts among the "cleaners" and "optimizers" of the operating system. Using Advanced SystemCare Free will help you not only clean up the platform, but also seriously overclock your computer's power readings. Thanks to the presence of a whole range of specialized tools, the program can increase the level of RAM and processor performance, which will have an excellent effect on the performance of the entire OS.
In addition to the common functions for cleaning the system from unnecessary and damaged files, Glary Utilities will provide you with proper protection of all sensitive data, increasing not only the performance, but also the level of security of the operating system. The program is able to correct even incorrectly entered links, as well as find any errors in the registry and correct them correctly. If you have to share your computer with several other users, Comodo System Cleaner will help get rid of even the slightest suspicion of stealing your information, the utility can delete any confidential data without the possibility of their subsequent recovery. Komodo System Cleaner has a simple interface and quickly removes all unnecessary files, in addition, analyzes the system for duplicate files.
Wise Registry Cleaner is one of the leading registry cleaning utilities. The program does not have such extensive functionality against the background of its main competitors, but it will perfectly cope with its direct responsibility. The application will empower you with both manual and automatic control modes. Do not worry that Weiss Register Cleaner will clean anything important automatically, because the developer has implemented a convenient option to create a backup copy of the registry. With Wise Care 365 Free, you can quickly clear cache and cookies within web browsers. The utility is distinguished by a convenient possibility of customizing (an already simple interface) according to your preference. Weiss Keir 365, will protect user personal data, defragment the required disks and clean the system of unnecessary garbage.
How to clean Windows history with Cleaner Cleaner is a little-known program for many users, but it is very useful and quite easy to use. It is intended to search for user actions in the Windows system, as well as to further delete the entire history on a personal computer.
The program allows you to quickly and efficiently cover up all traces, improve the performance of your PC, optimize files, and increase the amount of space on hard drives.
How to use Cleaner to clear Windows history
In order to start using Cleaner, you need to download it on the Internet. The program does not require installation and is immediately launched in working mode. Initially, the program looks like this.
Cleaner has the following features:
- Complete pc cleaning
- Delete history in Windows and clear cache
- Removing information on the Internet, in browsers, as well as on the entire PC.
- Fast cleaning of the entire system
- Deleting swapped files
- Clearing browser logs and completely destroying usage history.
It should be remembered that Cleaner is a standalone application for your computer that helps you clear all history in windows. It has a similar name to another program. Therefore, Cleaner can be easily confused with other PC optimization applications - CCleaner.
In order to clear Windows history with Cleaner, you need to:
1. Launch the program and familiarize yourself with its interface.

2. Then choose where to add a shortcut to this program and deal with other settings.

3. Choose to clear the logs.

This can be done with the mouse by selecting the necessary items.
4. After the selected logs, click the "clear" button.

5. Wait until the files are analyzed and cleaned.
6. Close the application or minimize.
This procedure will help you optimize your system, improve the performance of your computer, and clean up your Windows history. You can perform this procedure at any time or when you urgently need to clean the entire history. The program works very fast and is free for any user.
As you can see, Cleaner is quite a convenient and very easy-to-use program that will perform a large amount of work in a short period of time. It is for these reasons that every user is required to have a Cleaner program on their pc, which will be used as a workflow for cleaning Windows.
Download Cleaner- http://soft-arhiv.com/load/cleaner
The RDP client in Windows (mstsc.exe) saves its name (or ip address) and the name of the user under which the logon was logged on each time it successfully connects to a remote computer. The next time the RDP client starts, it prompts the user to select one of the connections that he has already used before. The user can select the name of the remote rdp server from the list, and the client automatically substitutes the username used previously for logging in.
This is convenient from an end-user perspective, but unsecured from a security point of view, especially when an rdp connection is initiated from a public or untrusted computer.
Information about terminal sessions is stored individually for each computer user in his profile, i.e. a user (meaning an ordinary user, not an administrator) will not be able to view the connection history of another user.
In this article, we will show you where Windows stores the history of remote desktop connections and saved passwords, and how you can clear this history.
Deleting the RDP Connection Log from the System Registry
Information about all RDP connections is stored in the registry of each user. You will not be able to remove the computer (s) from the list of rdp connection history using standard Windows tools; you will have to manually delete the keys in the system registry.

Note... The described technique for clearing the history of terminal rdp connections works both on all versions of Windows XP, Vista, Windows 7, Windows 8 (both) and Windows 10, as well as on Windows Server 2003/2008/2012/2016 server platforms.
Clearing the history (logs) of RDP connections using a script
Above, we discussed the method of "manual" clearing the history of connections. However, doing it manually (especially on several computers) is a rather long task. Therefore, we offer a small script (bat-file) that allows you to automatically clear the history of connections to remote desktops.
To automate the cleaning of rdp history, this script can be placed at startup, or distributed to users' computers using Group Policy.
@echo off reg delete "HKEY_CURRENT_USER \ Software \ Microsoft \ Terminal Server Client \ Default" / va / f reg delete "HKEY_CURRENT_USER \ Software \ Microsoft \ Terminal Server Client \ Servers" / f reg add "HKEY_CURRENT_USER \ Software \ Microsoft \ Terminal Server Client \ Servers "cd% userprofile% \ documents \ attrib Default.rdp -s -h del Default.rdp
Let's take a look at all the actions of the script:
- Disable information output to the console
- Delete all values in the HKCU \ Software \ Microsoft \ Terminal Server Client \ Default branch (clear the list of recent rdp connections)
- Delete all contents of the HKCU \ Software \ Microsoft \ Terminal Server Client \ Servers branch (clearing the rdp connection history and saved usernames)
- Recreate the previously deleted branch
- Go to the directory with the Default.rdp file. Note that in this case, the path to the "Documents" folder will differ depending on the version and language of Windows. In this example, the path is specified for Windows 7 En, for XP RUS - it will look like cd% userprofile% \ "My Documents", for XP ENG - cd% userprofile% \ "My Documents", etc.
- Change the attributes of the Default.rdp file - by default it is system and hidden ()
- Delete the Default.rdp file
Alternatively, you can clear the RDP connection history using the following PowerShell script:
Get-ChildItem "HKCU: \ Software \ Microsoft \ Terminal Server Client" -Recurse | Remove-ItemProperty -Name UsernameHint -Ea 0
Remove-Item -Path "HKCU: \ Software \ Microsoft \ Terminal Server Client \ servers" -Recurse 2> & 1 | Out-Null
Remove-ItemProperty -Path "HKCU: \ Software \ Microsoft \ Terminal Server Client \ Default" "MR *" 2> & 1 | Out-Null
$ docsfoldes = :: getfolderpath ("mydocuments") + "\ Default.rdp"
remove-item $ docsfoldes -Force 2> & 1 | Out-Null
Note... By the way, the function of clearing RDC logs is built into many system and registry cleaners, such as CCCleaner, etc.
In the event that Windows needs to completely block the history of remote desktop connections, you can try to prevent the system from writing to this registry key (but, you should understand that this is already an unsupported configuration ...).
Deleting saved RDP passwords
If, when setting up a remote RDP connection, before entering the password, the user checked the Remember Me checkbox, then the username and password will be saved in the system password manager (Credential Manager). The next time you connect to the same computer, the RDP client automatically uses the previously saved password for authorization on the remote computer.

You can delete this password directly from the mstsc.exe client window. Select the same connection in the list of connections, and click the button Delete... Next, confirm the deletion of the saved password.

Alternatively, you can delete the saved password directly from. Open the control panel and go to Control Panel \ User Accounts \ Credential Manager. Please select ManageWindowsCredentials and in the list of saved passwords find the computer name (in the TERMSRV / 192.168.1.100 format). Expand the found item and click the button Remove.

In a domain environment, you can prohibit saving passwords for RDP connections using the policy Networkaccess: Donotallowstorageofpasswordsandcredentialsfornetworkauthentication(cm. ).
Lists of open files and USB devices, browser history, DNS cache - all this helps to find out what the user was doing. We have compiled step-by-step instructions on how to remove traces of your activities in different versions of Windows, Office and popular browsers. At the end of the article, you will find several scripts to help you automatically keep your machine clean.
1. Clearing lists of recent places and programs
Let's start by cleaning up the list of recent places and programs. The list of recent (in Windows 10 - frequently used) programs is in the main menu, and the list of recent places is in Explorer. List of frequently used folders and recent files How to turn off this mess? In Windows 7 - right-click on the "Start" button, select "Properties" and in the window that appears, uncheck both checkboxes in the "Privacy" section.
  Disable the storage of the list of recent programs in Windows 7 To clear the list of recent places and documents, you need to delete the contents of the% appdata% \ Microsoft \ Windows \ Recent directory. To do this, open a command prompt and run two commands: cd% appdata% \ Microsoft \ Windows \ Recent echo y | del *. * It also doesn't hurt to delete the contents of the% appdata% \ microsoft \ windows \ recent \ automaticdestinations \ directory. It contains the most recent files that appear in the navigation list: cd% appdata% \ microsoft \ windows \ recent \ automaticdestinations \ echo y | del *. * Further, these lines will be useful to us when we write our own script to clean the system from traces of our stay in it. To clear recent files automatically on exit, you must enable the "Clear recently opened documents log on exit" policy, which is located under User Configuration \ Administrative Templates \ Start Menu and Taskbar. Now let's move on to Windows 10. You can turn off the list of recently added and frequently used applications through the "Options" window. Open it and go to the "Personalization" section, the "Start" item. Disconnect everything that is there.
  Disabling program list storage in Windows 10 It seems that the problem has been solved, but, alas, this is not entirely true. If you enable these parameters again, then all lists with the same composition will appear again. Therefore, you will have to disable this feature through Group Policy. Open gpedit.msc and go to User Configuration \ Administrative Templates \ Start Menu and Taskbar. Include the following policies:
 - "Clearing the list of recently used programs for new users";
- "Clear the log of recently opened documents on exit";
- "Clear tile notification log on exit";
- Delete the list of programs pinned to the Start menu.
 Group Policy Clearing recent places in Windows 10 is easier than in the "seven". Open Explorer, go to the "View" tab and click the "Options" button. In the window that appears, turn off the options "Show recently used files on the Quick Access Toolbar" and "Show frequently used folders on the Quick Access Toolbar." Don't forget to press the "Clear" button.
  Windows 10 Folder Options As you can see, a simple task like clearing recent items is a rather tricky solution. Without editing group policies - nowhere.
 2. Clearing the list of USB drives
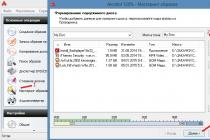
In some secure facilities, only flash drives registered in the journal are allowed to be connected to the computer. Moreover, as usual, the magazine is the most ordinary one - paper. That is, the computer itself does not restrict the connection of unregistered drives in any way. Doesn't limit, but records! And if, during the check, they find that the user has connected unregistered drives, he will have problems. We are by no means advising you to try to steal military secrets, but the ability to clear the list of recently connected drives can be useful in other life situations as well. To do this, look into the following registry keys: HKEY_LOCAL_MACHINE \ SYSTEM \ CurrentControlSet \ Enum \ USBSTOR \ HKEY_LOCAL_MACHINE \ SYSTEM \ CurrentControlSet \ Enum \ USB \ Here they are - all the drives that you connected to your computer. Registry section with the history of connecting drives It would seem that you just need to take and clean everything. But it was not there! First, the permissions for these registry branches are set in such a way that you will not delete anything even in the "seven", let alone the "ten".
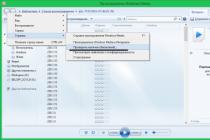
  Oops ... Secondly, it takes a long time to assign rights and permissions manually, especially if there are a lot of drives. Thirdly, admin rights will not help. The screenshot above was created when I was performing the delete operation with admin rights. Fourth, in addition to these two sections, there is a long list of sections to clean up. Moreover, they need not only be deleted, but correctly edited. If for some reason you need to do everything manually, then search for the keywords MountPoints, MountedDevices DeviceClasses and RemovableMedia. But it's much easier to use a ready-made program that will do everything for you. Some forums recommend USBDeview for this. However, I tested it and declare that it does not clear information from all the necessary sections. USBSTOR and USB continue to contain information about the connected media. I can recommend the program. Launch it, check the "Perform real cleaning" checkbox. You can enable the "Save .reg undo file" parameter or not, but if the goal is not to check the program, but to prepare for the upcoming computer inspection, then it is better to turn it off.
  USB Oblivion The program not only cleans the registry, but also displays a detailed log of its actions (see below). When it finishes working, there will be no mention of connecting drives to your computer.
3. Clearing cache and browser history
The third point in our tudu is clearing the cache and browser history. There are no difficulties here - each browser allows you to reset the list of recently visited sites.Continuation is available only to participants
Option 1. Join the "site" community to read all the materials on the site
Membership in the community during the specified period will open you access to ALL Hacker materials, increase your personal cumulative discount and allow you to accumulate a professional Xakep Score!