The final image we will create:
In this short tutorial, you will learn how to create glass text using layer styles in Photoshop. Let's start!
Materials used
Step 1 - Prepare materials and create a document
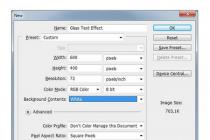
Create a new PSD document, 600 x 400 pixels in RGB mode at 72 dpi with a white background. Now let's prepare our materials. Install TheNautiGal font on your computer and optionally open the .PAT file to create a background, or use a pre-made background image to not create a background. You can skip creating the background and go straight to step 3 of this tutorial.

Step 2 - Making the Background
Let's go VMenu>Layer>Layer Styles>Blending Options(Menu>Layer>Layer Style>Overlay Options) and use the settings below. You can also access Blending Options in two quicker ways. The first and fastest way is to double click on the layer in the layers menu.
Another way: Right click on the layer in the layers menu and choose Blending Modes. When you're done with all the settings below, don't forget to hit "OK" in the overlay settings window! If you have downloaded file templates - use template #31. You can also leave the background without texture overlay or use any other texture that is suitable for a light background.
Inner Shadow: Blend Mode - Linear Burner, Color #171718, Opacity 34%, Angle -90, Use Global Illumination, Offset 96px, Pull Off 30%, Size 250px, Noise 8%.

Inner Glow: Blend Mode: Color Dodge, Opacity 19%, Noise 0%, Color #ffffff, Method-Soft, Origin-Center, Pull-In 24%, Size 250px, Range 50%, Jitter 0%.

Gradient overlay: Blend Mode - Multiply, Opacity 100%, #80b2a7 to #c7c8a2, Style - Radial, Align To Layer, Angle 0, Scale 74%.

Pattern overlay: Blend Mode - Normal, Opacity 100%, use texture from 72 Subtle Web Patterns, Scale 100%.


Step 3 - Let's start creating the first text layer
Now we can start making our text effect. First select the text tool and change the font to TheNautiGal, about 255 pt in size and the antialiasing method to sharp. Now enter some text somewhere in the center of the image. You can write any word, but in this lesson we will use the word "Wow".

Step 4
This first text layer will be placed below all text layers. Let's go to Menu>Layer>Layer Styles>Blending Options(Menu>Layer>Layer Style>Overlay Options) and use the settings below for our text.

Shadow: Blend Mode - Linear Burner, Color #171718, Opacity 19%, Angle - 52, Uncheck "Use Global Illumination", Offset 11px, Pull Off 0%, Size 16px, Noise 0%.

Embossing: Style-Inner Bevel, Method-Smooth, Depth 83%, Direction-Up, Size 3px, Easing 0px, Angle 0, Uncheck "Use Global Illumination", Height 26, Checkbox "Anti-Aliasing", Highlight Mode - Linear Dodge, Color #ffffff, Opacity 28%, Shadow Mode - Linear Dimmer, Color #000000, Opacity 0%.

Step 5 - Create and Adjust the 2nd Text Layer
Now duplicate the text layer. Select the text layer and go Menu > Layer > Duplicate layer(Menu>Layer> Menu > Layer > Layer Style > Clear Layer Style(Menu>Layer>Layer Style> Menu > Layer > Layer Style > Blending Options(Menu>Layer>Layer Style>
Again, you can use the Blending Options shortcut from Step 2 of this tutorial. When you're done with all the settings below, don't forget to hit "OK" in the overlay settings window! This text layer will be in the middle of all layers. So now it should be positioned above the first text layer.
Set the Fill Opacity to -0%.

Inner Shadow: Blend Mode - Linear Burner, Color #171718, Opacity 24%, Angle 180, Uncheck "Use Global Illumination", Offset 1px, Pull Off 0%, Size 0px, Noise 0%.

Embossing: Style - Inner Bevel, Method - Smooth, Depth 1000%, Direction - Up, Size 4px, Easing 1px, Angle 0, Uncheck "Use Global Illumination", Height 26, Checkbox "Anti-Aliasing", Highlight Mode - base lightening, color #ffffff, opacity 4%, shadow mode - linear dimmer, color # 000000, opacity 10%.

Step 6
Creation and adjustment of the last 3rd layer with text. We are almost there. Now we need to duplicate our 2nd text layer. Select the text layer and go Menu > Layer > Duplicate layer(Menu>Layer>Duplicate Layer) and name it whatever you want. Now go Menu > Layer > Layer Style > Clear Layer Style(Menu>Layer>Layer Style>Clear Layer Style) as we will be applying a different style to this layer. Finally go to Menu > Layer > Layer Style > Blending Options(Menu>Layer>Layer Style>Overlay Options) and use the settings below for your text.
Again, you can use the Blending Options shortcut from Step 2 of this tutorial. When you're done with all the settings below, don't forget to hit "OK" in the overlay settings window! This is the main text layer and should be placed above all other text layers.
Set the fill opacity to 0%.

Shadow: Blend Mode - Multiply, Color #171718, Opacity 82%, Angle -0, Uncheck "Use Global Illumination", Offset 2px, Pull 0%, Size 8px, Noise 0%.

Inner Shadow: Blend Mode - Linear Dodge, Color #ffffff, Opacity 22%, Angle - 90, Uncheck "Use Global Illumination", Offset 1px, Pull Off 0%, Size 0px, Antialiasing Checkbox, Noise 0% .

Embossing: Style - inner bevel, method - smooth, depth 1000%, direction - up, size 16px, softening 0px, angle 0, uncheck "use global illumination", height 40, checkmark "antialiasing", highlight mode - Linear Dodge, Color #ffffff, Opacity 18%, Shadow Mode - Linear Dimmer, Color #000000, Opacity 8%.

Stroke: Size 1 px, Position - Inside, Blending Mode - Overlay, Opacity 27%, Stroke Type - Color, Color #999999.

Final Image
If a multimedia presentation is used during the meeting, it is usually the first slide that the participants see the longest. That is, so that those who arrive on time do not get bored, and they do not forget why they gathered, and also to check the readiness of the equipment, the organizers launch by stopping it on the title slide. In fact, the presentation has already been launched, but at this time the organizational moments of the meeting, such as seating and recording latecomers, explanations can still continue. Therefore, the first impression of the quality of the presentation itself and the professionalism of the speaker largely depends on the quality of the first slide.
In the vast majority of cases, the title slide on the presentations contains its name, i.e. added text. Transparent letters in the name can look quite interesting when only their outline is painted in the required color, and the entire inner part contains a gap.
Let's look at how you can achieve this effect in PowerPoint 2010 and Word 2016 so that the letters do not hide the background behind them:
Transparent letters in PowerPoint
As you know, for normal tasks, to add text, use the settings of the presentation template. If you need to add text elsewhere, then the "Inscription" button in the "Insert" tab is an indispensable assistant.

The first step is to add in the standard way, including using pictures or images.
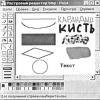
Next, in the "Text" group, we find the button for adding decorative text "Word Art" and select one of the styles. The set contains styles that initially do not have a fill. But to demonstrate the process, a style with an opaque fill will be selected.

After that, we start working on the content and location of the object:
- enter the desired text
- adjust letter size,
- position the object on the slide.
The activated object with text allows you to work in the "Format" tab, "Word Art Styles" group. To achieve the effect of transparency of the letters, you need to select "No Fill" in the "Text Fill".

At this stage, you need to adjust the thickness of the outline of the letters and their color. You can do this using the Text Outline button below the Text Fill.
Thus, we have created a transparent caption on the title slide of the presentation, suitable for this background option. And it happens that you need, without changing the letters.
How to make letters transparent in Word
In order to accurately learn how to create letters with a transparent background in a Word and not accidentally confuse it with a white sheet fill, change the background color of the background from white to light green or another as desired. In the process of preparing letters in the future, this is not necessary.
Design Tab - Page Background Group - Page Color Button

Hello. How to make text transparent in Microsoft Word?
Master's response:
Hello.
In the process of typing, creating site pages or program interfaces, it may be necessary to make some or all of the text transparent. The transparency of the text is very conditional on a computer and in various programs it is implemented according to the same principle. The method of creating transparent text can be considered using the Microsoft Word text editor as an example.
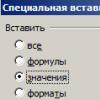
Start creating transparent text should be the background color where the text will be typed. Next, you need to find out the code for this color. To do this, select "Format" in the main menu of the editor, in the submenu that appears, place the cursor on the "Background" line, and then select the "Other colors" item. A window will appear where below the spectrum of colors the code of the selected color will be signed. It must be memorized or written down.
Next, you need to open the "Format" item in the main menu of the editor, and then "Font". In the font properties window that opens, select the "Font" tab. Next, you need to click on the color selection bar (under the "Text Color" line), then you need to select the "Other colors" item. In the color selection window that opens, you must enter the previously recorded background color code. Thus, the text color will merge with the background color, visually the text will appear transparent (invisible).
To read transparent text, you can simply select it with the mouse.
As you probably already know, such a concept as "fashion" is present even in website design. Both in the main style and in the elements. Flat has become very popular lately. This style implies simple sans-serif fonts, the absence of gradients and shadows, and many other little things, which include transparent text. What to do? The modern rhythm of life does not allow you to be scattered over trifles and spend a lot of time working out the details. This is such a handy mod. It's very easy to create this effect in Photoshop. For this we need the original image.
Using the text tool, write any word. And place it in the middle of the image. I think you understand that we are better off using bold and capital letters. So our effect will be more visible. The color we use is white.

In the layers window, find our text layer and change its opacity to 50%.

That's all! It remains only to reduce the layers. To do this, press the key combination ctrl+shift+e. And you can save.

Another variation is transparent text that looks like glass. This effect is done a little differently. We need to add volume to the text.
Let's take a different source image. It is desirable that one contains as few small elements as possible, at least in the place where we will place the transparent text. Otherwise, it simply will not be visible.
We write the text, but in black.

And now in the layers window, change the blending mode to "replacement with light." Our text becomes invisible. Let's give it volume. Using my favorite tool, Blending Options. They are called by the right mouse click on the layer.


We are interested in the "shadow" parameters, with the following settings:

And "embossing":

Play with flowers. You can choose them based on the color of your image. There can be many variations. A slight shift of the slider can give a new, very interesting effect. This method, of course, gives more just for the imagination. Although it can not be called in demand.

We reduce the layers, save.
As you can see, we have made another variation of transparent text, but this time it is more voluminous.
The third variation is the easiest. The same black text. The same blending mode "replace light". But in the overlay options, select only the stroke with the following settings:


We get a new effect. Transparent font with stroke. By the way, the stroke can be of any color and thickness. Turn on your imagination to the maximum and create!
Creating transparent text in Photoshop is easy - just reduce the opacity of the fill to zero and add a style that emphasizes the outlines of the letters.
Let's get started.
Create a new document of the desired size and fill the background with black.

Then change the foreground color to white and select the tool "Horizontal Text".

Fonts with smooth lines will look best. I chose the font Forte.

We write our text.

Create a copy of the text layer ( CTRL+J), then go to the original layer and double-click on it, calling up the layer styles.

First of all, select the item "Embossing". Set the settings as shown in the screenshot.

Then select the item "Circuit" and look at the screenshot again.

Let's add Stroke with these settings:

AND Shadow.

Done, click OK.
Don’t worry that you can’t see anything, everything will soon appear ...
Go to the top layer and call the styles again.
Adding again Embossing, but with these settings:

Then we define Circuit.

Setting up inner glow.

Click OK.

Everything is very simple. Lower the fill opacity for each text layer to zero:

The glass text is ready, it remains to add a background, which, in fact, will determine the transparency of the inscription.
In this case, the background is added between the text layers. Please note that the opacity of the placed image must be lowered (“by eye”) so that the lower text layer shows through it.
Try not to make it too bright, otherwise the transparency effect will not be as well defined as we would like.
You can take the background ready, or draw your own.

Here's what happened in the end:

Carefully adjust the styles for the text layers and get such a beautiful transparent text. See you in the next lessons.