In recent years, it has made tremendous progress: even the very first models of smartphones from Apple took very decent pictures - the latest ones are completely impressive with their photographic capabilities. What is technology worth? living photo available on iPhone 6 and 6S?
However, for the outstanding quality of photos, users have to pay with the free memory of the gadget. A live photo alone weighs about 4 MB, and users bring hundreds of them from vacations. iPhone owners now and then have to transfer photo albums from the device's memory to a computer. Luckily, this is pretty easy to do.
Users who frown in disgust at the word " iTunes", should be happy with the fact that you can transfer photos from iPhone to computer without using this program. Actually, most iPhone owners use this method - there is no need to disturb iTunes for no good reason.
To download photos to a PC, you need a USB cable. After you prepare it, follow the instructions:
Step 0 (preliminary). Create a folder on your computer where you will drop the photos, and remember its location.
Step 1. Connect smartphone to PC with cable.
Step 2. Wait a few seconds for the computer to detect the iPhone. After you hear the sound characteristic of a USB connection, you can proceed further.
Step 3. The smartphone screen will prompt “ Trust this computer?- click " Trust».
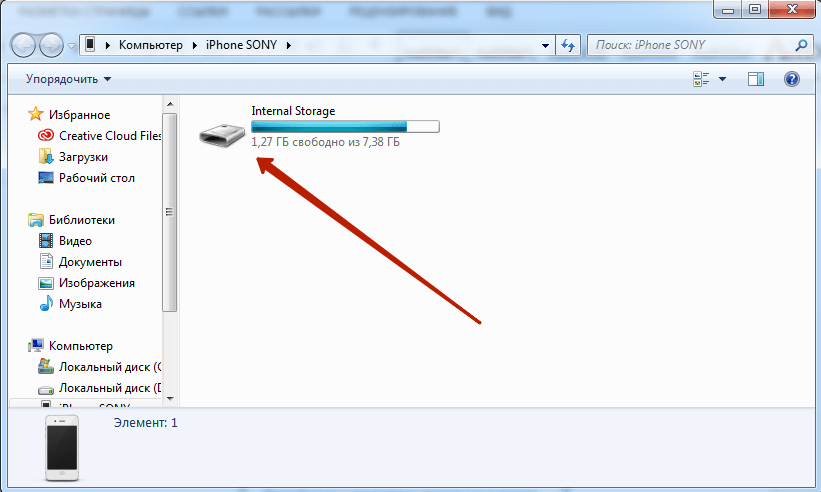
Step 4. On the computer monitor, you will see a window " Conductor».

Click on the option " Open device to view files».
Step 5. Go to the internal storage of the device - " Internal Storage».
Step 6. Open folder DCIM- inside you will see several more folders, each filled with photos and videos.

The number of folders in DCIM depends on the number of photos you have taken during your entire iPhone use: after the first thousand shots, a second folder is created, and new photos are saved in it.
Step 7. Cut photos from folders - use combinations CTRL+A (« Select all") And CTRL+X (« Cut»).

Step 8. Paste the pictures into the folder you prepared in the preliminary step - for this you can use the combination CTRL+V.
You need to follow the order - start cutting out the photo from the next folder only after copying from the previous one is completed, otherwise the computer will give an error.
Return photos to smartphone memory the same way will not succeed - will have to use iTunes. Therefore, when clearing memory on an iPhone, act prudently and carefully.
How to transfer photos from iPhone to Mac?
Despite the high integration of the iOS and OS X operating systems, the iPhone still does not appear as a physical storage medium when connected to a Mac. Therefore, the transfer of information from iPhone to Macintosh occurs approximately according to the same algorithm as on Windows.
Step 1. Connect your mobile device to your Mac.
Step 2. Run the built-in program " Image capture". You can find it in the " Programs» or through the internal search engine Spotlight which invokes by pressing the combination CDM + Space. The program looks like this:

Step 3. Select the photos you want to upload to your computer and drag them into the pre-prepared folder.
Transferring images to a Mac can also be done through other programs, such as iPhoto or Aperture, however, this software is not built-in - it must be installed separately.
Uploading photos via iTunes
Transfer to computer via iTunes you can only those photos that were loaded into the device's memory in the same way. In the application " Photo» albums with such pictures are marked with the caption « From my computer».

Camera photos cannot be exported via iTunes.
If necessary, transfer the photo back to the computer using iTunes act like this:
Step 1. After connecting iPhone to PC, launch iTunes.
Step 2. Go to the gadget control menu - to do this, click on the icon with the image of a smartphone.

Step 3. In the block " Settings» select the tab « Photo».

Step 4. Make sure that opposite Synchronize» was ticked. If it's not there, put it on.

Step 5. In field "Copy photos from:" Press " new folder"(someone will have -" Images"). From the drop down menu, select " Select folder».

Step 6. Find on your computer the folder from which you downloaded the photos to the iPhone's memory, and select it.
Step 7. Click the button Synchronize” and wait for the operation to complete.
There is another, unpopular way to get through iTunes photos stored on iPhone extract from backup.
All local copies of data are stored in computer memory: for example, on Windows 7 they are located at Start usernameAppDataRoamingApple ComputerMobileSyncBackup, and on a Mac, at usernameLibraryApplication SupportMobileSyncBackup. The backups in the computer folder look something like this:

To work with backups iTunes you need special software - let's say a utility will do iPhone Backup Extractor, which you can download. The need to master new software is the reason for the low popularity of this method.
Uploading photos via cloud storage
Cloud storage (such as Google Drive, Yandex.Disk, dropbox) is the fastest way to transfer a large number of photos from your device to your computer. However, this method has a significant flaw: mobile applications of almost all cloud storages are installed only on iPhones with iOS versions older than 8. Owners of iPhones of the 4th modification cannot count on this method, because iOS 8 is not installed on the iPhone 4 at all, but on 4S - works with a creak.
The method is very simple - consider an example dropbox:

This should be the result:

Step 2. Download dropbox from the App Store and log in with the same credentials.
Step 3. Open the folder " Photo» in the mobile application and through the button « Download» Throw photos there.
Step 4. Go back to your computer and open the " Photo" On him. You will see that the photo from the iPhone is inside.
Step 5. Click the button Download” and wait a couple of seconds for the download to complete.

About cloud storage Google Drive And dropbox more details in this article. Users of devices with iOS 8.1 may consider an application as an "intermediary" iCloud Drive, which is installed on iPhones by default, however, this application has a significant disadvantage compared to other storages - there is very little free space.
Uploading photos via mail and other methods
If email is set up on your iPhone, then you can transfer a photo to your computer in just a few elementary steps:
Step 1. Go to the application Photo” and find the desired picture.
Step 2. Click on the arrow icon located in the lower left corner.


Step 4. In the menu that appears, click on the icon " Mail". The photo will be attached to the email.
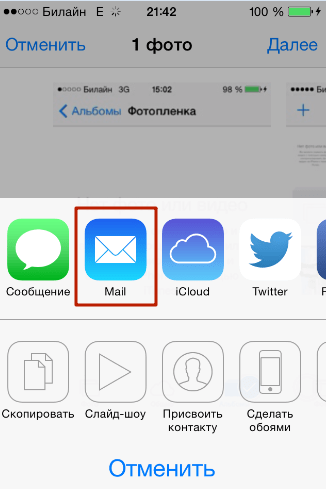
Step 5. On the next screen, enter the email address to which you will send the email. You can use a mailbox that belongs to you, but is registered on another service - now it's in the order of things when one person has several mailboxes.

Step 6. Click " Send».
Step 7. A message will appear reminding you that you are sending an email without a subject - confirm your intention by pressing " Send».

Step 8. Go to the mailbox where you sent the photo from your computer and download the image.
In addition to email, in the same way, any of the social networks can be used as an intermediary between iPhone and PC ( In contact with, Facebook): You just need to send an image as a message from your smartphone, then open the message history on your computer and download the image to your hard drive. However, this method is only suitable if you need to download a small number of images - in one message " In contact with» fits a maximum of 10 photos.
Conclusion
Photo and video transfer is the only data exchange between iPhone and computer that does not require a launch iTunes. When connecting an "apple" gadget via USB, the iPhone is defined as a digital camera, which allows the user to copy pictures from the device's memory to the hard drive directly. However, even if there is no USB cable at hand, the iPhone user has a lot of options on how to upload photos to a computer - for this he can use his email or social network account.
Unlike before, transferring pictures taken from iPhone to Windows 10 is now easy. Featuring multiple photo management software tools, Apple Mobile Device Service and more. Recently, some iPhone users complained about the difficulty of importing photos from iPhone to their Windows 10 PC.
There may be an instance in which when transferring images from iPhone to PC, users may not be able to view iPhone photos, or they may find it difficult to transfer images with applications such as Bluetooth, iCloud, and iTunes. In this case, it is important to understand the source of the problems, which may be caused by a corrupted driver or some adjustments in the settings may be required. If you are facing similar problems, we will look at some possible solutions to fix this problem.
Can't import photos from iPhone to Windows 10
It is recommended that you update your iPhone as well as iTunes before moving on. Also, check if your Windows system is updated to the latest version. Regardless, if the problem persists, check the following solutions. This should help you troubleshoot the error.
1] Restart Apple Mobile Device Service (AMDS)
The Apple Mobile Device Service is a process that contains tags along with other background processes when installing Apple iTunes on Windows 10. This process basically helps iTunes recognize an iPhone connected to a Windows system. If your system does not recognize the iOS device, you need to restart the Apple Mobile Device Service (AMDS)
Open the window Run by pressing Windows Key + R.
Enter services.msc in the Run window and click OK to open the Service Manager.
Search for Apple Mobile Device Service (AMDS) from the list menu on the page.
Right click on AMDS and select "Properties" from the drop-down menu.
In the Properties window, navigate to the option Launch type and select Automatically from the dropdown menu.
IN Service Status press the Stop button and press OK.

After stopping the service, right-click again on Apple Mobile Device Service and click on Begin in the drop down menu.

Restart your computer.
Now open iTunes and connect your iPhone to import pictures.
2] Import photos from Phone drive to Windows drive
Connect yo ur iPhone to PC. This will display a notification for the parameter Trust .
Click the "Trust" button to continue and close the prompt window.
Open File Explorer by pressing "Windows + E" which will show the phone as a drive.

Copy and paste images from the device to your system.
3] Change the "Image Resolution" folder
If you restarted AMDS and the problem still persists, you may need to check the permissions on the Picture directory on your Windows system.
Go to This PC and right click on the "Pictures" folder.
From the drop-down menu, click Properties.
Go to the tab Safety and click Edit.
Find and click your account name in the username list.
Examination Full control V allow.

Click Apply and OK.
4] Connect iPhone to a different USB port
While USB 3.0 ports are more efficient and faster than USB 2.0, iPhone users have had a problem connecting their device to USB 3.0. If you cannot transfer images through USB3.0 ports, try using USB 2.0. See if connecting to different ports fixes your problem.
5] Use cloud services like iCloud & enable Photo Stream on your iPhone
If you find it difficult to import images to Windows 10, try using cloud services such as iCloud to easily access images and videos from iPhone devices.
Download and install iCloud on Windows system.
Go to iCloud for Photos. which will display the available directories.

Click on directories to access images and transfer desired images to PC
In this article, we have described for you all kinds of ways to transfer photos from your iPhone to a computer, and we have chosen not only Windows, but also Mac OS for this.
If you still think that iTunes is required for transferring, then you are very wrong! You can also copy photos by simply connecting the device to a computer. The described method is suitable for almost all versions of Windows. Connect your iPhone to PC and wait for a notification to appear on the mobile phone screen "Do you trust this computer". Click "Trust" and wait until the system automatically detects the device and displays the autorun system on the screen with a choice of actions.
Here we are interested in the first point "Import images, videos". Now select the folder to import and transfer all the files to your computer. Please note that only videos and photos from your camera will be copied. As soon as the process is completed, the system will automatically open a window with the saved data on your computer.
Important! If you have previously imported images from this device and save photos and videos to the same folder or directory, only the new data will be copied.
Sometimes autorun does not appear, and in this case, the import will fail. But you can go to "My Computer", find the iPhone portable device there and open it. Find the DCIM folder and copy all the data from there.
Transferring Photos to Mac OS
If you have a Mac Pro or other devices based on Mac OS, then you should definitely know how to transfer photos from your smartphone correctly, because the process is slightly different from Windows.
Connect your iPhone to your computer via USB. The system will ask for confirmation of trust in this device, click "Trust". As soon as your phone is recognized, the Photos window will automatically appear on the screen. If it does not open, then find this program through the search and run it.
Mac OS will automatically open the Import window for you, where you can select photos and videos to transfer to your computer. If you want to import all photos, then just click "Import all new photos". If you need to transfer only certain images, then mark them, and then click "Import Selected".
Using iTunes via USB cable
iTunes is an all-in-one product that allows you to manage your iPhone, create backups, quickly customize desktops and icons, create new playlists, and more. But with the help of it you can also throw off photos. To do this, open iTunes on your computer. If you don't have it, download it from the official Apple website.
Next, connect your iPhone to your computer using a USB cable. If the system requires permission to trust this PC, you allow it. The program will automatically detect your device and display it as a phone icon in the top left corner of iTunes. Full information about your model, charge level will also be presented here.
To copy a photo from an iPhone to a computer, you need to click on the icon of your phone, select the "Photo" tab on the side and check the box next to the tab below. "Synchronize".
Next, select the directory into which the photos will be synchronized and click the "Apply" button. The system will automatically copy the data to the specified folder and open it. That's it, the transfer procedure is over!
Using iTunes over Wi-Fi
The process for the first connection will be the same as described above. You must initially connect your phone to your computer via USB and open iTunes. Now here you need to configure the ability to synchronize over the air. To do this, find your device in the list of devices, click on it in the left side tab. Next, go to the "Settings" item and check the box next to "Sync over Wi-Fi".
The selected machine will automatically sync with your computer. We go into the settings of our iPhone, and we find the item there.
It remains only to press confirmation, after which you can wirelessly control your device via iTunes and drop any data. A cable is no longer required for this. However, please note that this method is only suitable for you if your computer has a built-in or external Wi-Fi module.
Wi-Fi through a special program
There is another interesting way to transfer photos without using cables. To do this, go to the Apple Store from your iPhone and enter the request Wi Fi Photo Transfer in the search. You will be shown a list of applications that match the given query.
We choose any of them, evaluating the reviews. But the principle of operation is the same for everyone.
Have you downloaded the app? Come into it. We used Wi-Fi Photo as an example. You will be shown the settings with the IP address, which you will need to specify in the browser on your computer in order to access the photos remotely. In this case, you must have Wi-Fi enabled on your phone and computer.
We enter the IP address in the browser, and do not close the program on the smartphone.
In the browser we see a list of photos and mark all those that you want to transfer to your computer. Here you can even specify a range from and to, so as not to mark each one. Have you chosen? We press .
The system will automatically archive them and download them to your computer. Once the process is completed, close the application on the iPhone and turn off the wireless network.
 This method is not entirely logical, but when there are no other alternatives, it is the place to be! The main idea is to transfer via social networks Vkontakte or Odnoklassniki in order to copy the data to the servers, and from there, by logging into your account on the computer, download to the local disk.
But here there are 2 ways:
- Firstly, you can upload photos and videos to albums and then download them from PC. But, as a rule, your friends will also see them, including in the event feed.
- Secondly, you can send photos to yourself by simply attaching them as separate documents or photos. And then download via PC. But keep in mind that you can send no more than 10 photos at a time in one message, and this creates a little difficulty if there are a lot of materials.
And another important point! If you upload photos via social networks, their quality deteriorates significantly, because social networks automatically compress them! As a result, only a small part of Retina quality will remain.
 Transferring photos is also possible through cloud services, both standard iCloud and Yandex.Disk, Google, Mail and other services, of which there are a lot today. One of the most popular is Dropbox, where your data is securely protected.
To send photos from an iPhone, you need to log in to the service website or download its official application, log in with your account and upload all photos to the cloud.
Next, you log into the same account, but only from your computer and upload information to local drives. If you do not need copies of files in the cloud, then delete them! For example, now Yandex is running a promotion, according to which all users who upload photos to the cloud through the official application are given 32 GB for free on an ongoing basis. The iCloud service has a quota of 5 GB, and it is better to use them for backups!
Copy via AirDrop
 This technology is used only on Apple devices! It allows you to send photos, videos, various links and many other data from one device to another over the air. To use this option, you must first enable it. To do this, on your Mac, search for AirDrop and turn on Wi-Fi or Bluetooth. Better, of course, the first option. Find the item at the bottom of the screen. "Allow me to be discovered" and activate it. This is necessary so that you can receive data from all devices, and not just those that are in your contacts list.
Possible problems and solutions
- Windows does not see my iPhone. Check that when you connect, the system correctly detects the device. The tray will show when your iPhone is connected and you can click on this tab. In it you will see a list of drivers that are installed. If the installation does not occur, check if there is an Internet connection and try to install them manually. To do this, go to "My Computer", click RMB, select "Properties" and click in the window that appears on "Device Manager". Here, find the device with a question mark and update its drivers via the Internet.
- Photos are not copied. Sometimes the problem occurs due to lack of free space on the local drive of the computer. In this case, delete unnecessary files on the disk or specify another folder where there is free space.
- iTunes does not see the phone. Make sure you have the latest version of the software that supports iPhone. Very often, users ignore application updates, which is why they face similar problems.
- The computer does not see the iPhone. Most likely, you forgot to confirm "Trust" for this PC. In this case, remove the USB cable again and insert it. An alert will appear on your phone where you need to click the "Trust" tab.
In general, if you need to transfer photos from iPhone to computer, one of the presented methods will definitely suit you, regardless of your iOS version and device model!
Today, the subject of the article will seem to be a simple, but not always understandable topic. After all, I’m sure that when you first got your iPhone, you immediately began to use it to the maximum: play games, surf the Internet and take pictures. And so you took a bunch of pictures, connect your device to your computer and ... You get a little lost, because iTunes comes out and wants something from us. But we just need to transfer photos from iPhone to computer. Let's see, it's really simple.
How to Transfer Photos from iPhone to Computer in Windows OS
Before we transfer photos from iPhone to computer, we need to find a USB cable.
Next, in order to transfer photos from iPhone to Windows, you need to follow these steps:

Note to the owner. Sometimes the PopUp window that pops up every time you connect your iPhone to your computer is very annoying. Here are the instructions for turning it off.
How to Transfer Photos to OS X
Everything is very simple here, because, of course, Apple has thought about this issue about a bunch of their own devices.
Method 1: standard
Again, before transferring photos from an iPhone to a computer, prepare a USB cable.
We will need the "Image Capture" program, which is part of the standard applications in OS X. It is located in the "Programs" section. You can also find it through the internal Spotlight search engine (called by pressing CMD + Spacebar at the same time).

Method 2: non-standard
Since not everyone and not always use standard official methods, or maybe you just don’t have the right program at hand, here’s how you can transfer photos from iPhone to computer using one of the file managers. For example iTools.

Now you can easily transfer all your photos and more! Good luck!
Method 3: non-standard
Another way to transfer photos from iPhone to computer. This time without connecting to a computer at all. This is done through a shared folder in the Yandex.Disk cloud service.

A huge plus of this method is that photos can be uploaded from anywhere where there is an Internet connection. And these photos will be available even when the iPhone is turned off.
Reading time: 8 minutes
In this article, we have described 6 ways for you to quickly transfer photos from iPhone to laptop or computer. Choose the right one.
The iPhone is capable of taking high-quality pictures, so the device is often used as a full-fledged replacement for a digital camera. In order not to clog up the phone's memory, photos should be regularly transferred to the computer's hard drive.
Some users may experience some difficulties at this stage, since the process of transferring photos from an iPhone to a computer or laptop requires certain knowledge about the phone and its interaction with the PC. However, there are quite a few ways.
Using iCloud Music Library
With this tool, photos from your phone will be available not only on MAC, PC, but also on iPad, Apple TV, iPod, etc.
Preparatory stage for MAC:
Photos moved to iCloud take up a certain amount of space in the cloud. Therefore, make sure that the size of the online storage for all your pictures will be sufficient.
Preparation for Windows PC:

The location of the upload and download directory can be changed using the "Photo Sharing" and "My Photo Stream" items. When connected to Wi-Fi, now all photos from the iPhone will be synchronized with the PC and deleted from the phone's memory.
Transfer photos via iTunes
iTunes is not directly designed to work with pictures, but it is possible to transfer them to a hard drive using the built-in tools of OS X. Previously, the iPhoto application handled this task in MAC, which automatically launched when the iPhone was connected to the computer. Photos were sent to iCloud, where they were synchronized with all other devices.

Starting with OS X Yosemite, the Photos application took over the role of iPhoto, which has wider functionality than the old tool. It is more tightly integrated into iCloud. In order for all pictures to be automatically redirected to the cloud storage, you need to select the corresponding item in the settings.

Photos can use all the libraries created in iPhoto, so MAC owners will not feel the difference. Moreover, iPhoto has not gone away from the Applications folder - you can still use it:
- select the desired graphic content to transfer to a laptop or PC,
- click on the "Import" button.
After the process of transferring photos to a computer is completed, the latter can be deleted from the phone to free up memory.
Using the Image Capture App for MAC
Even if the connected iPhone is not recognized by the MAC as a storage device, using the Image Capture utility to transfer photos from your phone to your computer is not difficult:
- Connect iPhone with original USB cable to MAC computer.
- Launch the Image Capture utility.
- Select pictures and click "Import".

To select multiple photos at once, press Command. Then it remains only to specify the directory for saving photos to the utility and start the copying process.
The Easy Way to Transfer Photos for Windows
iTunes is installed if desired on any Windows, and you can synchronize your iPhone with your computer in the same way as if it were a MAC. But since the Microsoft system is able to detect any phones, including the iPhone, as a physical medium, it is easier to work with it as with a regular drive. For this:

If necessary, you can copy the entire DCIM folder with snapshots to a computer disk.
Transfer photos to PC from iPhone via Wi-Fi
It is often convenient to use a wireless connection to transfer pictures from an iPhone to a computer. To do this, the phone needs to be synchronized with the computer:
- Connect iPhone with USB cable to computer;
- Open iTunes (on a Windows PC, you need to install the application yourself);
- In the "Devices" section, select your connected iPhone;
- In the upper menu ribbon, click on the "Browse" button and in the block with a choice of parameters, check the box for synchronizing the device via Wi-Fi.