If you're not happy with the default page orientation or margins in Excel, you can always change them. Microsoft Excel will allow you to set both portrait and landscape orientation, as well as adjust the size of the fields in accordance with your wishes. How to do this, we will analyze in this lesson.
Many of the commands used in Excel to prepare a workbook for printing and exporting to PDF can be found on the tab Page layout. These commands allow you to control the display of your data when printing, including page orientation and margin sizes. Commands such as print headers And breaks, allow you to make your book more readable.
Layout mode
Before making changes to the markup, you can view the book in the Page layout to visualize what the result will look like.
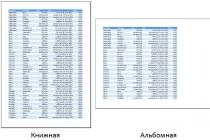
Excel has two page orientation options: landscape And Book. In landscape orientation, the page is laid out horizontally, while in portrait orientation, it is placed vertically. The portrait view is useful for sheets with many rows, while the landscape view is best for sheets with many columns. Regarding the example below, portrait orientation is more suitable here, since the sheet includes more rows than columns.

How to change page orientation in Excel

Field Formatting
The margin is the space between the content and the edge of the printed sheet. By default, the margin sizes in each Excel workbook are equal to the preset value Ordinary. Sometimes you may want to adjust the size of the fields so that the data is laid out as comfortably as possible. Excel includes several preset field sizes.

Custom fields
Excel also allows you to set custom field sizes.

Orientation Select Landscape and Portrait.
Scale Enlarges or reduces the size of a sheet or selection when printing so that it fits on a specified number of pages.
Change to If you press the button tune, you can enter a percentage in the field % normal size .
fit into When you choose write in, you can enter a number in the fields pages by width and in height. To fill the width of the paper and use as many pages as needed, enter 1 in field pages wide and leave the field Height empty.
Paper size In the dialog box, select a format letters, Legal or other size to indicate the size you want to use for the printed document or envelope.
Print Quality To set the print quality for the active sheet, select the desired resolution from the list. Resolution is the number of dots per linear inch (DPI) that appear on a printed page. The higher the resolution, the better the print quality on printers that support high resolution printing.
First page number In this field, enter Auto to start page numbering at address "1" (if this is the first page of the print job) or the next sequential number (if it is not the first page of the print job). Enter a number to specify a starting page number other than "1".
Fields tab options

Enter field values and view the results in the field Preview .
Top, bottom, left, right To set the distance between the data and the edge of the printed page, change the values in the top, bottom, left And right .
Header or footer Enter a number in the field page header or footer to adjust the spacing between the header and the top of the page, or between the footer and the bottom of the page. The spacing must be smaller than the margin values so that the header or footer does not overlap the data.
Align to the center of the page Align the data to the center of the fields on the page by checking the box vertical, checkbox horizontally or both of these elements.
Header Tab Options

Upper Click the Embedded Header in the box page header or select to create a custom header for the sheet you want to print. Embedded header copied to dialog box page header, where you can format or edit the highlighted title.
footer Click the Embedded Footer in the box footer or select an item custom footer to create a custom footer for the sheet you want to print. Embedded footer copied to dialog box footer, in which you can format or edit the selected footer.
Different headers and footers for odd and even pages Check the checkbox Different headers and footers for even and odd pages to specify that the header and footer on odd pages should be different from those on even pages.
Check box Custom header for the first page to remove headers and footers from and for the first printed page, or to create custom headers and footers. To create a custom header for the first page, check this box, select custom header or bottom running title and then on the tab First page footer first page, you can add header and footer data. should be displayed on the first page.
Scale with a document Check box scale with document to specify whether the headers and footers should use the same font size and scaling relative to the sheet. This checkbox is selected by default. Clear this check box to make the font size and scaling of headers and footers independent of the sheet scale to create a consistent display across multiple pages.
Align to page margins Check box Align to page margins to align the header or footer field with the left and right margins on the worksheet. This checkbox is selected by default. To set specific values for the left and right margins of the headers and footers that are independent of the left and right margins of the worksheet, clear this check box.
Sheet tab options

Print area Click the box printable area to select the range on the sheet to print, and then drag the pointer over the areas of the sheet you want to print. Button " Collapse Dialog
Title printing Choose one of the options in the section Seal headings to print the same columns or rows as headings on every page of the printed sheet. If you want separate rows Select horizontal headings for each page, select the command through lines. If you want vertical headings on each page, select through columns. Then, on the worksheet, select the cells or cells in the header columns or rows that you want to add. Button " Collapse Dialog" on the right side of this field temporarily moves the dialog box so that you can enter a range while highlighting the cells on the worksheet. When done, click this button again to open the entire dialog box.
Seal Specifies what is printed on the sheet, both in color and black and white, and what the print quality is.
grid lines Check box grid lines to include the grid lines on the sheet in the printout. Gridlines are not displayed by default, whether they are displayed on the sheet or not.
black and white Check box black and white if you are using a color printer but want to print in black and white only when printing. It is disabled by default. You do not need to select it if you are using a printer that only prints black and white.
draft quality Check box draft quality to print faster using lower print quality if the printer you are using has a draft quality mode. This setting has no effect if the printer does not have a draft quality mode.
Row and column headers Check box row and column headers to include these headers in the printout.
Notes In this window, select the location where you want to add notes added to worksheet cells so that they appear in the printout. Select at the end of the sheet to combine all notes and print them together on a page that is added at the end of the printout. Select as per sheet to print notes at their original location on the sheet. Notes are not automatically included in the printout because the default Nothing not chosen.
Errors in cells In this field, select the method for displaying errors in the cells that will be displayed on the printout sheet. By default, errors are displayed as they are, but they cannot be displayed if you select <пустая> , display them as double hyphens by highlighting them or specifying as #N/a.
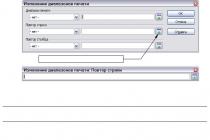
Page Order Click down arrow and then - down or up to control the numbering order and print data if it does not fit on one page. The sample picture lets you see the direction in which your document will print when you select one of the options.
see also
Repetition of certain rows or columns on each printed page Note: This page is translated automatically, so it may contain inaccuracies and grammatical errors. It is important to us that this article is useful to you. Was the information helpful? For convenience also (in English).
If you often print a certain section on a sheet, you can define a print area that includes only this section. The print area is one or more ranges of cells that you specify if you don't want to print the entire worksheet. When printing a sheet, only the printable area is printed after the printable area is defined. You can add cells to expand the printable area, and you can also clear the printable area to print the entire sheet.
A sheet can have multiple print areas. Each printable area will be printed as a separate page.
Note: The screen shots in this article were taken in Excel 2013. If you're using a different version, it might have a slightly different interface, but unless otherwise noted, the functionality is the same.
In this article
Setting one or more print areas
Note: The specified print area is retained when the book is saved.
To view all print areas to make sure they are needed, in a group book view modes press the button Viewpage break _gt_. When you save a book, the printable area is also saved.
Adding Cells to an Existing Print Area
You can increase the printable area by adding adjacent cells. When you add cells that are not adjacent to the print area, Excel creates a new print area for them.
When you save a book, the printable area is also saved.
Surely, you have come across a situation when a document sent for printing was not printed in the form that you expected: either the table spread over several sheets, or, conversely, wide borders caused the table to be printed, which cannot be read. Today we will look at issues related to setting the print area and displaying only the part of the table that we want to see on the sheet.
Print settings
To open the print settings in Excel, go to the tab File, in the left pane, select Seal. On the left you will see a window with basic settings and a preview of the document that will be sent to the printer.

To print the document, click the button Seal.
What to print?
Let's now deal with the settings that allow you to tell the program what to print. The first setting option allows you to choose from three options: Print Active Sheets, Print Entire Workbook And Print the selection.

Please note, in order to print several sheets of the workbook, select the necessary sheets, hold down the Ctrl key, select the item Print active sheets and click the button Seal.

When choosing an item Print selection, Excel will print those cells that were selected at the time of printing.
Single-sided / double-sided printing
Some printers support duplex printing, which can also be set in Excel preferences.

After several experiments with my printer regarding flipping on a long edge or a short one, I did not see any difference, so I concluded that this choice does not affect the output of my printer. I recommend you experiment with your printers and see what happens.
Sort into copies
Excel has a setting that allows you to collate / not collate documents when printing multiple copies of a single document.

In the first case, copies of documents will be printed sequentially. All pages of the first copy will be printed first, then the second, third, and so on. In the second, all copies of the first page will be printed first, then the second, third, and so on.
Document Orientation
You can switch between portrait (more rows but fewer columns will fit on the sheet) and landscape (more columns but fewer rows).

Print margins
To customize the print margins, you can use one of two methods:
1. Select one of the preset margin sizes from the list

2. Manually adjust the margins. To do this, click on the icon in the lower right corner of the preview window. Show fields. After Excel displays the fields, drag and drop as needed.

Scaling
Scaling allows you to adjust the size of printed objects in such a way as to make the most efficient use of paper space. If you want all the worksheet information to fit on one paper sheet, select Fit sheet to one page. This way, Excel will resize the table so that all the rows and columns fit on one sheet.
Part of this option is the ability to fit all columns or rows on one page. In this case, Excel will resize the table to fit the width or height of the printed area on one page.

Please note that you can manually adjust the scaling options. To do this, click on the tab Custom scaling options. In the dialog box that appears Page settings tab Page -> Scale, you can specify the scale percentage, or the number of pages to fit the printout in width or height.
Printing Notes in Excel
To print notes, in the print settings window, select the Page settings. In the dialog that appears, go to the tab Sheet –> Print. Opposite the field Notes select one of the three options for the ability to print Excel notes.

Outcome
Today we reviewed the basic print settings in Ecxel, having studied which you can make printouts that use the area of the printed sheet as efficiently as possible and at the same time do not lose readability.
Date: December 15, 2015 Category:When you create documents for printing (for example, reports, invoices, invoices, etc.), it is important to set them up so that the printed sheet looks correct, convenient and logical. Otherwise, the printed document will be difficult to read and the results of your work will leave an unpleasant impression. What worksheet settings you can do - I will tell in this post.
Most of the settings can be made in the window Page settings. It is called by clicking on the icon in the corner of the ribbon block Page Layout - Page Setup.
 Page Setup icon
 Page Orientation in Excel
Depending on the shape of the data on the sheet, you can choose portrait (vertical) or landscape (horizontal) orientation. You can do this in the following ways:

Each of these methods will change the orientation of the active sheet, or all selected sheets.
How to change page size in excel
Although most office printers print on A4 (21.59 cm x 27.94 cm) sheets, you may need to resize the print sheet. For example, you are preparing a presentation on A1 sheet, or you are printing branded envelopes of appropriate sizes. To resize a sheet, you can:

Setting up fields in Excel
Margins in Excel are empty areas of the page between the edge of the sheet and the border of the cells. There are several ways to customize the margins:

Add headers and footers in Excel
Headers and footers are information areas at the top and bottom of the page. on the fields. Headers and footers are repeated on each printed page, auxiliary information is written in them: page number, author's name, document title, etc. There are three fields for headers and footers (left, center and right) at the top and bottom of the page.
 Headers and footers in Microsoft Excel
 Yes insert headers and footers - go to, because. header and footer areas are clearly highlighted here. Click inside one of the headers and footers and enter informative text. This will bring up a ribbon tab. Working with headers and footers, which contains additional commands.
Yes, you can insert automatic header and footer, which will indicate the current page number, number of pages per sheet, file name, etc. To insert an automatic element, select it on the ribbon: Working with headers and footers - Constructor - Header and footer elements. These elements can be combined with each other and with free text. To insert - place the cursor in the header field and click on the icon in the group Header and footer elements(see picture above).
On the Design tab, you can set additional parameters for headers and footers:
- Custom header for the first page- headers and footers of the first page are not repeated on other pages. It is convenient if the first page is the title page.
- Different headers and footers for odd and even pages– suitable for page numbering when printing a booklet
- Scale with the document- the setting is enabled by default, headers and footers are scaled the same way as the entire page. I recommend keeping this option enabled to ensure the integrity of the sheet layout.
- Align with page margins– the left and right headers and footers are aligned to the respective margins. This parameter is also set by default, it makes little sense to change it.
Headers and footers are a handy tool for giving the finishing touch to your work. The presence of high-quality, informative headers and footers is a sign of the professionalism of the performer. Headers and footers bring the layout of the document closer to the publisher's view. It's really easy and very effective.
Insert a page break in Excel
If you need to insert a forced page break somewhere on the sheet, place the cursor in the cell to the right below the break point and execute the ribbon command Page Layout - Page Setup - Breaks - Insert Page Break. For example, to insert a break after column D and row #10, select cell E11 and run the following command.
 Insert a page break
 To remove the gap - there is a reverse command: Page Layout - Page Setup - Breaks - Remove Page Break. To remove all breaks created manually - the command Page Layout - Page Setup - Breaks - Reset Page Breaks.
After inserting a break, page separators will appear on the sheet. In they take the form of blue frames, dragging which, you can change the printed page borders.
Adding a Header in Excel
When you print large tables, you want the table header to repeat on every page. If you used , then this function will not affect the header in any way when printing, it will be printed only on the first page. That is, fixing sheet areas is only a visual effect for the convenience of displaying on the screen. When printing, it does not work!
To have cells repeat on every printed page, run the ribbon command Page Layout - Page Setup - Print Headers. A window will open Page settings, Sheet tab. In this window, in the Through lines and Through columns provide row and column references to repeat on each worksheet. Please note that the selected cells will not be physically present on each page, but will only be repeated when printed.
 Adding Headings to Excel
 Adjust print scale in Excel
Sometimes the information on the sheet cannot be placed compactly so that it fits on the required number of pages. It is not always convenient to match the column width and row height to get a well-composed sheet. Much more convenient change print scale(not to be confused with display scale). Using this option, you change the scale of your data on the printed page.
To change the print scale, use the ribbon commands Page Layout - Fit. You can set the scale manually using the Scale counter, but it's much easier and faster to use the Width and Height drop-down lists. Thanks to them, you can set how many sheets in width and height you will have. For example, to fit data into one page in width, set: Width - 1 page; Height - Auto.
 Excel print scale
 Hiding before printing
If you do not need to print some data, you can simply hide it. For example, containing technical information, leave only significant data. Most often, reports should not contain details of calculations, but only display their results and conclusions, suggesting certain management decisions.
You can also make objects non-printable. To do this, select an object (for example, or ) and right-click on its frame. Select Format… from the context menu. In the dialog box that opens, in the Properties group, uncheck Print an object .
 Configuring Printing Excel Objects
 Views in Excel
If you use the same document with different display layouts, you will often need to change the same display and formatting options. For example, you update the source data and calculations daily, which you then hide when printing. Instead of endless manual settings, you can create multiple views of the same sheet, after which changing the display takes a couple of seconds and a few clicks. give the name of the new view and make a choice in the suggested refiners. Click OK and the view is created!
 Adding a View to Excel
 In the future, to apply the saved view to the workbook, run View - Book Views - Views, select the desired view from the list, and click Apply . Unfortunately, views don't work if the sheet has , which limits the use of the tool.
These are the sheet settings that can and should be done in preparation for printing (and not only). Set up your workbooks the right way so your reports look perfect. Even the highest quality calculations look boring and useless if they are not formatted and prepared for printing. Even if you send out reports by mail, most likely the manager will want to print them. Therefore, I recommend preparing for printing each sheet of the report, regardless of the method of submission for consideration!
Friends, if you still do not understand any details on the materials of the post, ask questions in the comments. And do not forget to subscribe to updates , become professionals with the site ! Always yours, Alexander Tomm