In Part 1 of this article, I talked about how to use page styles in Calc to control the printing of spreadsheets. However, while page styles are one of the most useful tools for table prepress, they are far from the only tool. The ability to set page preferences for printing via printer settings and/or export to pdf format is only part of the whole arsenal. None of these remedies is a panacea, so you may need to use a combination of these methods to get the desired result.
However, the more you know about these tools, the more predictable the process of printing spreadsheets becomes for you.
Selecting a print range
When you print from Calc, you have the following options for selecting a print range:- print the whole table
- print selected range
- set the range of pages to be printed, or
- manually add line and column breaks.
In each of these options, you can keep track of the size of the columns and the number of lines printed on each page.
For example, if you print a portrait Letter/Letter page with 2.5 cm margins on each side, you will make the column 16.25 cm wide. Assuming there are no cells in the table that are larger than normal, you will get 50-55 lines. Many find it too complicated and do nothing. The problem with this choice, if you want to quickly learn how to print from Calc, is that you can never get a satisfactory result without carefully counting cell sizes. In most cases, rows and columns are split, separating information you've put in one place and making pagination unpredictable.
A more convenient way is to select with the mouse what you need to print. If necessary, you can use the menu Format to hide cells, columns and rows or just press the key ctrl when you select non-contiguous ranges. This method works well when you only need to print the table once, but if you need to print the same range in different sessions of the table, you can use the menu item Data > Define Range to give the range a permanent name.
Then, when you need to print this range, you can simply select the menu item Data > Select Range or select this range in the navigator window (key F5). In this case, the named print range is saved with the file. The print range is now just what it should be: highlighting the cells you want to print.
The print range is defined in the menu item Format > Print Areas. use paragraph Define print range to create a printable area for adjacent cells, paragraph Add Print Area to add new cells to the print range and item Change... to identify duplicate headings on each page, an action that will make the printed table much more readable.
The fourth method, manual pagination, accurately divides the specified print range into pages. Selecting a menu item Insert > Break and by setting either a line break or a column break, you directly specify where the page will start and end. At first, some people get confused when to select a line break or a column break. But after a few attempts, everything will fall into place.
The main obstacle to using manual breaks in large documents is that this method is very time consuming and requires a lot of time, as well as frequent use" Page Preview' to continue inserting breaks. Such an effort is not worth the trouble if you intend to print tables regularly.
Column and row breaks are marked with blue lines along the right (for a column) and top (for a row) border of the cell. However, this indicator can be easily missed in a complex table - you might not see it as a print range mark.
To avoid this, select the menu item View > Pagination Preview. When you're done, select the menu item View > Normal to return to the normal table view.
Setting Printer Options
When you choose File > Print for printing or File > Export to PDF, You can set print options. These options are generally common, but some special considerations need to be taken into account when you are printing spreadsheets:
- if you are printing a manually selected range or page range, make sure you select File > Print > Selection or tab General > Selection in the window Export to PDF. Otherwise, the print range will be replaced and the entire document will be printed;
- if you only want to print individual cells, select them before opening the print or export window. Use key ctrl to select an unrelated range. When you open the print window, click the button Options and check the box Print only selected pages. Remember that by default, all sheets of the spreadsheet are printed;
- setting a checkbox Options > Pages > Suppress Blank Pages prevent printing of pages that contain only empty cells;
- You may need to change the page orientation so that some rows or columns are not cut off. use paragraph File > Page Preview to decide what changes you want to make.
Summing up
Preparing a Calc page for printing or exporting consists of three steps:
- Create and apply a page style to control print results;
- Selecting the print area using the methods described in Part 2 of this article;
- Selecting printer setting values or export setting values.
In many cases, you can skip any of these steps. After all, spreadsheet printing is as hard as basic science. However, if you complete them all, then you increase the chances of a correct printout of the tables - if not the first time, then at least the second or third.
about the author
Bruce Byfield is a computer journalist who writes primarily for the Linux Journal and NewsForge sites.
Chapter 5 Printing from Calc
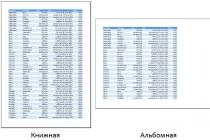
Select Format > Page from the main menu. The choice of page order is made on the Sheet tab. When a sheet is printed on more than one page of paper, it can be printed either in columns, when the first column of pages is printed, then the second column, and so on, or in rows, as shown in the figure at the top right in the Page Order section of the dialog box in Fig. 79.
Scale
Use the scaling option to control the number of pages on which data will be printed. This can be useful if a large amount of data is to be printed on a small number of pages, or if the reader has poor eyesight, the text can be enlarged when printed.
Reduce/Enlarge Printout - Scales the data in the printout by enlarging or reducing it. For example, if a sheet normally prints as four pages (two in height and two in width), a scaling of 50% will print it on one page (width and height are halved).
Fit Print Range to Number of Pages specifies exactly how many pages the printout will take. This option will only reduce the printout, it will not enlarge it. To enlarge the printout, the Reduce/Enlarge option must be used.
Fit print range to width/height - determines how tall and wide the printout will be, in pages.
Setting the print range
Print rows or columns on every page
If the sheet will be printed on multiple pages, you can select specific rows or columns to repeat on each printed page.
As an example, if the top two rows of a sheet, as well as the columns, are to be printed on all pages, do the following:
1) Select Format > Print Area > Change Print Range.
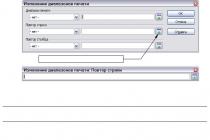
2) A dialog box appearsChanging the print range(Fig. 82). Click on - no - in the field on the left in the Repeat lines section, and change to - custom- .
3) In the text input field in the center, enter the repeated lines. For example, to repeat the first and second lines, type$1:$2 .
4) Columns can also be repeated; Press- no - in the field on the left in the section
Repeat columns, and change to -custom-.
5) In the input text field in the center, enter repeating columns. For example, to repeat column A, type$A .
Calc Guide |

Chapter 5 Printing from Calc
Click to shorten the dialogue
Rice. Figure 80: Change Print Range Dialog Box
6) Click OK .
Note You do not have to select the entire range of lines to be repeated. Only selecting one cell per row will work.
Specifying the print range
Use this setting to change or set a specific print range. This can be useful if, in a large spreadsheet, you only need to print a specific area of data.
To define the print range:
1) Select the range of cells that includes the print range.
2) Go to Format > Print Area > Define Print Range . Page break lines will appear on the screen.
Note You can check the print range using File > Page Preview. OOo will only show cells in the print range.
Adding a print range
After defining a print range, you can add cells to it. This allows multiple non-contiguous areas of the same sheet to be printed without printing the entire sheet. Once you have defined the print range:
1) Select the range of cells to be added to the print range.
2) Select Format > Print Area > Add Print Area . This will add extra cells to the print range.
Calc Guide |
![]()
Chapter 5 Printing from Calc
Page break lines will no longer appear on the screen.
Note The extra print range will be printed as a separate page, even if both ranges are on the same sheet.
Deleting a print range
It may become necessary to delete a specific print range, for example if you want to print an entire sheet.
To remove a print range, run Format > Print Area > Clear Print Range.
This will remove all defined print ranges on the sheet.
After the print range is removed, default page break lines will appear on the screen.
Editing the print range
At any time, the print range can be directly edited with Format > Print Area > Changing the Print Range. If you have already selected a print range, you will see something similar to Fig. 81.
Rice. Fig. 81: Dialog box Change print ranges
In this example, three rectangular areas are selected, each separated by a semicolon. The first is bounded by cell A3 ($A$3) in the upper left corner and cell C9 ($C$9) in the lower right corner. Clicking anywhere in the text input field will show the currently selected print ranges on the screen, each rectangle in a different color as in Fig. 82.
After making any changes, click the reduce icon to the right of the input text box (see Figure 80) to re-show the boxes with their new values.
Click the icon on the right (a box with an arrow pointing down) to expand the dialog box again.
Calc Guide |

Chapter 5 Printing from Calc
Rice. 82: Editing print ranges
Defining a Custom Print Range
In addition to allocating a print range for each print job, you can define a range of cells that is used repeatedly. This can be useful, for example, if there are different areas of a large spreadsheet that needs to be printed for different reports. Several different print ranges can be defined to suit this need.
1) To determine the print range, use the same procedure as for marking the sheet area. Select the cells you want to define as a print range and doInsert > Names > Define.(Cells can also be selected after opening the Define
names.)
2) In the Define Names dialog box(Figure 83), create a name for the range and enter it in the text field.
3) Click the Advanced button and then check the Print area box.
4) To include more than one group of cells in the selection, enter additional ranges. For example, to select a rectangle with A3 as the top left cell and F20 as the bottom right cell, type;$A$3:$F$20 or ;A3:F20 (both work equivalently) after the initial allocation. Make sure that each group of cells is separated by a semicolon.
5) Click OK .
Note Your range name cannot contain any spaces.
Calc Guide |
OpenOffice.org Calc offers a powerful and highly configurable printing system. Many different parts can be selected for printing or not. You can set the printing order of sheets and their size. You can select specific rows or columns to print on all pages, or specify a range of sheets to print.
Spreadsheet Printing
To print or to a spreadsheet file, run the command File > Print. Opening dialog box Seal allows you to change printer settings. Here you can quickly determine what to print: the entire document, individual sheets, or a group of selected cells. In this window, you can also determine the number of copies, the need to arrange copies. Press the button to start printing. OK.
Print Options
Print options can be set either for the current document only or for all spreadsheets. To set options for the current document in a dialog box Seal press the button Options in the lower left corner of the window. To permanently set parameters, run Tools > Options > OpenOffice.org Calc > Print. The dialog boxes for both cases are very similar.
Selecting the Print Area
You can select one or more sheets for printing. This can be useful if you have a large spreadsheet with many sheets and only need to print some of them. An example would be accounting data on expenses for a certain period of time, when one sheet is used for each month of the year. If you want to print only the sheet for November, then follow these steps:
- Select the sheets you want to print. (Hold down the key control when clicking on each sheet tab.)
- Execute the command File > Print and select Options.
- Check box Print only selected sheets.
- Click the button OK.

Setting the Print Area
Print rows or columns on every page
If the sheet will be printed on multiple pages, you can set up printing so that certain rows or columns are repeated on each printed page.
As an example, consider the need to print on all pages of the top two rows of the sheet, as well as column A:
- Execute the command Format > Print Areas > Edit...
- A dialog box will appear Changing print ranges. Click on - No- to the left of the field Line repeat, change it to - custom -.
- In the text input field, in the center, enter the lines to be repeated. For example, to repeat the first and second lines, type $1:$2.
- Columns can also be repeated; click on - No- to the left of the field Column repeat, change it to - custom -.
- In the text input field, in the center, enter the columns to be repeated. For example, to repeat column A, type $A.
- Click the OK button.
Specifying the print range
This setting is used to change or define the print range. This can be useful for large spreadsheets where only a set of specific data needs to be printed. To define the print range:
- Select the range of cells included in the print range.
- Execute the command Format > Print Areas > Define Print Range.
Page break lines appear on the screen.
Expanding the print range
Once a print range has been defined, additional cells can be added to it. This will allow multiple non-contiguous areas of the same sheet to be printed rather than the entire sheet. After defining the print range:
- Select the set of cells to be added to the print range.
- Execute the command Format > Print Areas > Add Print Area.
Additional cells will be added to the print range.
Page break lines will no longer appear on the screen.
Deleting a print range
Sometimes it is necessary to delete the previously defined print range, for example, if you want to print the entire sheet later.
To remove a print range, run the command Format > Print Areas > Clear Print Range
This command will delete all print ranges of the sheet.
After the print range is removed, standard page break lines will appear on the screen.
Surely, you have come across a situation when a document sent for printing was not printed in the form that you expected: either the table spread over several sheets, or, conversely, wide borders caused the table to be printed, which cannot be read. Today we will look at issues related to setting the print area and displaying only the part of the table that we want to see on the sheet.
Print settings
To open the print settings in Excel, go to the tab File, in the left pane, select Seal. On the left you will see a window with basic settings and a preview of the document that will be sent to the printer.

To print the document, click the button Seal.
What to print?
Let's now deal with the settings that allow you to tell the program what to print. The first setting option allows you to choose from three options: Print Active Sheets, Print Entire Workbook And Print the selection.

Please note, in order to print several sheets of the workbook, select the necessary sheets, hold down the Ctrl key, select the item Print active sheets and click the button Seal.

When choosing an item Print selection, Excel will print those cells that were selected at the time of printing.
Single-sided / double-sided printing
Some printers support duplex printing, which can also be set in Excel preferences.

After several experiments with my printer regarding flipping on a long edge or a short one, I did not see any difference, so I concluded that this choice does not affect the output of my printer. I recommend you experiment with your printers and see what happens.
Sort into copies
Excel has a setting that allows you to collate / not collate documents when printing multiple copies of a single document.

In the first case, copies of documents will be printed sequentially. All pages of the first copy will be printed first, then the second, third, and so on. In the second, all copies of the first page will be printed first, then the second, third, and so on.
Document Orientation
You can switch between portrait (more rows but fewer columns will fit on the sheet) and landscape (more columns but fewer rows).

Print margins
To customize the print margins, you can use one of two methods:
1. Select one of the preset margin sizes from the list

2. Manually adjust the margins. To do this, click on the icon in the lower right corner of the preview window. Show fields. After Excel displays the fields, drag and drop as needed.

Scaling
Scaling allows you to adjust the size of printed objects in such a way as to make the most efficient use of paper space. If you want all the worksheet information to fit on one paper sheet, select Fit sheet to one page. This way, Excel will resize the table so that all the rows and columns fit on one sheet.
Part of this option is the ability to fit all columns or rows on one page. In this case, Excel will resize the table to fit the width or height of the printed area on one page.

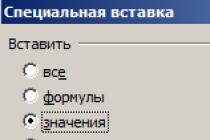
Please note that you can manually adjust the scaling options. To do this, click on the tab Custom scaling options. In the dialog box that appears Page settings tab Page -> Scale, you can specify the scale percentage, or the number of pages to fit the printout in width or height.
Printing Notes in Excel
To print notes, in the print settings window, select the Page settings. In the dialog that appears, go to the tab Sheet –> Print. Opposite the field Notes select one of the three options for the ability to print Excel notes.

Outcome
Today we reviewed the basic print settings in Ecxel, having studied which you can make printouts that use the area of the printed sheet as efficiently as possible and at the same time do not lose readability.
This command opens a dialog where you can specify a print range. Here you can also set the rows or columns that should be repeated on each page.
Choose a team Format - Print Ranges - Change
content
Print range
Here you can change the previously defined print area.
Select -No- to remove the previously defined print range of the current spreadsheet. Select -whole sheet- to define the entire sheet as the printable area. Select -selection- to define the selected area of the spreadsheet as a print range. When choosing an option -user defined- you can redefine the printable area previously defined with the command Format - Print ranges - Define. If the user assigned a realm name using the commands Insert - Names - Define, this name will be displayed in the corresponding list and this name can be selected.
In the right text box, you can specify a print range by name or by link. If the cursor is in a text field Print range, the range can be selected in the spreadsheet using the mouse.
Collapse / Expand
Click icon Collapse Expand
| Collapse | |
| Expand |
repeat lines
Select one or more lines to print on each page. Enter a string reference in the box on the right, such as "1", "$1" or "$2:$3". The value will appear in the list box. -custom-. You can also select to remove a duplicate row in the list -No-.
Duplicate lines can be identified with the mouse if the cursor is positioned in a field repeat lines dialog box.
Collapse / Expand
Click icon Collapse to shrink the dialog box to the size of the input field. After that, it is easier to mark the desired link on the sheet. Then the icon automatically turns into an icon Expand. Click it to restore the original dimensions of the dialog box.
The dialog box will automatically collapse when you click inside the sheet. When you release the mouse button, the dialog box will be restored and the range of links defined with the mouse will be highlighted in the document with a blue border.
| Collapse | |
| Expand |
Repeat columns
Select one or more columns to print on each page. In the right text box, enter a column reference, such as "A", "AB", or "$C:$E". The list will show the value -user defined-. You can also select from the list -No- to undo the set repeat columns.