A huge number of devices work on Android, and how any application looks on them depends on the image density - DPI. Android natively supports 7 DPI values: 120, 160, 213, 240, 360, 480 and 640. The larger the number, the larger the text and images. On devices with root access, this value can be changed manually and put on the screen as much useful information as possible, or vice versa - to increase the interface elements.
You can change the DPI manually in the Build.prop file or using a special Window Manipulator application. Before that, it makes sense to install a custom launcher to change the branded shell (for example, Google Start, Apex or Nova), since they are adapted for different devices. Then you need to download the application from XDA-Dev and install it as a regular APK file. Before installing, make sure that the system settings allow you to download the APK file outside of Google Play.
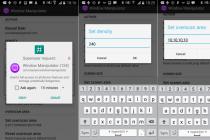
Once the app is installed, launch it, grant root access privileges, and look for the "Set Density" line. Click on it and select the desired density. Values less than the default will make fonts and images smaller, and more will make them bigger. Reboot your device to clear all cached images. You can return the default density by clicking on "Reset density".

In some cases, after changing the density, the image on the screen does not look correct. This can be fixed by choosing a different resolution in the "Set screen size" item and dimming the edges of the screen in the "Set overscan area" item.


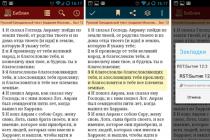
Some apps run on low DPI devices in tablet mode. For example, Chrome shows open tabs at the top and opens desktop versions of sites rather than mobile ones.
Let's face it, no matter how good the screens are on our Android phones and tablets, text can sometimes be too small if you have poor eyesight. Great news - there are many ways to help you increase the font on your Android smartphone.
The instruction is universal, no matter what smartphone (what manufacturer) and what version of Android you are using. We will tell you about all the ways to increase the text size on an android smartphone. After reading our recommendations, the information on the display will be perceived without the use of glasses or squinting.
Let's start with the simplest solution - determining the version of the Android device. We move the curtain from top to bottom and click "Settings" - "Information about the phone" - "Information about the software." In the window that opens, in our case at the very top, the version of the android device is displayed. If you are confused and do not know how to determine the version of your android smartphone, use the images below. They will greatly facilitate navigation through the menu of a smartphone or tablet. You have decided on the version of the smartphone, now select the necessary instruction in the table of contents.


Font increase on Android 7.0 - 7.X
On most Android phones, changing the font couldn't be easier than changing the ringtone. First of all, for a visual example, we use Pixel XL running Android 7.1.1 Nougat. The process for changing the font size should be identical for all devices, including older android versions. Things may look a little different, depending on the manufacturer of Android and phone, but otherwise the procedure is always the same. For example, the functionality of Android 7.x includes a preview of what the text will look like. Older versions of the OS simply display larger or smaller font options without a preview.
To increase the text size, go to the "Settings" menu. You can do this by pulling down the notification shade (twice on some devices) and then selecting the gear icon.

Then scroll down to "Show" and tap it. In this menu you will find the "Font Size" option.

The left screenshot shows how it looks on android 7.x, the right one shows Android 6.x. In both options, the same options are available as with Preview.


It's worth noting that the font enlargement process may look slightly different depending on your device. For completeness, check out this menu on Samsung (left) and LG (right) devices.


Once you have chosen your font, simply return from this menu and the changes will be saved. Nothing more is worth doing.
How to change font size on Android 8.0 – 8.X
With the arrival of Android 8.0 and newer software, you won't experience any problems with changing the size of text or app icons. The new smartphone operating system allows you to customize the screen size, icons, text and other interface elements based on your preferences.
To increase the text size on the screen of android 8.0 and earlier, do the following algorithm of actions:
Go to "Settings";

Go to the "Display" section;

Open the menu item "Font and screen scale";

Move the slider left or right to change the font size.

Video: "How to increase the font size on an Android device?
As for increasing the text size in SMS and the browser?
The large font in SMS messages on an android or device browser will automatically change when you change the settings according to our algorithm, which are presented in the instructions or on the video recording. If you have any questions, we will be happy to answer them in the messages to this article.

Android devices use the same font by default throughout, sometimes only changing in certain apps. At the same time, due to several tools, a similar effect can be achieved in relation to any section of the platform, including system sections. As part of the article, we will try to talk about all the methods available on Android.
We will further focus on both the standard functions of the device on this platform and independent tools. However, regardless of the option, you can only change the system fonts, while in most applications they will remain unchanged. In addition, third-party software is often incompatible with some smartphones and tablets.
Method 1: System settings
The easiest way to change the font on Android is using the standard settings by choosing one of the predefined options. A significant advantage of this method will be not only simplicity, but also the ability to adjust text sizes in addition to style.

The only and main drawback is the lack of such tools on most Android devices. They are often provided only by some manufacturers (for example, Samsung) and are available through the use of a standard shell.
Method 2: Launcher Options
This method is closest to the system settings and consists of using the built-in tools of any installed shell. We will describe the change procedure using the example of only one launcher Go, while on others the procedure differs insignificantly.
- From the home screen, press the center button on the bottom bar to go to the full list of apps. Here you need to use the icon "Launcher Settings".

Alternatively, you can bring up the menu by holding anywhere on the home screen and clicking on the icon "Launcher" in the lower left corner.
- From the list that appears, find and tap on the item "Font".
- The page that opens provides several configuration options. Here we need the last point "Choose Font".
- Next, a new window will be presented with several options. Select one of them to instantly apply the changes.

After pressing the button "Search Fonts" the application will start analyzing the device's memory for compatible files.

Once discovered, they can also be used as a system font in the same way. However, any changes apply only to the elements of the launcher, leaving the standard sections untouched.


The disadvantage of this method is the lack of settings in some versions of the launcher, for example, the font cannot be changed in Nova Launcher. At the same time, it is available in , and others.
Method 3: iPhone
The iFont app is the best font changer on Android, as it changes almost every element of the interface, requiring only ROOT rights in return. You can only work around this requirement if you're using a device that allows you to change text styles by default.
- Open the app downloaded from the official page and immediately go to the tab "My". Here you need to use the "Settings".

Click on the line "Change Font Mode" and in the window that opens, select the appropriate option, for example, "System Mode". This must be done so that later there are no problems with the installation.
- Now back to the page "Recommended" and check out the huge list of available fonts, filtering by language as needed. Please note that for correct display on a smartphone with a Russian-language interface, the style must have the tag "RU".
Note: Handwritten fonts can be a problem due to poor readability.

Once you've made your choice, you'll be able to view different text sizes. There are two tabs for this. "Preview" And "View".
- After pressing the button "Download", files will be downloaded to your device from the Internet.
- Wait for the download to complete and click the button "Install".
- Now you need to confirm the installation of a new font and wait for the setup to finish. Reboot the device, and this procedure is considered complete.

As an example, for reference, see how the various interface elements look after rebooting the smartphone. Here, notice that only those details that have their own Android-independent font settings remained unchanged.


Of all the things discussed in the article, it is the iFont application that is optimal for use. With it, you can easily not only change the style of labels on Android 4.4 and higher, but also be able to adjust the size.
Method 4: Manual replacement
Unlike all the previously described methods, this method is the most complicated and least secure, since it comes down to manually replacing system files. In this case, the only requirement is any explorer for Android with ROOT rights. We will use the application "ES Explorer".
- Download and install a file manager that allows you to access files with root rights. After that, open it and create a folder with an arbitrary name in any convenient place.
- Download the desired font in TTF format, place it in the added directory and hold down the line with it for a couple of seconds. On the panel that appears at the bottom, tap on "Rename" by giving the file one of the following names:
- "Roboto-Regular"- the usual style used literally in every element;
- "Roboto Bold"- with its help, bold signatures are made;
- "Roboto-Italic"- used when displaying italics.
- You can create only one font and replace each of the options with it, or choose three at once. Regardless of this, select all files and click the button "Copy".
- Next, expand the main menu of the file manager and go to the root directory of the device. In our case, we need to press "Local storage" and select item "Device".
- After that follow the path "System/Fonts" and in the destination folder tap on "Insert".

The replacement of existing files will have to be confirmed through a dialog box.
- The device will need to be restarted for the changes to take effect. If you did everything right, the font will be replaced.


It is worth noting that in addition to the names we have indicated, there are also other style options. And although they are rarely used, with such a replacement in some places the text may remain standard. In general, if you have no experience in working with the platform in question, it is better to limit yourself to simpler methods.
Articles and Lifehacks
Sometimes using the device, I would like to see written in larger letters and numbers. But here's how to increase the font in android - not every user knows. But there is nothing complicated.
Moreover, there are a lot of programs on the Play Market both for and for increasing its size. They will help you achieve what you want.
How to set your own font size
The easiest way is to download and install a special program on your device (tablet or Android phone).- Download application.
- Install on your device.
- Run it. You will see the "What's New" window. To get rid of it, press the "Back" button. The pop-up window will close.
- There will be a list at the top of the application. In some smartphones (or tablets) it can be displayed as a scrolling list, in others it “falls out”, unfolding when you click on the font size.
- In the center, you will see how the inscriptions will look after confirming the selected scale. The current font size will be displayed below.
- Once you have decided which font you want to see on the screen of your android equipment, click "Apply". Now all selected changes will be saved and will take effect.
- You can choose the required scale using a special slider.
- And in the unfolding window there are no such numbers. Then “grab” the slider and drag it until you see the numbers you need with percentages in the lines above it, which will be responsible for the font size.
What else can the program do?

This program can be used not only to increase, but also to reduce the font. Indeed, on some devices, the font is too small, and on some, on the contrary, it is too large.
The symbol scale varies from 50 to 300 percent. The program is also convenient in that before confirming the selected scale, you can arrange a preview. Then you can correct. In addition, a newer version may also change the system font.
The default API font is legible, well designed, and easy to read. Nevertheless, lovers of delving into the settings of their smartphone often wonder how to change the font on Android.
"Android" is an extremely flexible operating system that allows the user to change the default font 10 of the user interface. If desired, you can change both the style and size of the preset font. Sometimes this is easy to do even for a not very trained smartphone owner, but a number of methods require knowledge of technical subtleties.
Size using phone settings allow you to change all manufacturers. It is very easy to do this. Just go to the settings of your phone or tablet and select the "Display" menu item. In addition to general settings, it contains the ability to change the font size from small to very large. Increasing the size reduces eye strain, and reducing it makes desktop shortcut labels more convenient.

Making changes to font 10 through the user interface is the easiest way to change to Android, allowing you to change all of its characteristics, including size, shape and even transparency through your phone settings.
There are plenty of ways to change the look and feel of your tablet or smartphone software without rooting. Among them, the owners of Asian phones have the most opportunities. For them, a choice of pre-installed fonts is available in the settings. For everyone else, the issue of changing the design of a device without root rights is solved by installing themes or a launcher from the Play Market.
Settings menu
How to change the font on "Android" using Mobile gadgets released by Samsung and LG and some Chinese manufacturers already have a choice of alternative text display options built into the main firmware. For their owners, everything is very simple:
- Go to settings.
- In the "Device" section, go to "Display".
- Click the sub-item "Font" and choose the one you like by writing.

If you don't like any of the pre-installed fonts, you can find suitable ones in the Samsung App Store.
How to change the font on Android using themes
A huge number of skins are available for download in the Play Market, which already include interesting letters that fit the design of the theme. By installing them, you can change not only the standard font, but also the overall appearance of the phone's software shell. To install a new theme, you need to follow a few simple steps:
- Go to Play Market.
- Locate the "Personalization" app category.
- Choose the theme you like and install it.
- Go to your gadget settings.
- In the "Device" section, click on the "Themes" menu item.
- Find the installed theme and apply.
If you do not like the implementation of a new theme, then you can always change it in the same way.
Using the launcher to change the font
When wondering how to change the font on Android, few people remember the launcher, or, in another pronunciation, the launcher. A launcher is a program that controls the launch of applications in a certain way. In terms of changing the appearance, the launcher is even able to change the software look to the appearance of another brand of electronics. And if you are thinking about how to change the font on the Android tablet, then try this method.
There are a considerable number of launchers that make significant changes to the design of the phone's interface. In this article, we will look at font replacement using the GO Launcher EX launcher as an example:
- Select TTF file.
- Copy it to: ../sdcard/GOLauncherEX/fonts.
- Launch the launcher.
- You will see three dots on the display, click on them and open the menu.
- Click on the menu item "Preferences" and go to the settings tab.
- Click "Visual Settings", you need the "Font" tab.
- Scan the file system for available options by selecting "Search Fonts".

Please be aware that some launchers may slow down your smartphone performance and not all of them may have the same flexible settings as GO Launcher EX.
Ways to change the font style using root rights
For the font changing options described below, you must be rooted on your device. Upon receipt, you will be able to edit and change system folders and files, as well as install applications that require superuser rights to function. If it seems difficult for you to make root-rights, then remember that only the walking one will master the road. Obtaining unlimited access rights will not only allow you to change the font, but also remove the restriction on the removal of standard Google or manufacturer applications, which makes it possible to significantly increase the internal memory of the device.
What is the easiest way to change the font on Android with root rights? Of course, with the help of a special application. Several applications for changing the font on rooted tablets and smartphones are available for download in the Play Market. Their advantage is ease of installation and the ability to preview. Let's take a closer look at the two most popular ones.
Font Installer
First, find a TTF font worthy of your attention and efforts and save it to the memory card in the root folder. Then download the Font Installer application from the Play Store. What follows is not difficult:
- Enter the menu and select the "Backup" sub-item.
- Make a backup in case of failure.
- In the application, go to the "Local" tab, find and select the saved TTF font.
- Click to install and confirm the command in the pop-up window.
- The application will offer to restart the device, agree.

You can also select and install a font from those available in the Font Installer collection. To do this, go to the "Server" tab and view the options in the catalog. Click on the one you like and click "Preview" or install it right away. The Font Installer will reboot the device after installation.
iPhone
Owners of Samsung mobile gadgets win again. He will be able to use the application with standard, not extended rights. Users of other devices before working with iFont should attend to the installation of root rights.
The sequence of actions to select the fonts available in the application:
- Install the app and open it.
- In the "Online" tab, select the appropriate font.
- Click Download to download.
- Then Set to install.
- In the pop-up window, click System Mode.
- Reboot to apply your modifications.

When using the downloaded TTF file, the process changes slightly:
- Put the file in the program folder on the device's removable disk../sdcard/ifont/custom.
- Go to the Settings app and change the Change Font Mode.
- Do you have Samsung? Install Samsung Mode.
- If you are the owner of a smartphone with root rights - System Mode.
- Go to the Custom manual selection tab and install your TTF file.
Both applications are completely free and tested by millions of users of the Google Play store.
Attention! Before performing any actions that access system files, make a backup of the device.