Advanced users of Windows operating systems - what are sevens, what are eights - use third-party file managers and, accordingly, search for files on disks with their help. Novice users generally rarely use the explorer search and they don’t really need it. If you do not often use file search in Windows Explorer, then there is no point in keeping the file indexing service enabled - it will only waste precious system resources in vain. Therefore, it can be disabled.
To disable the file indexing service in Windows 7, 8 or 8.1, do the following:
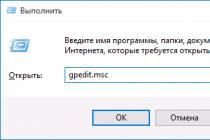
1) Click the "Start" button and select "Control Panel" from the menu. Next, we need to select the "Administration" >>> "Services" section. By the way, you can get into the "Service Management" faster. Just press the key combination Win + R and enter the command services.msc:
Click "OK" and we open the Windows services.
2) Looking for a service Windows Search:
Double click on it with the left mouse button.
3) In the service properties window that opens, you need to set the startup type to "Disabled" and click on the "OK" button.
4) Close the "Service Management" window and go to "My Computer".
5) On each of the local drives, starting with drive C, you must right-click and select Properties from the context menu of the drive.
6) In the window that opens, on the "General" tab, you need to uncheck "Allow the contents of files on this disk to be indexed in addition to file properties":
Click on "Apply". Windows will display this window:
Here you need to check the box "To the disk and to all subfolders and files." Click on the "OK" button.
If at the same time the message “Access Denied” pops up, just click on “Continue”.
If "Error changing attributes" appears, you will need to select the "Ignore all" option.
I repeat - this must be done for all local Windows drives.
7) Reboot Windows.
Many have already appreciated the performance of SSDs - perhaps this is one of the most desirable and effective computer upgrades that can seriously improve performance. In all parameters related to speed, SSD outperforms conventional hard drives. However, in terms of reliability, not everything is so simple: on the one hand, they are not afraid of shocks, on the other hand, they have a limited number of rewriting cycles and a different principle of operation. The latter must be taken into account when configuring Windows to work with an SSD drive. Now let's get down to specifics.
First of all, SSD drives don't need to be defragmented, defragmenting won't do you any good, and harm is possible. I already wrote about this in .
All recent versions of Windows "know" about this, and automatic defragmentation, which is enabled by default in the OS for hard drives, is usually not enabled for solid state drives. However, it is better to check this point.

Press the Windows logo key and the R key on your keyboard, then in the Run window, type dfrgui and click OK.

A window with options for automatic disk optimization will open. Highlight your SSD (the "Media Type" field will say "Solid State Drive") and look at the "Scheduled Optimization" option. For SSD, disable it.
Disable file indexing on SSD
The next item that can help optimize the SSD is to disable the indexing of the contents of the files on it (which is used to quickly find the files you need). Indexing constantly performs write operations that can shorten the life of the SSD in the long run.
To disable, make the following settings:
- Go to "My Computer" or "Explorer"
- Right-click on the SSD drive and select "Properties".
- Uncheck "Allow the contents of files on this drive to be indexed in addition to file properties."

Despite the disabled indexing, searching through files on the SSD will occur at almost the same speed as before. (It is also possible to continue indexing, but move the index to another disk, but I will write about this another time).
Enable write caching
Enabling disk write caching can improve the performance of both HDD and SSD drives. At the same time, when this function is enabled, NCQ technology is used for writing and reading, which allows for more “intelligent” processing of requests received from programs. ().

To enable caching, go to Windows Device Manager (Win + R and enter devmgmt.msc), open "Disk Drives", right-click on the SSD - "Properties". You can enable caching on the "Policy" tab.
Swap file and hibernation
The paging file (virtual memory) of Windows is used when there is not enough RAM. However, in fact it is always used when enabled. Hibernation file - saves all data from RAM to disk for a quick return to a working state later.
To maximize the life of the SSD, it is recommended to minimize the number of writes to it, and if you disable or reduce the swap file, as well as disable the hibernation file, this will also reduce them. However, I won’t directly recommend doing this, I can advise you to read two articles about these files (they also indicate how to disable them) and make your own decision (disabling these files is not always good):
- (what is, how to reduce, increase, delete)
Perhaps you have something to add on the topic of setting up an SSD for optimal performance?
Useful utility for instant file search in Windows, 3.5 years have passed, and " things are still there"- the regular search service still does not please users. The long-awaited release of the "dozens" with the personal assistant Cortana, who learned how to search for information not only locally, on the hard drive, but also on the Internet, has not changed the situation. In this review, I am not boring, brief and in "pictures" I'll tell you about the principles of work and self-configuring a quick search by adding popular directories to an indexed database (index).
How search works in Windows 10
As in previous versions of the OS, the "top ten" uses a similar search mechanism. Index is a set of necessary information about files on a hard disk, stored in a folder as a group of files. C:\ProgramData\Microsoft. Various file properties (path, name, size, etc.) get into the index, and indexing occurs with any of your manipulations - adding, changing or deleting controlled objects. Default Windows indexes a limited number of folders (directories, locations), this list does not include incl. system files, program folders, network drives. Unfortunately, if you save downloaded movies or books not in the directories specially designated for this, then they are also "deleted from the list". Thus, all non-system logical drives are "deleted" from the index, on which personal files are generally stored: video, audio, photos, software distributions, documents, etc. For this reason, the regular search service is so slow, because the system first searches in "its" list of indexed (index) files. Moreover, by default, search outside the index is performed only by file names, ignoring archives (ZIP, RAR, CAB).
How to speed up search in Windows 10

I think you have already guessed what to do to speed up the search in the system: index the folders of daily use. The easiest way to implement this is to add them popup-by-package to libraries, through a right-click → in the drop-down menu, click on the item of the same name → select the desired library or create a new one (screenshot). You can combine folders from different locations into one library (Videos, Documents, Pictures, etc.) and then view and organize files as you would in a catalog. When integrating a folder into a library, its contents will be automatically indexed.
However, there is a method to add a location to the index without using libraries. But first, let's make hidden folders and files visible, which will be useful to us in the future.

So, open the Control Panel and find the applet (section)" Decoration and personalization" → clicking on a subsection " File Explorer Options" (screenshot), switch in the opened window to the tab " View" and activate the option " Show hidden files, folders and drives(screenshot below).

Having finished with a minute optimization, let's move on to the second method of setting indexing and service parameters Windows Search"under yourself".
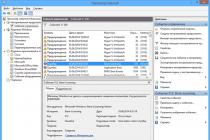
- Using the search in the Control Panel, find and open the subsection " Indexing options".

- All indexed locations will appear in a new window. Click on the button " Change" (screenshot) and check the boxes in the drop-down list for those areas in which you most often have to search. If the computer is powerful, and the decisive majority of the folders are on a non-system drive D:\ is in demand, it is easier to add the entire disk to the index.

- Also make sure that hidden directories are included in the list of directories to be indexed. C:\ProgramData\Microsoft\Windows\Start Menu and C:\Users\ [Your_Account_Name] \AppData\Roaming\Microsoft\Windows\Main Menu .

Confirm all changes with the button " OK", give Windows time to index new areas. Now you can be sure that Cortana integrated into the service will work very, very quickly.
Who liked and helped the voiced solution to the issue and who voted for it on social networks (not necessary, but desirable!) - read the review on how to replace the search field with a compact icon and how to disable search (Cortana) in Windows 10 . By the way, turning off the personal assistant (web search) will speed up the search process even more.
Important!
In the case of k.-l. problems with the service Windows Search(search does not work in Windows 10), such as slowing down or displaying incomplete results, in the "Indexing Options" window, through the appropriate link, run the troubleshooter to perform diagnostics (penultimate screenshot).
Important!
An attentive and experienced computer user must have noticed that the outdated "Internet Explorer History" has disappeared from the locations included in the indexing.
Dmitry dmitry_spb Evdokimov
The Windows 10 search feature in the Start menu, taskbar is pretty good. It allows us to quickly find applications, admin tools, files and folders. Indexing runs in the background without impacting your PC's performance. Starting with Windows 10 version 1903, you can enable a new setting for search indexing called "Advanced Mode".
What is Windows Advanced Indexing Mode?
You need to look at how search works in Windows 10 to understand how advanced mode differs from the default search mode that Microsoft calls classic.
Classic search indexes specific locations in the operating system, such as libraries or items placed on the desktop. Users can add or remove locations from the search; Indexing is nothing more than adding filenames and folder contents to a database to speed up searches. The built-in search can still find files in non-indexed locations, but it takes longer.
Microsoft has created a new type of search index. When advanced mode is enabled, it creates a persistent database for all files and folders stored on your drives. This allows Windows to search your folders and files across all drives, rather than limiting searches to your default documents, pictures, videos, and desktop.
Advanced mode, indexes all folders and files on your PC. All disks, including libraries, will be added to the database for accelerated search. You can set up exclusions for specific folders.
Enable advanced search indexing mode.
Here's how to enable advanced indexing mode in Windows 10.
Step 1: Open the app "Options" by pressing the keyboard shortcut Win + I. Go to section "Search" → "Search in Windows".

Step 2: To enable advanced indexing mode in a section "Find my files" select "Advanced (recommended)".

Advanced search is activated immediately. This will start a one-time indexing process, it will take about 15 minutes for the search to start returning these additional files in the results. If you have many files, this may take longer. Once indexing is complete, you will be able to find all your files using search, almost instantly.
Windows search will index all hard drives, folders, and files on the system, except for the folders listed in "Excluded folders" on the same settings page. To exclude a folder from search, add it to the Excluded Folders list.

Turn off advanced indexing mode.
Step 1: Open the app "Options". Go to section "Search" → "Search in Windows".
Step 2: To turn off advanced indexing mode in a section "Find my files" select "Classic style", this will disable Advanced Search Mode and return the classic behavior.
Search in Windows 10 - making the most of it
Windows 10 Search panel
Search in Windows 10, unlike previous versions of Windows, is initially built into the taskbar (taskbar) - you can recognize it by the magnifying glass icon next to the Start menu. The functionality of the program has been significantly expanded (cortana voice search for English versions is built in, searches are conducted on the Internet). One has only to enter the first letters (file or program) - the result instantly appears on the screen.
Windows 10 search bar - real life examples
So, let's see how you can and should use this Windows 10 toolkit! Let's start with the trivial things:
From my experience - The interface of Windows 10 is significantly different from its predecessors. It is very easy for a yesterday's user of Windows XP and even Windows 7 to get confused here! I think that is why the creators of Windows 10 left compatibility between old and new built-in programs of the operating system. I will give an example - the "Control Panel" of the times of Windows NT and the "Settings" tile program of Windows 10. Performing different actions, we get the same result.

Windows 10 indexing options
Now it's time to find out how Windows 10 search knows so much about programs and files, why it finds them quickly. The fact is that another service is hard at work in Windows that indexes files. An index is a set of necessary information about the properties of files (name, path). Indexing works when files are added, modified, or deleted. When a file enters the Windows index, the operating system already knows almost everything about it. The indexing service, in turn, passes the necessary information to the Search Engine in Windows 10 program.
I also want to say that not all folders and files are indexed in Windows 10. That is why some users complain that the search does not work in Windows 10. If you need to add files from a flash drive to the Windows 10 index, then I advise you to do the following.