With development the latest technologies a variety of lighting fixtures have appeared on the shelves of specialty stores, each of which is distinguished by its individual characteristics of brightness, economy and eye comfort.
Making LED lamp from energy-saving without solderingFor many years, manufacturers of LED lamps have tried to design a device that is similar in properties to a conventional incandescent lamp, plus all the low power consumption, low heat generation and impact on others. As a result, light bulbs were presented to consumers.
Experts advise giving preference to latest models, explaining the choice with a number of obvious advantages. The task becomes more complicated for those who want to know how to convert an energy-saving device into an LED one with their own hands.
The main differences
LED lamp, one way or another, provides the room with brighter lighting. With a voltage of 13 W, it gives out 1000 lumens, energy-saving - only 800 lumens.
With regard to heat transfer, it is determined by the indicators of maintaining the optimal temperature in the building, keeping it in a suitable condition. household appliances and furniture. And here, too, the LED product is in the lead, with a heat transfer of 30.5 degrees while the heat transfer of an energy-saving device is 81.7 degrees.

The last piece is rated for 8000 hours active work, while for the first, a record service life is set - up to 50,000 hours. Moreover, the LED lamp does not lose its original lighting shade and brightness over time, which cannot be said about energy-saving.
The laurels of primacy go to LED sources and during the recycling process, they can be thrown into the trash can. , thrown into a landfill, pollutes the environment (air and groundwater) with poisonous mercury vapor, as a result of which there is a severe poisoning of people, animals and fish. That is why it must take place in accordance with certain rules.

Despite the pros and cons, LEDs are interchangeable - the manufacturers have worried about the appropriate size for any of the lamps, and the sockets for them.
The two competing counterparts have in common a fairly high-quality color stream, which provides high level comfort for the retina of the human eye.
How to make an LED lamp
Necessary materials
In order to convert an energy-saving light bulb into an LED one with your own hands, you must have the following list of materials with you:
- A burnt out, out of order lamp.
- A small piece of fiberglass for connecting parts together. If you have other ideas (besides soldering), you can use your own to solve the question of how to mount the LEDs.
- A set of radio elements corresponding to a certain scheme, including LEDs. Experts advise you to choose ordinary parts for assembling an LED light bulb with your own hands, which are presented in a large assortment on every radio market, where their cost is significantly lower.
- A capacitor with a volume of 0.022 Mf, the voltage of which is 400 V, one resistance is designed for 1 mΩ and a pair of resistances for 200 ohms.
- LEDs are cheaper to evaporate in the required number by means of a tape.
Making a circuit
The process of creating a diagram with your own hands begins with cutting out a circle from the PCB, the diameter of which is 30 mm. Next, apply paths on the circle, nail polish does this job well. After covering one coat, set the part aside until it is completely dry.

At this time, you can do chemistry, namely, make a mass that dissolves copper with your own hands. To do this, mix copper sulfate and ordinary kitchen salt in a 1: 2 ratio. Be sure to add a small amount of warm water (but not hot!) And dip the future board into the resulting mixture. Within a day, you will notice how the copper disappeared from the textolite circle, only the part that was varnished remained.
At the final stage, soldering is performed. However, before moving on to this phase, use a special solvent and get rid of the varnish coat. Then download the available tracks.

Take a millimeter drill and make holes in the areas of fixing the elements. Finally, move on to fully soldering the circuit. If you are not new to working with a soldering iron and have certain skills, to create an LED light bulb with a voltage of 220 V with your own hands, more precisely, its driver's board, it is enough to allocate 30 free minutes.
The build process is not indiscriminate. Cut the perimeter at the very end of the plastic with a sheet of metal. Take out all the internal parts, leaving only the wires coming from the base of the old lamp. Arm yourself with a soldering iron again and fix the board to these wires.
Attach the LED circuitry to the inside of the plastic. Before final gluing, turn on the lamp, if it works, use hot melt glue.
How to do without soldering
Some may not be satisfied with soldering, in this case, as an alternative, the driver for the product is replaced with a full-fledged power supply designed for fixing and operating the LED strip. It is due to the use of a whole piece of tape, and not its separate sections, that soldering and global alteration are not required.
What problems can arise? With the dimensions of the power supply. Here you will either need to redo the electrical wiring from A to Z (the lighting of the building is reduced to one branch), or each lamp or row of products should be powered by a different transformer. If the house is equipped with point lighting devices, you can select the very first from the circuit and place a power supply in front of it, after which, instead of 220 V lamps, install homemade 12 V LED models.
How to assemble light bulbs
Do-it-yourself assembly of lighting products is carried out from plastic pipes cut into separate pieces. On the sides of the pipes, an LED strip is fixed with a soldering iron, be sure to check the parallel circuit. At the end of the wire harness, place two pins that act as a base.
If the luminaires are equipped with a traditional lamp holder, the process is greatly simplified - it is enough to modernize old energy-saving devices, and there is no need to use internal boards. As in the previous time, the sample is disassembled, and all the "insides", except for the wires of the base, are removed. The cap, from which the fluorescent tubes came out, is closed with a cylinder made of plastic, on which the sections of the LED strip are fixed. These tapes are connected to the wires from the base.
Consider "+" and "-" when connecting. Plus, it is desirable to solder to the bottom component of the base. If the connection does not work, you can solve the problem by reconnecting the output of the power supply to the wires.
Conclusion
In any case, there are plenty of ways to switch to more economical lighting. The energy-saving LED lamp can save you money, and the process will be especially appreciated by those with advanced technical thinking.
I got myself on trial 10W 900lm LEDs of warm white light on AliExpress. The price in November 2015 was 23 rubles per piece. The order came in a standard bag, I checked all the working ones. 
To power LEDs in lighting devices, special blocks are used - electronic drivers, which are converters that stabilize the current, and not the voltage at their output. But since the drivers for them (I also ordered them on AliExpreess) were still on the way, I decided to power them from ballast from energy-saving lamps. I have had several of these faulty lamps. which burned out the filament in the bulb. As a rule, the voltage converter of such lamps is working properly, and it can be used as a switching power supply or an LED driver.
We disassemble the fluorescent lamp. 
For the alteration, I took a 20 W lamp, the choke of which can easily give 20 W to the load. No further modifications are required for the 10W LED. If you plan to power a more powerful LED, you need to take the converter from a more powerful lamp, or install a choke with a large core.
Installed jumpers in the lamp ignition circuit. 
I wound 18 turns of enamel wire on the choke, solder the leads of the wound winding to the diode bridge, supply the mains voltage to the lamp and measure the output voltage. In my case, the unit gave out 9.7V. I connected the LED through an ammeter, which showed a current passing through the LED of 0.83A. My LED has an operating current of 900mA, but I reduced the current to increase the resource. I assembled a diode bridge on the board in a hinged way.
Alteration scheme. 
I installed the LED on thermal grease on the metal shade of an old table lamp. 
I installed the power board and the diode bridge in the case of a table lamp. 
When working for about an hour, the temperature of the LED is 40 degrees. 
By eye, the illumination is like from a 100 watt incandescent lamp. 

Currently, the so-called energy-saving fluorescent lamps are becoming more widespread. Unlike conventional fluorescent lamps with electromagnetic ballast, energy saving lamps with electronic ballast use a special circuit.
This makes it easy to install such bulbs in the socket instead of a conventional incandescent light bulb with a standard E27 and E14 base. It is about household fluorescent lamps with electronic ballast that will be discussed further.
Distinctive features of fluorescent lamps from conventional incandescent lamps.
It is not for nothing that fluorescent lamps are called energy-saving, since their use can reduce energy consumption by 20 - 25%. Their emission spectrum is more in line with natural daylight. Depending on the composition of the phosphor used, it is possible to produce lamps with different shades of luminescence, both warmer and colder tones. It should be noted that fluorescent lamps are more durable than incandescent lamps. Of course, a lot depends on the quality of the design and manufacturing technology.
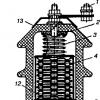
Compact fluorescent lamp (CFL) device.
A compact fluorescent lamp with electronic ballast (CFL for short) consists of a bulb, an electronic board and an E27 (E14) base, with which it is installed in a standard holder.
A round printed circuit board is located inside the case, on which the high-frequency converter is assembled. The converter at rated load has a frequency of 40 - 60 kHz. As a result of the fact that a rather high conversion frequency is used, the “blinking” characteristic of fluorescent lamps with electromagnetic ballast (based on a choke), which operate at a mains frequency of 50 Hz, is eliminated. The schematic diagram of the CFL is shown in the figure.

For this schematic diagram going mostly enough cheap models, for example, branded Navigator and ERA... If you are using compact fluorescent lamps, then most likely they are assembled according to the diagram below. The scatter of the values of the parameters of the resistors and capacitors indicated in the diagram really exists. This is due to the fact that elements with different parameters are used for lamps of different wattage. The rest of the circuitry of such lamps is not much different.
Let's take a closer look at the purpose of the radioelements shown in the diagram. On transistors VT1 and VT2 a high-frequency generator is assembled. Silicon high-voltage are used as transistors VT1 and VT2. n-p-n MJE13003 series transistors in TO-126 package. Usually, only the digital index 13003 is indicated on the case of these transistors. MPSA42 transistors in a smaller TO-92 format or similar high voltage transistors can also be used.
Miniature symmetrical dinistor DB3 (VS1) serves for autostart of the converter at the moment of power supply. Outwardly, the DB3 dinistor looks like a miniature diode. The autorun circuit is necessary, because the converter is assembled according to the circuit with feedback by current and therefore does not start itself. In low-power lamps, the dinistor may be absent altogether.

Diode bridge made on elements VD1 - VD4 serves to rectify alternating current. Electrolytic capacitor C2 smoothes the ripple of the rectified voltage. The diode bridge and capacitor C2 are the simplest mains rectifier. From the capacitor C2, a constant voltage is supplied to the converter. The diode bridge can be performed both on separate elements (4 diodes), or a diode assembly can be used.
During its operation, the converter generates high frequency interference, which is undesirable. Capacitor C1, choke (inductor) L1 and resistor R1 prevent the propagation of high-frequency noise through the mains. In some lamps, apparently from savings :) instead of L1, a wire jumper is installed. Also, many models do not have a fuse. FU1, which is indicated in the diagram. In such cases, the breaking resistor R1 also plays the role of the simplest fuse. In the event of a malfunction electronic circuit the consumed current exceeds a certain value, and the resistor burns out, breaking the circuit.
Throttle L2 usually assembled on NS-shaped ferrite core and looks like a miniature armored transformer. On printed circuit board this throttle takes up quite an impressive amount of space. The L2 choke winding contains 200 - 400 turns of wire with a diameter of 0.2 mm. Also on the printed circuit board you can find a transformer, which is indicated in the diagram as T1... The T1 transformer is assembled on an annular magnetic circuit with an outer diameter of about 10 mm. 3 windings are wound on the transformer with a mounting or winding wire with a diameter of 0.3 - 0.4 mm. The number of turns of each winding ranges from 2 - 3 to 6 - 10.
The fluorescent lamp bulb has 4 leads from 2 spirals. The terminals of the spirals are connected to the electronic board by cold twisting, that is, without soldering, and are screwed onto rigid wire pins that are soldered into the board. In low-power lamps with small dimensions, the terminals of the spirals are soldered directly into the electronic board.
Repair of household fluorescent lamps with electronic ballast.
Manufacturers of compact fluorescent lamps claim that their resource is several times longer than that of conventional incandescent lamps. But, despite this, household fluorescent lamps with electronic ballast fail quite often.
This is due to the fact that they use electronic components not designed for overload. It is also worth noting the high percentage of defective products and low workmanship. Compared to incandescent lamps, the cost of fluorescent lamps is quite high, so the repair of such lamps is justified at least for personal purposes. Practice shows that the cause of failure is mainly a malfunction of the electronic part (converter). After a simple repair, CFL performance is fully restored and this allows you to reduce cash costs.
Before starting a story about CFL repair, let's touch on the topic of ecology and safety.
Despite their positive traits fluorescent lamps are harmful to both the environment and human health. The fact is that mercury vapors are present in the flask. If it is broken, then hazardous mercury vapors will enter the environment and, possibly, into the human body. Mercury is classified as a substance 1st class of hazard .
If the bulb is damaged, it is necessary to leave the room for 15 - 20 minutes and immediately carry out forced ventilation of the room. Care must be taken when using any fluorescent lamps. It should be remembered that mercury compounds used in energy-saving lamps are more dangerous than conventional metallic mercury. Mercury can remain in the human body and be harmful to health.
In addition to this drawback, it should be noted that harmful ultraviolet radiation is present in the emission spectrum of the fluorescent lamp. Prolonged exposure to close to the switched on fluorescent lamp may irritate the skin, as it is sensitive to ultraviolet light.
The presence of highly toxic mercury compounds in the flask is the main motive of environmentalists, who call to reduce the production of fluorescent lamps and move to safer LED ones.
Dismantling a fluorescent lamp with electronic ballast.
Despite the ease of disassembling the compact fluorescent lamp, be careful not to break the bulb. As already mentioned, mercury vapors are present inside the flask, which are hazardous to health. Unfortunately, the strength of glass bulbs is low and leaves much to be desired.
In order to open the case where the electronic circuit of the converter is located, it is necessary to unclench the plastic latch, which holds the two plastic parts of the case, with a sharp object (narrow screwdriver).
Next, you should disconnect the leads of the spirals from the main electronic circuit. It is better to do this with narrow pliers, picking up the end of the lead wire of the spiral and unwinding the turns from the wire pins. After that, it is better to place the glass flask in a safe place so as not to break it.

The remaining electronic board is connected by two conductors to the second part of the housing, on which the standard E27 (E14) base / plinth is mounted.

Restoration of the efficiency of lamps with electronic ballast.
When restoring CFLs, the first step is to check the integrity of the filaments (spirals) inside the glass bulb. The integrity of the filaments is easy to check with a conventional ohmmeter. If the resistance of the threads is small (Ohm units), then the thread is in good order. If, when measuring, the resistance is infinitely high, then the filament has burned out and it is impossible to use the flask in this case.
The most vulnerable components of an electronic converter based on the circuit already described (see schematic diagram) are capacitors.
If the fluorescent lamp does not turn on, then the capacitors C3, C4, C5 should be checked for breakdown. When overloaded, these capacitors fail, because the applied voltage exceeds the voltage for which they are designed. If the lamp does not turn on, but the bulb shines in the area of the electrodes, then the capacitor C5 may be broken.
In this case, the converter is in good order, but since the capacitor is broken, no discharge occurs in the bulb. Capacitor C5 enters the oscillatory circuit, in which a high-voltage pulse occurs at the moment of start-up, leading to the appearance of a discharge. Therefore, if the capacitor is broken, then the lamp will not be able to switch normally to the operating mode, and in the area of the spirals there will be a glow caused by the heating of the spirals.
Cold
and hot mode launching fluorescent lamps.There are two types of household fluorescent lamps:
Cold start
Hot start
If the CFL lights up immediately after switching on, then a cold start is implemented in it. This mode the bad thing is that in this mode the cathodes of the lamp are not pre-warmed up. This can lead to burnout of the filaments due to the flow of a current pulse.
Hot start is preferred for fluorescent lamps. With a hot start, the lamp lights up smoothly, within 1-3 seconds. During these few seconds, the filaments are heated. It is known that a cold filament has less resistance than a heated one. Therefore, during a cold start, a significant current pulse passes through the filament, which can eventually cause it to burn out.
Cold start is standard for conventional incandescent bulbs, so many people know that they burn out just when they are turned on.
To implement a hot start in electronic ballast lamps, the following scheme is used. A posistor (PTC - thermistor) is switched on in series with the filaments. In the schematic diagram, this posistor will be connected in parallel with the capacitor C5.

At the moment of switching on, as a result of resonance on the capacitor C5, and, therefore, on the electrodes of the lamp, a high voltage arises, which is necessary for its ignition. But in this case, the filaments are poorly warmed up. The lamp turns on instantly. In this case, a posistor is connected in parallel to C5. At the moment of starting, the posistor has a low resistance and the Q-factor of the L2C5 circuit is much lower.
As a result, the resonance voltage is below the ignition threshold. Within a few seconds, the posistor heats up and its resistance increases. At the same time, the filaments are also warmed up. The quality factor of the circuit increases and, consequently, the voltage across the electrodes increases. The lamp starts smoothly hot. In the operating mode, the PTC thermistor has a high resistance and does not affect the operating mode.
It is not uncommon for this posistor to fail, and the lamp simply does not turn on. Therefore, when repairing ballast lamps, you should pay attention to it.
Quite often, the low-resistance resistor R1 burns out, which, as already mentioned, plays the role of a fuse.
Active elements such as transistors VT1, VT2, diodes of the rectifier bridge VD1-VD4 are also worth checking. As a rule, electrical breakdown is the cause of their malfunction. p-n transitions. Dinistor VS1 and electrolytic capacitor C2 rarely fail in practice.
The topic of alteration or modernization of out-of-order fluorescent (energy-saving) lamps into LED lamps has been raised more than once. Forgive me the authors of these articles, but most of the proposed options are ineffective and certainly not aesthetic. This is due to the complexity with the element base and components, as well as our mentality when we try to mold candy from ...
But thanks to the Koreans who released the wonderful Seoul Semiconductors Acrich2 LED module last year, which connects to 220V AC without any additional power supply. The manufacturer guarantees that, subject to the operating conditions (the recommended operating temperature is not higher than 70 ºС), this module will honestly work for at least 50,000 hours. We will not go into technical details, everything is clear from the figure.
As a comment
By the nature of my work, I have a rich experience of working with various power sources. So, the 15,000 hour power supply resource indicated by the Koreans is about 2 times overstated, provided that high-quality electrolytes are used. Chinese consumer goods, which are now widely sold, are clearly not included in the category of quality goods.
So, we figured out the light source. The next step is how to cool it down. Fencing a banal ribbed radiator is not aesthetically pleasing and inconvenient. And here it was not without luck. It turns out that in Russia a radiator profile AP888 has been developed and is being produced, specially designed for modules of this series.

The profile is universal, designed for installation of three types of Acriche modules: AW3221 (4 W) and Acrich2 for 8 and 12 W.

Further work on the modernization of the burned out energy-saving lamp was not difficult and took at most 15-20 minutes.
1 Cut the heatsink to the size necessary to ensure efficient cooling of the module. The profile supplier recommends the following dimensions to ensure an operating temperature of no more than 70 ° C:
- 4 W - 10-15 mm;
- 8 W - 30-35 mm;
- 12 W - 40-45 mm.
In this case, "you can't spoil the porridge with butter," and for 8 W I took a 50 mm radiator.


3 Drill holes in the base / plinth housing cover for attaching the radiator.

4 All components - heatsink, module and filter to the module, are ready for assembly.

5 Then everything is simple. We install the module on the radiator, do not forget about heat transfer paste(I recommend KTP-8). We attach the base / plinth housing cover to the radiator. We solder the wires to the module and the filter. Then we solder everything into the base.
Many thanks to the manufacturers of modern energy-saving lamps. The quality of their products constantly makes you wiggle your brains and pushes you to new technical solutions.
So this time we will consider the topic of converting a failed energy-saving lamp into an LED one. Today we will go the more traditional route of using a driver for the LED, but ... The most interesting part of the rework is the LED itself.
The other day I got my hands on several samples of the Chinese electronics industry. These LEDs are interesting in their own right, although they do not offer outstanding performance. But the fact that this LED provides a circular radiation pattern takes it to a whole new level and gives us a great tool for modernizing lighting systems.

As a radiator, I used the AP888 universal aluminum profile, already known from the last article, manufactured by Yug-Service LLC. Unfortunately, I only have a scrap that is a little over 10 mm thick. There was a concern that 9 W power might not be enough for a LED. But the urge to experiment won out.
A small drawback of this profile in relation to the new LED is the central hole with a diameter of 8 mm, and the thread of the "tail" of the LED is M6.
The solution is the simplest:
- we drill a hole up to 10 mm;
- screw the bolt into the M6 nut;
- carefully, hitting the bolt head with a hammer, press the nut into the profile. The bolt is needed in order not to accidentally jam the threads in the nut.


LED 7V, power 7-9 W, 12V, 600-800 mA. As a driver, I used a widely used 700mA driver for three LEDs from the same Chinese manufacturer.
Then, as always, everything is simple. We know how to disassemble an energy-saving light bulb, the main thing is not to break the bulb. And we are preparing the whole kit for assembly.

1. Drill holes in the base / plinth housing cover for attaching the radiator and cable.

2. Solder the positive wire of the driver to the central contact of the LED. Do not forget to first thread it through the radiator and the base / plinth cover.

3. Apply heat-conducting paste (KTP-8) to the LED thread and screw it into place. We attach the base / plinth housing cover to the radiator.


4. The negative wire of the driver must be connected to the radiator.

5. Solder the driver's mains wires into the base.

6. Collect everything into one.

7. The retrofit lamp is now ready for use.


As for my concerns about the overheating of the LED due to the insufficient size of the heatsink, we can say that they turned out to be unfounded. The temperature at the “LED-radiator” point after several hours of operation stopped at around 59-62 ºС (ambient temperature 23 ºС). In principle, it is permissible, but if the radiator is increased by 5-10 mm, then you can not worry about anything at all.
Everything is simple, beautiful and most importantly - affordable and not expensive.