Today we will learn with you install IIS web server in the operating system Windows Server 2016 in several ways, namely with the help of a graphical tool and, of course, with using Windows PowerShell.
What is IIS 10?
IIS (Internet Information Services) Is a set of services designed to implement web server and on Windows with support for HTML sites and ASP.NET or ASP applications. In Windows Server, it is distributed as a separate role with a fairly large number of role services. Earlier in the article "Description and Purpose of Server Roles in Windows Server 2016", we looked at a brief description of all server roles and their services, including the role " Web Server (IIS)"Therefore, repeat now, i.e. I will not describe each of the role services.
The current version of the server operating system Windows Server 2016 also contains the most a new version web server, namely IIS 10.
IIS web server versions
| IIS version | Operating system version |
| 10 | Windows 10; Windows Server 2016 |
| 8.5 | Windows 8.1; Windows Server 2012 R2 |
| 8.0 | Windows 8; Windows Server 2012 |
| 7.5 | Windows 7; Windows Server 2008 R2 |
| 7.0 | Windows Vista; Windows Server 2008 |
| 6.0 | Windows Server 2003 |
| 5.1 | Windows XP Professional |
| 5.0 | Windows 2000 |
Installing the IIS 10 Web Server
So, let's move on to examining the installation process, and for example, let's just install the basic components that are necessary for the functioning of the web server and its administration ( controls), and also place a simple HTML page on it, i.e. essentially an HTML site to test the web server. If you need to host applications, for example on ASP.NET, then you need to also install the corresponding role services from the section " Application Development».
Installing the IIS web server using the wizard
First, let's walk through the process of installing an IIS 10 web server using “ Server manager", And more specifically" Add Roles and Features Wizards».
Step 1
Open the server manager " Start -> Server Manager».
Then we run “ Add Roles and Features Wizard", Menu" Management -> Add Roles and Features».


Step 3
Then we select the installation type “ Installing Roles or Features", Click" Further».

Step 4
Then select the target server and click " Further».

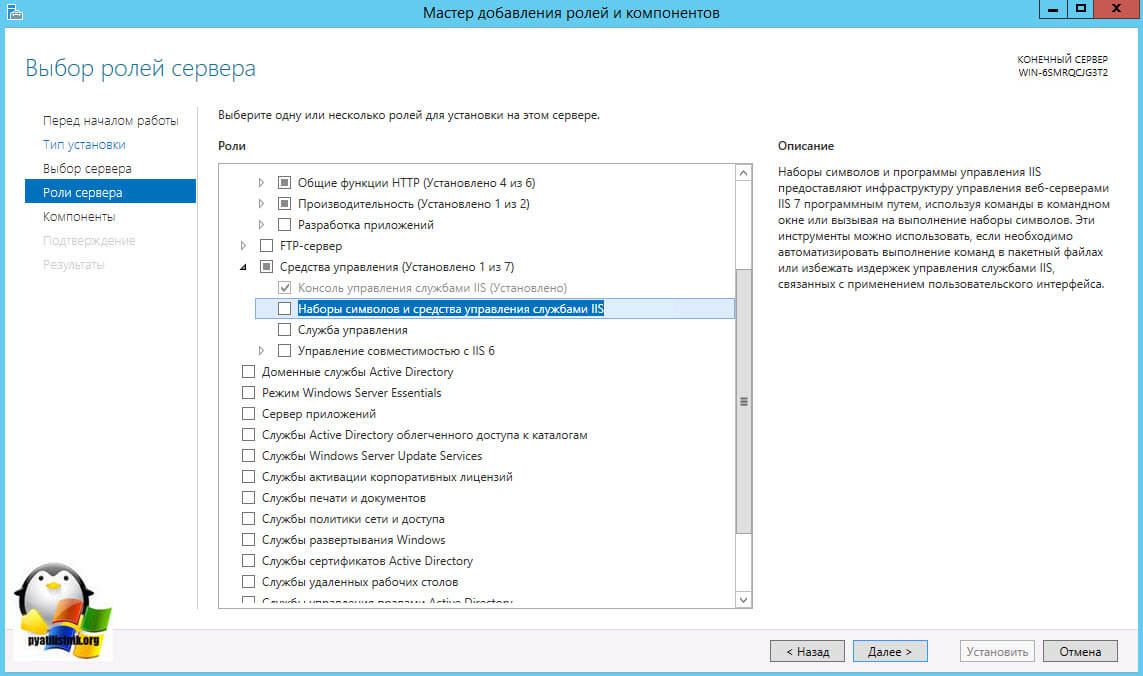
Step 5
At the step of choosing roles, mark the role “ Web Server (IIS)". You will be automatically prompted to install the component " ", We agree and click" Add components».


Step 6
We have already marked all the necessary components, so at this step we also immediately click “ Further».

Step 7
Now we need to configure the installation of the role " IIS web server", First press" Further».

And then we select the necessary role services, by default the minimum number of services will already be selected, but if you need something else, then tick them. For our test problem, i.e. host a simple static HTML site, the default services will be enough, click " Further».

Step 8
We check the selected roles, services and components and click " Install».

The installation will complete as soon as a message appears.

Installing the IIS web server using Windows PowerShell
To install the IIS web server using PowerShell, start Windows PowerShell and enter the following commands ( the commands below will install all the same services that we installed using the wizard just above).
Default document
Install-WindowsFeature -Name "Web-Default-Doc"Catalog overview
Install-WindowsFeature -Name "Web-Dir-Browsing"
Http errors
Install-WindowsFeature -Name "Web-Http-Errors"
Static content
Install-WindowsFeature -Name "Web-Static-Content"
Filtering requests
Install-WindowsFeature -Name "Web-Filtering"
Http logging
Install-WindowsFeature -Name "Web-Http-Logging"
Install-WindowsFeature -Name "Web-Stat-Compression"
Internet Information Services Management Console
Install-WindowsFeature -Name "Web-Mgmt-Console"

Hosting HTML site on IIS web server
The first thing to do is to create the root directory of our test site, for this in the directory C: \ inetpub \ create a folder TestSite and add the index.html file with the following content to it for checking, for example
<Н1>Test site
Then we open “ Internet Information Services (IIS) Manager", This can be done, for example, from the server manager" Tools -> IIS Manager».

Then we right-click on the item " Websites -> Add Website».

A window for adding a website will open, fill in the required fields and click " OK» ( TestSite in my case is the name of the site).

Now we can check the operation of the web server and the newly created site, for this we open any web browser and go to the TestSite site ( just remember, in order for you to open a site by name just like mine, it must be added to DNS server(A record was created) or at least for tests added an entry in HOSTS file local server).

Removing the IIS web server using the wizard
To remove the IIS web server, open the server manager, then in the menu click " Management -> Remove Roles and Features».

As a result, “ Remove Roles and Features Wizard", Where we do almost the same thing as during installation, only we do not check the boxes, but remove them.

Removing the IIS web server using PowerShell
To remove the IIS web server on PowerShell, run the shell Windows PowerShell and use the cmdlet Uninstall-WindowsFeature... To remove the following IIS Web Server Role Services, you can use the following commands:
Default document
Uninstall-WindowsFeature -Name "Web-Default-Doc"
Catalog overview
Uninstall-WindowsFeature -Name "Web-Dir-Browsing"
Http errors
Uninstall-WindowsFeature -Name "Web-Http-Errors"
Static content
Uninstall-WindowsFeature -Name "Web-Static-Content"
Filtering requests
Uninstall-WindowsFeature -Name "Web-Filtering"
Http logging
Uninstall-WindowsFeature -Name "Web-Http-Logging"
Compressing static content
Uninstall-WindowsFeature -Name "Web-Stat-Compression"Internet Information Services Management Console
Uninstall-WindowsFeature -Name "Web-Mgmt-Console"
Here we are with you and learned how to install and remove the IIS web server in the Windows Server 2016 operating system, and that's all for now!
Installing the IIS web serverOpen Control Panel -> Programs -> Enable or Disable Windows components... Find the IIS section in the list. We open it and select the necessary components:
Basic set:
- Security. We select all components except “Authentication with certificate matching…”.
- Application development components. I only need the CGI component to install PHP later.
- Common HTTP functions. We mark all the items.
- Performance check and diagnostics. Select "HTTP Logging" and "Request Monitor".
- Performance enhancement functions. We mark all the items.
- Website management tools. We mark only “IIS Management Console”.
When all the items are selected, click OK. After the installation is complete, be sure to reboot!
Now let's move on to creating a website. Open the Control Panel -> System and Security -> Administrative Tools -> Computer Management (as quickly as possible: Start menu -> right click on Computer -> select Management from the menu). In the window that opens, expand the "Services and Applications" group and open the "IIS Manager". In the Connections window, select the Sites folder, then in the Actions right window, click on the “Add website” link.


Click OK. On this basic setup completed. You need to check the functionality of the newly created site. Open a browser and enter http: // localhost in the address bar. If everything is working correctly, you will see a similar page:

Finishing touch. For the site to be accessible from outside, it is necessary to open the 80th port for incoming connections. How to do this using the example of the standard Windows 7 firewall:
Open Control Panel -> System and Security -> Windows firewall -> Extra options... Find and enable the Internet Services (Inbound HTTP) rule in the list:

In this basic installation mode, the web server is only able to render static pages (regular HTML + JavaScript). To expand its capabilities, you can install support for ASP, ASP.NET, or PHP. I myself am engaged in programming so far only in PHP, so further I will only talk about installing PHP on IIS in FastCGI mode.
Install PHP (FastCGI)
Of course, the best web server for PHP is Apache, but there are still times when you need to install PHP on IIS. Moreover, in recent times a lot of work has been done by the developers to improve PHP performance on IIS.
Before starting the installation, you need to download the PHP release from http://windows.php.net/download/. It offers several options. We need a release VC9 x86 Non Thread Safe... For FastCGI operation, this is the fastest and most stable option. I recommend downloading the release with the installer, not the zip archive (this is for fans of manual installation).
Now we launch the installer. After a few not very informative windows, we will be prompted to select a web server and PHP mode:

IISFastCGI - yes, right now this is the only stable option for installing PHP on IIS.
After the installer completes, go to the IIS settings. In principle, only one action needs to be done here - to raise the priority of php-files so that they are processed first. In the IIS Manager, click on the name of our site and in the window on the right, select the "Default Document" section. In the list that appears, you need to move index.php to the beginning:

Windows users 7 64-bit, attention! You need to perform one additional action. Open the Application Pools section. Highlight DefaultAppPool and open “Advanced Options” (via right click or in the far right column). In the General section, find the option “Enable 32-bit Applications” and set it to True. If additional pools have already been created for existing sites, then for each of them you need to do the same operation.
Now you need to test PHP. In the root folder of the website (c: \ inetpub \ wwwroot) you need to place the index.php file with the following content:
Open the site in a browser (http: // localhost). If everything is working correctly, you will see a page with information about installing PHP:

Installing MySQL
Moved out in a separate article.
- When launching the site, an error occurs: “The process cannot access the file because it is being used by another process. (Exception from HRESULT: 0x80070020) ".
This error means that the port to which the site is bound (80 by default) is already occupied by another application. Very often this error occurs if another web server is installed (for example Apache).
To find out which process is occupying port 80, in command line type: netstat -ano -p tcp
In the column “Local address” we are looking for an entry of the form 0.0.0.0:80, then we look at which “PID” corresponds to this entry. In the "Task Manager" open the Processes tab (the "Show processes of all users" option should be checked). Next, go to the View -> "Select Columns" menu and mark the "Process ID (PID)". Now, using the PID, you can find out which process is occupying the port.
Another solution to this problem is to bind the site to an alternate port (eg 8080). - When running the php script, an error appears: Warning: fopen (filepath): failed to open stream: Permission denied in filepath.
The problem is that the IIS_IUSRS user group has read-only permissions. Open the properties of the folder where the website files are located (wwwroot by default), the Security tab. In the list we find the IIS_IUSRS group and give it full access rights. - How to set site encoding.
Open “Internet Information Services (IIS) Manager”, select the desired website. In Site Settings, open the “HTTP Response Headers” section. Click the Add link. In the window that opens, in the Name field, enter: Content-type, in the Value field, enter: text-html; charset = windows-1251 (see screenshot). Instead of windows-1251, you can write any other encoding.

Installing and Configuring IIS
In most cases, in real production projects, one or more servers will be used to serve the website's client requests. These servers may be owned and operated directly by you, a dedicated team, or a third party hosting company. In any case, sooner or later there comes a point when the coding and testing is complete and the work has to be presented to the general public - this is the deployment of the website.
In this article and the next, we'll look at different deployment options. However, in all cases, the basic premises remain the same. On workstation you have a ready-made website that needs to be deployed on the server so that it is available to clients. For ASP.NET, such a server is IIS (Internet Information Services), And his current version- IIS 8. When it was first implemented, IIS was a basic web server. Over the years, IIS has evolved into a sophisticated application server providing a wide variety of functionalities, the most important of which is support for hosting ASP.NET applications.
This article focuses on IIS 8. Although the machine running IIS 8 is referred to here as a server, IIS can be run under both workstation and server versions of Windows. Not all are available on workstations, but most functionality allowing you to host complex websites. We recommend using Windows Server whenever possible, but Windows 7 or Windows 8 is an inexpensive alternative.
Microsoft binds IIS editions to Windows editions. Windows Server 2008 and Windows Vista include IIS 7.0, Windows Server 2008 R2 and Windows 7 include IIS 7.5, and Windows Server 2012 and Windows 8 include IIS 8. Versions 7.0 and 7.5 are collectively referred to by Microsoft as IIS 7, which can be confusing. The version of IIS supported by the operating system cannot be changed — Windows Server 2008 will only use IIS 7.0. For example, you will not be able to upgrade to IIS 7.5, which is used in Windows Server 2008 R2.
Installing IIS
IIS component is included as part of Windows installations(both for the server and for workstations) and requires activation and configuration. The following are three ways to activate IIS for different operating systems.
Installing IIS on desktop versions of Windows (Windows Vista, Windows 7, and Windows 8)
Each version of the operating Windows systems offers its own version of IIS - IIS 8 (on Windows 8), IIS 7.5 (on Windows 7), or IIS 7 (on Windows Vista). In all of these versions of Windows, IIS is enabled but not initially installed. To install it, you need to follow these steps:
Installing IIS on Windows Server 2008
Installing and configuring IIS is the same for Windows Server 2008 and Windows Server 2008 R2. The required steps are described below:
Start Server Manager. To do this, click the Start button and select All Programs -> Administrative Tools -> Server Manager.
Select the Roles node in the tree on the left.
Complete the required steps in the wizard. You will probably be asked to install additional required roles - if so, you just need to accept the operations and continue.
After installation, you will be prompted to set up a web server. As with desktop versions of Windows, you can select the specific IIS 7 features to be enabled.
If you are running ASP.NET with .NET Framework 4.5, then that version of the .NET Framework will need to be installed (.NET Framework Developer Center)
Installing IIS on Windows Server 2012
The installation process for IIS on Windows Server 2012 is essentially the same as on Windows Server 2008. The main difference is that user interface slightly different. Detailed description you can find it by following the link Installing IIS 8 on Windows Server 2012.
IIS management
When IIS is installed, it automatically creates a directory named C: \ inetpub \ wwwroot that represents your website. All files in this directory will appear as if they are in the root directory of your web server.
To add additional pages to your web server, you can copy the HTML, ASP, or ASP.NET files directly to the C: \ Inetpub \ wwwroot directory. For example, if you add a TestFile.html file to this directory, you can request it in your browser through the URL http: //localhost/TestFile.html. You can even create subfolders to group related resources together. For example, you can access C: \ inetpub \ wwwroot \ MySite \ MyFile.html through a browser using the URL http: //localhost/MySite/MyFile.html.
Wwwroot directory is easy to run simple examples and static pages. To use ASP.NET correctly, you must make your own virtual directory for each web application you create. For example, you can create a folder with any name on any drive on your computer and place it in the IIS virtual directory as if it were located in the C: \ inetpub \ wwwroot directory.
Before you get started, you need to start Internet Information Services Manager. It can be found in the Start menu. The exact location may vary depending on the used Windows versions(IIS -> IIS Manager). The program shortcut will be located under Programs or Administrative Tools. The IIS Manager start page is shown in the figure below:

Now you need to familiarize yourself with a number of terms used in IIS. On the left side of the IIS Manager window, an entry is displayed with the name of the server being used. Our server is named PROFESSORWEB, which is generated by Windows 8 by default, which will be used in most examples. The central area displays the server view. This view displays a set of icons that allow you to configure server settings. On the right side of the screen, there is a list of available actions. For example, in this view, you can start, stop, and restart the server.
Expanding the server item in the tree view on the left side of the screen displays the Sites item, which contains a single Default Web Site entry. A site is a collection of files and directories that make up a website. A single IIS server can support multiple sites, typically on different TCP / IP ports (port 80 is the default). The combination of the server name and site port forms the first part of the URL. For example, when using mywebserver with a site connected to port 80, the URL looks like this:
http: // mywebserver: 80
Each site can contain many files and directories. Each of them forms part of the URL. So, the url is static page mypage.html located in the myfiles directory will be as follows:
http: // mywebserver: 80 / myfiles / mypage.html
In some situations, the name by which you know the server and the name that clients use to retrieve the content will be different. We will ignore this nuance, but the server administrator or hosting company will provide the necessary information if it is important for a particular server.
To check if IIS is working, select Default Web Site and in the right pane of IIS Manager, select Start. After that, click the "Browse * .80 (http)" button to open the site page in the browser:

As you can see, in my case I changed the default port (from 80 to 8080). I did this because on the 80th I have a local Apache server running. If you have the same problem, you can change the port by right-clicking on the Default Web Site and choosing Bindings from the context menu. You can then change the default port in the dialog box.
So, each server can support many sites, each running on a different port or with a different IP address. Each site can have many files and directories, and the combination of these elements provides information about the URL. We'll come back to URLs and using IIS Manager when we look at each of the deployment approaches.
Good afternoon, dear readers and guests of the blog site, last time I told you how to configure a server on Windows Server 2016, today I want to move away from server platforms and talk about additional features desktop systems, namely about iis services windows 7, we will look at the question of how to install them and how to administer them. I am sure you will find it useful to know about this feature.
Iis services windows 7
And so, not many users of the Windows 7 operating system know that their favorite operating system, in addition to standard functions, it also has additional ones and may well become a server on which you can run your sites, for this it includes a component such as Internet Information Services or simply IIS. I have already introduced you to him dear readers in my posts:
- Installing IIS in Windows Server 2012 r2, where we installed version 8.5
- Installing IIS in Windows 10, here it is more advanced than in the seven
So what if you have more new system, then the links described above will suit you, I also want to note that in order to run various sites on your computer, you can use a simple and free complex called Denwer, but this is a lyrical digression.
There are two options for installing iis windows 7 manager:
- Through components
- Through powershell
Adding the Internet Information Services Component
We will do this through the control panel, for this open start and select "Control Panel"

For convenience, select to display large icons.

Find the item "Programs and Features"

Now, to enable iis windows 7 services, you need to start the component, this is done through the appropriate menu, it is marked with a red oval.

We put a daw on against IIS, note that there will be added, a lot of different components:
- Security
- Application development components
- Performance enhancement features
- Website management tools
- Common HTTP functions

Click ok and the installation of this component is carried out, it may take some time, upon completion, you do not need to reboot.

You can find IIS Manager in the control panel along the path "Control Panel \ All Control Panel Items \ Administrative Tools"

Alternatively, you can press the Win and R keys at the same time and type inetMgr

This will open the same Site Builder, that's all, but I advise you to read how to create sites in Internet Information Services.

Good afternoon, dear readers and guests of the blog, today we will continue to study, web services on Windows based, namely, let's see how setting up SSL on IIS for one or several sites, both with one Ip address, and with several. To accomplish this task, you must have an iis web server installed, on Windows Server from 2008 R2 and higher, at the moment the most recent is Windows Server 2016.
Configuring an https site on IIS
And so about creating an iis website on windows server 2012, I already told you, it is assumed that you have it. Further, when you registered all the DNS records, you generated a request to issue a certificate and only then received your certificate from the certification authority, but it still had to be sharpened under iis, since it needs the pfx format.
A little more theory and limitations
If you have one site on https on your iis server, then there will be no problems with the certificate, but if two sites are planned, then there are already options:
- Buy a wildcard certificate to be able to hang SSL on any IIS site
- Buy an additional ip for each site
- Use the script and apply the binding of the desired SSL to the desired site, on one IP address
- Use SNI (Server Name Indication) technology
Setting up SSL in PFX
First of all, to create sites on the https protocol, you need to import the required certificate, this is done very simply. You open IIS Manager and go to Server Certificates


Through the overview, indicate your pfx archive.

Specify the password, in the line "Select a certificate store" indicate either "Personal" is suitable for normal placement, but the item "Web services hosting" is needed for SNI technology.

In essence, this is a complex SSL installation in iis, whatever you like.

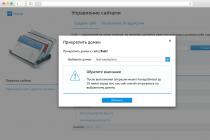
Now we will bind the SSL certificate to the desired site. First, I'll check my site on the http protocol, as you can see, everything works fine.

Now we click on the desired site with the right click and select the "Change bindings" item, this is where we will configure the https in iis.

As you can see, your default site will work over the http protocol, click the add button.

We indicate for the site:
- The https type and port number, by default, is port 443, make sure it is open in your firewall.
- In the hostname, write the full name of the site.
- SSL certificate> select the one you want and save the settings.

We check your site by HTTPS protocol, if everything is fine, then you will see a closed lock, which means that the ssl certificate is installed correctly in IIS.

Setting up multiple HTTPS sites on different ip
Let's assume you have two sites:
- api.pyatilistnik2010.ru
- new.pyatilistnik2010.ru
You need each of them to have their own ip tied to the DNS name and also a separate certificate, everything is simple here. You also raise individual sites, with the only difference that in the ip address field, specify the desired node name in the field, the address of your resource, and the required certificate itself.

We save and check if everything should work on any of the versions of the IIS server from 7.5 to 9.

Setting up multiple HTTPS sites on one ip
Now let's imagine a situation that you have one external IP address, how to be, we are trying to hang everything on it. As a result, one of your sites will receive a 404 error, who do not know what it is, then you should go here.

The whole problem is that in IIS, in this scenario, in the web interface, only a certificate for a domain, wildcard * .site format, can work. The asterisk implies that you can use SSL on any third-level domain. But don't you dare give up, there are two options:
- The use of SNI (Server Name Indication) technology in IIS is suitable for everything older than version 7.5, so that Windows Server 2008 R2 and lower are in the air.
- Use a script from Microsoft.
Here's an example of such a certificate.

If you have a wildcard, then everything is simple, either through the IIS manager you change everything, or through config file.
C: \ Windows \ System32 \ inetsrv \ config \ applicationHost.config

Open it, IIS settings are stored here. And you can set binding for different domain names:
Now the method, if you don't have a wildcard and only one external ip on the server, is suitable for IIS 7.5 and higher. The first thing we need to do is find out the ID of your site, this is done simply, either through the IIS manager console

Or everything in the same applicationHost.config file

% SYSTEMDRIVE% \ Inetpub \ AdminScripts

If you, for example, on IIS 8 and older do not have this file in this folder, then you need to deliver IIS Management Scripts and tools (IIS scripts and management tools
).