I have been thinking for a long time to buy LEDs in the head light, but everything that came across before that caused despondency - some idiotic fans and unnamed Chinese LEDs ... And in the summer of 2016 I caught my eye THIS.
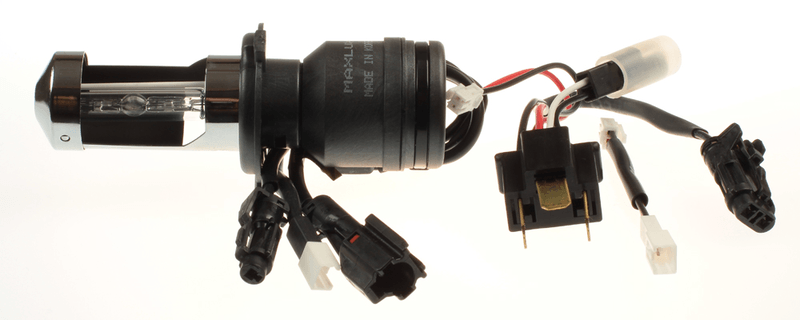
These lamps are essentially a Chinese free copy, and the Chinese even corrected the phillips' joints. Why exactly these lamps? And by a combination of factors: The lamps are decently manufactured, the driver and lamps are collapsible and, in theory, repairable. The design uses top-end Lumileds Luxeon ZES LEDs, the geometry of the arrangement of the LEDs and the reflector - as much as possible repeats the standard halogen, the power driver is present and is made in a separate unit, the lamp cooling is passive, in the form of flexible copper belts of a decent area, allowing how to remove the radiators into the headlight housing, and pull it out, cutting a gap in the rubber plug. These design features, including the absence of a fan, made it possible to assume that this generation of LED lamps is already capable of shining correctly, brightly and for a long time.
So, the goods are delivered in a rigid cardboard box, inside of which lamps and drivers lie in expanded polystyrene cells. So, despite all the efforts of the RF mail visible on the box, the contents did not suffer at all.

The goods were bought for their own money.


Here it is, my darling ... 
LEDs are already familiar to us from, however, here they shine 2-3 times brighter. Apparently, the operating current is significantly underestimated, so that with such a small radiator they warm up within reasonable limits. Probably, the LEDs are here, after all - Luxeon ZES of the first generation.

As you can see, the geometry of the light source is as close as possible to the filaments of a halogen lamp.


Lamps are mounted quite simply. If you change ordinary lamps without any problems, then these problems will not arise either. Although, if you want to place all the components inside the headlight, then it is easier to remove the entire headlight. That's exactly what I did. From the point of view of the thermal regime, this is not the best option, but you do not need to cut extra holes in the headlight, a completely regular look remains and, if necessary (for maintenance, for example), the lamps change to a standard halogen in 5 minutes. In general, I measured the temperature after 30 minutes of operation - on LEDs + 125C, on a radiator 50-60C. The manufacturer declares working the temperature of the LEDs is up to + 135C, so I found this mode satisfactory.

Instructions for lamps


I want to calm down the paranoid right away - lamps in this form have been working daily since September 2016. and there are no problems with them. And according to customer reviews, there are practically no refusals.
The light-shadow border and the far-near operation modes can be seen in the video below.
Here it must be borne in mind that the left headlight is the original 10-year-old, and the right one is a lousy unoriginal, but new. Hence the slight difference in the brightness and geometry of the headlights.
A small video demonstrating the work of lamps on the road.
The lamps shine gorgeous. Of course, they are far from good lensed xenon, but they have gone very far ahead from ordinary halogen. Compared to the Osram NightBreaker Unlimited, the lamps give less light in the near field near the bumper, but noticeably more in the far field. This results in more uniform illumination, which improves visibility, without a bright spot of light in front of the bumper.
Let's try to look for conditional flaws.
1. Snow / ice on the headlamp does not melt. Before, you turn on your neighbor and after a couple of minutes everything melted by itself. Now you have to clean it regularly.
2. It is impossible to turn on the diodes of the far and near at the same time, even for a couple of seconds. The car has such a function and it works fine with halogens, but here the driver turns on either the near or far diodes, but not both groups at once.
3. 6500K - although the diodes are not bluish, the light in artificial city lighting is not very contrasting. Well, not very well on wet asphalt. However, almost everything on it is not very good.
4. Greater irregularity of illumination compared to halogen - on the illuminated surface, if you look closely, you can see the gaps between the LEDs and the LEDs themselves, etc.
5. Formally, these lamps are not a proper light source for a halogen headlight and theoretically, you can stick under the article "for collective farm xenon." Although in practice, working LED lamps look completely ordinary, with STG and jackdaws, and if they excite traffic police inspectors, then only to questions - what does it shine so well? And where can you buy it?
6. Are expensive. For this money, you can buy two sets of Osram NightBreaker Laser or Unlimited and ride safely for 3-4 years. And for the undemanding user, standard bulbs for 150 rubles / piece. enough for the entire life of the car. Diode lamps, if they last 3-4 years, then by this time they will become morally obsolete, because there will be new LEDs - smaller, better, brighter, more energy efficient. So saving at the expense of a large resource - it is only in theory and advertising booklets. We must clearly understand that these lamps will never pay off in the financial payment. But they are worth it - I put them instead of Osram NightBreaker Unlimited and did not regret it for a second ... Why? Well, I have not yet met people who are happy with the headlights on H4 lamps. The lamp in the headlight is one and at the same time either the thread of the near or far can work. As a result, both the high beam and the low beam are so-so. In separate optics, you can turn on both the near and far ones at the same time, and here the only option to achieve suitable light is "reinforced" halogens or such LED lamps.
The light source in most vehicles is an H4 bulb that provides both low and high beam. This lamp can only be double-stranded. If we are talking about switching to "xenon", then replace the "H4" lamp with a bi-xenon module. One light source is located inside such modules, and it cannot change its brightness. The problem is solved by the presence of curtains and an electric drive.
Bi-xenon white light with a slight yellowish tint
Note that if the lamp is covered with a lens, then the system looks like one sealed module (bilens). If there are no lenses, the design is called a "bi-xenon lamp".
We disassemble the headlights at home
Logically, the installation of the H4 bi-xenon cannot be performed without removing the headlamp assembly. We will not consider in detail how to dismantle the headlights - each car has its own design features. We only note that it is necessary to disconnect the battery before dismantling. Which includes the following steps:
- disabling the DRL connector, turn signal,
- disconnecting the block from the terminals of the main lamp,
- as well as removing the hydrocorrector.
- The fixing screws are unscrewed at the last step.
The headlight modules themselves will have to be disassembled. This action is easy to perform. It is necessary to reach the temperature at which the butyl sealant melts. In general, the module should be placed in a box filled with hot air. A hairdryer will be the source of air.

The task is one - to melt the sealant
It is permissible to use only an industrial hair dryer. A diffuser is installed opposite the nozzle - a wooden board. Carry out all the steps in order:
- The box is closed;
- Include a hairdryer (use minimum power);
- After 10 minutes, the hairdryer is turned off and the headlamp module is pulled out with gloved hands.
Use a flathead screwdriver when disassembling. The result of all work is shown in the photo.

It remains only to remove the excess sealant
An "old" sealant applied to the edge of the reflector will prevent assembly. Remains of sealant must be removed. And it’s better to do it before it gets cold.
Refinement of the reflector for bilens
The stock H4 bulb is attached to the headlamp with a wire clip. In order to install the bilens, the bracket is removed in any case. The same applies to all metal tooling. And the protrusions located on the back of the reflector cut or break off:

Additional hole ready
Place the module on the reflector and secure it with the supplied nut. Then you need to align the lens by moving the module itself a short distance.

The module is connected to the battery through the adapter from the kit
When the last operation is completed, the nut is circled with a felt-tip pen. Then the entire structure is temporarily disassembled. Hot glue is applied to the points of contact between the reflector and the module, and the assembly is carried out.
In theory, installing a bixenon with your own hands takes a few minutes. The main thing is not to forget about the hot melt step. Otherwise, the xenon module will shift sooner or later.
The question remains, how to assemble the headlight and how to connect it correctly.
Build process
Before assembling the headlights, degrease the glass on the module. It uses pure alcohol or Secunda.

Applying sealant to the headlight reflector
To carry out the assembly according to all the rules, you will need butyl sealant. The material is applied to the edge of the reflector without leaving gaps. Instead of a liquid mass, a sealing tape is also suitable (see Fig.). And the hole into which the wires are brought out is also better to be treated with a sealant.
It will be necessary to perform "baking" again, but before that, an experiment is carried out. The adjusting screws are turned from one extreme position to the other. The bottom line is that the length of the cable from the xenon module to the reflector must be sufficient. Otherwise, an unpleasant effect may appear - the wires will be closed.
Butyl sealant must be baked anyway. Therefore, the assembled headlamp is placed in a box with a hairdryer and the actions specified in "Chapter 1" are carried out. In order not to repeat everything again, keep the hair dryer turned on for 10-15 minutes.
After baking, the headlight should cool down. Cooling time - 2 hours. After this time, installation can be carried out, earlier - not.
Anyone who touches the heated plastic with his hand can get burned. The use of gloves with pimples will solve the problem. Maximum caution will not hurt either. Happy installation.
Standard wiring diagrams
Let's say a headlight with a bi-xenon module is already installed. Then, after connecting, it is adjusted with the adjusting screws. In the meantime, let's look at how the schemes recommended by the manufacturer and relevant for the bixenon look like.

Removable shoe contacts
The socket for H4 lamps has three contacts. One of them is "mass". The cord going to the ground contact will always be in black insulation.
The owner may have two ignition units and one 5-pin relay. Then the connection can be made using a simple scheme:

Circuit with one common relay
As you can see, only one of the two H4 connectors is used here. The other needs to be insulated.
The manufacturer often offers not only an ignition unit, but also a control module in the kit. The headlights are then connected to the following scheme:

Scheme with separate control units
From each line feeding the dimensions, the unit can read additional data. However, it is not necessary to connect these lines.
When installing, follow the tips:
- A powerful fuse (30 A), shown in most diagrams, does not need to be installed - it is in the standard wiring. Just connect to the line that powers the headlights, not additional accessories;
- High-voltage wires that lead from the ignition unit to the headlamp must not touch metal surfaces. Also, these wires cannot be bent into a loop - use an S-shaped installation;
- After ensuring that the headlights turn on, be sure to carry out the adjustment with the adjusting screws.
It is illegal to operate a car without headlight range control today. To a greater extent, this applies to "xenon" light sources. Draw conclusions.
A simple action - their frequent switching on and off - causes great harm to any arc lamps. Therefore, in the low beam mode, try not to "blink" the headlights ever. But this does not apply to the high beam - in this mode, only the electric drive switches.
Everything except the last chapter in one video
Correction for reverse polarity
The reverse polarity of the base connection is implemented in many cars. The word "reverse" means that "plus" is applied to the common contact of the lamp (see fig.).

Reverse polarity option shown on the right
If the car uses exactly reverse polarity, buy a universal bi-xenon kit:

Kit allowing two connection options
As you can see, the kit is equipped with an inverting jumper and a control diode. When installing, follow the recommendations:
- If switching between modes does not work, reverse the polarity of the diode;
- If the switching does not work properly, install a jumper.
No further explanation is required here. Happy installation!
Installation of bi-xenon lamps
A bi-xenon lamp is a module that contains a lamp and a shade. Appearance such a module is shown in the photo:

Bixenon module for base / plinth H4
Such modules can be mounted on a standard "seat":

Installation diagram of a bi-xenon lamp
The brace provided in the headlamp design will press the metal part “A”. Then the rest of the elements are attached to this part.
To mount a bi-xenon lamp, the headlamp unit does not have to be disassembled or modified. Sometimes installation can be done without even removing the headlight from the car.
Before you put the bi-xenon in the headlights, you need to make sure of the following:
- The curtain or metal cover must not touch the headlight components. That is, the size of the module itself should not be too large;
- If the glass has a standard reflector hood, use modules without a reflector. You cannot break this rule;
- The reflector cap attached to the module itself can usually be removed. And they do this in one case - when the headlamp already has its "own" cap.
Let's see how the proprietary bi-xenon module looks like:
Here the module is fully assembled
The numbers indicate the details:
- Reflector cap (removable);
- Reflector curtain;
- Sliding curtain.
When the high beam is engaged, the shutter covers less of the surface. And vice versa.
When installing any electrical equipment, it is important to know: the battery terminal is connected last, when all connections are completed. The advice is widespread, but it is often violated, which leads to negative results.

The modern market offers a wide selection of headlights. Three varieties are now common: xenon, halogen and LED. An ignorant person will ask: "Why are you not talking about headlights with incandescent lamps?" This is the last century.
What distinguishes h4 halogen and LED lamps, an overview of the best 2018–2019, which model to choose, the pros and cons of each variety, reviews - you will find in the article.
H4 lamps: a review of the best 2018-2019
Consider what distinguishes h4 diode lamps from others. Car enthusiasts note their low energy consumption and long service life. Led do not have a filament, so they are shockproof. We will choose the best models 2018–2019.
- Sho Me g7 Ih;
- Led headlight;
- Bosch gigalight;
Philips X-treme Vision is different from standard beam lengths. It is more than 45 meters. Such a beam allows you to see the pits in advance. Car enthusiasts note the quality and durability of the product. X-treme Vision is a leader in its price segment... Phillips h4 are on sale in pairs. The average cost is 1000 rubles. 
- Beam length.
- Wear resistance.
- Glass allows the headlight to work after damage.
- The lighting angle may vary depending on the car model.
I recently purchased X-treme Vision. The light output of the beam is increased as stated by the manufacturer. But the illumination angle is very small. They didn’t come to my car. Suitable for someone.
Sho Me g7 Ih

Sho Me g7 lh are equipped with original chips from Philips. One of the brightest compact LEDs. Light flux - 3500 lumens. Color temperature - 5000K. The design of the model is equipped with copper radiators. Sho Me g7 Ih work well long time keeping the original parameters. 4500 rubles - the average price.
- Built-in tricks.
- Wear resistance.
- Copper cooling system.
- Brightness.
- Price.
Excellent brightness! I bought it for my father's birthday, then I bought it myself. I like everything, they work flawlessly.

Osram is a company from Germany. Immediately, we note the German quality of the model and the powerful light. The visibility with the night breaker is 40 meters. The distance is average, but sufficient to prevent a dangerous situation. The light of the night breaker does not get tired of the eyes. The high beam is white and the low beam is yellow. With these, you can easily drive hundreds of kilometers. 890 rubles - approximate cost.
- The safety distance is longer.
- Eyes do not get tired.
- Suitable for dusty roads and foggy use.
- Price and characteristics.
The Germans have increased the price significantly, and the quality is not much better than standard headlights. Before buying, think about it - is it worth it? From the pros - a distance of 40 meters, the light is brighter.
Led headlight

Led Headlight gives 0.7 times more light than halogen. This seventh generation model is easy to install in any car. Installed led lamps h4 from Philips. The model has trompe l'oeil. Therefore, your on-board computer will never "lie". The average price is one thousand rubles.
- Robust case made of special alloy.
- Powerful light.
- Deceptions.
- Bad high beam.
I took these headlights because I killed the old ones. The high beam on them is not very good, and the driver mutes the radio. There are pluses, but for me they are insignificant. Deceptions work.

With standard power, Koito learned to double the brightness. The Japanese manufacturer supplies 4 lamps at once. The whitebeam light reproduces xenon headlights. This effect was achieved with a blue bulb and a silver tip. It is inexpensive - 1500 rubles.
- Eyes do not get tired on long trips.
- Brightness.
- The headlights dazzle in the rain.
Lamps are ok, but visibility is poor in wet weather. Apart from xenon, there is little good on the market. In St. Petersburg, this is not suitable.
Bosch gigalight

Eyes from headlights practically never get tired. White color. Intensive. Close to daytime. The brightness of the headlights, due to the ice lamps, is 1.5 times higher than the standard ones. 1000 rubles - approximate cost.
- Good visibility in the snow.
- Light beam range.
- Blind.
- Poor visibility in wet weather.
At first I liked the headlights, until I drove into the rain. There is no visibility at all. You increase the light - oncoming cars wink to remove it, it blinds you. As soon as I got home. If you do not live in the Sahara or where it is dry and warm - I do not advise.

Painted yellow, sometimes purple. They have an unusual design. Aurum shine a pleasant yellow. Eyes don't get tired. Suitable for long driving trips. The replacement takes no more than 10 minutes. Average price - 700 rubles.
- Price.
- Eyes do not get tired.
- Wear resistance.
- Low light.
When it is raining outside the window, they shine better than the regular ones. You can see everything on the asphalt. Water does not eat light. When there is no rain - also on the highest level... But somewhat dull. For this price, one of the best options!
The best high-brightness halogen bulbs for h4 cars
High-brightness halogen lamps for h4 cars have the usual operating voltage and power of –12v 60 55w . But the light from the former is much brighter. The beam length in such models is also increased. The name usually indicates the gain. Consider best model in this category.
MTF-LIGHT ARGENTUM + 80% H4
They shine with the usual yellow light, as the name implies - Argentum. The color temperature of the model is 4000. Good Korean halogen lamps that do not require replacement of the wiring in the car. Installation is simple. Compared to standard, beam length rises by 15 meters and brightness by 80%. Price - about 820 rubles.
- Beam length.
- Eyes do not get tired.
- Brightness.
- There are no downsides.
Great model for the price. Brightness and distance higher than standard, until they broke. Easy installation... I advise you to buy and try it yourself.
MTF-LIGHT ARGENTUM + 80% H4
What are the best low beam h4 bulbs
Which h4 low beam bulbs are the best is not an easy question. After all, products are usually evaluated according to several characteristics. We tried to find out which model has the best low beam among others.
Plus 90 gives 1.5 times the brightness of standard. Lamps are available in three versions with different bases: H1, H4, H7. Painted in silver. This makes the Plus 90 almost invisible under the headlight. The increased distance and brightness allows the driver to see in all conditions. The cost is 900 rubles. Consider the pros and cons:
- The highest resource among all the representatives of standard headlamps discussed above.
- Excellent light output, almost twice the stock baseline.
- The unique technology of directing the light beam, which is one of the most important achievements of the company.
- Warranty from the most renowned manufacturer of automotive accessories and parts in the world.
- Highest illumination intensity, but at the same time no dazzle of drivers with dipped headlights.
- 90% more light output compared to standard incandescent bulbs.
- Excellent visibility and better overview over long distances even in bad weather conditions (rain, fog, etc.).
- High quality workmanship and premium design - the silver top and blue dusting create a blue shimmer effect even with the headlights off.
- There are no downsides.
Best h4 led bulbs near / far
A good solution for the car will be h4 LED lamps near / far. In such models, two types of light are combined in one. The light changes focus - and the far one changes to the near one.
Quality product from South Korea. Includes: 2 lamps, 2 wires and 2 plugs.
The main advantage of the model is the separate wiring. This increases the overall vitality of the system. The design has been significantly improved and improved in comparison with standard xenon. 2500 rubles - the approximate price of the model.
- Wear resistance.
- Long service life.
- Water resistant.
- Low energy consumption.
- Stable work.
- Weatherproof.
- There are no downsides.
A good choice when replacing stock bulbs. Be careful with your choice. The model has two manufacturers: China and Korea. The latter are better. What exactly? The light is better, the oncoming lane is almost not dazzled. Installed without lenses. All is well, I have been using it for a year and a half.
Best xenon bulbs
V recent times cases of converting halogen headlights into xenon ones have become more frequent. Why it happens? The power consumption of the latter is almost twice that of halogen ones. The light output of xenon headlights is greater than that of halogen headlights (3000 lumens versus 1550). The service life is more than 5 times longer. Immediately, we note that converting halogens into xenon ones is illegal! Consider the best xenon headlight bulb option.
The power is 35 W. The brightness of Sho – Me 4300 K is 2600 Lumen. The service life of this model is not less than 2000 hours. Luminescence temperature - 4300 K, color - white-yellow. Working voltage - 12 V. The model is not suitable for all motorists. The 4300 K setting assumes the combination of low and high beam in one lamp, the focus changes. In order for this bi-xenon bulb to work, an ignition unit is required. The price is about 800 rubles.
Has a number of advantages and disadvantages:
- The presence of "blende" in the ignition block.
- High quality.
- Light and power at a decent level.
- Long working time.
- Wear resistance.
- Rich white daylight.
- Weatherproof.
- Easy to install.
- Low price.
- Blinds oncoming cars if the setting is incorrect.
- Color may vary depending on headlights.
The new lamps are much better than the standard old ones. Brightness and distance benefit greatly. Of the shortcomings - wrong setting blinds the “oncoming lane”. The best xenon headlights in this price category, and among others, some of the best. Recommend!
The main technical parameters of lamps: power, light flux, body heating, color temperature
- Base type... Each lighting fixture has its own base. For streets - E40, for LED-lamps - GU and G. The most common headlight sockets are H4 and H7.
- Power... This characteristic indicates how many watts the light bulb consumes.
- Colour temperature... Measured in K. It characterizes the color of the light beam. Incandescent lamps have a color temperature of about 2000, for LEDs - 4500-5000K up to 6000. These values are always indicated on the packaging.
- Voltage. LED lamp operate at a voltage of 12 or 24 V. The mains supply is supplied through the converter.
- Light flow... This characteristic is measured in Lm / W (Lumens per Watt). The light flux is 5–6 times greater than that of incandescent bulbs. This means that they shine much brighter.
- Case heating. Frequent question Buyer: "How much does the LED lamp heat up?" A cooling system is hidden inside any such structure. The degree of heating depends on the power of the light bulb.
All these characteristics indicate the advantage of diode lamps over conventional ones. That is why the use of the second in headlights is a thing of the past. The efficiency of a diode is much higher than an incandescent lamp. This can be seen from the characteristics. When choosing a headlight bulb, be guided by the above parameters. Most of the characteristics are indicated on the product label.
Marking
For 2018, there are several types of headlights. All of them are fixed in the second section of the Technical Regulations. If there is an incandescent light bulb inside the headlight, it is marked with the following letters: C - high beam, R - low beam, CR - dual mode.
The carbon markings are similar to those of incandescent bulbs. The only difference is the addition of the letter H (HR, HC, HCR) at the beginning. For xenon, the letter D (DR, DC, DCR) is added to the marking.
H4 lamp test
To find out how good the lamps are, they are tested in laboratory conditions. Less often, products are checked in a store. Find out how this happens in the video below.
How to install an h4 lamp
Installing halogen pairs is simple. It does not require any special knowledge or skills, but takes several minutes. The headlight bulb will only fit in one position. How to install the LED in the headlamp is described in the instructions. The pinout is clear.
The installation of xenon and bi-xenon lamps requires special knowledge and skills. To do this, we advise you to contact a car service.
When installing, remember that you are not alone on the road. You cannot put a light that will blind oncoming cars. Be careful to replace one with another - the norms are prescribed in the law. Never change halogen bulbs to xenon bulbs!
Many car models sin with bad head light, moreover, both new ones, released just recently, and older cars. Most often, poor lighting is found on cars with headlights for lamps with an H4 base.
In this article, you will learn:
However, today there is a real way to improve the lighting on your car - to install H4 LED bulbs, which consume less energy and at the same time give noticeably more light. True, so that the lamps do not disappoint, you need to know about some of their features.
Design features of H4 lamps
To understand what kind of LED lamps will work correctly on a car with halogen headlights under the H4 base, you need to have a good idea of how such a headlight works.
The headlights under the H4 base have only one reflector, which works for both "low" and "high" beams. The H4 lamp has two built-in filaments emitting light and the activation of one or another mode occurs by turning on the first or second filament (or both at once). Changing the focal length of the reflector and ensures its operation in one mode or another.
One of the main problems that appears when installing non-standard lamps in the headlights is the incorrect distribution of the light beam, and as a result, the blinding of oncoming drivers.
As a rule, this is due to the fact that the location of light sources in non-standard lamps does not correspond to their location in standard H4 halogen bulbs. A discrepancy of just a couple of millimeters is already a big problem for oncoming drivers.
Thus, the key point when choosing any non-standard lamps for installation in a headlamp with an H4 base will be the need to choose only those lamps, the light sources in which are located strictly in the same places where they are on the standard H4 halogen lamps. Otherwise, the headlight will not work correctly.
What are H4 LED bulbs?
The key element that determines the shape and size of the LED lamp is the light source itself - the LED. LEDs come in square, rectangular and cylindrical shapes, ranging in size from a fraction of a millimeter to a few millimeters.
Each LED has its own luminous flux. Achieving the required amount of light emitted by the lamp is ensured by increasing the number of LEDs in it (up to 20 pcs). It depends on the shape and size of the LEDs, as well as on their number, what sizes and dimensions the bulb itself will be.

To ensure the correct distribution of the luminous flux, sometimes special curtains are used in H4 LED lamps that block one or more diodes (by analogy with bi-xenon lamps). Such curtains significantly complicate the design of the lamp, and therefore its cost.
Also, the dimensions of the light bulb (and its cost) are strongly influenced by the lamp cooling system. For any LED to work, a "driver" is required - a special microcircuit that heats up noticeably during operation. To prevent the driver from overheating and failing, the heat must be removed. The cooling system is passive and active.
Some LEDs require a small microcircuit that does not get very hot, and for it normal work a passive cooling system is sufficient. The passive cooling system consists of a large number of fins (either fixed, or soft and fixed freely, looking like a "bundle" at the base of a light bulb, also called a flexible radiator).
For other LEDs requiring a powerful and very hot "driver", a passive cooling system is not enough. For normal operation of a lamp with such diodes, a special fan (cooler) is built into its design - about the same as in computers. The presence of a cooler in the lamp significantly complicates its design, increases its dimensions and cost.
How to choose LED bulbs
To understand which H4 LED bulbs are suitable for a particular car and which are not, it is necessary to highlight several criteria that should be paid attention to first.
The first thing to figure out is the location of the LEDs in the lamp. In some LED bulbs, they may not be located in the same places where the filaments of a standard H4 bulb are located, which will entail an incorrect distribution of the light flux in the headlamp (the headlights will blind oncoming people).

The easiest way to find out the location of the LEDs is to ask to look at the light bulb in the store, put a standard H4 bulb on the LED one you are planning to buy, and look at the light. If the location of the diodes and filaments does not match, it is better to refuse such a light bulb.
The second thing that must be clarified is the dimensions of the light bulb itself. Many LED bulbs are much larger than standard H4 halogen bulbs. Not every car will be able to install a large light bulb in the headlight. It is not uncommon for car owners to cut holes in the rear headlight cover for the sake of installing LED bulbs and then seal them. Difficult work, it is highly desirable to avoid it. It is also possible to install special increased rear covers on the headlights, however, it is not so easy to find them on sale.
The third thing to remember is the color and luminous flux of the LED bulb. In theory, to improve illumination, the luminous flux from the lamp should be as strong as possible. But in practice, even with properly adjusted headlights, too strong a luminous flux can create problems for oncoming cars. If there is too much light, it begins to "fly away" in all directions.
The luminous flux of a standard H4 halogen lamp, according to the standards, is no more than 1000 Lumens for "low beam" light and no more than 1500 Lumens for "high beam". When choosing an LED lamp, you should not choose models with a luminous flux more than 1.5 times higher than the "standard" one. That is, 1500 lumens for the "low" light and 2250 lumens for the "high" will be enough.
As for the color of the luminous flux, it should be said that the best conditions for the perception of the environment by the human eye are created by sunlight. That is, on a good sunny day, a person is able to see all the smallest details. At the same time, any other lighting - bright white, or even bluish-violet - no longer guarantees that a person will see as well.
That is, the best color for lighting is daylight white (sometimes with a yellowish tint). Often on sale you can find LED lights that shine with "warm" light - this is the very color of illumination that is most suitable for perception by the human eye. When choosing headlight bulbs, it is best to look for just that color (or just white).
For automobile lamps, the color of the luminous flux is usually indicated by the temperature in degrees Kelvin. The most optimal color temperature is usually 4000K-6000K. At 4000K, the color of the luminous flux is the "warmest", at 6000K, the color of the luminous flux approaches daytime white. It is in this range that the human eye perceives surrounding objects as clearly as possible, and it is this color temperature that is best chosen when buying LED lamps.
Top 3 best H4 LED bulbs
All H4 LED bulbs that can be found on sale are divided into three categories - branded (and very expensive), slightly less expensive and made on the basis of high-quality branded LEDs, as well as cheap consumer goods.
To date, one of the best offers on sale can be considered lamps under the well-known European brand Philips, as well as the American brand CREE. True, it is necessary to make a reservation that the cost of these lamps may surprise an unprepared buyer - it starts from 9 thousand rubles.
You can also find a lot on sale alternative options- products under unknown Chinese brands, but based on Philips or CREE LEDs. It is also worth mentioning the Korean developers of LEDs, their products have recently been in no way inferior to European and American ones. Such lamps not only have an acceptable cost, but even boast high quality(though not all, but only a part).
As for cheap consumer goods, the installation of such lamps in the headlights not only guarantees the dissatisfaction of oncoming drivers, but can even cause the headlight to fail.
Among car owners, the most popular H4 LED bulbs are:
X-LITE LED H4 G7

Very interesting LED lamps from a Chinese manufacturer using high quality European Philips Luxeon LEDs.
The lamp is one of the few Chinese products where special attention is paid to the location of the LEDs. The location of the LEDs responsible for the "near" and for the "high" light as closely as possible repeats the location of similar filaments in a halogen lamp, which ensures the correct focal length and distribution of the luminous flux. Thanks to Philips Luxeon LEDs, the luminous flux of the lamp
The Chinese are used to indicating the total luminous flux of the lamp, so the numbers on the package must be divided by the number of LED groups - 16000/4 (2 groups for the "near", 2 groups for the "far") - the real values will be only 4000 Lumens.
The cost of such lamps is acceptable, you can order them on Aliexpress >>>
NIGHTEYE H4

Another interesting specimen from a Chinese manufacturer. The lamp is assembled very high quality, the developers used the Korean Seoul Y19 LEDs, which are in no way inferior to Philips products.
The previous model of the lamp under the Nighteye brand was in rather high demand, largely due to the precise location of the LEDs, which ensured the correct limits of the luminous flux, as well as long-term operation without breakdowns. In the new generation, the developers have retained all the advantages of the lamp, for which customers love it.
The manufacturer indicates the power of the lamp as “total”, therefore the indicated figures must be divided by the number of LED groups - 8000/4 (2 groups for “near”, 2 groups for “far”) - real values will be only 2000 Lumens. Enough for good lighting headlights under the H4 base.
The cost of the lamp is also very reasonable, you can order on Aliexpress >>>
4DRIVE H4

Another H4 LED lamp model that is in great demand due to its low cost and high power is the 4drive H4 model.
Fairly well-assembled lamp, assembled on the basis of Philips LEDs. Its design uses large LEDs that provide a dense daylight white light flux. The luminous flux power is indicated for each lamp, that is, the "near" and "high" light accounts for 3800 Lumens. Special attention has been paid to the location of the LEDs so that the headlights will not dazzle oncoming vehicles.
The model is distinguished by a large aluminum heatsink and a cooler - a fan that provides good cooling of the control electronics.
The cost of lamps is one of the lowest, besides there are no difficulties with ordering them, since lamps are sold in Russia. At a discount, lamps can be ordered (the base is indicated by phone)
Is it possible to install H4 LED bulbs in headlights
It should be noted that the installation of LED bulbs in headlights designed for halogen bulbs is expressly prohibited. This follows from the "List of faults in which the operation of the vehicle is prohibited." Clause 3.1 states:
The number, type, color, location and mode of operation of external lighting devices do not meet the requirements of the vehicle design.
As a punishment for the installation of lighting devices that do not comply with the "Regulations", deprivation of rights is provided (part 3 of Article 12.5 of the Administrative Code):
Driving a vehicle ... ... does not meet the requirements of the Basic Provisions for the Permit of Vehicles for Operation and the duties of road safety officials ..
It shall entail deprivation of the right to drive vehicles for a period from six months to one year with the confiscation of the specified devices and devices.
Do the advantages of installing LED bulbs in halogen headlights outweigh the disadvantages that may arise from possible problems with the traffic police - everyone can decide for themselves.
At a discount, lamps can be ordered (the base is indicated by phone)
Here I will tell you in what ways you can turn the bulbs in the headlightsand which of these ways are correct
So, first, let's figure out how turning a light bulb in a headlight affects road lighting.
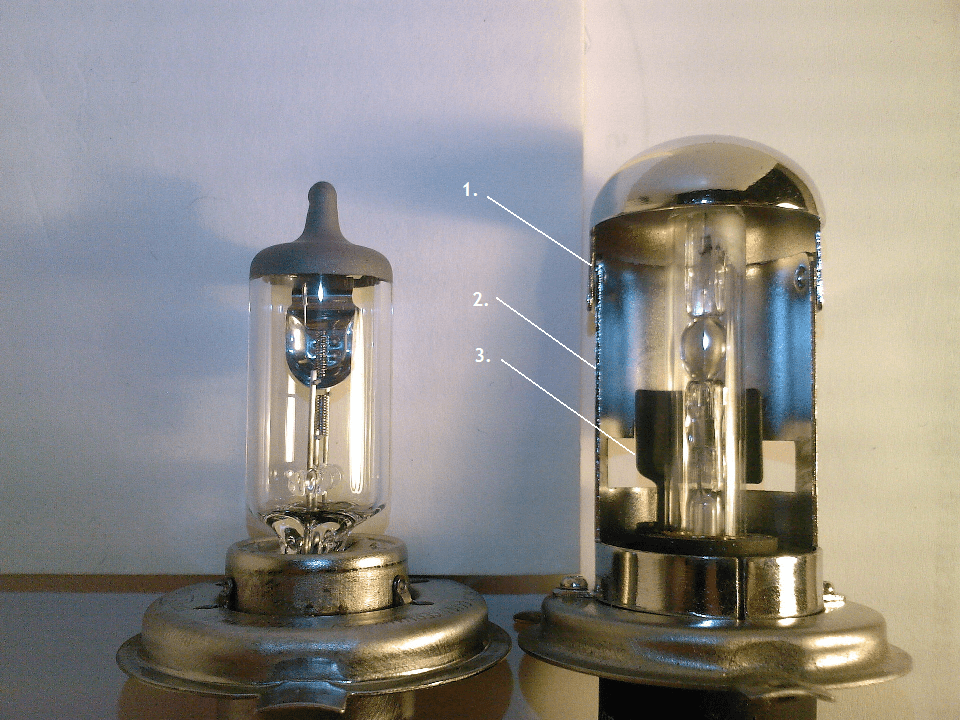
Let's take a closer look at the H4 lamp itself, namely, at what is inside its bulb:
Here # 1 is the high beam thread, and # 2 is the low beam. Please note that the dipped beam is covered by screen # 3. If you look more closely, you can see that the end of this screen is not made even, but with a corner (we will return to it later). That's the whole device.
Let's now figure out how the luminous flux is formed. Let's start with the high beam.
 Look, the filament of the high beam No. 1 is not covered by any screens and evenly illuminates the entire surface of the reflector, which, in turn, illuminates the entire surface of the road in front of it.
Now let's take a look at the low beam. 
Here we are interested in the thread of the dipped beam No. 2. It is covered from below by the same screen number 3. Accordingly, only the top of the reflector is illuminated. Moreover, the cut-off line passes on the reflector not in a straight line, but at an angle, yes, by the same corner, which is made on the screen No. 3. This corner is transmitted to the surface of the road (the so-called "jackdaw").
We turn the lamp in the headlight (with a bulb and a small screen), respectively, we turn the light-shadow border of the reflector illumination, which means we turn the "jackdaw" on the road. This is how easy and simple the whole process looks in theory, on a theoretical reflector of the correct shape with smooth glass.
How in practice? In practice, everything is exactly the same, with the exception of one thing - in the headlights the glass is not smooth, but corrugated, and if the glass is smooth, then the corrugated reflector. This means that that part of the light beam, which we "turned" to the side of the road, will pass through the scattering part of the glass (or reflector), that is, not an even part of the "jackdaw" will shine on the side of the road, but slightly blurred and curved. Is it important to you? No, and me too. Still, I note that the degree of blur and curvature of the "jackdaw" :-) depends only on the specific headlight, on different brands of cars the light turns out to be a little different.
Here is the result of turning the lights on the Toyota Mark II, taken.
Here is the result of turning the lamp on a Mitsubishi Delica headlight (dorestyle).
 And here is the result on the Toyota Axio and how it looks on the road.
 So what do you think? Is there a result? Of course.
Now that we have figured out the theory, we have been convinced of the work in practice, you can figure out what, ways, you can turn the lamp in the headlight and get normal light.
In fact, there are only two ways. The first is to remake the light bulb mounts on the headlamp itself, and the second is to remake the lamp itself.
The first method is difficult to implement, look at the place where the lamp is attached and you will understand why. But the second way seems simple. Here who is good at what, but the seeming simplicity of this method and as a result its careless execution leads to such a result as the "northern lights" - this is when the headlight shines, and does not shine. This happens because, it is quite difficult to separate the lamp from the fixing ring, turn it and fix it precisely in place, it is difficult to manually make an adapter that keeps the lamp from falling out, it is very difficult to achieve the return of the lamp "into focus". And so you have to suffer every time the lamp burns out.
There is an exit. And it is simple as always. It is called light-correcting adapter for automobile lamps H4 "RIGHT LIGHT" and is worth a penny. Manufactured on modern stainless steel laser equipment. Allows you to secure the rotatedthe light bulb in the headlight, while leaving it in focus, the entire installation procedure takes 5 minutes, and its service life is not limited, the lamps change, and the adapter remains with you. It was invented by the entire Internet, but not everyone knows about it.