- 1. FIGURE PR SHG PV3 SHG NV SHG PV3 PV3 SHG NV SHG PV3 PV3 SHG NV SHG PV3 PV3 SHG NV SHG PV3 PR2 PR D (FIGURE) P (FIGURE) D (FIG) PR KP P (FIG) PR D (ZIG)4 PR2 KP R (ZIG) SHG D (RIGHT) SHG PV SHG D (RIGHT) KP P (RIGHT) PV3 KP ROW D (ROW) R (ROW) PC (NS) D (FIGRYAD) KC D (RIGHT) ) KP P (FIGRYAD) D (FIG) E (NS) PR KV KP FRAME D (FRAME) P (FRAME) D (SERIES)4 KP D (RMCYCL) P (RMCYCL) PC (NS) D (FIGRAM) KC KP P (FIGRAM) D (FIG) E (NS) PR IN D (RIGHT) KV KP FIELD D (FIELD) P (FIELD) PC (NS) D (ROW) D (RETURN) KC KP P (RETURN) D (RIGHT) ) PK (NS) PR KTs PV PR3 E (NS) PR PV KV KP
- 2. FOLLOW ST3 SHG PR turn turn turn turn step jump ST3 SHG PR Command system SK) STEP - move the “Arrow” one step forward with drawing a trail JUMP - move the drawing of the “Arrow” trail one step forward ROTATE - turn 90 degrees against hour hand without
- 3. FOLLOW ST3 SHG PR turn turn turn turn step jump ST3 PROCEDURES start SQUARE ST3 SHG PR turn turn start SQUARE turn procedure body do SQUARE end end SQUARE CYCLE "BYE" while ahead NOT wall nts step jump NS kts yes PC (NS) NTs SHG PR KT SHG PR yes no NS PR no PV E (NS) THEN PR IN PV CV if there is NOT a wall ahead then jump otherwise turn all procedure SQUARE step turn step turn turn step turn step end of procedure ST3 L (SQUARE) P (SQUARE) SH ST ST SHG MF SHG MF SHG KP BRANCHING E (NS) TO MF HF yes NS MF if there is NOT a wall in front, then turn all is not
- 4. Entering and editing algorithms in the environment of the graphical executor "ARROW" The initial state of the interface of the graphical executor "Arrow". All control buttons are currently inactive except for the "Start" menu item. To get started, you need to position it with the screen cursor and click the left mouse button. Take this action.
- 5.
- 6. After selecting the “Development” menu item, the buttons in the blocks are active: “Command system”, “Procedures”, “Control structures” (to the left of the command entry field). Entering the text of the control algorithm is done by selecting and pressing the appropriate buttons with the mouse. Consider a simple example of entering and editing text of a simple linear algorithm.
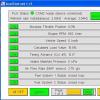
- 7. The text of the linear algorithm was entered using the buttons from the "Command System" block. The same result can be obtained by pressing the corresponding function keys F2, F3, F4 on the keyboard. In edit mode, it is convenient to use the context menu that appears on the screen if you press the right mouse button. The context menu is shown on the slide. To switch to the algorithm execution mode, select the "Debug" item.
- 8. The slide shows the result of the algorithm execution. There are three speeds for testing the program: "slow", "fast", "very fast" (mode switching buttons are located under the menu bar). Nearby is a red stop button to interrupt the algorithm execution process.
- 9.
- 10. GRAPHIC TRAINING PERFORMANCE "ARROW". INTERFACE. command system.
- 11. Initial state of the interface of the graphical executor "Arrow". All control buttons are currently inactive except for the "Start" menu item. To get started, you need to position it with the screen cursor and click the left mouse button. Take this action.
- 12. The state of the interface of the graphical executor after selecting the menu item "Start". The "Develop" item in the menu bar becomes active. Entering and editing the text of the algorithm for solving educational problems will be possible after positioning the screen cursor on this item and clicking the left mouse button. Take this action.
- 13. After selecting the “Development” menu item, the buttons in the blocks are active: “Command system”, “Procedures”, “Control structures” (to the left of the command entry field). Entering the text of the control algorithm is done by selecting and pressing the appropriate buttons using
- 14. OBJECTIVE: To complete a training complex task in the HRIS "Strelochka" environment, which includes a package of interrelated training tasks built on the basis of a simple graphic element, which we will conventionally call the name "FIGURE". There can be a lot of options for such a task to control basic skills, and each option is set by the shape of the original graphic element.
- 15. FIGURE Without procedures FIGURE With procedures ROW Cycle + branching FRAME Procedures FRAME Infinite cycle FIELD Complex task
- 16. OPERATING MODES OF THE GRAPHIC EXECUTOR "ARROW" The "Arrow" executor works only in the program mode. The program (algorithm) for Strelochka is written in an educational algorithmic language. You can edit the text of the algorithm on the screen using the context menu.
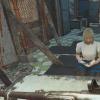
- 17. OPERATING MODES OF THE GRAPHIC EXECUTOR "ARROW" Initial state of the graphic artist (beginning). The "arrow" is at point A, the direction is down. Using the scroll buttons, you can see all the steps in the execution of the algorithm for solving the learning problem.
- 18. OPERATING MODES OF THE GRAPHIC EXECUTOR "ARROW" Execution of the first command "turn". The "arrow" rotates 90 degrees counterclockwise.
- 19. OPERATING MODES OF THE GRAPHIC EXECUTOR "ARROW" Execution of the "step" command. The Arrow performer moves one step to the right and draws a trail (straight line)
- 20.
- 21. OPERATING MODES OF THE GRAPHIC EXECUTOR "ARROW" Execution of the "turn" command. The "arrow" rotates 90 degrees counterclockwise.
- 22. OPERATING MODES OF THE GRAPHIC EXECUTOR "ARROW" Execution of the "turn" command. The "arrow" rotates 90 degrees counterclockwise.
- 23. OPERATING MODES OF THE GRAPHIC EXECUTOR "ARROW" Execution of the "step" command. "Arrow" moves one step down and leaves a trail.
- 24. CONTROL AND ALGORITHMS Cybernetic control model Object (subject) exercising control Control object Object (subject) executing control commands Control object Direct connection Control command transmission channel Feedback Algorithmization Discreteness Automatic systems with program control Comprehensibility Algorithm properties State data transmission channel control object Control algorithm SCI - a system of commands for the executor Algorithm executor Accuracy Finiteness Algorithmic structures Following Branching Cycle Structural method of algorithmization Sequence of control commands Technical systems in which the functions of a control object are performed by a computer Building an algorithm from basic algorithmic structures following branching cycle Sequential detailing Main algorithm Auxiliary algorithms Design top down
- 25. Symbols in block diagrams A block diagram is a graphic representation of an algorithm. The block diagram of the algorithm consists of figures (blocks) denoting the individual actions of the performers, and arrows connecting these blocks and indicating the sequence of their execution. Within each block, the action to be performed is recorded. start Abbreviated Algorithmic Language (GRIS "Arrow") record (on paper) command step SHG SHG4 jump jump jump PR PR2 turn procedure step step step turn turn turn turn PV PV3 procedure call do PROCEDURE_NAME yes NS no PROCEDURE-NAME procedure. . . . . . . . . . . . end of the procedure while the wall is ahead description of the procedure while the wall is NOT ahead nts. . . . . . . . . . . . . . . . . . kts end D (NAME) P (NAME). . . . . . . . KP PK (S) PK (NS) NTs. . . . . . . . KC if there is a wall ahead if there is NOT a wall ahead then. . . . . otherwise. . . . . all that. . . . . . . . . all E (C) E (HC) TO. . . IN. . . HF
| Lesson planning for the school year | Graphic Tutorial Performer
Lessons 4 - 7
Graphic Tutorial Performer
(§ 4. Graphic training executor)
Working with the learning executor of algorithms: building linear algorithms
 |
|
 |
 |
Purpose and capabilities of the graphic artist (GRIS)
Training executors are used to teach the compilation of control algorithms.
There are many educational executors invented for computer science classes. They have different, often funny names: Turtle, Robot, Draftsman, Kangaroo, Vacuum cleaner, Ant, Cucaracha and others. Some performers create drawings on a computer screen, others add words from cubes with letters, others drag objects from one place to another. All these executors are controlled by software. Each of them has a certain activity environment , control command system , operating modes .
In this chapter, we will not describe in detail the work with some real educational executor from the above (in computer classes of different schools there may be different software). We will describe a conditional executor, which is very similar to some of the existing ones in the main: command system, programming language and techniques.
Many of the training performers are engaged in drawing on a computer screen. Of those named above, these are Turtle, Kangaroo, Draftsman. This group can be called graphic performers. Let our hypothetical (invented) performer also be from this "company". Let's call it GRIS, which means "Graphic Artist".
What can GRIS do? He can move around the field and draw with his tail on this field (suppose he has a tail with a piece of chalk attached to it).
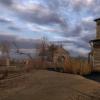
The environment in which the performer operates is called executor environment . The graphics executor environment is shown in the figure below. This is a sheet (screen page) for drawing. HRIS can move in horizontal and vertical directions with a constant step. The dotted line in the figure shows a grid with a step equal to the step of the performer. The performer can only move along the lines of this grid. HRIS cannot go beyond the boundaries of the field.

The state of the performer on the field is determined, firstly, by his location (where he is on the field), and secondly, by the direction (where he is looking). We will determine the direction, as on a geographical map: up - to the north, down - to the south, left - to the west, right - to the east. GRIS can step or jump along the grid lines, as well as turn around. It can only turn counterclockwise.
The graphic executor is a control object. And we will manage it with you. The purpose of control is to obtain a certain pattern. It is clear that this pattern can only consist of horizontal and vertical segments, the HRIS cannot move in other directions.
The task is usually set as follows: the performer is at a given point in the field, looking in a given direction. You need to get a specific drawing. For example: HRIS is in the middle of the field and faces east. It is necessary to draw the letter "T" with the length of each line equal to four steps.
Initially, the performer is given the initial state. This is done in a special installation mode .
Now let's move on to managing the graphical executor. There are two possible modes here: direct control mode
And program control mode
.
Simple GRIS Commands
Work in the direct control mode is as follows: a person gives a command, the GRIS executes it; then the next command is given, and so on (as in the example with the owner and the dog).
In direct control mode, the command system of the executor is as follows:
- step- moving the HRIS one step forward with drawing a line;
- turn- turn 90° counterclockwise;
- bounce— move one step forward without drawing a line.
These commands will be called simple commands.
For example, suppose you want to draw a square with a side equal to one step. The initial position of the HRIS is in the lower left corner of the square, the direction is to the east. We will mark the state of the performer with a small arrow. Then the sequence of commands and the results of their execution will be as follows:

Working in Program Mode
Work in the program mode imitates the automatic control of the executor. The control system (computer) has a memory into which the program is stored. A person writes a program and enters it into memory. Then the HRIS is switched to the installation mode and the person manually (using certain keys) sets the initial state of the performer. After that, a transition is made to execution mode and GRIS starts working on the program. If a situation arises in which it cannot execute the next command (going beyond the field boundary), then the program execution ends abnormally. If the accident does not occur, then the work of the performer ends on the last command.
Thus, the program control of the graphical executor goes through the preparation stage (programming and setting the initial state) and the program execution stage.
In program control mode, the steps, turn, and jump commands are still used. However, there are other commands in this mode as well. You will meet them later.
The programming language for a graphic artist is an educational Algorithmic Language (AL). Therefore, the control algorithms for the GRIS, written on the AL, are programs for it at the same time.
Graphic training executor "ARROW"
Executor environment
Executor command system
Simple commands:
_________
- move one step forward with line drawing; ___________
- turn 90 0 against the course of the hour hand; _____________
- move one step forward without drawing.

The algorithm for working with the environment of the executor ARROW:
1. To start working with the program: _____________________
2. Activate the "command system" (start developing the program) - _ ____________________________________
3. Run the program for execution - ______________________
_______ control mode of the executor (the programmer issues a command, the executor executes it, then the next command is given, etc.)
________________ control mode
(imitation of automatic
management)

Control structure "CYCLE"
UNTIL there is a wall ahead
. Loop body (repetitive commands)
District competition "Teacher of the Year 2015"
Informatics lesson in grade 9
Topic: "Graphic Tutor"
Graphic executor "ARROW"
Student : ________________________________
Teacher: Khamueva Larisa Anatolyevna,
IT-teacher
MAOU "Shigaevskaya secondary school"
March 2015
MAOU "Shigaevskaya secondary school
website: schigaevo.narod.ru
Khamueva Larisa Anatolievna
e-mail.ru: [email protected]
View document content
lesson plan 1
Informatics lesson in grade 9 "Graphic performer GRIS"
The purpose of the lesson: To give an idea of the purpose and capabilities of the graphic artist GRIS; introduce students to simple GRIS commands; learn to work in software mode.
educational:
To consolidate with students the concepts: "Algorithm", "Executor", "Executor's command system"; types and ways of representing algorithms.
To acquaint students with the graphic educational executor "Arrow" in more detail.
Work out the basic methods of working in the GIS environment
Learn how to work in software.
developing:
To develop students' ability to draw up linear programs in the GRIS environment.
To develop the ability of students to analyze, compare, draw conclusions.
Develop algorithmic thinking.
To activate the cognitive activity of students through multimedia teaching aids, gaming technologies.
Increase student motivation.
educational:
Achieving a conscious level of assimilation of the material by students.
Formation of a sense of collectivism and healthy rivalry.
Formation of patriotic feelings: pride in one's country, desire to strengthen its power and potential, promote its advancement and success.
During the classes:
Teacher: Hello guys! You and I are lucky - we were born and live in a big, strong, great country - Russia! Undoubtedly, Russia occupies a leading position in many science-intensive and high-tech areas, and first of all, as you know, in space exploration. Let's get acquainted: I am Larisa Anatolyevna Khamueva, a leading specialist of the Federal Flight Control Center, in short - MCC (she pointed to her badge). Attention to the screen.
Voice behind the scene: The Mission Control Center provides practical flight control for spacecraft of various classes: manned orbital complexes, spacecraft, automatic interplanetary stations and artificial earth satellites for socio-economic and scientific purposes. At the same time, he conducts scientific and design research and development of methods, algorithms and tools for solving problems of control, ballistics and navigation, and also deals with the examination of space projects in the direction of his work.
Teacher: MCC's main task force is currently setting up a new test facility. I was instructed to form a school for junior specialists and begin their training.
Guys! You are now on the threshold of adulthood, and it is already necessary to start thinking about choosing your life path, in particular, your future profession. I suggest that you become a Mission Control Center specialist for at least thirty minutes: learn how to plan a route, control flying objects and vehicles, and control the state of their flight. These basic skills are necessary for specialists of almost all high-tech computerized digital systems, regardless of the specific field of application: mechanical engineering, medicine, nuclear energy, and much, much more. Are you up to such a challenge? Do you agree?
Then let's start! When applying for a job, you must pass testing and get admission to the internship.
Test.
Permission received. Everyone gets a trainee pennant.
Next test: Please remember what is control?
This is a purposeful impact of some objects (managers) on others (managed).
How can an object be managed?
Write an algorithm for it.
What is the name of the object that executes the algorithms?
Algorithm executor.
And if the performer is engaged in drawing on a computer screen, then what can he be called?
Graphic performer.
Now you have determined the topic of our lesson: Graphic training executor. Since you are not yet the MCC specialists and the spacecraft will not be trusted to you, we will do the internship at the training executor Strelochka.
Guys, what do you think, what task is the Mission Control Center setting for you today?
That's right, to learn how to manage the performer, but in order for the performer to understand you and accurately complete all your tasks, what should you do?
Write an algorithm (program).
Will any sequence of commands and instructions be considered an algorithm?
Only the one that satisfies the properties of the algorithm: discreteness, understandability, accuracy, finiteness.
What do you need to know in order to write an algorithm for a specific performer?
In what environment the performer operates, the system of commands of the performer and modes of operation.
Now I ask you to take a booklet-cluster on the table, in which you have to work in order to independently master the environment of the graphic artist "STRELochka". On your computer desktop you have Applications folder which contains everything you need: the software shell of the graphic artist - file 9.13, a presentation containing theoretical material - "Arrow Artist"). Time to work - 5 minutes).
While working, I ask you to make notes on the margins of the booklet: - I already knew this, or thought I knew; + - if what you write is new to you, "-" - if what you write contradicts what you knew or thought you knew. Put a "?" in the margin if what you are writing is not clear, or if you would like more information on the subject. (Table INSERT)
Guys, did you complete the task? Tell me, who has a “minus” mark in the margins? And the question mark? (we analyze what remains unexplained).
Open the ARROW graphic artist environment. Please note that all commands are inactive, what action is needed? - Execute a command BEGIN. What needs to be done to activate executor commands? Run command DEVELOPMENT. To run the program for execution, you need to execute the command ... DEBUG. (three modes).
Guys, do you understand how the ARROW executes commands? In order not to get confused with the team - turn stretch your hand forward and try to execute the command (turn counterclockwise).
For reference: The programming language for a graphic artist is an educational algorithmic language. Therefore, the control algorithms for the GRIS, written in the algorithmic language, are programs for it at the same time.
Well, now, get ready for the first launch of the object! We take our jobs - the flight control panel. And we proceed to the first launch of the space object ARROW. You have to write a program to obtain the following trajectory: ____ ____ ______ ______. If you have any doubts or something does not work out for you, I am ready to help you. GOOD LUCK in your endeavors! Don't forget about the control panel: Start, Develop, Debug buttons.
Guys, what type of algorithm did you get? In what mode did you do it?
The first basics of management you got, it's time first qualifying exam: Make an algorithm for the ARROW, under the control of which the letter “C” will be drawn on the field, which will mean “start” or “first steps” in the profession that we are mastering.
(independent work)
Who coped with the first task - he receives a distinctive badge "junior specialist of the TsUP school".
Who did not cope with the qualifying task - look at the screen. Program example.
Guys, tell me what this algorithmic construction is called (commands are executed sequentially one after another) - LINEAR.
The internship continues! Who successfully passes the next test, receives a distinctive badge - "specialist of the MCC school." If you notice: in addition to simple commands, the ARROW can perform complex commands. Remember what algorithmic constructions (types of algorithms) we have not yet remembered today? (branching, loops, auxiliary algorithms).
Look at the screen - the trajectory of the object's movement is shown here. How is it different from the previous one? Before since when ARROW keeps moving? Will simple commands be enough for us to develop compact algorithm? - No.
Clue: Take a close look at the command bar and experiment with the control structures. Have you chosen the right one? Remember: we said that the ARROW goes down the stairs until until there is a wall ahead.
This structure is called cycle, your task is to highlight the repeated commands and write them into this structure. Who is confident in his abilities - proceed to launch, Who doubts - I will give you instructions.

Repetitive Commands
Successfully passed the qualification exam: ____________________
You have been accepted for the position of Mission Control Center Specialist. Congratulations! Your algorithms were the most accurate! You can easily cope with the work of a programmer, easily master the remote control for the security of our country's airspace, and be able to ensure the information security of databases of the most secret information!
I am sure that each of you, if you try, will become a good specialist in your field! And with such informationally advanced personnel, our country will be able to overcome any difficulties and remain a strong, highly developed power!
Guys, tell me please, what was new for you today? What or who surprised you? Is there anything that is not understood?
Amazing!
I suggest that you do not stop there and continue our work Houses:
§ 28; Compose algorithms for drawing the following figures:
For verification, you can send them to e-mail: laran [email protected].ru and the leading specialist of the TsUPa will appreciate your work!
Thank you for the lesson!
"Artist ARROW"

HRIS interface "STRELochka"
Program menu
Executor
Programming environment
Programming environment commands
Graphical Executor Environment

Executor environment
The performer can only move horizontally and vertically with a constant step, inside the graphic field, and cannot go beyond its boundaries.
The state of the performer on the field is determined by his location (coordinates) and direction (where he is looking)
Performer action: step, jump, turn

Executor command system
Simple commands:
Step– move one step forward with line drawing;
Turn- turn by 90 0 counterclockwise;
Bounce– move one step forward without drawing.

- Get started with the program: select "BEGIN" in the program menu.
- Start Algorithm Development: Select "DEVELOPMENT" in the program menu.
- Run the program for execution: "DEBUG" .

Executor direct control mode (the programmer gives a command, the performer executes it, then the next command is given, etc.)
Program control mode
(imitation of automatic
management)

Program launch
View presentation content
"ARROW"

Khamueva Larisa Anatolievna
Informatics and ICT teacher
MAOU "Shigaevskaya secondary school"
10:00:35 am

Access to internship

I test:
1. What is management?
2. How can the object be managed?
3. What is the name of the object that executes the algorithms?
4. A performer who draws pictures on the screen?

Lesson topic:
Graphic Tutorial Performer
"ARROW"

GRIS "ARROW"
Executor environment
Operating modes
5 minutes

Marginal notes:
you know or thought you knew
is new to you
contradicts what you already knew or thought you knew
is not clear, or would you like more information on this issue

Programming language for a graphic artist - educational algorithmic language
ALGORITHM PATH_0
Given: Performer in t.A
Do: Reproduce a sample
What is the structure of this control algorithm?

I start:
Compose and execute a program by which the ARROW will receive this picture

Compose and execute a program by which the ARROW will draw a letter on the field "WITH"- start

I qualification test:

qualifying exam

Control structure "CYCLE"
UNTIL there is a wall ahead
Loop body (repetitive commands)

mission control center

Homework:
1. § 28;
2. Create algorithms for drawing the following figures:
e-mail: [email protected]

Thank you for the lesson!
The GRIS Strelochka program is designed to teach programming. The utility is made in a graphical format, and the user sets the commands.
Usage
Install and run the program. Before the user opens the main menu for drawing. Arrows can be moved in any direction. The main purpose of the arrow controls is to get a specific pattern. It is worth noting that the picture includes only vertical and horizontal lines.
Possibilities
The program has 2 main modes: program and direct control. If you choose the second option, then the control is carried out according to the following scheme - the user gives a command, and the program executes it. In this mode, it is possible to move the arrows by one step, it is also possible to jump when the arrow jumps one cell without drawing and rotate the arrow by 90 degrees. In program mode, simple commands also remain, but more complex algorithms are added here. For beginners, it is recommended to first master the work in simple mode, and only then move on to the second stage. The main task of the program is to prepare a person for real programming. The utility is distributed free of charge in Russian.
Key Features
- the program is compatible with all versions of Windows;
- a wide range of commands in the programming mode;
- basic commands for control - turn, step, jump;
- the utility is fully translated into Russian;
- You can get more information about training in the help menu.
Having passed the topic "Algorithms", you can move on, deepen your knowledge. And the next step is programming. The scary word for most people is programming. But everything is not so difficult if you approach the issue correctly.
Part 1.
Management is an important part of our life. Whether we see it or not, the success of any enterprise depends on how clearly the instructions are given, how clear they are. In addition, they must take into account the knowledge and ability of the one who will carry out these instructions.
Let's say your teacher gave you homework on a topic you didn't study. It is quite obvious that not everyone will cope with this task.
What if you were asked to build a house? You either won’t be able to do this at all, because you don’t have the necessary knowledge and skills (or maybe you’re just physically unable to do some work - for example, raise a concrete slab) ... Or your house will not meet expectations, will not be suitable for a full-fledged operation.
The reality is that in the communication of people, you can often observe that we do not give each other clear instructions. We rely on logic, ingenuity and knowledge that each other has. Many things seem elementary to us, requiring no comments or explanations.
But is it? For example, I ask: make me tea. And even a small child knows that for this you need to pour water into the kettle, turn it on, wait until the water boils, etc. As a result, they bring me a cup of warm green tea, without sugar. Everything seems to be correct. But I wanted a cup of black, strong, hot tea with sugar. This means that I did not give clear enough instructions. The one I asked to make the tea used logic and thought of something about which he had not received instructions.
If we are talking about communication between a person and a computer, you need to understand that a computer is a machine. He can count at great speed, perform many operations at the same time. But he is completely unable to make independent decisions, even if they are logical and obvious. The machine is our tool for solving various tasks, making work easier. If we want to get a result, we need to provide for all options for choosing actions at any stage of the task. A person can either make a decision himself, or ask: should you put sugar in your tea? The computer is just waiting for our decision.
Now we are starting our journey into the world of programming.
The program is an algorithm written in the language of the performer. And the performer's language, also known as the performer's command system (SKI), is his skills.
We will start by working in the graphic artist Drawer. Such programs are designed to visually demonstrate the management process. Understanding how it works, it will be enough for you to simply move to a new level - start working in a programming language. The draftsman will help us learn how to compose control algorithms.
Open the Arrow program on your computer.
The environment in which the performer operates is called the performer's environment. In our case, as you can see, this is a lined field. The arrow indicates the position of the performer. It is her movements that we will control.
We will work in direct control mode - a person gives a command, and the GRIS executes it (GRIS is a graphic executor).
Now let's see what the SKI of Arrows is.
Here are the simple commands that our GRIS can do:
step- moving the HRIS one cell forward with drawing a line;
turn- rotation of the direction of movement by 90 ° counterclockwise;
bounce- move forward one cell, without drawing a line.
You can see these commands on the left side of the window. You can either click on the buttons corresponding to the command, or type manually. The first method is more preferable, as it saves time and eliminates spelling errors.
Let's start with a simple one - a linear program. Just like a linear algorithm, such a program is built on the principle of sequential execution of steps.
To enter the programming mode, you must press the buttons - "Start", then "Development". On the left side of the screen you will see the first words of our program.
The test of the program, or rather, the body of the program, should, as in the block diagram, be placed between the words Begin and End. In the performer, for simplification, their abbreviation is used: BEGINNING and CON. All commands written above or below will not be taken into account by the program, which means they will not be executed.
TASK 1.
Let's build a square with a side of 2 cells. Let's take the initial position of the HRIS as the upper left corner of the square. The arrow points to the right.
Program test:
STEP STEP TURN TURN TURN
STEP STEP TURN TURN TURN
As you can see, it's pretty simple.
Now find the button with the green arrow - this is debugging. This mode allows us to see how the GRIS executes the written program. You can choose the browsing speed. Our first program is not great, so I suggest you watch it at the slowest speed. This mode allows not only to see the result, but also to identify where the mistake was made. If there is no error, you will see a neat neat square on the screen.
If an error is found, return to programming mode and make adjustments.
TASK 2.
Now let's build three squares with a side of two steps. You need to place the squares in one horizontal line. The distance between squares is one step.
In this case, you can say that we have the same action repeated several times. But we can't just copy the text of the previous program and repeat it three times. The fact is that after finishing drawing the first square, the GRIS will stop so that the arrow will stand at the starting point and look up.
But that's not all. It is also not necessary for us to write the square program three times. For such cases, there are auxiliary algorithms. These are algorithms that solve a certain subtask from the main task and are repeated many times. As can be seen in our example, this can be an independent algorithm (our first task), or part of other algorithms.
In a programming language, such algorithms are called subroutines or procedures.
We have the main task - Line of Squares and an auxiliary algorithm - Square.
To build the procedure Square, you need to select the button on the left side of the screen - Description of the procedure. You will see a window in which you must specify the name of the procedure to be specified, i.e. for us - Square. Close the window and see that the beginning and end of the procedure appear on the left - between them you write the text of the procedure:
STEP STEP TURN TURN TURN
STEP STEP TURN TURN TURN
STEP STEP TURN TURN TURN
Now we need to build the basic Row of Squares algorithm.
First, we call the Square procedure using the corresponding button on the left side of the screen. Now, I remind you - after its execution, the HRIS is in its initial position, but the arrow looks up. So it is required to write steps that bring it to the position we need - when the arrow is in the upper left corner of the future square and looks to the right. In these steps:
If you are not sure, do some debugging - make sure the arrow position is correct. The more often you do it, the more likely it is to catch the mistake in time. This is especially valuable when writing a large program.
If everything is in order, we can continue and finish the program:
Do It Square
TURN TURN TURN JUMP JUMP JUMP
Do It Square
TURN TURN TURN JUMP JUMP JUMP
Do It square
There is one more option - since the steps of bringing the arrow are repeated, they can be included in the Square procedure, or a second procedure can be created - Returning the arrow to its original one.
Try at least one of the options.
The method of the algorithm that we used - the description of the procedure, and then the subsequent writing of the main algorithm - is called bottom-up. But you can do the opposite, first write the main algorithm, and then describe the auxiliary algorithms (procedures) included in it.
TASK 3.
You need to draw a line across the entire screen. The initial position of the HRIS, as in previous tasks, is on the left. The arrow points to the right.
You can count how many cells are on the field (15) and write a program by pressing the STEP button 15 times. But this is not very convenient. What if the field were huge, say 200 squares? You can go astray, both when counting and when writing steps.
To facilitate our work, we will use a special team. We are building a cycle. As you remember, a cyclic algorithm is an algorithm in which a command or a group of commands is executed repeatedly until a condition is met. In our case, the condition is to take a step until we reach the edge of the field. In GRIS, the edge of the field is also called a wall.
We choose the condition:
STEP
end of cycle

By setting such a condition, we fulfilled one of the main properties of the algorithm - finiteness. Upon reaching the edge, the GRIS will stop. If you do not set such a condition, the program will become looped, i.e. will never stop and will not achieve any result.
TASK 4.
You need to draw a frame around the edge of the field. GRIS is in the left corner of the field, the arrow is looking to the right.
Let's call the algorithm Frame and use all the knowledge gained to make the program as concise as possible (without writing extra steps).
We know that the GRIS can only rotate counterclockwise, therefore, in order not to make many unnecessary turns (look at the algorithm from the first Square task), it is more convenient for us to turn the arrow down, then we can do a turn in each corner of the frame using only one ROTATE command .
In addition, we already know that it is easier to build a procedure and a loop than to type the same commands several times. Let's use this knowledge.
Let's create a line procedure, as we did in the previous task:
procedure LINE
until the end is ahead, repeat
STEP
end of procedure
Now let's write the basic Frame algorithm:
TURN TURN TURN
do LINE
TURN
do LINE
TURN
do LINE
TURN
do LINE
end of cycle
Now, to make sure that you remember everything from the Algorithms topic and understand how the GRIS Strelochka works, take a break and take the test.
It is convenient in that you immediately see your result - the question number will be highlighted in red if you made a mistake. After passing the test, you will be shown the correct answers. Try to take the test several times to make sure you remember everything. Good luck:)
TEST
If you have completed this task, we can move on.
Part 2.
You can try to work with all GRIS. For this lesson, we need only one - the Robot. Open it on your computer.
We have some creative work ahead of us. Before us is an empty field. This is what the Robot Executor environment looks like:

To get started, we need a maze that our Robot will go through.
And you will create it yourself. In the future, this can be used not only as training, but also as entertainment.
Go to the Maze tab and select - Edit Maze. The photo above shows exactly this mode. The first icon is Create a new maze. Further objects: sand (the main background), a wall and flowers (barriers), a garden bed, the penultimate one is the Robot itself. The last one is the base. The cell where you place the robot is the start, the base is the finish (it is in the cell of the base that the Robot must come).
Further to the right, there are tools for resizing the field - adding and removing new columns and rows.
Work out, it will be good entertainment and relaxation before the upcoming work. After drawing the maze, save it to your computer. IMPORTANT! In order for it to be preserved and subsequently work, after the name of the labyrinth you invented, you must put the extension .maz
You can draw as many variants of labyrinths as you like. As necessary, load them into the program for execution.
TASK 1.
Try to draw this maze:

As you can see, next to it I have already written our first algorithm, consisting of simple commands
Pay attention to the difference in the design of commands! Just like in programming languages, in the Robot executor, after each command, a - sign is placed; If you forget to set it, the executor will not execute the command. Another useful difference is that if the same command is repeated in a row, you can specify the number of repetitions in brackets without calling the operator several times.
Let's see what SKI the Robot has and you will perform several algorithms.
The command system of the Robot is larger than that of the Arrow:

I have placed both simple commands and operators (on the right) in one figure. The phrases "right_flowerbed", etc. needed for working with operators (for building cyclic algorithms and branching).
This GRIS can not only move, but also plant beds.
TASK 2.
Before you is a labyrinth in the form of a cross, built from a wall and having no way out. The base is in the center. The initial position of the robot is the center of the cross, the direction of movement is up. The task is to plant flowers on all the beds located inside the labyrinth.
TASK 3.
Build a maze and write a program for the Robot. Conditions: The robot is in the upper left corner, the direction of movement is down. Diagonally, beds are placed from the left corner. The last cell is the lower right corner of the field - the base. The task is to write an algorithm according to which the robot moves to the base, planting flowers on all the beds along the way.

I have prepared such a problem for you, since it is interesting in that one procedure contains the second one. On the one hand, the solution suits us: the robot moves down 1 cell from its initial position, turns to the left and takes a step into the garden. Plants flowers and turns to its original position, i.e. looks down. If the bottom is empty, he can move on.
The error of such a program is at the very end - as soon as the robot gets to the base, the program will give an error. For this, an additional condition is introduced: if the bed is planted, if the base is the starting position.
Part 3
If you have completed all the tasks of the Robot, then we can move on. And now we will introduce you to another program that will be the last stop on the way to programming in a programming language. This program is KuMir.