Caravan 2001
* The article was written by Sergey Oskin, Moscow.
A long time ago I replaced the standard cassette player with 1DIN with an adapter frame. It turned out like this
Over time, I wanted more and I began to look closely at what is on the market. In short, I stopped at the latest generation Chinese 2DIN GU. There are many different options with different appearance and the same filling.
There is a place in the 2001-2007 Dodge Caravan (aka Chrysler Voyager, aka Chrysler Town & Country), but it is rather limited in height, by means of measurements it was found that it is a maximum of 105 mm in height, quite spacious in width and depth.
From the descriptions of such installations, it turned out that such devices are most suitable in size (hereinafter, links to Redpower models):
Redpoewr 7628 with motorized front panel

However, it cannot be installed flush with the console panel and therefore it will look "collective farm".
Model - Redpower 8910
The knobs are convenient, but it's very bad that they are at the top, in our cars, by turning the left and even more so the right knobs, you will block the screen with your hand. Another bad thing is that the front panel is absolutely flat, and the center console in our cars has rounding both vertically and horizontally, as a result, when installing, we will get either bulging corners or a center strongly recessed inward.
Redpower 7629

There is a twist in a good place, then the panel is also flat - remember the protruding corners. A likely candidate if nothing is better.
Drew attention to the model - Redpower 8946

There are twists in the right places, the curvature of the front panel almost completely coincides with the curvature of the console, but! the thickness of the panel at the bottom is twice as large as at the top, i.e. the panel is, as it were, tilted back relative to the screen and the case itself. If you put it, then the plane of the screen will stand out strongly against the background of other elements of the console.
Found a model - Redpower 8901

There are no twists, but the vertical rounding completely coincides with the console, and the horizontal one is slightly less, but it is there. It was decided to stop at it.
After weighing all the pros and cons, the device was purchased at T-ZON LLC at the end of December. Installation in a car is planned for the New Year holidays.
It was decided to install so that at any time it was possible to return to the previous version. For this, plastic was purchased for the center console of the car, another adapter frame for 1DIN and an adapter cable from Chrysler to ISO.
Began with the preparation of the center console. Marked the contours of the hole for 2DIN

In the corners I drilled holes with a diameter of a couple of millimeters so that I would not accidentally cut through with a cutter further than it was supposed to.

I cut through the plastic with a cutter. The cutter was made from a piece of a hacksaw blade for metal using a sharpener (grinder), there it lies on top with a handle made of green electrical tape.
Then I just sawed the vertical slots with a hacksaw blade.

Trying on


We do not discard the remaining rounded scraps, they will still come in handy

from one of them I make a horizontal shelf under the GU (glue it), otherwise, due to the different radii of curvature of the console and the GU under the GU, a gap may appear. from above it is not necessary because I made the upper cut for the inner partition, which serves as the upper shelf.

Due to the vertical curvature of the console, it turns out that the body of the standard rear wiper switch is tilted slightly down, and the body of the climate control unit is up. If the GU is already in place, then everything is in order, but in our case the GU is attached to the insides of the center console, and the console panel with the wiper switch and the climate control unit installed on it is, as it were, put on the GU. In this case, the front panel of the GU will not crawl between the switch and the climate unit. To do this, you need to remove a little "excess" plastic from the bottom of the switch and from the top of the climate unit. A 5 mm wide strip is cut from the climate unit (shown in red as it was at the beginning) and on a belt sander the remaining part is grinded off at an angle: at the front panel, the thickness of the plastic remains the same, and grinds to zero at the cut point.
We proceed in the same way with the switch, only you do not need to cut off the plastic and you can grind less.


Remember that holes remain on the sides. To close them, a second adapter frame for 1DIN was purchased. You can use pieces of suitable plastic instead, but then it will be much more difficult to calculate the dimensions of the GU fasteners, for this I used the fastening holes in the frame.

A pocket is sawn off from the frame so that it does not interfere

The frame itself is first completely fixed in the standard hole by welding the plastic, "drowning" it a little inside, then the excess is cut off with the same cutter.

Leave the standard mounting holes intact.

Irregularities must be putty. You can use these two-component glues-putties for ABS-plastic. On the left from the Leroy-Merlin store, it costs 600-700 rubles, adheres very well to plastic, but hardens for a long time until it can be processed. What is sold on the right in car markets for 1500-2500 rubles is usually used to repair bumpers, it sticks to ABS worse (I need some kind of adhesion inhibitor, I could not find one), but it sets in 10 minutes and after 30-40 minutes it can be processed

I used a composition from 3M, To enhance adhesion, I walked over the plastic of the frame with a drill (dremel). Sanded with sandpaper.

On the sides, he blinded something like the same shelves, as above and below, grinded off the excess. I made the necessary measurements for the manufacture of fasteners and cut off the fastening holes of the frame.

Of course, it would be more correct to prime it with a special primer and paint it with matte paint in order to preserve the texture of the console panel, but this is not always possible, and even until the summer it is not available to me, so I bought a vinyl self-adhesive film (with which cars are pasted over) in matte black and the panel is pasted over to it

Such a fastener is made from an aluminum corner 40x40x2, on the wide side there are 2 sets of holes - at the end it will be clear why. I decided not to use the standard fasteners from the set with longitudinal slots. when removing and installing the GU, every time you have to "hit" the front panel of the GU into the hole in the console panel, I'm going to periodically remove the GU and take it home for all sorts of software experiments.


From the Chrysler-ICO adapter cable, matching black and gray connectors were taken to put on the standard connectors of the car, their contacts were unclenched with a special tool. I doubt that you will find such a tool, therefore, you can use a heat shrink wire soldering. One adapter cable was taken from the GU set, the Nissan connector was cut off from it and the contacts with the Krasler connectors were crimped onto the wires. To connect the reverse signal and power the TV antenna, a two-pin connector from the MTF xenon kit (marked in red) was added, as a result, we got such an adapter cable.

To connect external RCA and steering wheel buttons, the standard connectors from the GU set will be used.
Further work will be carried out in the car in the garage. Unfortunately, both times I came to the garage forgetting to take a normal camera and taking pictures with my phone, and by that time it was already noticeably dark on the street, so the quality of the pictures was not very good. :(
There will be a lot of "threads on plastic", so such a gas apparatus is being prepared and refueled.

The center console is freed from all removable items. Outlines are drawn in red, along which you need to cut the interfering plastic.

The "excess" plastic has been cut off. A metal tubular beam of rectangular cross-section has been exposed, on which a bunch of things are held under the "torpedo". It has a cross-section of approximately 50x25 mm, the metal thickness is 1 mm. Red shows where it is necessary to "modernize" it so that it does not interfere with the GU. In height, you need to remove 3 mm, and 15 mm in depth will be enough. I used a small Chinese grinder, bought 5 years ago in Leroy-Merlin for 299 rubles, and oddly enough works fine even after using it when installing iron gates in the garage and after major repairs in the apartment.

Having tried on the GU in place from pieces of plastic, I made two additional points of support for the GU.

Center console panel with OEM parts installed. 
Fastened, connected, turned on - it works!

I suppose you could say "I got up like a native."

Side view - no protruding corners or gaps in the middle.

All the same, I decided to call the GU from the console by about 0.5 mm - since it somehow looks more embossed, the same as the climate unit and the upper switch, as if an optical illusion. This is why a second set of holes appeared on the fasteners.

Since I liked the idea of Corrus "and I liked it, but I don't have a computer, it was decided that reading lamps would go to" consumption ", and they are still available on the monitor 
Carefully removing the plafond, which is fastened with latches, I found quite powerful stiffeners on the roof 
But an ambush was discovered - the distance between the ceiling sheathing and the roof was several centimeters. To eliminate the ambush and due to the fact that it was no longer supposed to operate the standard cover, the transparent part was carefully removed from it and the remainder was attached to the roof with standard clamps and additional self-tapping screws. 
From above, all this was covered with a metal plate from the monitor, fastened with two long self-tapping screws in the roof stiffeners. 
I threw the wiring from the monitor along the right pillar 
In order to conduct the wiring to the beard, I had to remove the top cover of the "torpedo", since it is fastened with latches 
I had to make out the beard essno, I already wrote about it here 
On the ashtray casing, you can see the interface block from the monitor.
It was decided to immediately replace the head unit with something that understands DVD. The choice fell on the Sony MEX-R1. Relatively cheap and cheerful. I put the radio tape recorder in its regular place through a spacer, bought in advance from VIPs. 
Well, then - the order of assembly is the reverse of the order of disassembly.
In the end, it turned out this 


Impressions: The monitor is just right for such a car, the image is of high quality, it can be seen from all seats, when folded from the street it is very problematic to see through the tint, even by squatting in front of the front doors.
It has already been used several times in a parking lot with a beer (for everyone) and in a long distance with a family (you can only hear it yourself). The lack of a rear-view mirror is not a problem for me, because I’ve already got used to it as something on the side mirrors.
Of the plans: a complete replacement of the acoustics, because the standard one does not play very well with the radio tape recorder due to the lack of 4 Ohms recommended by the manufacturer of the radio tape recorder. Yes, and she is old.
These car models are typical "Americans": reliable and simple. But the functionality of the "native" (standard) radio tape recorder with such a development of technology is not always enough for Dodge owners.
Installation
Most models of cars of domestic and foreign production have places for installing 1DIN radio tape recorders with dimensions (178x50x180 mm).
Models Dodge Caravan, Caliber (Caliber), Stratus, Journey, Ram and others provide for the installation of radio tape recorders with a large standard size 2DIN (178x100x180 mm), which allows you to expand the functionality of these audio devices equipped with a 7 or even an 8-inch display. This allows you to conveniently display visual information: road map, videos, games, mobile applications etc.

Installation of a new device does not require any special tools and skills.
However, there are models with intermediate dimensions 1.5DIN (for example, the 2004 Dodge Neon head unit). In this case, you will have to look for a transition frame or cut dashboard(as in Dodge Neon). Therefore, some car owners of the Neon 2004 car install a 1DIN radio tape recorder with a sliding screen.
If, after installation, the car radio asks you to enter a code, you can find it on the back of the radio. There is a sticker with a code. In some cases, the code can be found in the radio tape recorder's passport under the appropriate heading.
Dodge Caravan Native Receivers
The head unit Winca S100 for Dodge Journey and Caravan (models 2001 - 2007) deserves special attention, as it runs on the Windows operating system. The 4.2-inch widescreen touchscreen has a contrast TFT matrix with high resolution 800 by 480 dots. The size of the virtual CD changer is 20 discs. The radio tape recorder supports a large number of audio and video file formats. There is a radio tuner and an analog TV tuner with picture-in-picture support.

There is a built-in GPS receiver, USB connector and SD slot. It is possible to connect a parking sensor and the value of air pressure in the wheels, a rear-view video camera.
Access to the global Internet is performed via a USB modem.
For comfortable driving, there is a built-in speakerphone and the ability to control the radio tape recorder using the steering wheel buttons or the on-board computer.
Another model of the head unit for the Dodge Caravan - WINCA C201 is made in the same style as the Dodge panel design, therefore it retains the interior style of the Caravan's cabin. It is easily installed in a regular place and connects to the existing connectors.
The radio tape recorder has a touchscreen display with high resolution and contrast. It has anti-reflective coating and high sensitivity matrix, which makes it convenient to control the functions of the device. There is also a button control panel, it is possible to connect control buttons on the steering wheel.

The Dodge Caliber WINCA C201 radio tape recorder supports a large number of multimedia file formats, has a clear and powerful sound.
There is a built-in virtual CD changer, Internet access and many different additional functions.
Dodge Caliber Receivers
Fans of classic car radios for Caliber should pay attention to the Alpine CDE-W233R model. Thanks to the long-term collaboration of Dodge with a Japanese audio device manufacturer, Alpine's radios are characterized by a unique sound that is achieved by taking into account the acoustic characteristics of the Caliber.

If an LCD screen is needed, then the WINCA C206 will be an excellent choice of a radio for the Dodge Caliber (Caliber). The device has a high-definition screen with a resolution of 800x480 pixels, which does not fade in bright sunlight. WINCA C206 has a digital TV tuner, GPS navigator, mp3 player, flash card slot.
Car radio for Stratus
Avis Electronics AVS070AN - suitable for many car models, including the Dodge Stratus. The 7-inch capacitive multi-touch screen with a resolution of 1024 by 600 provides convenient control of the device and various Stratus equipment. The radio tape recorder has an operating Android system 4.4.2, radio tuner with memory for 30 stations.

There is GPS, Bluetooth, Wi-Fi adapters. Navigation system supports various cards. It is possible through training to connect buttons on the steering wheel. There are 3 inputs USB connectors for connecting your Stratus' rearview camera and an AUX output.
Universal QR-6205
This device is intended for installation on Dodge Grand Caravan (on models later than 2007), Caliber (2006-2013), Jornie (2008-2010), Ram (2008-2012).
The radio tape recorder has operating system Android 6.0 and 6.2-inch frost-resistant multitouch screen. Provides a DVD drive, SD card slot, rear view camera input. Supports OBD2 adapter, TMPS sensors, allowing you to monitor the current tire pressure of the car.

Connect to global network Internet and installations of numerous Android applications possible via 3G-modem or WI-FI access point. For hands-free communication in the car and communication with a smartphone, Bluetooth is used.
Optional connection of digital TV and hard drives up to 1000 GB via the existing USB connector.
The navigator uses GPS and GLONASS networks, supports various navigation programs.
There is a previous generation Dodge Caravan (2005). The car has many advantages, but it was not lucky with music. Considering that there are plenty of caravans, Voyagers, Neons, Interpids and others on the roads of Russia, I am sure that their owners will be interested.
So please, under cat.
Chrysler engineers have spawned an unhealthy amount of radio tape recorders, but they all look like twins.
Dodge / Chrysler radios

There is either a cassette, or a CD (some even with a CD changer), or even a cassette with a CD.
There are quite interesting models (for example, P56038629AD with a screen, DVD and navigation, but with a cost on ebay of about $ 500, MP3 support is not there).
In my case, the radio tape recorder was P56038589AM, moreover, since the Caravan is American, it is also possible to tune to not all stations in the FM band.
Most frustrating was the lack of MP3 support and the American FM band, so the following options were considered:
-reflash the radio for the European band, use the FM transmitter for MP3. The cheapest solution, but also the most fig. It is inconvenient to operate the transmitter, the cigarette lighter socket is occupied, the name of the songs cannot be recognized. But the transmitter can be taken for 5-10 bucks. And there is also a problem with FM - all references to places where you can reflash the receiver (this is definitely possible, there are reviews!) Were irrelevant (phones did not answer, etc.)
USB adapter for radio. Produced under different brands (as far as I understand, they are not compatible with each other). For the radio, they pretend to be a CD changer. The cost of the solution is about $ 70 (for example, this:). This will not solve the problem with FM either, and the ease of navigation on the numeric (no RDS, cannot write words) screen was doubtful.
Buy some kind of universal radio tape recorder. The subtlety here is that the standard place of the radio is 1.5 DIN. The format is quite specific, there are very few models, and there were no models suitable for the standard dashboard (oval cut). On the forums, craftsmen buy adapters 1 DIN -> 1.5 DIN, take an ordinary 1 DIN radio tape recorder and collective farms (sorry, but most often it looks like this) a plug. Alternative option- insert a 2 DIN radio tape recorder (space allows), but then vice versa - a collective farm with cutting out the panel. It is curved, so it's almost impossible to make it beautifully, except that the masters will be able to do it in auto-tuning salons. Precisely because of the reluctance to breed a collective farm this decision was rejected.
They began to think that there was no normal solution, but quite by accident, thanks to the OFFstrade () review, I learned that the Chinese are releasing models designed to be installed in the regular place of the car. It was decided to stop at this option.
A search on aliexpress and ebay showed that on the face, all suitable radio tape recorders are the same, but differ in the number of declared features and inputs-outputs at the back.
Most cheap option was on aliexpress, $ 330 + $ 70 shipping (at that time), but there were just few connectors. The more sophisticated options cost about $ 450 (with free shipping). On ebay, the picture is about the same. One of the highest prices was at the very seller where I ended up getting (and where I got OFFstrade) and there were several reasons for this:
The seller claims to be a Maxtrons Technology () factory with a hassle-free warranty, etc. By itself, I tend to attribute this statement to marketing, but together with the rest and it played a role, I will not argue
Free camera and active TV antenna as a gift. I looked at these cameras and antennas and figured that if you take + camera / antenna elsewhere, then the prices are about the same (the camera is from 30 bucks and the antenna is active at 20 bucks). In total, the seller's option maxtrons_com was chosen for $ 420 + $ 90 shipping (sends via EMS). Total 510 $
The characteristics of the device are as follows:
-Operating system: Windows CE 5.0
-RAM: 64MB
-CPU: Samsung S3C2449A, 533MHz
-Screen: 4.5 ", 800 * 480, resistive touchscreen. Glued to the screen protective film(semi-glossy).
-FM / AM / MP3 / CD / DVD / DivX / analog TV
-playing music from SD (to be precise - microSD), USB flash, iPOD
-bluetooth (headset profiles and A2DP for transferring songs from phone)
-preinstalled iGO (included microSD card 4GB with maps of almost the whole world). I will clarify that the device has 2 microSD slots - one for navigation, the second for MP3, AVI, etc.
-automatic switch to camera when reverse gear is engaged
-remote control
-Russian language support (interface / navigation)
Supported Cars List:
1999-2004 Jeep Grand Cherokee
2003-2005 Jeep Wrangler
2002-2007 Jeep Liberty
2002-2004 Chrysler 300M
2003-2005 Chrysler PT Cruiser
2002-2006 Chrysler Sebring
2002-2004 Chrysler Concorde
2004-2007 Chrysler Town & Country
2002-2004 Dodge Dakota
2004-2005 Dodge 1500 Pickup
2004-2005 Dodge 2500 Pickup
2004-2005 Dodge 3500 Pickup
2004-2005 Dodge Neon a
2004-2006 Dodge Stratus
2002-2004 Dodge Intrepid
2004-2007 Dodge Caravan
2005-2006 Dodge Viper
Small note: configurations with an amplifier installed are not supported:
Pls notice that The unit don "t support factory external amplifier !!!After paying for the goods, the seller was somewhat surprised by the request to duplicate the address in Russian so that it would be received faster (I did not deceive - the address was indeed in Russian too) and strained a little with another request - to confirm that I had checked the dimensions before buying. I was ready to expect any kind of fun from the Chinese, so, just in case, I measured the standard dimensions of the radio tape recorder seat. Looking ahead, I will say that the device sat down like a glove.
Here is the original post from the seller:
Thanks for your order, please tell us your detailed shipping address, postal code as well as telephone number, all is very important and should be in English
To ensure a smooth local delivery, please also tell us the information in Russian language
Also please confirm you have checked the size before bidding
Thanks,
Bobo
After confirmation, the seller sent the parcel in a couple of days, it took another 12 days to get it by mail.
The box has not survived, so I won't take a picture, but it is packed well enough. A thick layer of white foam rubber (several cm thick), inside is the device itself. On the side of the box is a small box with instructions, wires, etc.
Photos of the device
I apologize for the quality, as it was filmed on a mobile phone. 


It's cold outside now, so it was decided to install only the most necessary things for now, and connect the TV antenna and camera later.
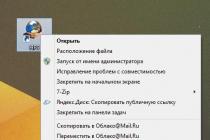
Removing the frame (in the bourgeoisie it is called bezel), hiding the mounts of the radio, is elementary. We remove the plug at the very bottom, under the frame. Unscrew 2 medium screws and carefully remove the frame from the latches. Next, unscrew the 4 screws securing the radio tape recorder, remove the terminal from the battery and turn off the radio tape recorder.
If I didn’t quite clearly explain it, then here is a video where it is shown even in unnecessary detail:
Now let's start connecting a new radio. The main connector in it differs from the standard one, so there are already 2 adapters in the box. One did not fit (probably for other models of the plant), the second was just for the Caravan.
The FM / AM antenna connector in the Caravan is also non-standard, but an adapter for this case is available as well. Both adapters are approximately 15cm long, so the wires have to be laid. But there are plenty of places "behind" the radio, so this does not cause a problem.
The GPS antenna is screwed onto the corresponding connector (it is standard and is found in many places, but I forgot the name of the standard). The kit includes Velcro to place the antenna unit somewhere on the glass, but the Caravan has quite a lot of space under the upper part of the dashboard, where the windshield heating air ducts are located. So put it there. Thin plastic should not affect the reception, and the antenna is invisible.
The microphone (in general there are two of them, one is built into the radio tape recorder and serves, as I understand it, to suppress noise, and the second on a long wire and is designed to be installed near the driver) stretched along the right windshield pillar and slightly lowered it in the area of the rear-view mirror. I also plan to install a TV antenna there, but I need to supply power to it, so I haven't installed it yet. For about the same reason, I have not yet installed the camera (you have to pull the wires through the cabin + crash into the power supply).
By the way, the antenna and the camera are passed as a gift, so the warranty does not apply to them (I read this somewhere on the seller's page. Now I could not find it, but keep in mind that this can very well be)
Since I did not use everything that came, I will list, just in case, the complete set:
-magnitola
-remote control
-instruction (it covers in detail the issues of using the menu, but about the installation everything is rather poor and without pictures)
-stylus. From experience - not needed, it is quite realistic to operate with your fingers, the elements on the screen are quite large
-microSD memory card for 4GB Sandisk (maybe it really is :)) with preinstalled iGO
-two types of cables for connection instead of a standard radio. As we found out in the discussion, one of the adapters (with two connectors) for older models
- adapter for AM / FM antenna
-GPS antenna
-cable for connecting to iPOD (connects to the back of the radio)
-cable miniUSB (male) -> USB (female). Sticks into the muzzle of the radio. In the seller's photo there is also an exit from the back, but on the arrived device this useful thing absent
- RCA cable (AV In / Out). You can connect something to the radio (VCR!: D) or bring something from it to an external screen (some Grand Caravan trims have one under the ceiling)
-active TV antenna with a bunch of adapters for different sockets. In this radio tape recorder, the TV antenna connector is standard, as in conventional TVs (in the seller's picture there is a 3.5mm minijack) and on the antenna itself is exactly the same, so in this case no adapters are needed
-camera
After connecting, we return the battery terminal back, check the operability and put everything back together. This is how it looks:
Car radio installed

Video of work (not mine, my phone shoots a shitty video, and it was dark):
Now personal impressions(somewhat chaotic, but fresh, the eye has not yet blurred):
+ the device meets the requirements that were put forward for it
When turned on, it takes 20 seconds to load. Quite a long time compared to the standard one (it is understandable, in general)
The radio itself does not slow down, the interface is quite smart
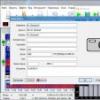
The management is not so badly thought out, but the Chinese could not do without some nuances. First, the buttons<< и >> duplicate, in fact, the Tune knob (autosearch to the previous / next radio station). Those. to go from one saved radio station to another, you need to either poke at the screen (unsafe on the road) or use the remote control.
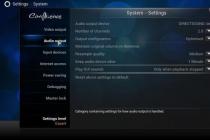
Secondly, the instructions describe that a short press on the PWR brings up the main menu (a window with a selection of sources), and pressing the Volume knob mutes the sound (mute). In fact, PWR also calls Mute (like Volume), and you can get to the main menu only by pressing the small arrow<== в самом верху экрана. Кнопка мелкая и в дороге пытаться попасть в нее точно не стоит.
And, thirdly, pressing the CLK button does not lead to any result. Although the clock is already in the status bar.
The button illumination is associated with the instrument panel illumination. Although the shade is cold, so it is visually perceived a little brighter than the rest of the backlight in the car
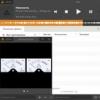
Switching between already running iGO (it is clear that starting the program itself takes a few seconds) and any other mode does not cause brakes. Moreover - during route guidance, you can listen to (and even control) radio or MP3. If iGO needs to output some sound, the melody is muted for a few seconds
Control buttons "soft". Apparently, there are not mikriki (as in mice and many other radio tape recorders), but membranes. Like TV remote controls, etc. The move is quite long, so you need to get used to pressing them all the way. Similar sensations happen if you switch from a laptop keyboard to a regular full-size one. But the Vol and Tune controls are well made. Moderately tight and the course is clearly marked
There are no complaints about the sound quality. On standard speakers, it is not worse than a native radio. Maybe a little quieter (it's hard to compare, since you can't swap places quickly), but the margin remains in any case.
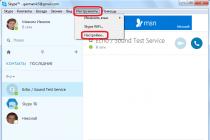
The phone mates with how the headset works. You can open the device's notebook from the radio and call the person. But the numbers of the incoming ones are not determined in the name, so they remain in numbers (SE Aino can accurately transmit this information, at least to the native SE headsets)
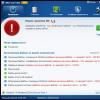
The GPS suddenly stopped looking for satellites after the device was rebooted by pressing the Reset button for the sake of sporting interest. Repeated reboots did not solve the problem. Considering that I had devices with the same percentage for WM5 and the glitches were similar, I suspect that either something went wrong in the iGo config (I changed the settings there through the program itself). Or, as I thought about this already in the process of writing the review, you just need to throw off the terminal from the battery so that the device is completely reset. Those. that something broke there, I do not really believe. Rather, the problem is software. While the GPS was working, satellites were caught very quickly. The first inclusion (after unpacking) - and after a few seconds the device received the date-time. It was fixed a little longer, but hardly more than 1 minute.
There are small problems with the watch. I haven't managed to get to the date-time settings yet, so maybe I'm wrong. So far, everything looks like this. In iGo I set (while the satellites were caught, see above) time synchronization and automatic transition to time zones. In this case, iGo shows the correct time, but the device itself is lying (just for 3 hours). If you uncheck the checkbox for automatic switching to time zones, then the time on the device will be correct, but not in iGO. But, again, it will be necessary to see if the time zone can be set there in the date settings in the device itself. In any case, it would be more convenient if the time both there and there synchronized itself. By the way, after clicking on Reset, the settings for the type of saved radio stations are reset. And the clock is not. This is what led me to the idea that it is worth trying to de-energize the car.
The screen is quite bright (adjustable) and the viewing angles are good. So far I can’t say how it will behave in the bright sun (and I’ll hardly be able to until March-April), but it’s hardly worse than ordinary PND aka navigators. On the factory film, prints are not very noticeable, and the screen sensitivity (for a resistive sensor) is quite good. For obvious reasons, I can't say how the screen tolerates the cold either.
Looks good enough (from the face). You can't say it's Chinese. The plastic is normal, the gaps are even, nothing creaks / rattles
The menu is acceptable in design. Not what IOS, but I have met head units that are scarier
There is no RDS in the radio. Our RDS services are poorly developed, so all sorts of features such as searching for stations by genre are not interesting, but displaying the name of the radio station on the screen is a useful thing.
So far I have not found Russian translation jambs. Maybe there is something somewhere, but at least do not "call the book", as in the first NOKLA
IGO maps were announced in 2012, and in fact in 2011. Although I don't see any particular problem. All the same, as I understand it, no one bought them :)
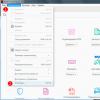
The main menu is somewhat unpredictable the first time around. You get there, but there is no button with settings. It turned out that there are two screens and you need to flip them left and right, just like in an iPhone.
I apologize for the "sheet", but there are too few reviews for such devices, and the price is not at all Chinese. Therefore, there were many doubts before ordering, so I hope that the review will be useful to all caravan owners.
If you have any questions - ask, I will try to answer.
P.S. One of the cheapest options for a very similar (or even the same, you guess here) radio tape recorder: - $ 420
The set includes a passive TV antenna, they offer to report the camera for $ 30