Situations when users, creating documents in the form spreadsheets, protect them with a password, are quite common. This is sometimes necessary so that no changes are made to the formulas or they are simply not visible. Many people begin to think about how to remove the password from the Excel file or remove the protection. Below are some of the simplest methods that allow you to perform such operations in just a couple of minutes.
How to remove protection from an Excel file knowing the password?
To begin with, consider a common situation when a sheet or group of sheets is protected, but the user knows the password to be able to change the content.
The algorithm for removing protection is as follows. First, you should use the main panel, in which you select the review section and then go to the unprotected line. To confirm the actions, you will be prompted to enter a valid password, after which the sheet or file will become available for editing.
With this, everything is simple. But how, then, to remove the password from the file, the user who needs to make changes to the file, does not know or does not remember the desired combination? There are several ways you can use it.
How to remove a password from an Excel file using the program?
The password removal method looks simple enough. For this in open document you need to use the file menu, where you select the line of information about it.

After that, the button for setting protection on the book is pressed, and then the password encryption item is used. The previously set combination will be shown in the window that appears. How to remove password from Excel file? Yes, just remove all characters from the password string and re-save the document. When you reopen the workbook, you will no longer be prompted for a password.
Using file format changer
There is one more at least efficient way, allowing you to solve the question of how to remove the password from the Excel file. It's about changing the format of the original document.
At first open file you need to save directly in the program, choosing XML as the format. The new document is then opened in a regular "Notepad" using the right-click menu and the "Open with ..." command, and already there you should find the password tag (usually it looks like Password), then delete the content and just click on save the document (for quick save, you can use the combination Ctrl + S).
But if you have a large number of sheets, this method may not work, so you should initially resave the document in XLSX format, then open it with any 7-Zip) and extract the content to any convenient place.

Next, you need to find the Worksheets folder in the unpacked directories, where all sheet files in XML format (Sheet1, Sheet2, etc.) will be contained. After that, for each such object, you should repeat the editing operation in a text application. Only first, the search for the sheetProtection tag is set, and then everything that is between the combinations "
Third party programs
Finally, the question of how to remove the password from the Excel file can be solved using special scripting programs like Password Remover.

After installation, the application integrates its own commands into office applications (not only in Excel, but also in all others). To remove the password, at the first start with the built-in VBA script, you first need to agree with the execution of the macro, then open the file, and use the Straxx command in the main editor panel. Here you need to understand that the application is not a cracker and does not work by the principle of random selection of the desired combination. It disables file protection from the inside out, so it's easy and safe to use. Feedback from users who have used such a script in practice indicate that the entire process of removing protection takes about two minutes.
When we transfer our data to Excel to others, we may need to protect the data in the worksheets from changes or editing.
In this article, we will analyze how to protect an Excel sheet from changes and editing, as well as how to remove protection.
The basics of data protection in Excel
Sheet protection in Excel does not reliably restrict access to data in your files or sheets. This is due to the fact that Excel uses a simple password encryption algorithm that is easy to crack. Older versions of Excel (earlier versions, lower than Excel 2010) use such a simple coding algorithm that anyone who knows VBA can crack it. Excel versions 2013 and 2016 use a more advanced encryption algorithm, but there are also simple approaches to breaking it.
Protecting Excel sheets or files is most needed to limit unwanted changes and editing data or formulas. I do not recommend storing and forwarding sensitive information in Excel spreadsheets.
In order to minimize the risks of unwanted changes in your files or sheets, adhere to the following rules:
- Use latest versions Excel - 2013 or 2016;
- Use complex passwords to protect sheets;
- Protect the file structure from changes to avoid editing, deleting or transferring data;
- Use different passwords to open Excel file and editing permissions;
How to protect an Excel sheet
To protect a sheet in Excel, we will do the following steps:
- Right-click on the tab with the Excel sheet at the bottom of the page and select the item "Protect sheet ..." ... Or go to the tab "Review" on the toolbar and click the button "Protect Sheet" :
- In a pop-up window "Leaf protection"
:
- In field "Password to disable sheet protection"
enter the password that you need to enter to remove protection. Write down your password in a safe place .;

- If you do not want to protect your sheet with a password, but only want to warn users that editing the data on the sheet is not welcome, then leave the password field blank;
- In chapter "Allow all users of this sheet" set the settings for those actions that will be allowed to all users who do not have a password. By default, the items are marked with checkmarks. "Highlight locked cells" and "Highlighting unlocked cells" ... If you leave only these items, then users who do not have a password will only be able to view and highlight locked and unlocked cells.
- If you want to allow users who do not know the password, actions such as: formatting of cells, rows and columns, the ability to insert / remove columns and rows, add hyperlinks, sort data, use auto filters, build pivot tables and graphs
, then mark these items with checkboxes:

- After we press the "OK" button, the system will ask us to re-enter the password assigned to the sheet.
- In field "Password to disable sheet protection"
enter the password that you need to enter to remove protection. Write down your password in a safe place .;
How to remove protection from an Excel sheet knowing the password
If you know the password for the sheet, then it will not be difficult to remove the protection.
For this:
- Right-click on the Excel sheet tab and select "Remove sheet protection ..." =>
- Also, you can remove protection from the sheet through the tab "Review" on the toolbar by clicking on the item "Remove sheet protection" => in the pop-up window, enter the password and click the “OK” button.

How to unprotect a sheet in Excel if you forgot your password
As I wrote above, removing protection from a sheet if you do not know the password is not the most difficult task. In order to remove password protection from an Excel sheet, use the methods described below.
Unprotect Excel sheet without password using VBA code (for Excel 2010 and below)
If you use Excel version 2010 and below, you can unprotect a sheet without a password using a macro. If you are using Excel 2013 or 2016, then save the protected file in xls format (Excel 97-2003 Workbook). Then do the following:
- Open the file and go to the password protected sheet. It is important that the sheet is active, for this I recommend clicking on any cell on the protected sheet;
- Press the key combination Alt + F11, thereby calling the menu Microsoft Visual Basic ;
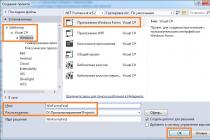
- In the window that opens, find the section "Project - VBAProject" => right-click on the section item ( VBAProject (file name.xls ));
- In the drop-down menu, select "Insert" => "Module" ;
- In the window that opens, enter the code:
Sub PasswordBreaker () "Breaks worksheet password protection. Dim i As Integer, j As Integer, k As Integer Dim l As Integer, m As Integer, n As Integer Dim i1 As Integer, i2 As Integer, i3 As Integer Dim i4 As Integer , i5 As Integer, i6 As Integer On Error Resume Next For i = 65 To 66: For j = 65 To 66: For k = 65 To 66 For l = 65 To 66: For m = 65 To 66: For i1 = 65 To 66 For i2 = 65 To 66: For i3 = 65 To 66: For i4 = 65 To 66 For i5 = 65 To 66: For i6 = 65 To 66: For n = 32 To 126 ActiveSheet.Unprotect Chr (i) & Chr (j) & Chr (k) & _ Chr (l) & Chr (m) & Chr (i1) & Chr (i2) & Chr (i3) & _ Chr (i4) & Chr (i5) & Chr (i6 ) & Chr (n) If ActiveSheet.ProtectContents = False Then MsgBox "Password is" & Chr (i) & Chr (j) & _ Chr (k) & Chr (l) & Chr (m) & Chr (i1) & Chr (i2) & _ Chr (i3) & Chr (i4) & Chr (i5) & Chr (i6) & Chr (n) Exit Sub End If Next: Next: Next: Next: Next: Next Next: Next: Next : Next: Next: Next End Sub
- Press the F5 key or click "Run" to run the code. Excel will freeze for 3-5 minutes and after that it will display a password window.
- This is not the actual password, but the one generated by the system. Click “OK” - your list is unlocked!
If your file contains several protected sheets - use this macro for each sheet separately.
Remove protection from an Excel sheet by copying data to another sheet
Another way to remove protection from an Excel sheet is to copy the contents of the protected sheet to a new Excel sheet. To do this, follow these steps:
- Open an Excel file with a protected sheet;
- Go to the protected sheet and select the cell with the left mouse button A1 ;
- Press the keyboard shortcut Shift + Ctrl + End to select all content on the sheet;
- Create a new sheet in the working Excel workbook (Ctrl + N );
- Left-click on the cell A1 on a new sheet;
- Press the keyboard shortcut Ctrl + V and paste the copied data.
This method will work, provided that the selection of locked and unlocked cells is allowed by the author of the file.
It happens that when Excel creation tables, you need to protect some cells with entered formulas or constants from unauthorized changes. Hope the reader knows how this is done! So, after a certain time, it becomes necessary to change formulas or other protected data.
And suddenly it turns out that the password has been irretrievably forgotten, and I don't really want to create the tables again and remember the formulas. In addition, it becomes clear exactly when everything is needed urgently, right now, and even better - yesterday ... And here - this article will come to the rescue!
Excel format
The method is suitable only for documents (files) saved in Excel 2007-2013 format, i.e. with the extension ".xlsx". You can open Excel 97-2003 files with the extension ".xls" in the new Microsoft Office suites and save them in the format you want.
Attempt to access a protected cell
The following figure shows the message that is displayed when trying to access a protected cell:
Arrow number 1 shows a button, when pressed, you can enter a password. But the password is forgotten and what to do? There is such an option to get rid of the password. Close the open file. Right-click on the file and open it using the WinRar archiver:
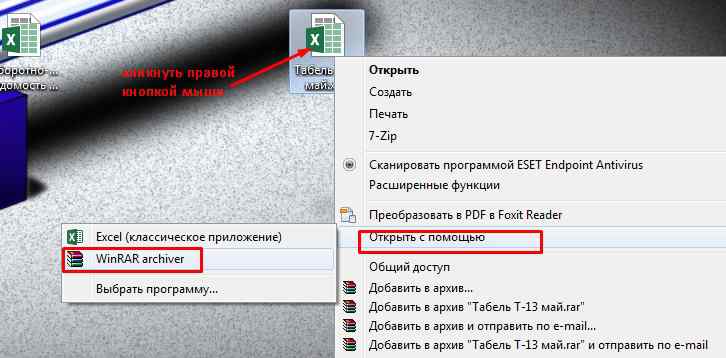
The result will be:
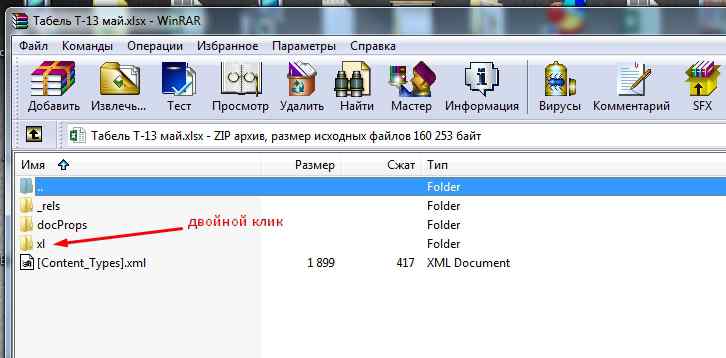
Opening the folder, we see:
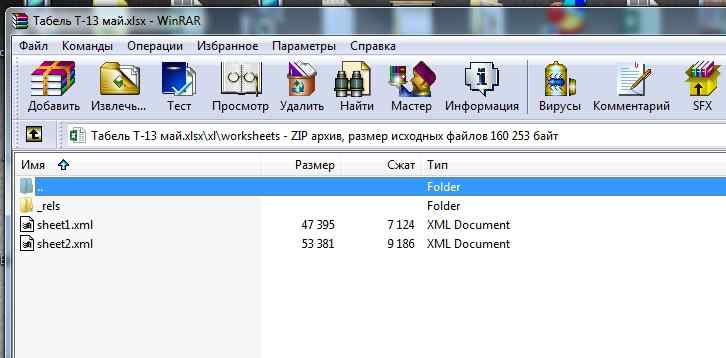
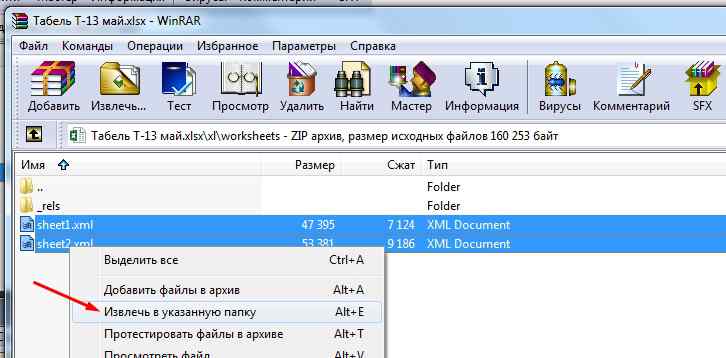
Archive in excel
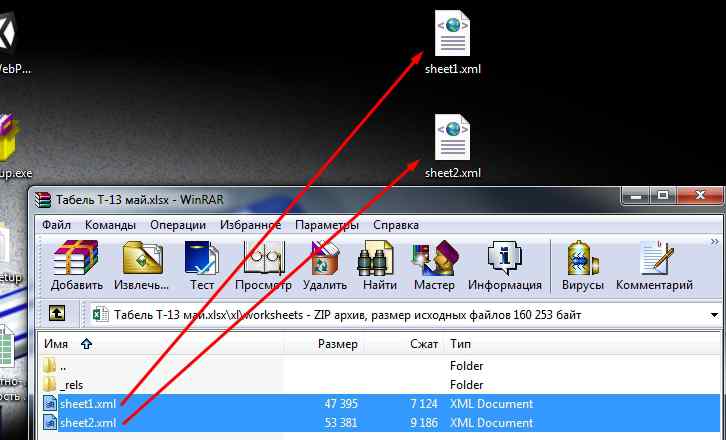
There are two page files here: sheet1.xml and sheet2.xml. The number of files depends on the number of sheets in the Excel document. You need to unzip the password-protected pages. To do this, select the necessary files using the pressed "Ctrl" key and clicking on desired file... Next, either by simply dragging and dropping onto the "desktop", or by right-clicking -> the context menu, extract to the specified folder -> select "desktop". After completing these steps, do not close the archive!
As a result, it should look like this:
From notepad to excel
Open the saved file - right-click on the file, in the context menu -> open with -> select "Notepad".
When the file opens, follow the steps in sequence:

sheetProtection

Next, delete the selected text by pressing the “Delete” key and save the file by pressing the key combination “Ctrl + S”. Or in other known ways. Next, you need to go back to open archive by clicking its icon on the taskbar, and by dragging and dropping the previously saved file in the archive window. Hopefully everyone knows how to do this. A dialog box will appear (as in the picture), where you need to click on the "OK" button.

This inscription means that the sheet is not protected and the values in its cells can be changed. And in the formula bar, the entered formulas are now visible, which can be changed.
Remember password in excel
This is the opportunity to "remember the password". Of course, this is not a one hundred percent method - but from many files, this way, you can remove the protection of the sheet. And more importantly, this method is only suitable for files with the "* .xlsx" extension. Therefore, files with the extension "* .xls" need to be opened in Excel 2007-2013 and re-saved in the required format.
Excel program from the package Microsoft Office is perhaps the most popular office application. It is used everywhere for storing data, working with tables, importing and exporting information for other purposes. V Microsoft Excel there are a lot of functions for storing and protecting information, which are useful to activate if several people are working on a file at the same time. Among the security features in Excel, it is possible to set password protection to separate sheet by limiting various actions with data on it. In this article, we will consider how to set up sheet protection in Excel, as well as how to remove it, including without knowing the password.
Table of contents:How to protect worksheet and password in Excel
To protect information on a sheet in Microsoft Excel from unwanted changes, just set a password on the sheet. This can be done with the functions built into the program:

How to remove protection password from worksheet in Excel
If you received an Excel file with a password set on the sheet, and you know this password, it will not be difficult to remove it. To do this:

After that, the protection from the sheet in Excel will be removed, and it will be possible to perform all the actions available by the program with the sheet of this file.
How to remove protection password from a sheet in Excel without knowing the password
There are several ways how you can remove protection from an Excel sheet without knowing the password. Below we will consider two options:
- Using an archiver. This method is more complicated, but it allows you to remove the password from the sheet on a computer that is not connected to the Internet.
- Using Google service Tables. An easier option to remove protection from the sheet, but requires an internet connection.
Important: You can find all sorts of programs on the Internet that promise to remove protection from a sheet in Excel without a password. We do not recommend installing such applications on your computer. Chances are good that they can be infected with viruses.
Using the archiver
Let's consider a way to remove protection from a sheet in Excel without knowing the password. To do this, you need any archiver installed on your computer - WinRar, WinZip or another. Perform the following steps in sequence:
- Install in Windows Explorer the ability to display the extension of file names in the folder where the Excel file with the sheet protection is located. To do this, in the explorer above, switch to the "View" tab and check the box in the option;

- Next, you need to switch to the mode of renaming the Excel file (right-click on it and select the "Rename" option). As you can see, it is possible to change not only the file name, but also the extension. Change the extension “.xlsx” to “.zip”;

- When you change the name, a warning window will appear, which can negatively say on the file. Click “Yes” to confirm your desire to change the file;

- Next, you need to open the resulting ".zip" file using any archiver;
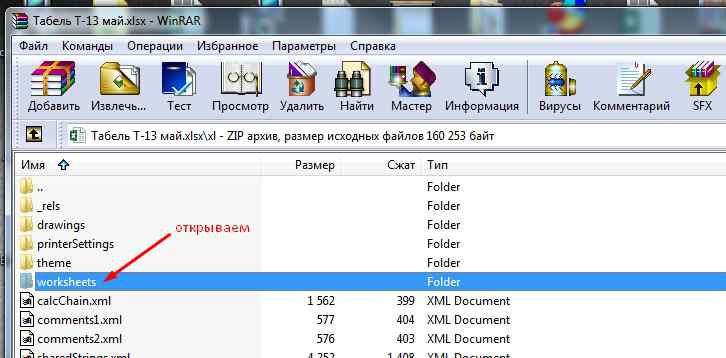
- Inside the archive, you can see several files and folders. Go to the “xl” folder;

- Then go to the “worksheets” folder;

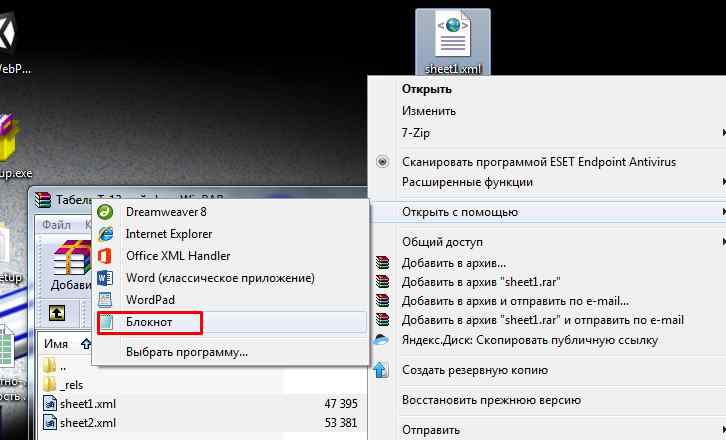
- All sheets of this Excel document are displayed here in the “.xml” format. The sheets are assigned a serial number, depending on their sequence in the document itself. Select the “sheepN” file, depending on the sheet from which you want to remove protection. Click on it and move the file to any folder in Windows Explorer;

- After that, in the explorer, right-click on the file and select the option “Open with” - “Notepad” to switch to the editing mode;

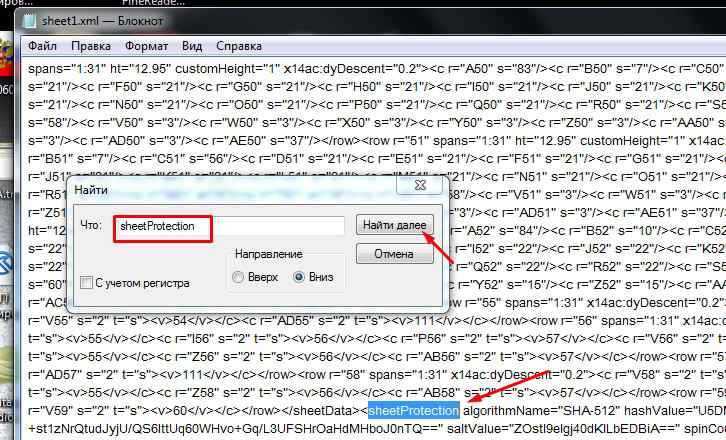
- Notepad will open the text of the file, as well as its Technical information... Here you need to edit the code to remove the mention of the password from it. Press “Ctrl + F” on the keyboard to open the document search and enter “sheetProtection” into it;

- One occurrence of this phrase in the document will be found. This expression is enclosed with other variables in a single block, which opens with the symbol “<” и закрывается символом “>”. Select this block and remove it from the file;

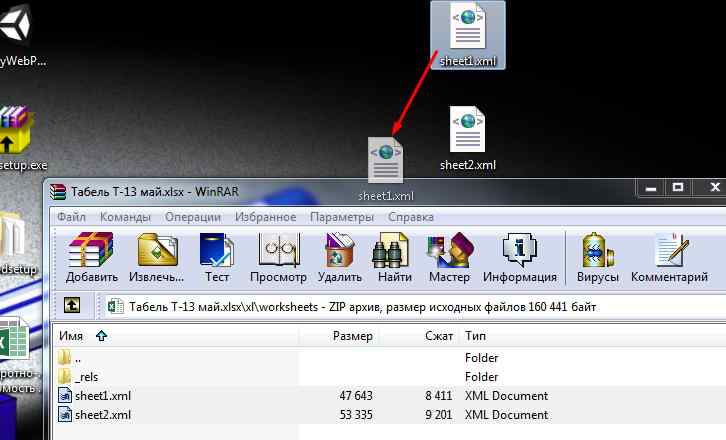
- Next, you need to save the changes in the notepad file;

- After that, copy the modified file “sheepN.xml” back to the archive in the folder from which it was taken. If an information message appears confirming the replacement of the file, confirm;

- Close the archive and change the file extension back from “.zip” to “.xlsx”.

After that, you can simply open the file with using Excel, and protection in the form of a password will be removed from the sheet, that is, it will be possible to perform all actions with information from the document.
Sometimes there are times when we are working with important documents and do not want anyone to see them. Or, at the very least, we prohibit editing the content without our knowledge. But, as practice shows, if such files are not opened for a long time, the owner himself can forget the access code. In this article, we will look at how to remove protection from a sheet in Excel editor without knowing the password.
This is not about hacking other people's documents. We will work with what is on our computer.
When you open a protected document, you will see the following.
The toolbar will be inactive. File modification and almost all functions are not available. Try clicking somewhere and typing something on the keyboard.
The selected cell will be inactive and editing will be impossible. In this case, the following error will appear.
In order to unlock a document in Excel, you need to follow these steps.
- Click on the "File" menu item.
- In the window that appears, click on the "Remove protection" link.
- Immediately after that, you will be asked to enter a password. If you do not know him, then you will not be able to remove the protection.
A similar window can be called through another menu. To do this, you need to follow a few simple steps.
- Go to the "Review" tab and click on the "Unprotect sheet" button.
- The result will be exactly the same.
In this case, the book is available for reading, but you cannot change anything. It should be noted that sometimes, if maximum file protection is not set, Excel program allows you to copy the contents of cells.
Try to select something and press the keyboard shortcut Ctrl + C. The active range is immediately highlighted with a dotted frame. This means that copying is not disabled.
Open a new document and press Ctrl + V. The data will be perfectly transferred and for this you do not need to hack anything.
How to remove protection in Excel 2003
The steps described above are suitable for new versions of Excel. In the old one, the principle of operation is slightly different. When opening the file, many functions will also be unavailable.
In order to release the lock, you need to do the following.
- Click on the "Service" menu item.
- Then select "Protection".
- After that - "Remove sheet protection".
- Immediately after that, you will be asked to enter a security key.
How to remove a password
It doesn't matter what you are trying to do - hack someone else's document or open your old file - in any case, you have to do the same thing. There is no difference for the program and it does not understand who the owner is. Ultimately, you are trying to bypass the protection.
In fact, everything is very simple. To do this, follow these steps.
- Most likely in your operating system file extensions are not displayed. To enable them, follow a few simple steps:
- Open File Explorer.
- Go to the "View" tab.
- Check the box next to the corresponding item.
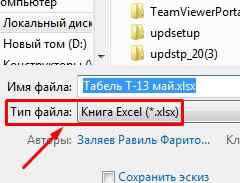
- Then change the extension of your file from XLSX to ZIP.
- To do this, click on the file and press the F2 key. After you change the end of the document and press the Enter button, you will see the following window. Click on the "Yes" button.
- Your file now has a new icon because Windows system thinks it's an archive.
- Open this file (but don't unpack it!). Go to the "xl" folder.
- Then in "worksheets".
- A list of files for each sheet will appear in this folder. Click on it with the mouse and drag it into the explorer.
- Then right click on this file. In the menu that appears, select the "Change" item.
- As a result, a window like this will appear.
- Press the keyboard shortcut Ctrl + F. Enter the word "sheetProtection" there. Then click on the "Find Next" button.
- If the file is saved in Excel 2013 or 2016 editor, you will see the following.
- In the 2007 program, this tag is much shorter, and the type of encryption is simpler.
- We remove everything contained in the sheetProtection tag. In the case of an example, you need to delete this piece.
- Then we save the document by pressing the hot keys Ctrl + S. We transfer this file back (from the explorer to the archiver).