Actions(Actions / Operations) are pre-recorded actions in Photoshop that allow you to create a wide variety of beautiful effects with text, images and Photos in seconds.
After you have downloaded the file with the action you need, you must move it to the Photoshop folder (not necessary for the latest versions of Photoshop).
Photoshop is usually located in the following directory:
Drive C/Programs Files/Adobe/Adobe Photoshop CS5/Presets/Actions/
This directory contains all Photoshop actions.
Sometimes it is enough to double-click on the action after the download and it will automatically move to Photoshop - this is if we are talking about the latest versions.
After you have placed the action in the desired folder (for older versions), go to Photoshop itself.
After you open Photoshop, press the keyboard shortcut Alt+F9 to open (Window - Operations).
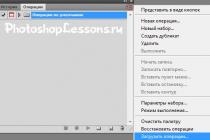
After opening the window Actions(Operations), click on the small triangle in the upper right corner. A menu will open in which we select the item " Load Actions» (Download operations), after which we open the directory where you downloaded / placed the Photoshop action.


Now it can be used.
Select the desired photo if you are using a photo action.
Or write the text you need if you are going to use the text action.

And press the arrow at the bottom of the action window (Performs the active operation or command).
Then click " Proceed» maybe press a few more times « OK and enjoy the result.
Final result 
⇐ . (previous page of the tutorial)
. (next page of the tutorial) ⇒
How to install actions in Photoshop:
Just double-click on the downloaded .atn format action and it will install itself into Photoshop and be ready for use right away (without restarting Photoshop).
METHOD 2.
You have downloaded a file with actions (you need to place it at: drive C (by default) - Program Files / Adobe Photoshop CS / Presets / Photoshop / Operations (Actions)
Open Photoshop.
Press the key combination Alt + F9 to bring up the Actions window (Operations)
Click on the small black triangle in the top right corner.
The Actions palette menu appears. There is a Load Actions command (Load operations)
Select this command:
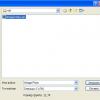
Another window will appear where you must specify the file you want to install.
If you copied the file with the action to this address, then you will see such a window (if not, then just specify the path to it), Select your file and click Load again (Download)

Now, this file should appear among the other actions. That's it, Photoshop has copied the specified action file into its set. You can use!
How to use actions in Photoshop: - Open your photo - Duplicate it, name the duplicate "backgraund", and close the original layer (turn off the eye next to the layer)

Open a window with your actions that you have installed (Alt+F9)
Find the desired action in the Operations tab:
1.Click on the arrow next to it
2.Go below
3.Click the Play arrow.
While the action is running, click Continue on all the windows that open.
You can also change some settings while doing this, if you know what they are responsible for.

How to install and use Actions in Photoshop.
That's all your photo was transformed in a minute. And you saved a lot of time.


Have you ever wondered how to speed up your work in Photoshop? If yes, then you will be interested to know about action games.
Actions will help you quickly create various effects, from photo manipulation to creating 3D texts.
In this introductory lesson, you will learn how to download, configure and use actions.
Materials for the lesson:
Step 1 - Loading the Action
Before you learn how to create your own set of actions in Photoshop, try using a ready-made action in order to understand what effect and how quickly you can achieve. Go to the Photoshop Actions link and download one of the free actions. For the sake of familiarity, for this tutorial I'll be using a set of actions called "Instant Hipster".
When you download an action, you get an ATN or ZXP file (or both). The difference between these files is that:
ATN files - load the action directly into Photoshop;
ZXP files - load the action through the Adobe Extension Manager.

Step 2 - How to use the ATN file
Once you've downloaded the action, find the ATN file and double click on it.
Open a window in Photoshop Operations(Actions panel) for this go to Window > Operations(Window > Actions).

If you're having trouble loading an action automatically, you can add it manually. To do this, you need to click on the mini arrow in the upper right corner of the operations panel - in the submenu select " Download Operations" (Load Actions) - select the folder with the unzipped action.

Step 3 - How to use the ZXP file
ZXP type files are not always included in the archive. But if such a file is still in the folder with the action, then it can be installed through the Adobe Extension Manager.
Adobe Extension Manager is very useful when working with multiple addons, as they will all be available to you in one place.

The main problem faced by users who encounter Adobe Extension Manager for the first time is that they cannot find the installed operations. The solution is very simple - you first need to add actions (action) in Photoshop through the panel Operations(Actions).

Step 4 - Be Careful at Work
Not all Photoshop actions are safe to use!
Before launching a ready-made set of operations, save the source file with the image separately. Many actions will fill your story with so many actions that you won't be able to undo them and return to the original document. There are also actions that include such an operation as - Merge layers, which also makes it impossible to return to the original image.

Step 5 - Playing a set of actions (action)
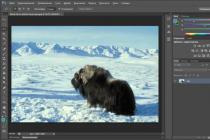
Using actions is easy! To start an operation, select it in the list and click the button Perform an active operation(Play). After launching the action set, you will see on the monitor how Photoshop performs a series of specified operations, let it work a little, and - you're done!
The image below shows the result of the Instagram effect operation. Everything was done in one click!

Some actions, such as Quick Skin Retouch, require additional steps in the process of applying them. Directly in the above action, the program prompts you to work out the layer mask.
As a rule, in such sets of operations, there are pop-up windows that give you hints about further actions.

Step 6 - Using Button Mode
You can switch the Operations window control to " in the form of buttons" (Button Mode). To do this, click on the mini triangle in the upper right corner of the panel and select the desired item.

The Actions panel contains many additional actions that you can customize. Below is a chart to give you some guidance.
Translator's note:
- Enable (disable) an element(Include Command ). You can check the box to mark the operations that you want to enable or disable.
- Set (cancel) dialog box(Modal Control). The icon indicates whether a dialog box will pop up. They can also be turned on and off..
- Expand (collapse) operation set(Expand Action ). Arrow for expanding (collapsing) the actions specified in the operation.
- Buttons(Buttons). From left to right: stop recording an operation, start recording an operation, play an operation, create a new group, create a new operation, delete an operation.
- Mode "in the form of buttons"(Button Mode). Changing the appearance of the action bar.
- More Action Playback Options(Playback Options).
- Possible actions with operations(Allow Tool Recording). Functions for recording, deleting and other actions with operations.
- List of installed actions(action list)

And in conclusion:
Actions are a wonderful tool in Photoshop that can be successfully used by both masters and beginners.
Spend some time on this functionality and experiment with various ready-made sets of operations that you can find on many paid and free Internet resources!
Photoshop is a universal program that is used by many users. Her possibilities seem endless. It provides a variety of tools to facilitate file editing. More and more often users work with actions. What it is? How to install an action in Photoshop? All this will be discussed later. Even a beginner can master the procedure for working with actions and loading them.
Action is...
The first step is to understand what you have to deal with. Action - what is it anyway? Maybe you don't need to download these components?
In fact, Action is a useful feature in Photoshop. In translation from English, this name sounds like "action". The tool allows you to create a step-by-step record of all changes made to the image. Designers and just people who value their time use Actions quite actively.
But not everyone is clear on how to install an action in Photoshop. What will be required for this? What should every user be aware of?
Training
The first stage is preparation. The thing is that if we are talking about an installable action, then you will have to implement some actions. Actions performed directly on the image at work do not require any download. They are displayed initially in the corresponding window.
How to install an action in Photoshop? To do this, you will need to download the tool. You can find suitable actions without much difficulty on the World Wide Web.
Preparation for installation is sometimes described as a small instruction. Namely:
- Find find suitable "actions" for "Photoshop". It is important to maintain compatibility with a particular version of Photoshop.
- Download the document to your computer. Usually the downloaded file is saved as an archive.
- Unpack (if necessary) the action in a convenient place. The document ready for subsequent work has the .ATN format.
Everything is ready for the next step! How to install actions in Photoshop CS6? Just a few simple steps - and it's done! Even a beginner will cope with the tasks.

Download instructions
Let's assume that the prepared Actions of the user are stored on the "Desktop" of the computer. How to install an action in Photoshop?
Some actions will help to bring the idea to life. It is recommended to pay attention to the fact that the folder names change depending on the version of Windows. But the general meaning remains the same.
To install actions in Photoshop, you need:
- Copy all documents in .ATN format to the clipboard. You can use the "Cut" command.
- Find a suitable folder to download actions. English-language versions of the program allow you to move previously copied documents to: C:\Program Files\Adobe\Adobe Photoshop\Presets. For Russian-language "Photoshop" you will have to go to: C:\Program Files\Adobe\Photoshop\Presets.
- Find and open the Actions folder. In Russian versions, it is called "Photoshop Operations".
- Paste the previously copied Actions into the mentioned folders. You can simply drag them with the cursor from the desktop to the specified addresses.
This concludes the main steps. How to install an action in Photoshop? It is this algorithm that helps to bring the idea to life. But often the work with the tool does not end at this stage. There are a few more simple steps to take.
The final stage
Now it's just a matter of getting started with Actions. How to install an action in Photoshop CC? And in any other version of the application? When all of the above steps have been taken, the user needs to:
- Launch Photoshop. You can do this in advance, before uploading documents in .ATN format to the previously specified folders.
- Open the menu item "Window" - "Operations". This function can be activated using the keyboard shortcut Atl + F9. In the English version of the program, the tool is located in Window-Actions.
- A list with "actions" will open. You will need to click on the small button in the upper right corner. It is designed in the form of 3 horizontal stripes with an arrow pointing down.
- Select "Load Actions".
- The Actions root folder opens in the list. It was in it that "actions" were loaded earlier.
- Select the desired tool and click on "Download".
The marked document will appear in the Actions list. Now it’s clear how to install an action in Photoshop. You can work with the tool further.

It should be noted that the version of Photoshop does not play a special role for the ongoing manipulations. All assemblies of the program use the same algorithm of actions.
Working with graphic editors brings a lot of trouble. Especially if users want to initialize additional tools into their respective programs. Next, we will try to figure out how to install an action in Photoshop. What will be required for this? We will try our best to understand all this. Step-by-step guides will help shed light on the relevant topic. Installing the action will not cause any real difficulties.
Action is...
What is a Photoshop action? This tool can greatly facilitate the work with a graphic editor.
An action is a sequence of actions recorded by the user. Such a toolkit allows you to achieve one or another result without performing certain actions in stages. For example, through an action, a person can quickly add a watermark to an image. Very comfortably!
But how to install an action in Photoshop? There are different scenarios for the development of events. Below are all possible manipulations to solve the problem.
Ways to initialize
How to install an action in Photoshop CC? As already mentioned, users can handle the idea in different ways. It all depends on the preferences of each user.
To date, the following methods of installing actions are distinguished:
- standard (correct);
- manual;
- custom.
The first case is in great demand. It allows you to avoid unnecessary problems and failures when working with the tool.
Standard Solution
How to install an action in Photoshop CS6? Let's start with the simplest layout. It is used by the majority of users. We are talking about the usual initialization of the tool.

To do this, you will need to perform the following manipulations:
- Find a ready-made action. This document is in .atn format. It is in this interpretation that a person will be able to load the tool into the application.
- Open Photoshop.
- Go to the "Window" menu item. It is located at the top of the dialog box.
- Go to the "Operations" section.
- Click on the button responsible for opening the functional menu of the toolkit. It's the control in the top right corner of the Operations section.
- Click on the line that says "Load operations ...".
- Specify the path to the previously unpacked file with the action.
- Confirm procedure.
After a few seconds, the tool will be loaded into the graphics editor. Nothing more needs to be done. If you wish, you can restart Photoshop and start working with the action.
Important: You can also press Alt + F9 to quickly navigate to the Operations menu.
Manual initialization
The second method is a manual installation. This option is often used, but it can lead to errors.
It is proposed to act like this:
- Unpack the finished file with the action. It must be in .atn format.
- Close Photoshop. This is an extremely important point. If you neglect this operation, the installation of the tool may occur with errors.
- Double-click on the document prepared in advance with the action.
- Wait a while.
As a rule, this technique does not cause any difficulties. If at the time of initialization the user was working in Photoshop, he will have to restart the utility. Only after this will the instrument be pumped.

Custom method
How else can you install an action in Photoshop? The last suggestion is to carry out all the manipulations yourself. The reception is not as popular as previously suggested instructions. It can lead to errors, and in some cases, this solution does not work at all.
The instruction for "custom" initialization of the action is as follows:
- Unpack the finished action.
- Copy the file to the computer's clipboard.
- Open the folder where Photoshop is installed. It is usually located on the C drive, in "Program Files"/"Adobe"/"Adobe Photoshop"/"Presents". We need the Actions section.
- Paste from clipboard action.
- Launch Photoshop and wait a bit.