Probably everyone has already appreciated function to delete objects, which appeared in Photoshop CS5 and was successfully improved in the next version.
Several times I described different programs for removing unwanted objects in photographs, but if we use Photoshop, then why install other programs to perform actions that he does very well on his own?
See also the post “Graphic editor Teorex Inpaint 4.2. Removing unwanted objects in images.
I will briefly describe two similar functions that are very convenient and easy to use to remove or move objects in images based on content. "Content Aware" means that the smart program analyzes the areas near the object, determines the "important" and "unimportant" pixels, and only then changes the content of the document. The picture above shows examples of how the alpine yak first disappeared from the picture, and then moved to another place.
Please note that these methods work best when the background has a uniform structure. With complex geometric patterns, the program may delete or move objects not very correctly and accurately. What can you do, car...
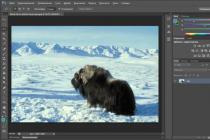
For example, I took against the backdrop of a high-altitude snowy landscape on the site lhnet.org.

Please note (look on the right in the layers palette) that the image layer should not be a changeable layer, but a background. Otherwise, the object will simply be deleted.
In the toolbar, select the Lasso tool (letter L on the keyboard). In principle, you can take any tool familiar to you for selection.

See also the post: "An easy way to select a complex object in Photoshop CS5".
We select (circle) with the help of this tool the “extra” object.

Press the Delete key on the keyboard. In the "Fill" box, "Use: Content-Aware" should be selected. Press the OK button.

Now the picture looks like this:

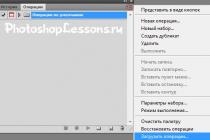
To remove the dotted selection, you need to press the key combination Ctrl and D or select in the top menu: "Select" - "Deselect".

Content-aware object deletion result in Photoshop CS6:

This operation is essentially similar to the previous one, but the selected area is not deleted, but its position on the image is changed. Just like with deletion, not every picture will be automatically processed neatly.
If you want to correct the composition of the shot by moving the subject in the frame, open the original shot (I'll torment the "snow bull" a little more).

On the toolbar, find the "Patch" button.

Note that another button may be visible instead. For example, Spot Healing Brush. In any case, these tools correspond to the J button on the keyboard.

See also posts: «
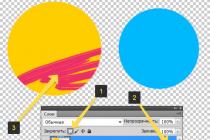
Fill selection with color- a great way to create shapes and add colorful colorful photo frames to your image. Once you've created a selection, you can fill it with color in several ways.
One of the options- select menu command Edit => Fill(Edit => Fill) and pick a color from the dropdown Use(Use) in the dialog that appears. Choose a color from the dialog box that opens Color palette(Color Picker), and then click OK twice to close the dialog boxes. Photoshop will fill the selected area with the specified color.
Another variant a more flexible way is to create an adjustment layer with a color fill (this layer is vector, in fact, so it will not increase the file size). After creating a selection with the tool, click the button Create New Adjustment Layer or fill layer (Create new fill or Adjustment layer), which is located at the bottom of the layers palette (the icon with the image of a half black, half white circle) and select the option Color(Solid Color). Then choose a color from the palette that appears and click OK. In the example below, I inverted the cats in the middle so that the fill is from the edges of the image. For extra chic, you can add different layer styles, such as shadow, glow, and others.

Using Content-Aware Fill (Content-Aware)
Photoshop CS5 has another fill option called Content Aware. He works with the team Fill and the Spot Healing Brush tool. By comparing the brushstrokes to neighboring pixels, the program then fills the adjacent area so that it blends seamlessly with the background.
When to use each option, you ask? If you have a lot of good pixels on either side of the pixels you want to remove, try using the Spot Healing Brush tool. If you want to remove pixels more precisely, say if the object you want to remove is very close to something you want to keep - create a selection and then apply a Content-Aware fill (if possible, it's better to add a little background).

Once you've created a selection, you can use the new fill option, Content Aware, to fill selected pixels with their neighbors.

A few quick brush strokes and the fox highlighted on the left becomes almost invisible.

The magic used by Photoshop to fill a selection is random and changes each time the command is used. In other words, if it didn't work the first time, try selecting the menu command Edit => Refill. You will most likely get different results.
Now the same, but in detail:
1. Open an image and duplicate the background layer by pressing Ctrl+J.
2. Select the fox on the left. The tool will do a great job, as there is significant contrast between the fox and the background. Select it from the toolbar or by pressing the Shift+L key combination several times. Place the mouse pointer on the image and click once to set the starting point, and then circle around the fox, clicking the mouse button to add anchor points.
3. Select a menu command Edit => Fill and select an option Content Aware drop down list Use, OR select a tool Spot Healing Brush, check the corresponding box in the options, select the brush size and paint over everything that was selected. Photoshop will fill the whole place with adjacent pixels.
To eliminate the remaining path, switch to the Spot Healing Brush tool (make sure the switch in the options bar is still set to the same position). With quick strokes, you can clean up the final image quite well, and it will not take several hours, as it was in previous versions of the program. The new tool is great until you need to completely remove an object from a photo.

Noticed an error in the text - select it and press Ctrl + Enter . Thanks!
Photoshop CS5 has a new handy tool - Content-Aware Fill (Content-Aware Fill), which allows you to remove some details from the image by filling the resulting space with the contents of the surrounding background.
In our tutorial, we'll show you how to select the desired object and then make it disappear in such a way as if it had never been in the image. Perhaps this method does not give a perfect 100% result, but you will still be very surprised to see the effect obtained.
To get started, download the photo I provided, which we will work with.
Step 1. Select the object.
Open the city image in Photoshop. Look in the lower right corner and note the seagull sitting on the railing. The seagull blends well with the surrounding background, but the railing and canopy spoil the picture a little. Let's get rid of these extra objects. Selecting the Lasso Tool (LassoTool) and create a rough selection around the railing, seagull and canopy. Don't make a selection very close to the edge of objects, because the program needs information about the background surrounding these objects.
Step 2. Fill in the selection.
With the area selected, go to the menu Edit-Fill (Edit-Fill). In the fill dialog box, click the drop-down arrow of the fill option, and select the Content-Aware option (Including content). Apply the fill by clicking OK.

Step 3. Remove objects.
After a little processing, your selection will be erased. It's great, isn't it? Photoshop has replaced the selected space with the surrounding background. True, there was a small flaw in the image in the embankment area, which we can easily fix.

Step 4 Our old friend, the Stamp Tool!
Selecting the stamp tool (clone tool) and zoom in (Zoom or Ctrl+). Then, hold Alt and click the left button. mice modeled on the lower part of the embankment. We move the cursor to the correction area and again click on it, inserting the sample taken at this place. Everything is fixed, and the image looks so believable, as if our seagull did not exist.

I hope that your acquaintance with the new tool was not in vain for you and will come in handy for future work!
- 3dMaxMan
- April 25, 2013
- 1317
- Comments on Photoshop CS6 Special Technology - Content-Aware Fill disabled
"Marvelous! Simply extraordinary! It can't be!" - approximately such exclamations you can hear from people who see in action the new features of Adobe Photoshop CS6 for filling with content. Indeed, companies
Adobe managed to do the impossible, opened a new page in the field of computer graphics.
How often have you had to see beautiful photos spoiled by the appearance of an unwanted object in the frame? I think constantly. Sometimes you can spend hours in Adobe Photoshop trying to remove a passer-by or unwanted graffiti on a wall from a frame.
In Adobe Photoshop CS6, a solution to the problem of removing unwanted objects has been found. Moreover, for these purposes, there are as many as two ways: filling, taking into account the content and the possibility of the corresponding function in the tool Spot Healing Brush (Spot Healing Brash Tool).
The essence of the action of this function is as follows: the program replaces the area you have selected with an image composed on the basis of the objects surrounding the area. Thus, you can easily remove a person against a brick wall from the frame: select him, then use the content-aware fill function.
https://news3d.org/wp-content/uploads/2013/04/image190.jpg" width="435" height="331 src=">
Rice. 6.19. Photo after processing with the Fill Based on Content effect
2. Select the unwanted object using any convenient tool in Adobe Photoshop CS6. To obtain the most natural results, it is recommended to create selections not along the very edge of the objects, but somewhat capturing the background of the object. Perfect for this work Lasso (Lasso Tool) and Rectilinear lasso (Polygonal Lasso Tool).
3. Select the command of the main menu Editing -> Fill (Edit-> Fill). The Fill dialog box opens. This dialog box can also be called by the key combination Shift+F5.
4. In the Fill dialog box, from the Use drop-down list, select Content-Aware.
post-views post-567 entry-meta"> Post Views: 65
Probably everyone has already appreciated function to delete objects, which appeared in Photoshop CS5 and was successfully improved in the next version.
Several times I described different programs for removing unwanted objects in photographs, but if we use Photoshop, then why install other programs to perform actions that he does very well on his own?
See also the post “Graphic editor Teorex Inpaint 4.2. Removing unwanted objects in images.
I will briefly describe two similar functions that are very convenient and easy to use to remove or move objects in images based on content. "Content Aware" means that the smart program analyzes the areas near the object, determines the "important" and "unimportant" pixels, and only then changes the content of the document. The picture above shows examples of how the alpine yak first disappeared from the picture, and then moved to another place.
Please note that these methods work best when the background has a uniform structure. With complex geometric patterns, the program may delete or move objects not very correctly and accurately. What can you do, car...
For example, I took a photo of a hairy bull against the backdrop of an alpine snowy landscape on the site lhnet.org.

Please note (look on the right in the layers palette) that the image layer should not be a changeable layer, but a background. Otherwise, the object is simply deleted.
In the toolbar, select the Lasso tool (letter L on the keyboard). In principle, you can take any tool familiar to you for selection.
See also the post: "An easy way to select a complex object in Photoshop CS5".
We select (circle) with the help of this tool the “extra” object.

Press the Delete key on the keyboard. In the "Fill" box, "Use: Content-Aware" should be selected. Press the OK button.

Now the picture looks like this:

To remove the dotted selection, you need to press the key combination Ctrl and D or select in the top menu: "Select" - "Deselect".

Content-aware object deletion result in Photoshop CS6:

This operation is essentially similar to the previous one, but the selected area is not deleted, but its position on the image is changed. Just like with deletion, not every picture will be automatically processed neatly.
If you want to correct the composition of the shot by moving the subject in the frame, open the original shot (I'll torment the "snow bull" a little more).

On the toolbar, find the "Patch" button.

Note that another button may be visible instead. For example, Spot Healing Brush. In any case, these tools correspond to the J button on the keyboard.

See also the posts: "First Step in Photoshop" and "Photoshop Toolbox".
Press and hold this button until a hidden menu appears with other tools in this group. Select the Content Aware Move tool.
Now, holding down the left mouse button, carefully outline the "extra" object (our bull).
Circled? Move the cursor to the center of the selected area and drag it to the desired location.

We wait until the program "integrates the moved fragment to a new position."

It remains to cancel the selection (Ctrl + D).
Here's what happened to me:

Good luck! Wait for new lessons