Every beginner who masters the Adobe Photoshop Lightroom graphics program is faced with the problem of saving already processed photos. And indeed, the Save button, familiar from Adobe Photoshop, is not here. What to do?
Related Articles
To begin with, the images in Lightroom are already saved, because the program uses non-destructive editing. In other words, information about image changes is stored in the directory. So, we are not talking about saving, but about exporting photos. That is, in order to get photos in tif or jpeg format, you need to export images with all the settings made in the program.
Just execute the "export" command in lightroom as follows:
In the Lidrary module, select the photos that you want to export. You can select all photos by pressing CTRL+A. 
Click on the EXPORT button next to the IMPORT button. You can select a command from the File menu, or by pressing CTRL+SHIFT+E. 
A dialog box appeared on the screen. Let's set the parameters:

You need to make sure that all images are exported, and now you can work with the photo further. Good luck in mastering Adobe Photoshop Lightroom!
Make sure all images are exported
How to save photo in lightroom video
Sometimes, after processing photos in Lightroom or Photoshop, for some users, photos differ in color and contrast when they are saved and uploaded to the Internet, viewed in another graphics editor, or simply on a computer. They don't look like they do in Photoshop or Lightroom.
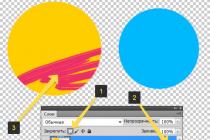
For example, our poster looks like the first picture in Photoshop, and when saved, it turns into the second picture:

In order for your photos to be displayed equally correctly after saving and retain their color and contrast, you need to properly configure programs, Photoshop and Lightroom.
The Internet, almost all monitors and phone screens work in sRGB color transmission mode, therefore, we need to configure programs so that they save and show us an sRGB image on the monitor.
Adobe Lightroom
Let's start with Lightroom. Here it is enough to set the correct parameters for exporting photos. After processing the photo, we click "export" and in the window that appears, check that the "color space" sRGB is indicated in the "file format" section. That's all!

And also, if you save photos for publication on the Internet, in social networks or on forums, you need to prepare photos in advance so that when uploaded to the appropriate resource, they do not lose quality and saturation.
File format

Image size. Social networks and forums have a limit on the size of the uploaded photo, and if the photo is larger than the allowable limit, then it is automatically compressed. Well, automatic interpolation algorithms will only spoil the quality of your photo. To avoid this, you need to reduce it in advance. The size of the photo should be chosen based on simple logic, so that when viewed from both a mobile phone and a computer, it retains its sharpness. The optimal size for the Internet now is from 1400 pixels on the long side to 2100. In particular, for VKontakte, 1680 pixels on the long side will be ideal.
Output sharpness. For the Internet, the more the better. Within reasonable limits. Set Lightroom to "Strong".
After these settings, your photo is ready to be published on the Internet.
Adobe Photoshop
In order to adjust the correct color rendering in Photoshop, go to "editing", "color settings".

And in the window that appears, select the settings "universal settings for Europe 3".

If your photoshop does not have presets for Europe, then just set the RGB field to “sRGB IEC61966-2.1”, there will always be one sRGB profile.

"View" - "proofing options" - and set the Internet standard sRGB.

And also when opening a RAW file in Photoshop, pay attention and set the sRGB profile.


Now your Photoshop correctly reproduces and preserves all the colors of the photo.
Saving a photo for the web in Adobe Photoshop
You can also prepare a photo for export to the Internet in Photoshop. To do this, you first need to reduce it, then add sharpness.
Reduce through "image" - "image size":

We set the unit of measurement to "pixels" and in the "width" field we indicate the size we need. Resampling is left automatic or set to “bicubic (with reduction)”.

After reducing, you need to sharpen the photo. For this, “smart sharpness” is perfect.
Be sure to make a new layer and go to "Filter" - "Sharpen" - "Smart Sharpen".

We set the noise reduction to 0. The radius for the reduced photo is found in the range from 0.3 to 1. For a photo with a size of 1680 pixels along the long side, a radius of 0.4 - 0.5 is suitable. The effect is also found in the range from 70 to 150.

Since we made a new layer, we can set a strong "sharp effect", for example 180, and then, by reducing the opacity of the sharpening layer, we can achieve the correct sharpness of the photo.

The sharpness values are selected by eye, but for the Internet it is better to do more sharpness. The photo will look much more expressive on the screen.
5871
Polina Maslenkova
For all those who are at sea, we have compiled a selection of the best tips for shooting seascapes. Take it into service and do not forget to take your camera with you on vacation (and also a tripod, a couple of filters and inspiration, where would you be without it :)
Heading: Ideas Training 20.09.2017
Oleg Nasytko
How to apply the most favorite mode of portrait photographers, play with depth of field and beautifully blur the background, we will tell in this article.
Heading: Instruction Council Phototechnics 05.04.2018
Artur Shah Huseynov
These were two incredible days full of shooting newlyweds in interesting locations of the city and the Podgoretsky castle in the vicinity of Lviv.
heading: Photo report Photo tour 09.04.2018
Polina Maslenkova
Even photographers sometimes take pictures. And how to choose a photographer for yourself if you are a photographer yourself and the quality bar is set high enough?
Heading: Choice 29.08.2018
Polina Maslenkova
We talked with our teacher of food photography in Minsk and the basics of photography in Vitebsk about how to shoot in 100 cities of the world every year and have more than 60 thousand followers on Instagram.
Heading: Interview 23.08.2018
Oleg Nasytko
We got a very cool photo report from a regular photography class for beginners. Vivid images of models, various schemes of light and creativity of students - see our photo report.
How is the defense of the diploma in our photography school: photo essay
On Saturday, the last lesson in the group on the basics of photography took place - the first graduation of Andrey Barilo! The children presented their best work and received certificates. How it was, see the photo report.
heading: Diploma Photo report 08.06.2018I use several versions of Lightroom installed simultaneously on my computer running Window OS. Different versions have slightly different functionality, or different methods for implementing the same functions. Depending on the situation, I choose the version I need. Screenshots shown here are based on a fairly old version of Lightroom 3.7. I have all versions of Lightroom without Russification, because it doesn’t matter to me.
For a long time working with the program, I developed my own algorithm for working in Lightroom, which I almost always use. My 5 simple tips will help as much as possible only for those who shoot in RAW format and develop photos in batches.
For thoughtful development of each RAW photo individually, I recommend using the original (i.e. native) software. For example, for a Nikon system, this is .
0 (zero point). Importing RAW files.
The essence of the action: prepare the workspace for further file manipulations.
This is a zero, additional point, from which work with Lightroom always begins. To start processing photos, you must first import them into the program. I use fast and primitive loading: I just drag and drop all the files into the Lightroom window and click the 'Import' button. I always import from a directory located on the hard drive. If the import is carried out from a USB flash drive, then the import process will be delayed, since the program will most likely first copy all the source files to its special directory.
Importing has its own peculiarities. When photos are imported into Lightroom, you can sometimes notice how the preview picture (preview) changes its color, saturation, exposure. This is due to the fact that each RAW file contains not only the original information about the image, but also a lot of other additional data. One such data is photo previews for quick viewing. Roughly speaking, a JPEG thumbnail is embedded in the RAW file, which serves to quickly view the captured photo on the camera display. This JPEG thumbnail is based on the settings specified by the camera. When importing photos into Lightroom, the program shows JPEG thumbnails plucked from the RAW file. After trying to view the photo closer, Lightroom builds (renders) a new image directly from the original raw data, using its own presets. Lightroom presets and JPEG thumbnails do not match, which is why the original picture changes before our eyes.
Unfortunately, it is very, very difficult to achieve an exact repetition of all camera settings from Lightroom. In fact, it is impossible to repeat all the camera settings. Only native software can display a RAW image on a computer in full accordance with the one that can be seen on the camera display. But in order to minimize the differences between how the picture looks on the camera display and in the program window, I recommend turn off all additional functions in the camera that improve the image. For the Nikon system, this primarily concerns the Active function.
All enhancements must be made with Lightroom. It makes sense to use on-camera functions to improve the image only when shooting in JPEG format, or if RAW files will be processed using native software.
After importing, you can add tags, labels, correctly catalog a series of pictures, and set up sorting photos in the feed.
Also, you can import immediately using a specific preset, into which you can write the settings listed below.

1. I set the camera profile.
The essence of the action: basic setting for the most correct / beautiful rendering of the original RAW file.
The setting is located at Develop -> Camera Calibration -> Profile -> select the desired profile
In order for the image generated in Lightroom to be as similar as possible to the one displayed on the camera display, Lightroom needs to specify the correct camera profile. In short, the Camera Profile is a picture management mode that is set on the camera (neutral, saturated, monochrome, etc.).
This is the key point. The correct profile of the camera allows you to significantly improve the visual perception of the image. Finding a good profile for a specific camera is very, very difficult.
Lightroom usually has a set of basic profiles: neutral, saturated, landscape, portrait, etc. These profiles correspond very poorly to similar profiles that are set on the camera.
You can search for a profile for your specific camera yourself. Usually, third-party developers are involved in creating profiles. I am sure that for a large number of cameras it will not work to find a good profile. In this case, you will need to choose the profile that you like the most.
An already existing profile can be modified, namely to adjust the color offset in the shadows, the offset and saturation of each of the three main channels. After that, you can create a custom preset, writing to it only changes related to Camera Calibration (when creating a preset, you should select only the ‘Calibration’ checkbox).
2. I set the lens profile.
The essence of the action: get rid of the flaws of the lens.
The function is set as follows Develop -> Lens Corrections -> Profile -> Enable Profile Corrections
Everything is simple here. By choosing a lens profile, you can completely get rid of some of the disadvantages of the lens. In general this setting allows you to completely cure vignetting and distortion. Also, lenses are treated here. Lightroom has an extensive database of lenses, with which you can “cure” any of them.
If the lens used is not in the list, then you can manually correct these parameters, and then write the result to a preset that can be applied to all photos.
After this adjustment, the distortions introduced by the lens should be leveled.
In the following, the lens profile will be applied to each photo.
3. Optimize and expand the capabilities of the camera and lens.
The essence of the action: make the most beautiful / desired image through basic manipulations with exposure and color.
Everything is very simple here. I usually choose one key photo from a series, or even from an entire shoot, and fine-tune it according to the main parameters:
- Increased DD - restoration of lights and shadows (Highlight recovery, Fill light, Dark)
- Adjusting Vibrance (Vibrance)
- Increase saturation (Saturation)
- Clarity enhancement
- Sharpening
- Noise reduction
The main thing here is not to overdo it.. I try to make the photo "neutral-positive" so that all further manipulations are already repelled from the original "normal" image.
Important: the level of one or another setting is highly dependent on the camera used and the shots directly taken. For example, I clearly know and understand how strongly this or that slider in Lightroom affects the RAW files of my cameras, and it takes a long time to get used to a new camera and processing its RAW files.
In the future, these settings will be applied to each photo.
4. Synchronize all images by one key photo.
The essence of the action: bring all images under one base view.
After all the previous manipulations, I synchronize all the photos with the changed settings. This is done very simply. In the 'Develop' section, all photos in the feed are selected (CTRL + A) and the 'Sync' button is pressed. In the synchronization menu, I press the 'Check All' button (Select All), after which I uncheck the 'White Balance' (), 'Crop' (Crop), 'Spot Removal' (Spot correction). Captured parameters should not be synchronized, since each photo has its own individual , cropping and spot correction / restoration.
Synchronization is part of batch processing. At the end of it, all photos are adjusted to similar settings.

After this manipulation in the Lightroom feed, all the photos are already more or less brought to normal. The previous four points allow you to “bring images to zero” - rid it of the shortcomings of the lens, camera and squeeze out the capabilities of the RAW file to the limit. After carrying out these four manipulations, it is already possible to begin real fine processing and prepare the image for the final stage that the client will see.
5. I crop all photos.
The essence of the action: correct framing imperfections - align the horizon, crop the photo with the correct arrangement of details in the frame, cut out key parts of the photo.
Unfortunately, cropping one photo and applying cropping to all photos of the tape will not work. After synchronizing the basic settings I crop all photos. During the cropping operation, I also selectively remove unsuccessful shots from the Lightroom tape.
Important: I highly recommend cropping photos with fixed frame proportions. The proportions of the classic frame are 3:2. After cropping, all photos have the same frame proportions and do not differ in any way during viewing. If this is not done, then after cropping, photos-squares, strongly elongated stripes, may turn out. This does not correspond to the general style of the photo feed. In addition, during printing, with 100% probability, parts of the frame will be cut off or filled with white space. Usually printed on standard sizes, which also correspond to 3:2 proportions. For almost every shooting, I print photos or mount a photo book, it is very important for me to maintain proportions after cropping. To maintain crop proportions in Lightroom, just click on the padlock icon.
After cropping and deleting unsuccessful frames, I get a “licked” set of photos in the tape, with which further manipulations can be carried out.

Important: I call all specified action ‘ Exit To Zero’, since these simple manipulations allow you to look at the image, devoid of basic flaws, raw, neutral, like a blank sheet, looking at which you can already carry out further fine processing.
I believe that these manipulations can improve the quality of the original image by 30%. The remaining 60% is the finalization of the image using Adobe Photoshop (Photoshop, not Lightroom).
In my practice, it often happens that after completing just these five points, you can already get an image option that can satisfy both me and my clients. Most often, processing is limited to just these five points, if you do not need to retouch photos (eliminate skin imperfections, work with plastic, artistic color correction, etc.).
For me, the most difficult thing in processing is after bringing all the photos from the series / shooting into a digestible form - to choose the best ones for their fine refinement.
6. Export all photos (bonus point)
The essence of the action: get a ready-made result that can be viewed by any user/client on any device.
In this case, export is the process of exporting photos from RAW format to a format that is suitable for further processing or viewing. If I plan to do nothing else, then I export to a poppy JPEG. If I plan to further refine photos in Adobe Photoshop, then I use the 'TIFF' or 'DNG' format. Recently, laziness has attacked me, I do not use TIFF and export all photos immediately to JPEG.
Eventually My photo processing workflow is divided into two stages: processing in Lightroom and processing in Photoshop. Lightroom - for basic settings, restoration of "wrapped" pictures, batch processing of a tape of photos. Photoshop - for the final “finishing” of photos, retouching, manipulations with layers, masks and more.
Philosophy
I am convinced that a photographer should have a clear action plan, a clear concept, a well-thought-out methodology with step-by-step photo processing steps. The well-established technological process greatly speeds up and simplifies the processing and delivery of the finished material to the client.
Outcome. My basic processing built like this: import -> set camera profile -> set lens profile -> extend camera/lens options -> synchronize selected settings -> crop -> export. I repeat - this is the basic process, the basis from which my processing begins.
Thanks for attention. Arkady Shapoval.
Updated 07.11.2019 Views 34640 Comments 76
I got to the last article related to photography, hooray! On the topic of processing, there are many holivars on the net: both regarding what it should / should not be done, and regarding how specifically to do it. My view on this topic is based on what result I personally want to get and at what cost. To clarify: first of all, I shoot for the blog and for my family archive, that is, I do not earn a living from photographs directly. Plus, I can’t spend too much time on them, otherwise I won’t have time to work, after all, I have to process a lot of photos. My site publishes 2-3 articles a week, each with about 20-40 photos. On the other hand, I can’t release completely unprocessed ones either, they are faded (because RAW), there are often too bright or too dark areas, and so on, and I don’t like such photos myself. That is, it would be possible, probably, to spread any, but this is not my option.
All parts of my FAQ for beginner photographers
How do I edit photos in Lightroom?
Thus, I am a supporter of shallow processing due to the lack of motivation to spend a lot of time on it, and I don’t see much difference for myself yet. Of course, occasionally I can conjure a little longer, but this “masterpiece” still has nowhere to put it. Now I have all the processing going on in Lightroom, and I already forgot when I used other programs. So, if you are good with Photoshop and prefer to process photos quite heavily, then in the post you are unlikely to find something worthwhile for yourself :)
As I said, I do all the processing in Lightroom and it's pretty simple. In fact, I only crop and level the horizon, stretch the shadows and darken the highlights, add color and sharpen.
Import photos and presets
I insert the flash drive from the camera into the card reader and import the photo with transfer to an external hard drive. About the storage of photos, I will write below. When importing, I apply pre-created presets: and . Now I use only the latter (I have a Sony A6500), it has more settings for my camera and for the way I shoot. There is also a couple for the phone and a second camera.
But the presets are very similar, they differ a little only in the settings for shadows, lights and exposure, and I constantly correct them, because my opinion changes, then once again I try to adjust the settings for most photos in order to process them less. Some of the recurring settings are: Clarity +25, Vibrance +25, Sharpening +60, Noise Reduction Luminance +65, Enable Lens Correction. The latter is quite important, as it adjusts the photo (mostly geometric distortion is removed) to fit your lens. But this is if Lightroom knows your camera. For example, for the Canon G7xm2, I then have to manually select something similar to it.
Regarding presets, I want to say right away that there is no right or wrong here. Well, if we talk about amateurs, the pros are different, although they may have a special author's style. Therefore, you can create a preset for yourself with any settings you like, and it will be right. After all, the main thing is that it suits you, you process them, simply because "I see it that way." Here, of course, you can argue, I do not insist :) It's never too late to read about professional processing, about how gurus suggest using this or that setting, and change your presets.
I do not rename the files, I leave them as they are.


Photo thinning
The next step after import and before processing is thinning. Usually I delete: photos that are blurry, duplicates (when 20 photos of the same object were taken), all photos with marriage (too dark, too overexposed, etc.), just photos that I don’t like. Sometimes I can leave with a marriage, if there is nothing like that, and the photo is very necessary.
But in general, after a couple of years of photography, I began to spend much less time on thinning and thinning less carefully, at first I left almost 50% somewhere. It's easier to change hard drives to more capacious ones and buy new ones than to sit for several days and thin out. Moreover, my archive is not growing so fast. Plus, besides, more than once there was such a moment that suddenly a remote photo was needed, even if it was defective.
Thinning also takes place in Lightroom, I mark the photo as Rejected with the X key, then I delete all the marked ones at once.
Cropping and flattening the horizon
At first I did framing very often, then apparently I took aim and I build a normal composition already at the stage of photographing. In the article, I said that I use the rule of thirds, and so when cropping, I use it in the same way. Not fanatical.

white balance
Since I always take pictures with automatic white balance, I correct it in the program by eye with the Temp and Tint levers. Mostly I use the first, the second less often. Sometimes you can use Auto to get Lightroom's opinion. By the way, it is difficult to correct colors on ordinary monitors, because they are not calibrated, and the matrices themselves have poor color reproduction. That is, you will do as you see fit, and other users will see everything in a completely different way.
I currently have a Macbook Pro 15″ with a Retina screen. I consider it, of course, not a reference, but very good in terms of color reproduction. Also, 15 inches of double resolution is enough for me to process photos.
Stretching shadows and darkening highlights
Since many photos have some problems with dynamic range, processing can reduce them. To do this, I lighten the shadows with the Shadows lever (move it to the plus), then darken the too bright areas of the Highlights (move it to the minus). The resulting result I correct Exposure (plus or minus, depending on the situation) and often still adjust White and Blacks. Oh, and I almost forgot, I add Contrast, because when lightening the shadows it is lost, and occasionally I add more Clarity (up to 50), increasing the micro-contrast. Although usually the contrast and micro-contrast are immediately set by the preset when importing to the fixed values \u200b\u200bthat I need (+10 and +25, respectively).
I personally like photos with micro-contrast more than those with contrast or oversharpening. That's why I sometimes even take Shadows a big plus, and then increase Clarity even more. How watchable it turns out for you, you decide for yourself. Well, I often do contrast not at the expense of Contrast, but at the expense of White and Blacks, so it turns out to be more accurately adjusted, because they are regulated from “two sides”.

Adding color
Previously, I applied 2 presets: Blue Sky 0.5 (), or Skin toning lighter (). The first preset was peeped at by Sergey Doli (it was called Matts Blue Sky 1), but I redid it a little, reduced the parameter changes by half. I don't remember where I downloaded the second one. So, now I have Blue Sky 0.5 already "sewn" into the preset when importing, so I have reduced my processing steps a little more.
Blue Sky is needed to increase the blueness of the sky, but for this it should not be too overexposed (otherwise it will be useless), and to increase the saturation of yellow and orange colors. It is important to mention that sometimes you need to set the Luminance for the blue color back to zero, otherwise the blueness does not come out natural.
Skin toning changes the balance of light, making the skin color more like the real thing. But the truth and everything around also changes the balance, not just the skin. So let's say, for lovers of warm shades and lamps.

Sharpen and remove noise
Since all the photos go either to a blog or to Instagram, that is, the photos will be viewed only from the screen, and not at the maximum resolution, but about 1000 px wide, the sharpness can be painlessly turned up in the program. My sharpness is also set by a preset during import (+60). Depending on the photo, I may lower the Sharpening values to avoid over-sharpening or noise. Actually, noise neutralization also occurs during import, and then I rarely touch the Luminance (+65) lever. Basically, you have to reduce Sharpening and Luminance for jpegs received from a soap dish or a smartphone.
And again, I will mention the Clarity tool here. In fact, it also makes the photo sharper.
Using additional tools
Most often of all presented, I use a gradient filter to brighten / darken a part of a photo, or change the contrast or white balance of a certain part of a photo. Sometimes it's better to use a brush instead, which is more convenient when you need to change a difficult area, for example, a face, on which, on the contrary, you need to remove Clarity (otherwise it will be too structured). In the latest versions of Lightroom, these tools have much more settings, you can change anything in the selected area.
Less often I use a stamp to remove some garbage from a photo.

Export
After I have processed the image, I put a flag (Set Flag -> Flagged) with the P key. This will allow, after I am done with all the images, to display only them using the filter (Filter by flag -> Flagged only), view once again only on the processed images and export them all in droves. For each article, I usually process about 20-40 photos.
I have already created a special preset for export. The folder for export, the size of the exported jpeg (2048 × 2048), its quality (75%), export sharpness (High), saving meta-data, watermark (configured and saved as a preset) are selected in it. I do 100% quality for Instagram, I don’t add a watermark.
Final result
In fact, in the example above, there was some attempt to expand the dynamic range (if you expand it too much, it will already be pseudo HDR). Naturally, it is not always necessary to carry out exactly such manipulations with photographs, but usually they are very similar: adjusting the blue / yellow balance, brightening shadows, darkening highlights, increasing contrast. Simply, when there is not such a big difference between dark and light areas, then the levers will not need to be moved to their extreme positions, but only a little bit and this is done, of course, by eye.

Why Lightroom
It's simple, it just happened. I tried and I liked this program. It is great for correcting photos, not for deep editing them. Everything here is done for this, there are all the tools. Plus, I also have the entire photo library in it, and you can quickly find everything you need: there are a bunch of different filters, you can set labels for photos (I really don’t use this at all).
There are plenty of analogues, but I don’t want to try anything yet, everything suits.
About resizing in Wordrpess
I can't help mentioning something that might be important for bloggers of the WordPress platform. I upload photos to the blog that are 2048px wide, but in the post they are displayed at 800px (full size on click, the photo is shown in the lightbox). If you upload full-size photos on your blog, and the engine resizes them to the size you need, then this is a so-so idea, if quality is important to you, of course. The fact is that the built-in resize will spoil the sharpness quite a lot, the photo turns out to be blurry. However, few visitors will notice this, unless of course you have a photographer's portfolio with an offer of your services. Well, there may not be enough space on the hosting, since a full-sized JPG can easily take up 10 megabytes.
Alternatively, use the Sharpen Resized Images plugin, it will add sharpness when resized, but it also does it quite roughly.
How do I store photos?
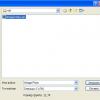
All photos, videos and other files are stored on a Seagate 4TB external portable hard drive, because they do not fit on a laptop drive. This CD is always with me. The photo archive now takes up about 1.5 TB (for 2017), which is actually not very much if you are a photographer or blogger and shoot a lot. The file structure is shown in the screenshot below. As a rule, there is a separate folder for each trip, inside of which there are 2-3 more folders for each of the cameras. But if the trip is long and in different cities, then a separate folder is also created for each city.

The folders have the following structure: Year/Month_Day_Event Name/Survey Device. The catalog structure in Lightroom is exactly the same. And what is convenient, you can put a photo in any of the folders on the disk, and then synchronize this folder in Lightroom, and the photo will appear in the program. For me, such a structure is quite convenient for storage, and does not take additional time for cataloging, I did it once and that's it. Now there is just a trend to dump everything in one heap, and only then the program itself distributes photos according to different criteria. I like this option less.
I store the photos in the originals, that is, in RAW, in order to be able to make what I need from the photo at any time. And in Lightroom, I have in the settings to save all information about the photo to XMP files. After all, when RAW is processed, nothing happens to the file itself, all information about the actions taken is stored in the catalog file. So XMP is a double of information for each photo, they weigh quite a bit, so the total volume is not particularly increased. Due to XMP files, it is easier to transfer photos to other computers and this is a kind of protection against the fact that something will happen to the catalog file, there have already been precedents, you had to delete it.
Where to backup photos
In addition to how to store photos, it is important where else to back them up. First you need to remember the golden rule that backups should be 2. As I said, all my photos are stored on an external hard drive, that is, this is the main base, and 2 backups (copies) need to be made to it. Your main base can also be on a hard laptop, that's more convenient.
I make the first backup to another external hard drive. About once every 3 months (and before each trip) I make a complete copy from one external (main) to the second (backup). So that it does not take time, I set it to be copied at night, and in the morning everything is ready. I don’t take a second hard drive on trips, that is, the risk of ruining it is minimal.
I make the second backup to the cloud from the main hard drive, specifying the folder with the base as the folder for the cloud. For now, I use the Mail.RU cloud service, since in 2014 they had a promotion and they gave 1TB for life. But this place is no longer enough for me, plus I don’t like the download speed, and the fact that the storage is not very reliable, there was already a case when they deleted some of the files for me. Therefore, I want to switch to, which is now considered the most functional and secure. There is a good paid tariff with no space limit. In principle, I already use it, I store important files, but for now it's a free plan.
And one more important, as it seems to me, moment. Since on all trips I take only one external hard drive, where the main database is stored, there is a risk of ruining it. This is not scary, since a copy is kept at home, but you can lose photos from current trips if you constantly transfer them from a flash drive to the main drive. So, if possible, I leave all the files on the flash drive, and do not delete them immediately after transferring them to the hard one. Yes, for this you need a larger volume of flash drives (or several pieces) so that they are enough for the whole trip, but there is a guarantee. Also, if there is good Internet at the hotel during the trip, then the files also fly to the cloud.
P.S. That's all I can tell you about photo processing and storage. Not thick, but there :)
Life hack #1 - how to buy good insurance
Choosing insurance is now unrealistically difficult, so to help all travelers. To do this, I constantly monitor forums, study insurance contracts and use insurance myself.
The first part of the article is for beginners. Part two and back.
To start exporting photos from Lightroom in good quality, you need to be in the Library module. This is where the Export button is located.
1. Only selected photos will be exported.
You can select all photos by pressing Ctrl+A. You can prepare a group of photos for export by holding Ctrl and clicking on the desired photos. Clicking on the photo again will deselect it.
2. Press the button Export / Export

3. Consider the settings necessary to export photos from Lightroom in good quality. For printing photobooks, for printing in a photo lab.
In the tab Export Location / Export Location, I advise you to select Export to Desktop / To the desktop. It is very easy to find a fresh folder on your desktop and immediately send it to a USB flash drive or by mail for printing. Just don't forget to check the "Put in Subfolder" checkbox. And write the name of this folder. Then all the export photos will hide in it, and will not cover the entire desktop.
4. In the "File Setting" tab, select the maximum Quality / Quality of the photo.
Move the Quality slider to the far right (100)

5. You can slightly increase the sharpness in the field "Output Sharpening / Sharpening at the output"
6. What should the program do after exporting photos to the specified folder?
In the "Post-Processing / After the export process" select "Show in Explorer / Show in Explorer". With this choice, you can leave Lightroom, leave to read an article, for example "". And when the export is over, an explorer window will pop up on top of your screen and photos ready for publication

May the Light be with us!
You may also find the following resources useful:
Lightroom Hotkeys for Selecting Photos
Hotkeys Lightroom. Top 20
Export photos from Lightroom to Photoshop and vice versa. Part for "advanced" users
Any photo can be sent for editing from Lightroom directly to Photoshop. by right-clicking on the thumbnail. A list of commands will open, one of which will be Edit to Edit in Adobe Photoshop. It is important that this program is pre-installed on your computer.

There are a number of photographic tasks that Photoshop will perform better than Lightroom, these are:
- Create a collage. For example, instead of an "empty" sky, insert a characteristic one. Compare below the landscape Before (calm sky) and After (sunset sky)
- Correcting the shape of an object with the liquify tool - Liquify
- Deep skin retouching using the frequency decomposition method
- Stacking photos taken with focus bracketing, etc.


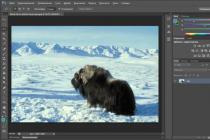
In Photoshop, let's make a collage with a new, sunset sky. Photo by Dmitry Sakharov.

Do whatever you need to do and then either close the image or exit Photoshop. Photoshop will ask you if you want to save the image. Yes, you confirm this and return to Lightroom with your edited photo. The Photoshop version appears in the thumbnail ribbon next to the original photo and adds the word Edit to the original title. The file format that Photoshop uses to save the image is determined by the Lightroom settings (more on that below).
The problem is that by default lightroom returns TIFF and it can be gigantic. In megabytes the same or significantly more than the original. To resolve this issue, there are three options you can take.
1. In this case, if "Photoshop edits as TIFF files" are saved in the Lightroom preferences, merge all the working layers of the image before exiting Photoshop.
Go to menu "Layers Layers" and select "Flatten Image Flatten". This step is especially important when you've sent multiple photos to Photoshop as layers at once, such as when you're doing Auto Layer Stacking (focus bracketing), panoramas, or HDR fusion. The TIFF file format supports layers, so if you don't flatten your image, you'll end up with a huge file.
2. In the Edit Preferences menu tab, go to External Editing and create your own external editing preset.
I have it called Photoshop JPG. This preset can be selected for editing, and then from Photoshop the photo will return to Lightroom with a light JPG, automatically merging all working layers into one.

3. The third option is Save the file in photoshop in a different file format to avoid heavy TIFF.
The "Edit in Adobe Photoshop CC 2019" settings in Lightroom under the "External Editing" tab are simply the default settings that Photoshop uses when it closes an image and saves it. Photoshop doesn't even offer to choose a file format. Photoshop saves the file with the settings specified in Lightroom and returns the image to the thumbnail feed.
But you can override the file format in Photoshop itself. You can save in any format that Lightroom supports (JPG, TIFF, PNG, PSD) by simply selecting " Save as Save as" on the menu " File". Once saved, exit Photoshop or close the image.
You can even use Photoshop's Save As command to save an image multiple times in different formats (like both PSD, PNG, and TIFF) and/or different filenames, and each time you do so, the image automatically imported back into Lightroom. And next to the original photo, all these options will appear.