How to install actions in Photoshop:
Just double-click on the downloaded .atn format action and it will install itself into Photoshop and be ready for use right away (without restarting Photoshop).
METHOD 2.
You have downloaded a file with actions (you need to place it at: drive C (by default) - Program Files / Adobe Photoshop CS / Presets / Photoshop / Operations (Actions)
Open Photoshop.
Press the key combination Alt + F9 to bring up the Actions window (Operations)
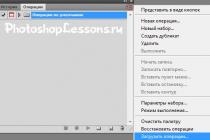
Click on the small black triangle in the top right corner.
The Actions palette menu appears. There is a Load Actions command (Load operations)
Select this command:
Another window will appear where you must specify the file you want to install.
If you copied the file with the action to this address, then you will see such a window (if not, then just specify the path to it), Select your file and click Load again (Download)

Now, this file should appear among the other actions. That's it, Photoshop has copied the specified action file into its set. You can use!
How to use actions in Photoshop: - Open your photo - Duplicate it, name the duplicate "backgraund", and close the original layer (turn off the eye next to the layer)

Open a window with your actions that you have installed (Alt+F9)
Find the desired action in the Operations tab:
1.Click on the arrow next to it
2.Go below
3.Click the Play arrow.
While the action is running, click Continue on all the windows that open.
You can also change some settings while doing this, if you know what they are responsible for.

How to install and use Actions in Photoshop.
That's all your photo was transformed in a minute. And you saved a lot of time.


We do many things during photo processing from time to time. Resizing a file, adding a personalized frame around a photo, changing a color to monochrome, adding grain or sharpening are just a short list of things we do over and over again. Wouldn't it be nice to have some automated way to do this? Well, it exists and is called Action, and this article will explain to you how to create and use them.
What is an Action?
Action is a programmed set of steps taken to complete a task. They can be recorded and saved in the tab Window> Actions (Window> Operations), Alt + F9 hotkeys. In it you will see a set of default actions that come with Photoshop, but there are many more actions at your disposal.
Click on the downward pointing arrow on the left side of the Operations window to open the drop-down menu. At the bottom of the menu there is a list of operations, when you click one of them, a list of all the actions that are grouped in the folder of this operation appears. For example, the Vignette list (Vignette) begins with the action "Make snap shot" (Form a picture) and ends with "Move current layer" (Move the current layer).
How to create an Action?
To learn how actions work, we'll create one to optimize photography for the web.
1. Open your photo
In Photoshop, open the photo you'll use to record the action.
2. Create a new operation
In the Actions window, hotkey Alt+F9, select New Action (Create a new action), using the drop-down menu or the icon on the bottom bar of the Operations tab.
The window that appears has several options:
Name (Name): this will make it easier to find your actions in the future, so be as specific as possible. We'll call this action ePzresize.
Set (Set): where the action will appear. A set is a group of actions and you can create your own new groups, but for now save in the Default Actions set.
Function key (function key): allows you to use a set of hotkeys that will apply operations to the image. Let's set F12 and tick Shift.
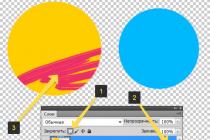
Color (Color): This allows you to group operations by color. We will mark our action in red. Any of these settings can be changed later.

3. Recording
The next step is to click Record and start taking action. On the bottom panel of the tab Actions (Operations) there is a button Stop (square) - it stops recording, Start (circle) - starts recording, and Play (triangle). The Start icon will be red, indicating that you are in recording mode. To end recording when you have finished making operations, click the Stop button.
How to record an operation
To record an operation, you will need to go through all the steps of the task for which you are creating this action. So, for our example, we need to resize the image so that it is suitable for uploading to the ePHOTOzine gallery. You need to take the following steps:
1. Change the width by 1000 pixels through the menu Image> Image Size (Image> Image Size).
3. Close image
4. 4. Click the Stop icon to end recording.

Operation use
In order to use an action, you can either open a photo and use the hotkeys you set to play the action, or perform a batch conversion, in which the action is applied to several photos at the same time, or you can create a droplet (droplet), which can be located on your desktop, which will make the process even faster. Batch conversion (Batch processing) and Droplets (Droplets) are in the menu File> Automate (File> Automation).
We will create a droplet that will speed up the process and will resize the image and save files ready for uploading to the gallery.
Droplet Creation
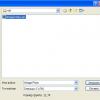
Go to File> Automate> Create Droplet (File> Automation> Create Droplet) and the following window will open:

2. Select an action from the set (Default actions) and the list of actions (ePz resize).
4. Click OK and the droplet will appear in the specified folder (on the desktop). Now when you drag a photo to the droplet shortcut, it will run the photo through the action.
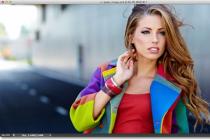
Learn to edit your photos better "Processing photos in Photoshop from A to Z. Advanced level." Link to the course:
There is a special function - action. With its help, you can significantly reduce the time of working on the layout. If you, for example, need to repeat the same actions, they can be "remembered" in the program thanks to this option. Then you do not have to click many times, choosing filters and effects. It will be enough to press one button. Figure out how to install an action in Photoshop, how to turn it on, how to create it yourself and what, in general, it is.
It can be made or downloaded from the web, and then added to Photoshop. This feature will come in handy when working with large-scale projects. It will also be useful if you need to edit a large number of images.
Actions will save you a lot of time when working with Photoshop
An Action is a specific set of actions and commands that is saved in a file. It has the .ant extension. It can be loaded into Photoshop and used as needed.
For example, you need to change some drawings or photos. Apply a texture, make a shadow, add a gradient, adjust the contrast. If you manually do this with each image, it will take a lot of time. In order not to waste it, you need to learn how to use actions in Photoshop. Then you will apply all the parameters instantly by simply selecting the desired function.
Action can be written independently if you know the sequence of commands. Also, similar files are available on the Internet on specialized sites. To find them, enter the query " download actions for Photoshop" in any search engine. See if the search results contain what you're looking for. Or install the collection of these files at once.

You can take, for example, action, which turns a photo into a drawing. Or makes a flickering sign out of an ordinary inscription. Or creates an interesting and unusual background from a monochrome sheet.
Why choose what range to set the glow, if you can take the experience of designers and artists? You will skip long hours of processing and get the final result right away. And for this you do not need to learn how to use graphic editors.
How to install an action?
- Open the "Window" menu and click on "Actions". A panel of the same name will appear. You can also call it with the keyboard shortcut Alt + F. These buttons turn the tool on and off.
- It may already have pre-installed functions. Their list is in the "Default" section.
- Click on the little icon that looks like a few horizontal lines with a black arrow. It's in the upper right corner of the tool. Do not confuse it with an icon resembling the rewind button in the player. They are located nearby.
- Select "Load" option.
- Specify the folder where the ant file is located.
- Confirm the installation.
- You can simply drag the Action into the Photoshop window.
The action will appear in the list. They can be used right away. If it doesn't appear, try restarting the program.
How to use action?
These functions are activated in the same "Operations" panel in which they could be loaded.
- Click on the layer.
- Turn on the Actions panel.
- In the list of actions, select the desired one.
- Click the "Perform active operation or command" button. It looks like the "Start" or "Play" icon - a triangle pointing to the right.
- Wait until all settings are applied.
How to make your action?

Here's how to record an action in Photoshop:
- Open the Actions panel.
- Click on the button with horizontal stripes. She is on the top right. The operation menu will appear.
- Click on "New Action".
- In the field "Name" ("Name") write the name of the future action.
- In the Set list, select which directory the action should be in.
- To create your own section, select the "New Set" item in the operations menu in advance.
- You can set keyboard shortcuts to call this function.
- When everything is set up, click "Record" ("Record").
- Start executing commands and actions for the action. Add levels, masks, adjustment layers. Do what you planned.
- Then click on the "Stop" button. She looks like a square. Located at the bottom of the panel. A similar option is found in the operations menu.
- Save the edited drawing. Go to File - Save for Web (File - Save for Web).
- The action itself will be placed in the main directory of the program in the \Presets\Actions subdirectory.
- You can remove it or get rid of its individual parts. To do this, in the list of operations, select the desired action or command inside it and click on the trash can image. This cannot be done while recording.
It is useful to learn how to add an action to Photoshop. With it, you will finish the layout or drawing much faster. No need to waste time on the same commands. You can immediately see the result without selecting the parameters yourself. Why do boring and monotonous work? If you haven't found a suitable action, or you have a very specific set of actions, you can write it as an action file and use it fully.
I really regret that I did not write this lesson at the beginning of the blog introduction. After all, I missed such an important topic for a beginner. And the fact that this lesson is 27th on the list can somehow confuse my readers, because this is a very simple lesson, I would say the basics of Photoshop!
Before we learn work with actions, you need to find out what these “actions” are.
Translated from English "Action" means "action". But, this does not explain anything to us :) Actions make it possible to save the stages of image processing and later apply them to many others. If you have worked with Lightroom, then it has an analogue of actions - presets. Oh, I already wrote on my blog.
And now let's figure out how to install and use them!
To begin with, I advise you (click to download) a few action games and learn from them. In general, actions come in two formats: ATN and ZXP, but in this lesson we will consider the first type, since it is easier to install and I recommend using them further.
Step 1. Before you start working with actions, or as they are “called” in Russian-language Photoshop - “operations”, they need to be installed. Open the operations window (Window->Operations).
Step 2 Now we install them directly.


Step 3 As we can see, the actions are installed and now we can safely use them.

In order to use operations, you need to select the name of the action with the left mouse button (it will be highlighted in blue) and click on the triangle.

As a result, with one click, I processed the photo.


What can they be used for?
For example, you had a photo shoot and you need to process the photos. Usually this process takes a considerable amount of time, and with the help of actions you can process a photo once, save your settings (I will tell you how to do this in the next lesson) and use ready-made operations while processing other photos.
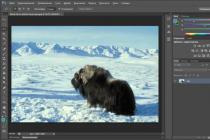
Now I will tell you how to use actions in Adobe Photoshop. First you need to download Action, so that there are not a small number of them on the network now, you can also download from this site, from the section " Photoshop Actions". What are these Action? Action, is a set of different operations recorded in one set. I'll try to tell you with an example - let's say you have a video camera, you take the material, then rewrite it on a cassette, and call the cassette what this recording refers to. Everything is exactly the same here. To begin with, you create a new document, write something or just insert a picture, then go to the actions tab, select what you want to do from the list of actions, be it a DVD box or a 3D box, press the start button, after that the order begins perform all necessary operations. Then in a few seconds you will get what you wanted to achieve from your initial image, but notice that you did not put any effort into it. Of course you can create your own Action. Let's say you often use reflection for text, so to start, just create a new document, write the text. Then go to panel Actions, click on the button create a new action, give it a name and click on the button Entries, and start making a reflection, after you have done all the necessary operations, you can click Stop. Now you can test your action. To do this, again create a new document, write some other text, select your created action, click Start, and voila, your reflection is done by itself, and you just look and enjoy the finished result. All actions are in the folder C:\Program files\Adobe\Adobe Photoshop\Presets\Actions. This is where you add all the downloaded actions. To download them, you need to click on the tab Actions and click on the triangle. After that, the action will be available in the action panel. Everything is very simple friends and convenient. Personally, for myself, I already have about 40 actions made by me, because I often use popular effects, and in order not to do this a hundred times, I just press start, and in 10 seconds I have an excellent result ready. It saves a lot of time, believe me. I'll explain with screenshots how it all works:1. Take any picture. I took this one:
2.
Next, go to the tab Actions and click on the triangle  3.
Choose from the list of available actions which one you need. If they are not there, then you need to download them by clicking on the button load and indicate the path where you uploaded them. I chose the box option. Let's say you have chosen an action, actions consist of two steps, the first step is an expanded picture, i.e. you choose Step 1 and press Start:
3.
Choose from the list of available actions which one you need. If they are not there, then you need to download them by clicking on the button load and indicate the path where you uploaded them. I chose the box option. Let's say you have chosen an action, actions consist of two steps, the first step is an expanded picture, i.e. you choose Step 1 and press Start:  4.
After that, you will have something like this picture:
4.
After that, you will have something like this picture:  5.
Here is the expanded version of the box, since I chose the create box action. Pay attention to the layers panel, there are new layers that you can adjust or add something of your own. Now I will transfer our initial image to this box and write what thread the text is:
5.
Here is the expanded version of the box, since I chose the create box action. Pay attention to the layers panel, there are new layers that you can adjust or add something of your own. Now I will transfer our initial image to this box and write what thread the text is: 
6.
I won't go into too much trouble building a super box here, I'm just showing you how it works. You see in the figure there is a vertical line. This side cover of the box. That is, the front we will have where is shown Knight, and the side with the inscription Play Station 3. Now if you have done everything, go to step 2 - Step 2, and click on the button Start. You will see how operations take place in the layers panel, layers are created there, something changes, etc. This is something that you do not have to do yourself. After waiting for the end of the session, you will see the following result: Well, how impressive? We just set a background for everything and added an inscription, and in the end we see that we have a great 3D box, and even a reflection with shadows. This is how easy things like this are made. There are a huge number of actions, but do not forget that you can record your own according to your needs. I hope I've made it clear to everyone how it works. Use actions and you save a lot of time.