Chapter 3. Metallurgy.
The Tinkers' Construct mod adds an engineering smelter to minecraft! With its help, you can increase income from various ores by 2 (!) times. Also, only with the help of a smelter, you can make tools from metals and their alloys. More on this later.
Consider how to build a smelter.
First we need to craft a lot of cement (you can see its craft in the same NEI). Next, we melt the cement in an ordinary furnace and get a burnt brick. He's the one we'll need. We make a smelter controller, several smelter drains, fired glass / windows, foundry taps, foundry tables, foundry tanks, as well as fired bricks (namely, blocks of fired bricks) out of it.
Now let's start building the smelter itself.
First, we put a 5x5 square of fired bricks, this will be the bottom of the smelter. Then we build “walls” on the sides of the bottom (on the sides, so that the bottom remains visible 5x5). Some "wall" blocks are replaced with one smelter controller, smelter drains, and scorched glass/windows. We put foundry taps on the sinks of the smelter, we put foundry tables and foundry tanks under the taps. All. The smelter is ready. Don't forget to fill the foundry glass/windows with lava buckets.
Using the smelter is pretty easy to master: just put ore in it and wait.
Spoiler: Fully built smelter
Now, in order to start making alloy tools, we need to understand how these alloys are made!
Spoiler: Alloys

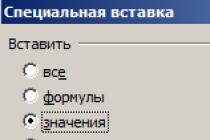
With the help of aluminum brass, we need to make casts for their further pouring with metals from the smelter. To do this, we just need to take any wooden / cobblestone part and put it on the casting table. Next, go to the smelter interface, click on the already “liquid” aluminum brass. Next, just right-click on the casting tap (above the casting table), pour the aluminum brass into the wood/cobblestone part. Everything, the cast is ready. I recommend that you immediately make all possible casts.
Spoiler: The process of creating an impression

To create tools from alloys, you need to put an impression on the casting table, select the desired alloy in the interface of the smelter controller and pour it into the impression. All. Next, we go to the engineering forge (already a forge, since the station has a limited number of tool recipes) and lay out the details. All. Our first alloy tool is ready.
The main thing in the game is the craft (craft), that is, the creation of various items, mechanisms and much more at the expense of the extracted resources, which will require a lot. Beginners and inexperienced players use a pickaxe to extract various ores and other materials, not suspecting that there is a tool in the game that is more effective for this, such as a hammer.
Any pickaxe in the game captures a zone of one block when extracting resources, and a hammer processes an area of 3x3 blocks at a time and is therefore more efficient for extracting various resources.
![]()
In this guide, we will cover all the stages of creating an iron hammer from getting schematics to crafting the hammer itself. Many may ask, why iron hammer? It's very simple - iron is the main metal for mining on our servers.
Creating a Tinkers' Construct hammer requires a small amount of resources and the whole process can be divided into several stages.


Necessary resources for the hammer All stages of creation
First stage. Create empty diagrams
The first thing we need is four empty schemes, to create them we need 2 wooden boards and 2 wooden sticks. You can use boards of any wood.
Second phase. Cutting diagrams of hammer parts
Blank schemes are placed in a cell on the table for cutting out parts. We find the details we need: a hammer head, a strong rod and a large plate. In turn, we select the necessary parts from the list and as a result we get a diagram of the part we need.


Stable rod cutting Hammer head cutting Large plate cutting
Third stage. Prototyping a Wood Part
To create prototypes of hammer parts, we will need fabricated schemes, wooden boards (19 pcs.) As a material, and a parts designer.To create a part, we place a diagram in one cell, and wooden boards in another. As a result, we should get the hammer part we need from wood. By the same principle, we get other parts of the Tinkers' hammer.


Sturdy wooden rod Wooden hammer head Large wooden plate
Fourth stage. Smelting casts
To smelt casts, you will need liquid metal. We will use gold as the metal for casts, for this we need 8 gold ingots. We immerse the gold bars in the smelter and wait for the gold to melt.

melting gold liquid gold
When the metal is ready, we place the wooden prototype of the part on the casting table. Then we open the casting tap and wait for the liquid metal to completely cover the part, after waiting a couple of seconds, we get a finished mold of the part made of gold. In the same way, we make the rest of the casts.
Cast of a strong rod Cast of a hammer head Cast of a large plate
Fifth stage. Smelting Hammer Parts
To smelt hammer parts, we put iron ingots into the smelter. As soon as the metal has melted, we place one of the molds of the part on the casting table and fill it with molten iron. In a few seconds we get the finished part. We take the finished part from the table and the used cast. And in the same way we smelt the remaining parts of the hammer. As a result, we need to smelt one hammer head, one strong rod and two large plates.
Iron preparation


Smelting a strong rod Smelting a hammer head Smelting a large plate
Sixth stage. Crafting the Tinkers' Hammer
Having received all the details we need, we go to the engineering forge. In the engineering forge, we select the tool we need, cells will appear on the right for each part separately, we install the parts in them and craft the hammer.
The tinkers hammer is ready, but it can also be made even better and more powerful with the help of improvements.
Hammer Upgrade
You can improve the hammer with various materials. Each material improves certain parameters of the hammer. We will use diamonds, red dust and lapis lazuli to improve the hammer.Using a diamond as an upgrade will allow you to increase the extent of the extracted resources. That is, before upgrading, you could extract a maximum of red dust, then after upgrading with a diamond, you can extract obsidian.

Using Redstone as a modifier will allow you to increase your mining speed. Using 1 block of red dust increases mining speed by approximately 0.05 units. 50 blocks of redstone can be used to improve, which will increase the mining speed by 2.5 units in the end.

Lapis lazuli is used to increase good luck. Increasing luck allows you to increase the chances of getting more resources when mining. And the more lapis lazuli you use to improve, the greater the level of luck and the chance to get the maximum possible resources will be. On our servers, the amount of lapis lazuli to upgrade the hammer is limited to 450 units.

To keep the hammer durable, you can periodically repair it at the engineering forge. You can repair the hammer only with the materials from which this hammer was made. Since we made the hammer completely from iron, we will repair it with the help of iron ingots.

We hope that this guide will help you in playing on our servers. Good luck and enjoy your game.
Meaning modifiers(improvements) is to replace vanilla charms, but there are also those that have no analogues in vanilla. The number of tool or weapon upgrades is limited (from 3 to 5), so often an item is upgraded for a single purpose. Items in the forge are improved, when you click on the upper left icon - repairs and improvements.
Also a brief description of the modifiers - in the book "Materials and You".
Diamond Increases durability by 500 units.
Emerald Increases durability by 50% of the base.
If the base strength of the product is more than 1000, then it is more profitable to increase the strength with an emerald, and if it is less than 1000, then with a diamond.
If we are talking about arrows, crossbow bolts or shurikens, then "Strength" is the number of shells in the package. Diamond adds 50 units to this amount, emerald - all the same 50% of the original. That is, if the base number of shells is more than 100, then it is better to raise the "Strength" with an emerald, if less than 100, then with a diamond.
Quartz- "Sharpness". Increases damage. "Sharpness" - it is also "Sharpness" in Africa. There are 5 levels in total, 72 quartz is spent for each level of improvement.
Lapis lazuli- "Luck" or "Production". To get "Luck III" or "Loot III" you will need 360 pieces of lapis lazuli.
Touchstone + flint- "Strengthening". The level of the extracted material rises to the level of the touchstone.
For example: you have a paper pick. If you use a Manulin Whetstone in your modifier, you can even mine cobalt with this pickaxe. In my opinion, a pointless modification. It is easier to immediately make a manulin pickaxe and not bathe.
silk stone- "Silk touch". I always carry a separate pick for silk with me. Crafted from emerald and silk fabric:


red dust- "Speed". Increases attack speed for weapons, for tools it corresponds to the "Efficiency" enchantment. Each level consumes 50 Redstone, adding 20% to the effect. To upgrade 5 levels, you need 250 redstone.
Pearl + Obsidian- "Executioner". Increases the chance of getting a head from a Skeleton, Wither Skeleton, Creeper, or Zombie. There are 10 stages in total, each increasing the head drop chance by 10%.
strengthener- "Strengthening". It has 5 levels, each upgrade uses 1 fortifier. Each level brings 20% durability. And "Fortification" of the 5th level gives "Indestructible".

Pickled Spider Eye- "Bane of arthropods". Each level consumes 24 Pickled Spider Eyes and adds 7 damage to spiders. A maximum of 120 Pickled Spider Eyes will have to be spent on Arthropod Scourge V, which will give +35 damage to spiders. Whether it works on bugs, I still do not understand.

consecrated ground- "Holy Damage". Each level consumes 24 holy ground and adds 7 damage to undead. The maximum for "Holy Damage V" will have to spend 120 holy earth and this will give +35 damage to the undead. Exclusively for weapons against zombies and skeletons. Consecrated earth is roasted in a vanilla oven from graveyard earth:


Undead Bone- "Vampirism". The essence is simple - you beat the enemy and you get + to your hp. Only 10 levels, each level increases the power of enchantment by 10%. Wither Skeletons drop Undead Bone with an initial 7% chance. True, finding a wither skeleton in hell is hellish luck.
Fire Powder- "Fire hazard". It has 5 levels, each level costs 25 fire powder. Each level adds 1.67 fire damage to the base damage (at level V, the damage is 8.33), and the burning time increases from 4 seconds at level I to 16 seconds at level V.
Piston- "Return". 10 pistons are spent on one level of enchantment. By the way, this modifier has 99 (!) levels. If you make a sword with a 99 level of "Recoil", then poor mobs are carried away by about 140-150 blocks from the place of attack: D
hell star- "Connection of the soul." Keeps items in your inventory safe when you die. This modification should be carried out with those tools and weapons that are sharpened for a specific function ("Production III" or "Luck III", etc.).
Expander-horizontal And expander-vertical- "Width ++" and "Height ++". For fans of terraforming and metro construction. Increases block cutting height and width by 1 block. The hammer will cut a 5 by 5 block square, except for the 4 corner blocks.


memory moss- "Patch". When gaining experience from the work of an item (mining coal and dust, killing mobs, etc.), it does not "fall" into the experience scale, but is saved and at some point spent on repairs. Three levels - 1 moss for each.
Craft moss: from 9 mossy cobblestones we craft a ball of moss, then with this ball RMB on a bookcase. This consumes 10 lvl-s of experience. If the experience is not available, then the moss will not turn into a memory one.

TNT(3 pcs)
Lightdust(2 pcs.) and eye of the edge ![]() - "Glow". One time upgrade. The item places a block of Snow White under the player approximately every 8 blocks. For the installation of each block
- "Glow". One time upgrade. The item places a block of Snow White under the player approximately every 8 blocks. For the installation of each block
spends 1 strength each, Recommended when stressed with potions of night vision, as well as in the absence of a cave scorpion set.
Roasted Chorus Fruit- "Ascension". A maximum of 50 fruits is spent. When hit, an enemy will float above the ground for a maximum of 1.75 seconds. Imagine shurikens with one paper part, with "Ascension" and the rest is quartz;)
Fish(2 pcs.) - "Fins". Allows projectiles not to slow down in water. Useful for exploring underwater fortresses with a light bow or shuriken.
Web- "Confusion". Slows down the enemy. There are three levels in total, each requires 1 web and provides a slow of approximately 1 second. With "Slowdown III" the enemy will slow down for almost 3 seconds
Embossment .
We are talking about transferring the features of one type of material to a finished tool or weapon without losing an attempt to improve (!!!).
Example. Let's take a pickaxe completely from manyulin, the basic features are "Cold-Blooded" and "Glut". If you use a modifier, which includes any part of the paper, then the feature of the paper "Rewriting" will be added to the existing ones. And now we will have the opportunity to improve the Manyulin pickaxe not 3, as before, but 4 times.
Foreword
Basically, for our tools, we will need to mine 2 ores, which even a diamond pickaxe does not take. It's ores cobalt And Ardita. From them we will make an alloy called Manulin. (ratio 1 to 1).
In order to mine these ores, we first need to make an aluminite alloy, from which we will make a pickaxe.
It is crafted with 5 Aluminum Ore, 2 Iron Ore and 2 Obsidian Blocks.
We also need modifiers for each weapon.
There are three in total.
The golden apple is crafted from golden blocks.
So let's get started.
Combat weapon.
First on our list Rapier for 24 units. damage.
Rapier crafting template.
Blade of the sword - Manulin
Rod - Paper
Small cross hilt - Paper.
Rapier upgrade.
Second on the list Cleaver for 50 units. damage.
Cleaver crafting template.
Large Sword Blade - Manulin
Strong rod - Paper
Plate - Paper
Cleaver Upgrade to 50 pts. damage.
Closes this trio, my beloved, Cleaver Cutthroat.
Cleaver upgrade to Cutthroat.
P.s. buff
With a 100% chance, knocks the head out of anyone with whom it is possible.
Useful when farming wither heads.
Digger.
We all know that you need a lot of glass for canning and farming aura nodes.
Now this problem can be solved.
Digger crafting template.
Shovel Head - Obsidian
Plate - Paper
Strong Mount - Paper
Strong rod - Paper
Digger upgrade.
P.s. Now we dig sand 3x3 blocks, plus immediately melt it into glass and finally do it all with incredible speed.
In a minute, you can dig up 3 stacks of glass with absolutely no hurry.
And by the way, thanks to the obsidian shovel head, we can repair it for about 8 obsidian, which is good news)
The king's hammer completes the list.
Craft template.
Hammer Head - Obsidian
Plate - Paper
Strong core - Paper.
Hammer upgrade.
In short. our hammer digs 3x3 blocks, and immediately smelts everything possible. It also has Luck III installed. In tandem with auto-smelting, we get just a cheat thing. For clarity, I put 10 gold ore and 27 ingots that we got by digging with this hammer.
Oh yeah, and repairing this hammer will also cost you about 8-10 Obsidian.
Let's summarize.
Thanks to this wonderful mod, we got two beautiful and powerful weapons, made it easier to farm wither heads, learned how not to worry about glass, and found 1 completely legal and very profitable way to process ores. What else is needed for happiness?
Well, for the sake of completeness, I provide a list of all these tools in a highly readable format. Use on health)
Type- weapon;
Damage – 50;
Where to look- do it yourself;
foldable- No.
Description and features
Well, what can you say about the cleaver, which will deal 50 damage, created in the mod? This is a great indicator that overrides the fact that with this cleaver you get the Fatigue level 3 effect and strike much more slowly than usual, and such damage can greatly simplify your existence and fight against malicious pests - hostile mobs, and even in the PVP arena you can wave, although in this case the solution is still better, since the armor is, in fact, not a very serious hindrance to it. So, let's figure out how you can make such a miracle cleaver:
First, we collect the usual cleaver:

For assembly you will need:
- A large manulin blade of the sword, and this is done by casting manulin melted in a smelter into a special mold;
- Paper plate;
- Two strong paper rods.
When creating this weapon, we received 3 modification slots, and also due to 3 paper parts + 3 more modification slots, that is, now there are 6 of them.
To add three more slots, we go to , and right-click on it, going into their interface. You will see something like this (the interface of the tool station is shown here, however, in the forge everything will be the same, only some weapons and tools will be added):

In cell 2 you place a cleaver, and in cell pos. 1 in turn modifiers that you see below (3 modifiers):
Now there are as many as 9 total slots for modifications.
We start sharpening the item and use quartz blocks for this. You will need a lot of them - 160 blocks of quartz, so you will have to work hard in the Nether, collecting this material, so when collecting it is better to use a pick with the Luck effect (this can be obtained by enchanting or just create such a pick, because in Tinkers Construct you can do this )
Having placed the quartz blocks in cells pos 1, we place the cleaver in cell 2. We see in cell pos 3 a cleaver with already changed characteristics. We take the cleaver from cell 3 and again place it in cell pos 2. You will have to repeat this until all 160 blocks run out, that is, given that there are 160 blocks, it will take 80 moves, however, look what awaits you result:

50 damage is not a joke at all, so with such a weapon you will feel comfortable in almost any fight.