x86_64/.
We see that CentOS is distributed in the following form:
- 7 CDs - this is not suitable for us, so many discs need to be cut, and then juggled with them
- 1 DVD is already better, but still, it weighs a lot - it will take a long time to download.
- LiveCD - this is a sample to get acquainted with CentOS without installing it on your hard drive.
- netinstall- but this is more interesting, it weighs only 9.4Mb, the OS will be installed over the network, i.e. you don't have to download anything extra. We will choose her.
netinstall CentOS:
Downloading CentOS-5.4-x86_64-netinstall.iso.
We cut it to disk, boot from it. In order not to use the graphical mode when installing, I write “linux text” to the bootloader's suggestion, I press it.
A window appears with a choice of language. We select the language - "Russian" and the type of keyboard - "ru".
Next, let's select the installation method, select HTTP:
Now we need to configure the network, although I have a DHCP server on the network, but I still configure it manually:
We drive in IP-shniks. The gateway is also my name server:
The next step is to specify the path to the mirror where the files for installing CentOS 5.4 are stored
Click "OK", the installer downloads the necessary files for further installation.
A welcome window appears. It is followed by the hard disk layout window:
I choose the partition manually, the default partition does not suit me, maybe. I don't need LVM.
After setting up the bootloader, a window appears asking you to configure the network interface in the system, we say “YES” and set it up in the same way as we did before.
A window appears with a choice of time zone, choose which one is ours.
Now we need to select the packages to be installed:
I remove the graphical interfaces, leave the server, and check the "refine software selection" box for a more detailed selection of packages.
Before starting the installation, a window appears where it says that the complete installation log will be located in /root/install.log.
After the installation is completed, it will say that the system is installed.
We reboot. When starting CentOS for the first time, a window will appear where you can configure some system parameters.
On this CentOS installation ends. Installing this operating system is no more difficult than installing windows.
Downloaded from the CentOS torrent. Instructions for installing CentOS 6.5 server are illustrated in detail.
Burn the CentOS 6.5 distribution ISO image to a CD or a bootable USB disk, you can install the server directly from the distribution ISO image into the Oracle VM VirtualBox CentOS 6.5 virtual machine. In the computer's BIOS, determine the boot order from the CentOS disk.
Start downloading CentOS 6.5 server:
You can skip the CentOS 6.5 distribution check:

CentOS 6 Community ENTerprice Operating System logo: 
Select a language during the installation process:

Select keyboard layout:

Select the type of hard disk to install CentOS 6.5 server:

On the next screen, take your time. Enter the computer name, separated by a dot domain. Switching the keyboard layout two - Shift -a. Next, set up the network, it's easier to do now. Click the Configure network button. In the Network Connections window, select eth0 and click Edit...


Select timezone:

Enter the password for the root user account:

Determine how to use the hard drive:

Save all previously entered parameters for CentOS 6.5 on your hard drive:

Installing CentOS 6.5 server packages:

At the end of the installation of CentOS 6.5 server, you need to restart the computer:

Remove the CentOS 6.5 distribution disk and restart your computer.

CentOS 6.5 server is ready to go.
So, no matter how you cope with the first task of directly pouring the system, we will assume that you succeeded. And here it is in front of us - an empty, bare console, from which it is now necessary to raise a decent server with a bunch of virtual hosts, a database and all sorts of other goodies.
So, let's begin.
First things first, let's define security. I NOT I recommend disabling selinux and iptables, but it will be difficult for beginners to immediately delve into all the intricacies of how these systems also work. These two services MUST be enabled and configured later, but for now, disable.
Let's deal with iptables first.
If you want to turn it off completely, you will have to remove it from startup and do not forget about ipv6:
chkconfig --del iptables chkconfig --del ip6tables
If you just turn it off until the next reboot or until you turn it on yourself, then:
/etc/init.d/iptables stop
Next, we need to find and modify the selinux configuration file. BUT! Of the editors, that is, only the terrible vi =) But nothing. As long as we get through them.
So, we find and change the line SELINUX=enforcing on the SELINUX=disabled. Actually, everything is written in the file. How to do it?
vi /etc/selinux/config
Next, press the following:
i
edit the required line
esc
shift+Z+Z (twice Z)
In order for selinux to still turn off, you have to reboot:
shutdown -r now
Everything. Now let's move on to the most important thing - setting up the network and the Internet.
Enter ifconfig and see something like this:
Spoiler: Highlight to view
Ifconfig lo Link encap:Local Loopback inet addr:127.0.0.1 Mask:255.0.0.0 inet6 addr: ::1 / 128 Scope:Host UP LOOPBACK RUNNING MTU:16436 Metric:1 RX packets:0 errors:0 dropped:0 overruns: 0 frame:0 TX packets:0 errors:0 dropped:0 overruns:0 carrier:0 collisions:0 txqueuelen:0 RX bytes:0 (0.0 b) TX bytes:0 (0.0 b)
There is information only about lo. The fact is that network cards are not included.
Let's go to the folder:
cd /etc/sysconfig/network-scripts/
The files we are interested in in this folder are called ifcfg-*. Under "*" is the name of your interface and its number. For example, I have a name like this - ifcfg-em1. Could it be - ifcfg-eth0- etc.
Estimate in advance how many interfaces you need. For example, I have two - for the external network (dedicated ip) and for the internal (local ip).
Turn them on, change the line in each of the necessary files ONBOOT="no" on, respectively, ONBOOT="yes" and indicating getting ip from dhcp. You can do this, of course, I did not forget to change the interface name in the command to my own:
sed -i -es#no#yes#g ifcfg-em1 sed -i -es#no#yes#g ifcfg-em2 echo "BOOTPROTO="dhcp"" >> ifcfg-em1 echo "BOOTPROTO="dhcp"" > >ifcfg-em2
If you are using static, then instead of dhcp need to write static and add more captions IPADDR=- ip address of the computer and NETMASK=- Subnet mask. It's better to use an editor. The file should look something like this:
DEVICE ="em1" HWADDR ="E0:DB:55:01:C2:40" NM_CONTROLLED ="yes" ONBOOT ="yes" BOOTPROTO ="static" IPADDR =192.168.0.214 NETMASK =255.255.255.0
That's not all. Now you need to specify the gateway
echo "GATEWAY=192.168.0.1" >> /etc/sysconfig/network
and dns
echo "nameserver 192.168.0.1" >> /etc/resolv.conf
Do not forget to change the ip if your DHCP server has a different address!
It remains to restart the network:
service network restart
Spoiler: Highlight to view
Disable em1 interface: [ OK ] Disable loopback interface: [ OK ] Enable loopback interface: [ OK ] Enable em1 interface: [ OK ]
ifconfig
Em1 Link encap:Ethernet HWaddr E0:DB:55 :01:C2:40 inet addr:192.168.0.214 Bcast:192.168.0.255 Mask:255.255.255.0 inet6 addr: fe80::xxxx:xxxx:xxxx:c240/ 64 Scope: Link UP BROADCAST RUNNING MULTICAST MTU:1500 Metric:1 RX packets:0 errors:0 dropped:0 overruns:0 frame:0 TX packets:0 errors:0 dropped:0 overruns:0 carrier:0 collisions:0 txqueuelen:1000 RX bytes:0 (0.0 b) TX bytes:0 (0.0 b) Interrupt:35 lo Link encap:Local Loopback inet addr:127.0.0.1 Mask:255.0.0.0 inet6 addr: ::1 / 128 Scope:Host UP LOOPBACK RUNNING MTU :16436 Metric:1 RX packets:0 errors:0 dropped:0 overruns:0 frame:0 TX packets:0 errors:0 dropped:0 overruns:0 carrier:0 collisions:0 txqueuelen:0 RX bytes:0 (0.0 b ) TX bytes:0 (0.0b)
Let's start with a system update. At this stage, we will use only standard repositories. In general, for reliability, you should not update anything from third-party repositories, without a reason. Well, let's skip the moral and get down to business:
yum update
Base: mirror.academica.fi * extras: mirror.academica.fi * updates: mirror.academica.fi Setting up Update Process Resolving Dependencies --> Running transaction check ...
Install 5 Package(s) Upgrade 113 Package(s) Total download size: 124 M Is this ok [ y/ N] :y
In general, everything will be downloaded there, installed and the old one will be deleted =) Most likely, your kernel will be updated. Package starting with kernel. For it to "take effect", you need to restart the system. It won't delay:
shutdown -r now
Now. We will install additional repositories in order to download the necessary packages of the latest versions. But first we need a couple of standard components. Let's put them:
yum install wget nano
- nano- console text editor (http://ru.wikipedia.org/wiki/Nano);
- wget- console program for downloading files over the network. Supports HTTP, FTP and HTTPS protocols, and also supports work through HTTP proxy server (http://ru.wikipedia.org/wiki/Wget).
The name of the Linux-based operating system - CentOS is revealed as Community ENTerprise Operating System. This distribution is based on the commercial Red Hat Enterprise Linux developed by Red Hat and is fully compatible with it. At its core, CentOS is the same Red Hat Enterprise Linux, only with a different name, logo, and graphics. Red Hat distributes the compiled operating system for a fee, however, since the OS itself consists of free and open source software, under the terms of the GPL license and other types of licenses based on the GPL, Red Hat is required to provide source codes. From these codes, with minor changes, CentOS is built. CentOS uses the yum program to update (like Fedora, also developed by Red Hat) and is updated from the CentOS Mirror Network repository, while Red Hat Enterprise Linux receives updates from Red Hat servers network.
This article describes how to install CentOS 6.3 from the distribution DVD on a new computer.
Download the distribution DVD from the CentOS website https://www.centos.org/
Burn iso images to DVD
Boot from the iso image and at boot select "Install or upgrade an existing system"

You will be prompted to verify the DVD's checksum, as there might be errors in writing. In most cases this is not required, especially if you are installing on a non-production server, so you can click "Skip" to skip this lengthy process.

In the event that your computer has enough RAM, a graphical installer will start. Click Next.


In the next paragraph, you will need to select a keyboard layout. If you have chosen the Russian installation language, then by default you will be offered the Russian keyboard layout. However, it is recommended to choose the English layout, as otherwise, the Russian layout will also be the default system layout, which will cause inconvenience when working with the system. all commands are entered in Latin.


If you are installing CentOS on a new hard drive, you will be warned that you need to initialize the hard drive.


Choice of time zone. Leave the “System clock uses UTC” checkbox only if Fedora 17 will be the only system on your computer. If you are installing CentOS as a second operating system after Windows, then remove it, otherwise, the clocks on different systems will conflict. The problem is that CentOS 6 suggests using the more modern UTC, while Windows uses Greenwich Mean Time as the time reference.

Specify the system account password (root password). It is recommended to use a complex alphanumeric password with mixed case characters and at least 8 characters long.

The next step is to choose a method for partitioning the hard drive. Standard options are suitable for most users. If you are installing CentOS on a computer without other operating systems, then select the "All space" option, and if the second, then "Use free space" is most likely suitable for you.

Then you will need to confirm the changes on the hard drive.

The next step is to select the type of CentOS 6 installation, i.e. which programs will be installed with the system. Of course, any software can be installed later. By default, the "Minimial" option is offered, but this option does not even contain utilities for configuring the system from the command line and will be very difficult to learn and initially configure, especially for novice users. For initial work it is recommended to select "Desktop" or "Minimal Desktop".

For reference, here is a list of the package groups that are included in each installation type:
- desktop: base, basic-desktop, core, debugging, desktop-debugging, desktop-platform, directory-client, fonts, general-desktop, graphical-admin-tools, input-methods, internet-applications, internet-browser, java-platform, legacy-x, network-file-system-client, office-suite, print-client, remote-desktop-clients, server-platform, x11
- Minimal Desktop: base, basic-desktop, core, debugging, desktop-debugging, desktop-platform, directory-client, fonts, input-methods, internet-browser, java-platform, legacy-x, network-file-system-client, print -client, remote-desktop-clients, server-platform, x11
- Minimal: core
- Basic Server: base, console-internet, core, debugging, directory-client, hardware-monitoring, java-platform, large-systems, network-file-system-client, performance, perl-runtime, server-platform
- database server: base, console-internet, core, debugging, directory-client, hardware-monitoring, java-platform, large-systems, network-file-system-client, performance, perl-runtime, server-platform, mysql-client, mysql , postgresql-client, postgresql, system-admin-tools
- webserver: base, console-internet, core, debugging, directory-client, java-platform, mysql-client, network-file-system-client, performance, perl-runtime, php, postgresql-client, server-platform, turbogears, web -server, webservlet
- Virtual Host: base, console-internet, core, debugging, directory-client, hardware-monitoring, java-platform, large-systems, network-file-system-client, performance, perl-runtime, server-platform, virtualization, virtualization-client , virtualization-platform
- Software Development Workstation: additional-devel, base, basic-desktop, core, debugging, desktop-debugging, desktop-platform, desktop-platform-devel, development, directory-client, eclipse, emacs, fonts, general-desktop, graphical-admin-tools , graphics, input-methods, internet-browser, java-platform, legacy-x, network-file-system-client, performance, perl-runtime, print-client, remote-desktop-clients, server-platform, server-platform -devel, technical-writing, tex, virtualization, virtualization-client, virtualization-platform, x11

When finished, remove the DVD from the drive and reboot.

When you first boot you will need to make the initial system setup.

The first step is to ask you to agree to the license terms.

Then you need to create a user.

Next, set the date and time. Surely your computer will be connected to the Internet, then it will be useful to check the box next to "Synchronize date and time over the network", which will ensure high accuracy of the time displayed on the computer.


The last step will ask you to enable kdump. Kdump is a service that collects information about kernel crashes in order to determine the cause of the crash. Using kdump requires special knowledge, so given that kdump requires a portion of RAM to be allocated, it might be worth disabling its use.

Also, in case you don't have enough RAM, you won't even be able to activate kdump

Initial setup completed. CentOS 6 welcome screen.


So, the installation of CentOS 6 is over.
You will need to enter the root user password.
Any server administration work begins with the most obvious and mandatory process - installing the necessary OS, which we will do. Download and install CentOS 7 server in a minimal or netinstall configuration from a bootable flash drive or over the network to a regular disk or raid partition. Before that, let's do a little preparatory work and get acquainted with the details of our distribution, which may be useful in the future.
If you have a desire to learn how to work with Mikrotik routers and become an expert in this field, I recommend using a program based on information from the official course MikroTik Certified Network Associate. The course is worthwhile, read the link for all the details. There are free courses.
Purpose of the article
- Briefly talk about the Centos 7 system.
- Explain the differences between installation images.
- Show how to make a bootable Centos flash drive for installation from a flash drive or over the network.
- Describe in detail all the steps of installing Centos 7 on the server.
- Show installation of Centos on the mdadm software raid on those servers where there is no physical raid controller.
This article is part of a single series of articles about the server.
CentOS 7 system requirements
On July 7, 2014, the release of the CentOS 7 distribution was released. Before installing it, it is recommended that you familiarize yourself with the system requirements. You can see the full list of maximum and minimum system requirements in detail on the official wiki. I will give only the most important parameters:
This is the official data from the CentOS website. At RHEL they are the same, I checked. For me personally, everything works safely on VDS and with 512MB of memory, I didn’t try to install less, I think it will start with 256 too.
Types of CentOS 7 iso images
The release of CentOS contained several types iso images. A detailed description of each of them is presented in the table:
| CentOS-7-x86_64-DVD | This DVD The image contains all the packages that can be installed using the installer. Recommended for most users. |
| CentOS-7-x86_64-NetInstall | This NetInstall image for installation over the network and for recovery. The installer will ask where the packages will be installed from. Useful if you have a local package repository. |
| CentOS-7-x86_64-Everything | In that Everything The image contains the full set of CentOS 7 packages. It can be used to install or update a local mirror. This image requires a double-sided DVD or an 8 GB flash drive. |
| CentOS-7-x86_64-LiveGNOME CentOS-7-x86_64-LiveKDE | These two images are LiveCD CenOS 7. Depending on the name, one or another graphical shell is used. They are designed to test the CentOS 7 environment. They are not installed on your hard drive unless you force them to. The set of installed software cannot be changed, this can only be done on the installed operating system using yum. |
| CentOS-7-x86_64-Minimal | With the help of this Minimal image, you can install a base CentOS system with the minimum set of packages necessary for the system to work. Everything else can be installed later with yum. The set of packages in this image will be the same as on the DVD if you choose to install minimal. |
I usually use either minimal image, or netinstall.
Download CentOS 7
Download the latest version CentOS 7.2.1511 can be done in two ways:
- Via torrent network
- From the nearest mirror
I prefer to use as such a mirror:
| Torrent | Yandex Mirror | Size |
| Download CentOS 7 DVD torrent | Download CentOS 7 DVD iso | 4G |
| DownloadCentOS 7 NetInstall torrent | DownloadCentOS 7 NetInstall iso | 360M |
| Download CentOS 7 Everything torrent | DownloadCentOS 7 Everything iso | 7G |
| DownloadCentOS 7 LiveGNOME torrent | DownloadCentOS 7 LiveGNOME iso | 1G |
| DownloadCentOS 7 LiveKDE torrent | DownloadCentOS 7 LiveKDE iso | 1G |
| DownloadCentOS 7 Minimal torrent | DownloadCentOS 7 Minimal iso | 634M |
I remind you that 32bit or i386 there is no edition of CentOS 7. All distributions only x86_64, i.e 64bit.
Bootable flash drive for CentOS 7
Recently, I personally practically do not use ordinary CDs, preferring bootable flash drives to them. They are more convenient, take up less space, it is easier to update the distribution kit on them. But sometimes you have to get confused to create a bootable USB flash drive. For example, to create a bootable CentOS 6 flash drive, I used to use the program unetbootin, but with the 7th version this number did not pass. The flash drive created in it does not allow installing CentOS 7, since the installer itself at some point does not see the installation source on the flash drive.
But a free program came to the rescue. With her help, you can easily create a bootable CentOS 7 flash drive. Here's how it's done:

This is enough to create a flash drive. Now you can use it to install the operating system from a USB flash drive.
Installing CentOS 7 from a flash drive
After creating a bootable USB flash drive, you can proceed with the installation. We insert the USB flash drive into the server, specify USB as the boot source and start the computer. We are greeted by the initial CentOS installation menu:

Select the first item: Install CentOS 7 and press enter. After downloading the installer, we are greeted with a window with a choice of language that will be used during installation. I always choose English, it's more familiar to me:

CentOS 7 Minimal
If you are using disk centos minimal iso, you will see the following screen:

Here you are prompted to specify installation options. An exclamation mark marks a section that cannot be continued without setting it up. The following installation options are available for customization:
- Choice .
- Selecting a keyboard layout.
- What languages will be supported on the server.
- Where will the installation take place? Since we have a centos minimal distribution, the installation will be from a local iso.
- Selecting packages to install. Only a minimal set of software is available in the minimal image.
- Partitioning a hard drive. We will touch on this point in more detail when we disassemble the installation on raid.
- Setting up network interfaces.
To proceed with the installation, you must at least partition your hard drive. Without this, the installation cannot continue. But we will go through all the parameters and set the values \u200b\u200bthat we need.
So, click on DATE & TIME and adjust the time settings:


After completing the settings, click on the top blue button Done.
Go to the next setting - KEYBOARD LAYOUT :

- Add the necessary layouts. I added Russian .
- Click Options and choose how layouts will be switched.
- Testing layouts and switching. If everything is in order, we move on.
Click LANGUAGE SUPPORT:

Select additional languages that the system will support. Most often, I don’t need this, but for example, let’s add support for the Russian language. This can be useful, for example, when creating a file archive with Russian names in files. With support for the Russian language, you can work in the console with the Russian names of folders and files. If, for example, you have a server configured to act as a gateway, support for additional languages is most likely not useful. Once selected, click Done again.
Now let's do the network settings. We go to the NETWORK & HOSTNAME section. I pointed out in detail about it in one of my articles, so I will not dwell on this issue. Turn the slider to the ON position and automatically get the settings according to dhcp:

- Turning the slider to the ON position activates the interface, it receives settings via dhcp.
- If you want to change these settings, click Configure.
- Specify hostname . If you forget, then after installation this parameter can be changed.
We complete the configuration by clicking on Done. Now you can return to the clock settings and activate Network Time.
Now let's move on to the INSTALLATION SOURCE section. When installing centos minimal there is no need to change this setting. The local source is set there by default, it suits us. You can not touch anything:
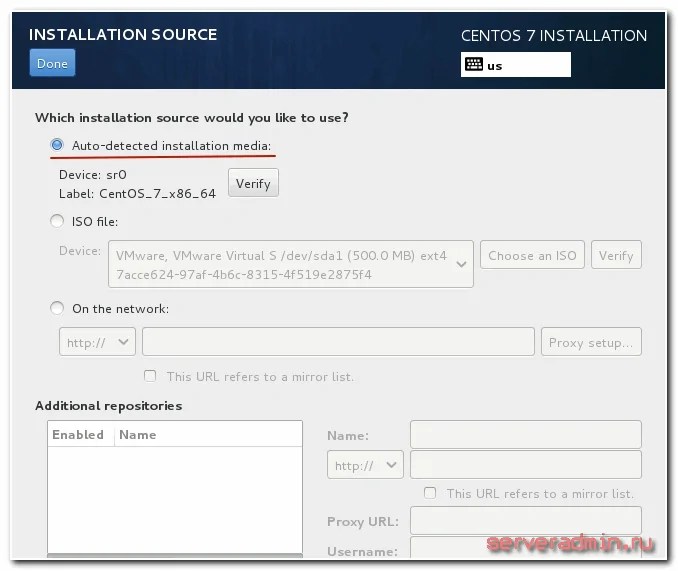
In the SOFTWARE SELECTION section, with a minimal installation, there is also nothing to select, the only possible option is already indicated:

It remains for us to consider the last mandatory setting, without which the installation of centos will not start - INSTALLATION DESTINATION . Having entered it, you will see a list of disks connected to the server. In my case, this is one hard drive.

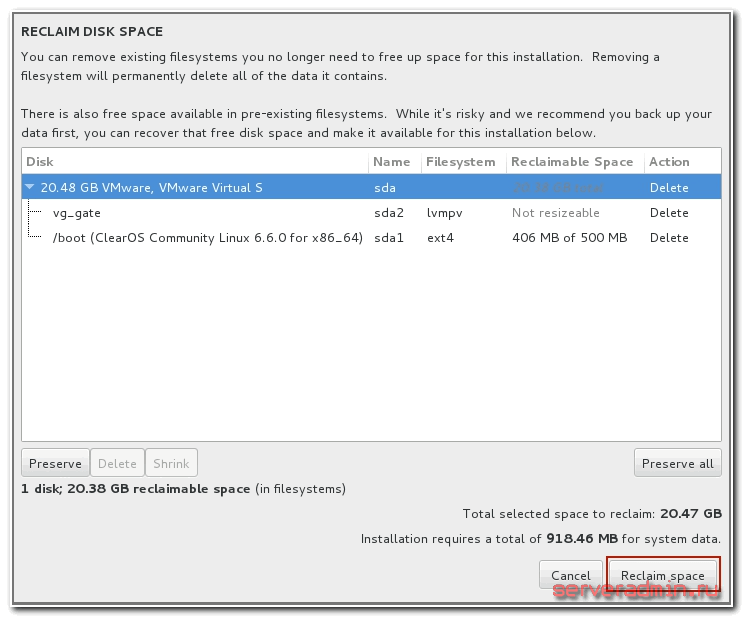
If your disk is detected correctly, select it and click Done. A window pops up with a warning that the system will need approximately 1 GB of hard disk space for installation, and your hard disk does not have the required free space. This is because another system was previously installed on this disk and it occupied the entire hard disk. We need to remove all the old information to install the new system. We do this by pressing Reclaim space:

Select the disk and delete all existing partitions on it - click first Delete all, and then Reclaim space:

The installer will then select the entire drive as the drive to install. After that, you can start directly installing centos by clicking the button Start Installation.
CentOS 7 netinstall
Installing Centos 7 from an image netinstall differs from others in only one moment. When preparing for a network installation, in the INSTALLATION SOURCE section, instead of a local source, you need to specify the path to an image located somewhere on the network. Obviously, before doing this, you need to configure the network and make sure that the computer has Internet access.
I'll use the previously mentioned . — https://mirror.yandex.ru/centos/7/os/x86_64/
The screenshot shows the old url. After a series of updates, it became irrelevant. The correct link is above in the text.
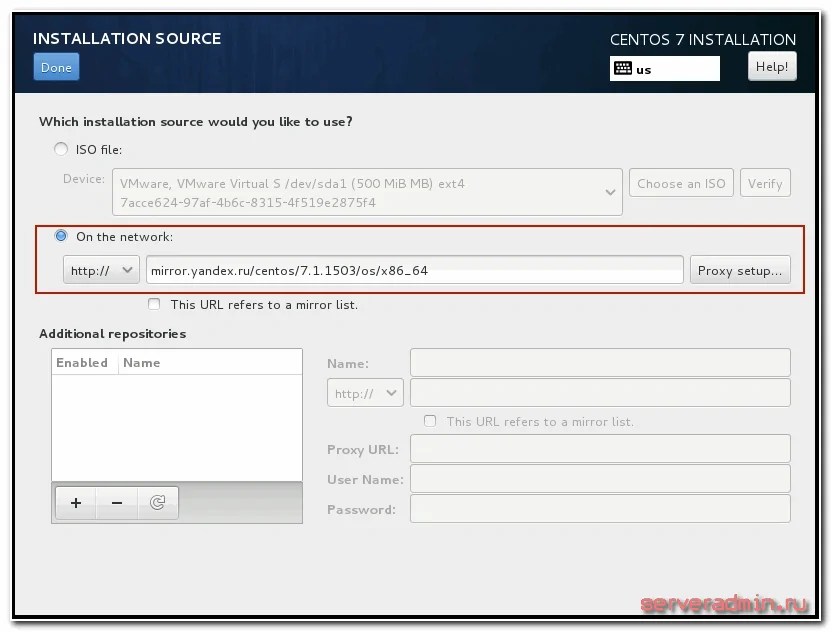
Specify the path and click Done. After checking the availability of the source, in the SOFTWARE SELECTION section, you can select the software set required for installation:

Now consider the most complex installation option. We will install CentOS 7 on software raid. For example, let's take 2 disks and raid 1. All installations will be the same as we discussed earlier, except for one - INSTALLATION DESTINATION .
We connect 2 disks to the system, boot from the installation disk and go to the disk partitioning section. We see 2 hard drives. Select both and mark the item I will configure partition:

Click Done. A slightly crooked hard disk partition management window opens.

Here we first delete all existing partitions:

And we create our new ones by pressing the plus sign. We need to create 3 partitions: boot , swap and root / . Choose the partition sizes yourself, based on your needs and RAM on the server. For the boot partition, 500MB is enough, for the swap, the amount of RAM is enough. Everything else can either be filled with one root partition, or create several, if necessary. Device Type set RAID. Choose the file system type of your choice. Which is better - xfs or ext4 depends on the specific situation. It is believed that xfs works better with large files, ext4 with a bunch of small ones. This is a topic for a separate discussion. RAID level specify RAID1 .
It should look something like this:

Click Done when we're done. In a new window, confirm the partitioning of the disk by clicking Accept Changes:

All other parameters are set as described above. We are now ready to start installing CentOS 7 on the software raid we just created.
During installation, you must specify the root password, or create additional users. I recommend setting a password, users as needed.
After the installation on the raid is completed, we will log into the system and check the state of the array:
# df -h # cat /proc/mdstat
Online Linux Security Course
If you have a desire to understand in more detail the processes of setting up and ensuring the security of a local and network infrastructure built on the Linux OS, I recommend that you get acquainted with online course "Linux Security" in OTUS. The training lasts 3 months, after which successful graduates of the course will be able to be interviewed by partners. The course program is designed as a series of practical workshops and is aimed at prepared students who already have knowledge and experience in Linux administration. What will you learn:- Apply the best world practices and information security standards (Debian, RedHat, MitRE);
- Use tools to detect and exploit vulnerabilities in Linux OS;
- Install and configure network systems for detecting and preventing attacks;
- Work with monitoring and containerization systems based on Docker;