Install the official firmware CM 14.1 (Android 7.1) on the Samsung Galaxy S3 I9300. Despite the fact that the phone Samsung Galaxy S3 was released 4 years ago, its owners are still available latest updates Android 7.1 Nougat.
Thanks to the efforts of the CyanogenMod developer community, the international version official firmware CM14.1 is now available for the aforementioned smartphone. You can install it using TWRP (TeamWin Recovery Project) and enjoy the latest version of Android 7.1.
Galaxy S3 owners looking to update their smartphone to the latest version can check out the easy installation guide below to install the official CyanogenMod 14.1 (Android 7.1) on the Galaxy S3 i9300.
note that current state CM14.1 for this phone model is updated every night which means bugs and some CM features that are missing are constantly being addressed. Users need to sometimes wait a bit to get a stable working CM14.1 build.
However, if you are ready to face some inconvenience in order to then experience the new features of Android 7.1, update the CM14.1 firmware on your Galaxy C3. Before starting, make sure you have a backup. current state systems. If not, create it using TWRP and you can continue.
Note: We will assume that you have already downloaded your Galaxy S3 and installed latest version TWRP recovery (version 3.0). Be sure to back up any important data stored on your phone.
Denial of responsibility: Please follow this guide at your own risk. Although we went all this way to describe all the actions as accurately as possible, we cannot take responsibility for everything that can go wrong. This manual is intended only for those users who have at least a little understanding of how the technique works.
How to install official CM14.1 on Galaxy S3
1. Download the CM14.1 ROM ZIP file for the Galaxy S3 i9300 from here. Also, download the Android 7.1 compatible GAPPS package (ARM and Nano versions are recommended). Save both archives on a memory card.
2. Reboot your Galaxy S3 into TWRP recovery mode (turn off your phone, press and hold the Volume Up, Home and Power button for a few seconds).
3. In TWRP recovery, do a full wipe (cache, dalvik cache, data / factory reset) by selecting the "wipe" option.
4. Now, firmware CM14.1 and GAPPS. To do this, select "Install", find the downloaded archive file and run to confirm the installation of the firmware. Repeat the same for GAPPS in the same way.
5. Before rebooting, once again clear the cache and data partition and then reboot the phone.
Note: The first download can take about 10-20 minutes.
After it's finished, customize your phone to your liking and enjoy updated Android 7.0.
Still have questions? Ask them in the comments section below.
Instructions for installing the official single-file firmware on Samsung Galaxy S3 Neo / Duos (GT-I9300I, GT-I9301, GT-I9301Q).
Drivers and programs
Attention!
To establish the official stock firmware on Galaxy S3 Neo / Duos and return the phone state ("Settings"> "About device"> "Properties"> "Device status") to "Official" after switching from custom firmware and thereby return the ability to receive updates over the air, just follow the provided instructions.
Installation instructions
Unpack the downloaded archive into the Odin PC folder for convenience. The file in the ".tar" or ".tar.md5" format must be kept and "SS_DL.dll" can be deleted.
Reset device data.
To do this, go to the settings on the tab “ Accounts
"In the section" Archiving and reset", Select the item" Reset device"And press the button" Delete everything". The phone will restart.
Run Odin PC as administrator.
Put the device into download mode ( Download Mode).
To do this, you must simultaneously hold down the Volume Down key, the Home button and the Power button. Then wait until the phone restarts and accept the warning by pressing the Volume Up key.
In this state, connect the smartphone to the computer. Odin should light up the inscription “ COM».
Press the button " AP»And select the TAR-archive of the firmware.
Items " Auto reboot" and " F.Reset Time" must be activated, a " Re-Partition", If active - must be disabled.
Press the button " Start". The process of installing the firmware will begin.
At the end of the operation, if everything went well, the message “All threads completed. (succeed 1 / failed 0) ". The phone must be rebooted manually by holding down the power button until the screen turns off. The device may take up to 5 minutes to boot up for the first time.
ATTENTION!
If the device does not boot for a long time or the data has not been reset, it must be performed from the recovery.
To do this, simultaneously hold down the Volume Up key, the Home button and the Power button. After downloading, select the item " Wipe data / Factory reset", and then - " Reboot system now". If after these steps the device also freezes at startup, you need to reflash it again.
Samsung Galaxy S3 GT-I9300
European region and other countries can now download XXUGMK6 Android 4.3 firmware for Samsung Galaxy S3 I9300. This is the last Jelly bean firmware updates should be available on Samsung kies or you should have received an OTA update notification on your phone. Samsung started releasing Android 4.3 firmware a few weeks ago and it is currently being released in many new regions. You can check the availability of this firmware on the settings for your device. If it is not available for your region or just used to install it manually through the Odin installer, then you are in the place you need. For you, we have prepared a step-by-step tutorial on how XXUGMK6 will receive Android 4.3 firmware for Samsung Galaxy S3 I9300.
Then if you keep reading, we will guide you on how to install XXUGMK6 Android 4.3 Jelly Bean on Galaxy S3 I9300 using ODIN. Before starting the installation, you need to do backup some important of your applications and personal data as a precautionary measure. You don't want to lose because of any problem. After that, you can go boldly, for complete guide on installation. Let's continue with the tutorial now.
Warning: Use these instructions at your own risk. We will not be held responsible for anything that happens to you or your device resulting from the use of the information in this manual.
Training:
- This tutorial is for Samsung Galaxy S3 GT-I9300 only. Please do not try to flash this on any other variant of the phone.
- Make sure the drivers for your device are installed on your computer.
- You need to enable USB debugging mode which is disabled by default.
- Your smartphone should have 70-80% charge.
- Make sure you did backup all data in the phone memory before continuing.
Download:
Download the firmware you need by going to the sammobile website.
Also download ODIN, (Odin3.09.zip) which will help you install this firmware.
Read more updates for the Samsung Galaxy S3 I9300.

Installation:
1 ... Unzip the firmware file you downloaded in the previous step. After unpacking, you will receive either one .tar /. tar.md5 file or you get multiple files.
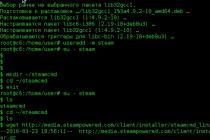
2 ... Let's extract Odin to get the "Odin3 v3.09.exe" file.
3 ... Turn off the device.
4 ... Now go to download mode. How? Press and hold the Volume Down + Dame buttons together, then press the Power button until you see the Android robot logo and triangle. Press the power button again to confirm to enter download mode.
5 ... Now run v3.09.exe Odin3 as administrator, because administrator rights are required to complete the process smoothly.
6 ... Now connect your phone to your computer using a USB cable. A message will appear in the lower left corner of the ODIN saying “Added!”. If you do not receive this message, then you should try another USB port(try the USB port located in the back in desktops). If that doesn't work either, then you must reinstall the driver. If you have successfully added "Added!" Messages in ODIN, then you are ready to go to the next step. In addition, it should COM port turn yellow if you have successfully added a device.
7 ... Select these files in ODIN on the corresponding buttons from the extracted firmware folder:
- Press PDA buttons and select ". tar.md5 ″ file here (required)
- Click on the Phone button and select the file with the "modem" extension in its name (Add it if you only have it in the extracted folders in the firmware)
- Press the CSC button and select the file with the "CSC" extension in its name (Add it if you only have it in the extracted folders in the firmware)
- Press the PIT button and select the ".pit" file (Add it if you only have it in the extracted folder in the firmware)
8 ... In the ODIN window, make sure that only Auto Reboot and F. Reset Time were selected. By default, it should be like this. Be sure not to select the Re-Partition option.
9 ... Double check everything we said above. Now, if you are convinced of all the orders, click Start to start the firmware procedure.
10 ... Once the installation is complete, your phone will restart and you will soon see a PASS message with a green background at the top of the ODIN. You can now unplug the USB cable to disconnect the device from your computer.
Congratulations! Manual Android installation 4.3 Jelly Bean firmware update is completely done for your device!