A full-screen contact photo is not only beautiful, but also informative. But, unfortunately, for many Android smartphones, a contact photo occupies a very small window during a call, which is very inconvenient. I will tell you how you can take a photo of the caller to fill the phone screen.
What should happen:
Before we take a picture to full screen, let's figure out how to set a photo to a contact.
It's not difficult at all. Here are a couple of ways how you can do this:
Through the "Contacts" application
Open the phone book and select required contact.

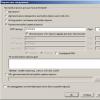
- Click on the edit contact icon.
- In the editing window, click on the image of the man (in the photo below it is indicated by an arrow)

The system will offer to select a photo from the gallery or take a new photo with a smartphone camera.
Set a photo to a contact through the standard gallery
Open the Gallery app on your phone and select the desired image.

- Click on the additional options button, in this case, these are the three dots in the upper right corner.

- We are interested in the option “ Const. image as“, Click on it. We are offered to choose what this picture will be.

- We press the button " Contact photo"And select the area in the picture that should be displayed when called and confirm" OK ".

The selected picture will now be displayed during the call.
# 2 How to take a photo in full screen
And so, we have established a photo for a contact, now let's figure out how to make it full screen during a call.
On some devices, the default photo on a call is displayed in full screen. But what if your smartphone doesn't support this feature? In this case, we will be helped special utilities, we will consider one of them below.

The application is one of the best of its kind, it has a friendly interface and a large number of settings. Let's take a closer look at the settings.
Screenshots


Key features:
- Full screen photo of the caller in HD quality
- Incoming SMS in full screen
- Full screen missed call notification
- Black list of calls
- Call control with gestures
- And other settings
The free version of the program supports:
- Full screen photo when calling
- Call blocking
- Gesture control
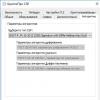
Program settings:
The application has a lot of settings. You can change almost everything - the call window, a large number of gesture parameters, notifications, and more. Even the most sophisticated user will like it.
When you start the application for the first time, a setup wizard will open, which will guide you through the steps to set the optimal values.

Now, through the built-in contact manager, you need to assign pictures to subscribers. After that, the caller's photo will be displayed in full screen.
Articles and Life Hacks
Having bought a smartphone, people are not limited only to calls and SMS messages. Most new smartphone users are interested in how to take a big photo on a call from an Android device?
Consider possible ways setting images in the entire display to incoming.
Ways to set photos on calls
- Before you start attaching pictures to contacts, make sure that all the phone numbers to which you want to put a picture are in the phone's memory.
- The easiest way is to select a picture from the device gallery. To put it on a contact, go to the menu and click "Install on", and then - the icon of the required contact.
- You can also put a snapshot on an incoming call from the Contacts section. To do this, go to the menu of the desired phone number, where select "Change".
- In the window that appears, choose where you want to attach the picture: from the ready-made pictures saved on the phone in the "Album" section or directly take a picture with the phone in the "Take a photo" item.
Installation of a large photo

- This method will be a little more troublesome than the previous ones. For a full-screen picture, you need to download a special application for Android. The choice of such "dialers" is quite extensive.
- They can differ in the range of functions. For example, some have many commands for editing images, while others have a minimum of such tools. But all of the programs are installed on the incoming large photographs, which is what we need.
- One of these programs is called BIG Caller ID. Its feature is wide functionality and the ability to set a photo not only for incoming, but also for outgoing.
- The original quality and color characteristics of the snapshot are preserved after linking to a contact. An added bonus of this application is the ability to change the location and response of the main call acceptance and end buttons.
- You can also enable synchronization with your page in social network, which will allow you to upload photographic materials from there.
Hello everyone, dear users of smartphones based on excellent operating Android systems... Today I will try to tell you how you can easily and without unnecessary gestures put a photo or image on a contact in the address book. Those. with an incoming call on the screen of your Android smartphone the caller's photo or some other selected image will be displayed.
For these purposes, we will use a special application that allows you to easily and without unnecessary settings set a photo or any other picture to the contact of the caller.
Moreover, all the tools discussed in today's article will allow you to display the caller's photo in HD format in full screen, which you will agree is very convenient and beautiful.
So let's go. If you have any questions or comments about the selection presented below, then leave them in the comments to this post.
Attention: in order to be able to leave comments on this article, you need to log in, i.e. log in to the social network Vkontakte.
Ultimate Caller ID Screen HD

An excellent and functional program for setting a photo on a call. Of all the undoubted advantages and wide possibilities of this application, I would like to note the following three, tk. they struck me as the most interesting:
- Possibility, with ease, to put an HD photo on a caller's call. Moreover, with an incoming call, the photo will be displayed on the whole screen;
- There is how paid version applications are both free. V free version there are several restrictions, for example, you can put a photo on a call only on six contacts, in the full version there is no such restriction, as you might have guessed;
- The application allows you not only to put images on the call, but has others, undoubtedly useful functions, for example: blocking a call from an unwanted subscriber, cataloging phone numbers and many other interesting features.
Download this application from the store Google play you can follow the link that is located above.
Attention: in order to immediately download the application to your smartphone, you need to follow the proposed link directly from your Android device.
Full Screen Caller ID

Another application that replaces the standard dialer on your Android gadget. This application is somewhat similar to the previous one. I will note the following three possibilities:
- Full screen notification of calls and SMS;
- The ability to set your own design for the notification, such a function will undoubtedly be useful for creative and extraordinary people;
- Blocking a call (call) from selected subscribers (contact).
That's all for today, I hope you liked the material and you were able to choose a good tool for yourself..
Users of Android smartphones can be roughly divided into two categories. The first includes those who painstakingly compile a list of contacts, carefully filling out each of its lines, it is important for them that everything is laid out on the shelves (email, address, home phone number of the contact, etc.). But the second category is usually limited to only the name and phone number. Especially for those who consider themselves to be in the first category of users, we will tell you how you can put a photo on a contact in Android.
From the article you will learn
Installing a photo on a contact using the operating system
The first thing you need to know about before trying to set a photo is that the contact must be in the smartphone's memory or in the contact list of your Google account, but not on the SIM card. If the data is stored on a SIM card, it must first be copied to the phone memory.
The first way
- Open the Contacts menu.
- In the list that appears, we look for the contact we are interested in and select it.
- Now we are looking for an area intended for photography and make a long tap on it.
- A menu appears where you can select the photo setup option. You can use an image from the gallery or take a photo with your phone camera.
Second way
- Open the "Contact" settings.
- Click on the icon with the depicted pencil, which is located on the right upper corner.
- Tap the portrait area.
- Next, use the instructions from the first paragraph of the previous method.
Third way
- Find "Gallery" in the application menu and open it.
- Find the photo you are going to set to the contact.
- In the menu that opens, select the "Operations" menu and then "Set Image As".
- In the window that appears, select "Contact photo".
- In the list of contacts that opens, select the one you need.
- A menu will open where you can select the area of the photo that you want to set as the photo. Select the area and confirm the action by clicking on the checkmark.
Of course, the installation of photography described in this material using the capabilities operating system is not suitable for all devices. The fact is that today there are many add-ons for Android, as well as versions of the operating system. Therefore, the order in which you set up your contacts may vary.
If you are unable to install the photo using the described methods, use one of the special applications for these purposes, which are discussed later in our review.
Setting a photo to a contact using applications
Currently, there are many applications on Android through which you can produce fine tuning your contact list.
How to set a photo to a contact in Android using third party applications and what are they? Let's take a look at some of them.
Multifunctional application for Android devices designed to handle incoming calls. Thanks to him, you can easily set the desired photo to any contact from your list. The app has received many positive feedback in Google Play and thematic forums.
Separately, it is necessary to highlight the application's ability to create a black list, as well as block incoming calls. Plus, with Ultimate Caller ID Screed HD, you can reject incoming calls without pressing any buttons. To do this, just pick up the phone and turn it over.
Despite all the advantages, the application also has jambs, and some smartphones may have bugs during operation. Most likely, in future versions, the developers will fix these shortcomings.

If you believe the statistics, then this application takes one of the leading positions in its class. With Full Screen Caller ID Pro, you can easily set photos or pictures from the memory of your device to a contact, using a camera, or download from your Facebook account.
The application has the ability to customize the interface, font and color scheme. It is also worth noting the ability of the application to read aloud the name of the subscriber during an incoming call.

Functional and free app, which contains a whole heap of possibilities. Like the other two apps described above, HD Caller ID can display a full screen photo of a contact while making a call or incoming SMS. The application interface is simple and straightforward.
All applications described in the article can be downloaded to your device via Google Play.
Solving the most common problems and mistakes
As practice shows, many users have different problems when solving this problem. As a result, the contact photo does not appear during an incoming call.
Perhaps the photo still did not attach.
First of all, we recommend that you check again if the photo is attached to a specific contact. Often there are cases when users, it would seem, have done everything right, but in the end result they simply forget to click on the "Save" button, or some kind of failure could occur in the system.
It is necessary to check the profile of the person. To do this, you need to find it in the phone book and see if the selected photo is in the photo area or if there is a standard avatar. If necessary, just do the picture setting operation again.
Perhaps the contact is written to the SIM card
The selected photo will be displayed on the device screen when incoming call only if the contact is saved in the phone memory, and not in the SIM card memory.
If you have a need to transfer from a SIM card to the memory of a smartphone, then you need to do the following steps:
- Open your address book and select the desired profile.
- Launch the options menu.
- Find and activate functionality "Copy contacts".
- Choose from sim card to phone.
- Check the functionality with a call.
The system may have crashed
Very often, users find themselves in situations where the Android system succumbs to minor errors. As a rule, most of them are solved very quickly by simply rebooting the device. After that, you need to check the functionality of the function.
If the reboot did not give the desired result, then you need to reset the settings to the factory settings or flash the Android. But please note that in this case inner memory will be completely cleaned up, so first of all, take care of creating a backup.
One of the nice features modern smartphones- the ability to customize them. We are given the chance to change fonts, themes, select applications that we like externally and in functionality. Even in the phone book, you can make pleasant changes, for example, put a photo on a contact in Android and iPhone. Below are the most versatile and simple ways to help you do this.
How to assign a photo to a contact in Android?
To get started, go to the menu and find the "Contacts" application. Then search for the person you want manually or through the built-in search (enter the first name or the first letters of the subscriber's last name in the top line). Open the post and follow one of the two options provided.
Method one:
- tap on the gray picture where the image should be;
- two methods will appear to upload a photo: upload from the gallery or take an instant photo;
- if you take a snapshot, then select desired camera, and when the photo is ready, mark the area that will be displayed when you call;
- if the photo is in the gallery, upload it and select the part you want.
It is easy to set a picture to a contact in your phone using this method, but if it doesn't suit you, read the next one, which is more universal.
Method two:
- when you have found the contact you need, there will be a pencil icon in the upper right corner;
- click on it to start editing;
- on the template where the picture should be the plus icon, tap on it and a new window will open;
- you will be prompted to take a picture of a person right now or pull up a picture from the gallery.
Choose the method of addition that is convenient for you and repeat the third and fourth points from the first method.
How to make a contact's splash screen full screen?
On Android, you can put a photo on a contact in full screen.
It remains to select the desired area and confirm the action. Thus, a full-screen contact photo can be installed on any Android device, if the "Contacts" application itself supports such a display.
How to assign a photo to a contact on iPhone?
You can put a photo on a contact in iPhone by following a short guide.
Method one:
Method two:
- in the phone book, select a contact and open it;
- in the upper right corner there is a button "Edit", click on it;
- when the menu opens, there will be an inscription “Photo” on the image template;
- click on it.
It remains only to take a picture of a person or select his finished picture from the list of images. Now it will not be difficult for you to put the desired image on the contact of a friend, girlfriend or relative on any smartphones.