From the very first versions Minecraft Pocket Edition, some developers have started to create many different and add-ons for Android version of the game. But mods were recognized as an official part of the game quite recently. Now each mod is supported on any resource, regardless of the platform on which the game is installed. Today we will sort it out how to install Minecraft PE mod on Android?
Addons
V this manual, written by us, you will learn how to install mods for your Android phone.
MCPack, .MCWorld
Most mods on the Internet will have file extensions .mcpack / .mcworld... Files of this type will automatically install add-ons to your Minecraft PE.
1. First, make sure you have latest version installed ES File Explorer
2. After downloading the mod, open ES File Explorer
3. Go to your downloads folder
4. Find the file with the extension .mcpack or .mcworld, click on it and wait while the file itself installs the necessary elements into your. The screen may go black for a few seconds, but don't worry: it's just a little loading.
5. But that's not all: after adding the mod, you need in the settings MCPE change resource pack and / or pack of mobs' behavior when creating a new world
ZIP, .RAR
If your installed add-on has the extension .ZIP or .RAR then do the following:
1. Make sure you have the latest version installed. Versions prior to 0.16.0 do not support installing mods.
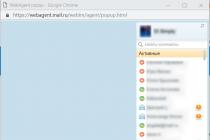
2. To select mods, go to the "Mods" tab on the site, for example, the mod will be used More Chairs Add-on.
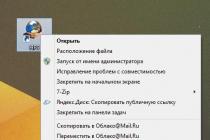
3. Now you need to find the required file in the download folder. But use ES File Explorer or whatever file manager... Use a long press on the archive with the mod. A More button appears in the lower right corner. Click it to extract files from the archive using the "Extract to .." 
4. Next, a small window will appear in which you need to click the button 
5. When extracting, the program creates a folder with the extracted files. Open this folder to continue working. 
6. If the mod has textures, then the mod folder will contain two folders, as happened in our example.
We copied the folder More Chairs by Genta by long pressing on the folder and the "Copy" button. 
7. Now you need to go to the /games/com.mojang/ folder. You will get there very simply: go to " Internal memory", open the" games "folder and then" com.mojang ". This folder contains the files. But to continue exploring, you need to figure out what the folder names mean:
- behavior_packs- the main purpose of the folder is installation
- minecraftpe- don't even try to touch that folder
- minecraftWorlds- purpose: for installation
- resource_packs- purpose: to install or texture mods

9. Textures for the mod are added, now it's up to the package of behavior. To install this file type, go to the Downloads folder again, copy "More Chairs by Genta"... And again in the folder with, namely "/games/com.mojang/", where you will find the "behavior_packs folder", where you will paste the previously copied folder.

10. Run Minecraft PE.
You need to create a new world or edit an old one.

11. As usual, select all the necessary settings and click Resource Packs, where you need to select More Chairs Add-on.

12. After that, you guessed it, select the Behavior Packs and accept the More Chairs Add-on.

13. We go into the created world. Each mod adds various functions and items. In our example, noteworthy armchairs and chairs are added.
ModPE (BlockLauncher)
The following instruction only works for extensions like .js and .modpkg.
1. First, download BlockLauncher Free or BlockLauncher Pro.
2. Go to the "Mods" tab on the site. Download the required mod. In the example below, we will use the addition Achievements Mod.
3. Enter the game and launch the BlockLauncher menu and select "Manage ModPE Scripts". 
4. Click "Import". 
5. Click "Local storage". 
6. Click the "Download" or "Downloads" folder. 
7. In this folder you will find the file "Achievements v1.1.js", clicking on which will start the installation. 
8. The add-on is already installed! 
How to install a mod for minecraft, install mods for minecraft, instructions for installing mods for minecraft.
The Mojang team has slightly changed the mod installation system. Now there are no such concepts as uploading a mod to /minecraft/bin/minecraft.jar. Everything has become different and a little more difficult, so we ask you to read carefully and do everything exactly so that the modification is successfully installed.
Step 1
First of all, let's go to the Minecraft version directory. You can drive this into the explorer:
% appdata% /. minecraft / versions
Now the contents of the files in this folder need to change the name of all files to the same folder name.

Step 3
You need to be careful in this step, now open any text editor json format file in the same folder. In the line "ID" you need to write the name of our folder.

Step 4
Create a new profile in Lanucher (Game Launcher). In the new profile, select that folder, Save and Voila, everything should work.

Step 5
Now to install mods for Minecraft- download the mod from our website, move it to Minecraft.jar (open this file using the archiver). In the same archive, delete the META-INF folder
All now you have patched your version of Minecraft, which means that you can continue to install mods yourself (repeat step 5). If the game does not start or if an error occurs, then most likely this is due to a mismatch between the version of the mod and the game. Or during the installation process, you made some mistake.
How to install a mod on Minecraft:

Monstrously Massive Seaside Village - have you seen in the pictures in which there are a lot of residents, most likely all these residents were added to Minecraft using mods. But you can do without mods, in Minecraft 1.11 version they found a territory in which there are more than a hundred inhabitants in one village. It is a gigantic village with many friendly residents inside.

Another place that contains a large amount of rare resources is the Sunken Temple located in the desert. Despite this, there are various villages in the neighborhood. Well, if you want to find gold bars, golden apples, saddles, emeralds and other rare resources, then you definitely need to come here.

A very interesting neighborhood which is a small village that our team discovered during the game. In this village are hidden very rare resources that can be useful to many players. There are such rare resources as: obsidian blocks, steel ingots, steel pickaxe, diamonds, etc.
This page was created for those site visitors who do not know how to install a mod for their favorite game. If you downloaded some mod from the site, you will need an archiver WinRAR files(if you do not have it installed, you will need to install it). Be sure to read the description of the mods carefully!
How do I install mods for Skyrim / Oblivion?
The installation for these two games is no different, below will be the installation instructions.
- unpack the archive with the mod;
- place the mod files in the directory with the Skyrim / Data game (Oblivion / Data), confirming the file replacements;
- go to Skyrim Launcher (Oblivion Launcher) and connect in it esp file for mod;
To install retextures, you need to copy the Textures, Meshes folders from the archive to Skyrim / Data (Oblivion / Data), confirming the replacement.
When downloading a particular mod, be sure to read its description, as it may contain additional instructions installation. Sometimes you need to install SKSE, SkyUI, etc. Also pay attention to compatibility and non-compatibility with other modifications. Remember that if installed correctly, you can get exactly the mod that you wanted to see in the game!
How to install mods for GTA 5?
Please note that if you have the .NET Framework version 4.0 or higher or Visual C ++ 2013 for a 64-bit system installed, then the mods may not work (not always so, but sometimes it happens).
The installation is quite simple and does not take a lot of time to understand it. For a successful installation, you just need to carefully read the description. Mods for GTA 5 are divided into regular and script, their installation is different.
Installing common mods on PC:
- to install the program Script Hook V(you need to unpack the archive with the program to the root directory of the game);
- place the mod files with the .asi and .ini extensions in the game directory;
- installation is complete, you can turn on the game and play.
Installing scripted mods based on .Net:
- install the Script Hook V program;
- download and install ScriptHookV .NET;
- place the mod files with the .ll, .cs, .vb extension in the scripts folder;
- you can start the game and play.
If you want to delete a mod, you just need to get rid of it in the root folder of the game.
How do I install add-ons for World of Tanks?
Installing mods: copy the mod files to the game directory, confirming the replacement. (for example World of Tanks / res_mods / patch version * /. This instruction only applies to single mods, installation for packs / compilations is done using the installation file, which you need to run and follow the instructions.
* - the version of the game, for example 0.9.10, 0.9.11, etc.
Installation of scopes: place the gui and scripts folders from the archive into the directory with the game (as a rule, the path is indicated in the description of the sight, be sure to read it!).
Setting penetration zones: copy the vehicles folder from the archive to the directory with the game, if you see confirmation of the replacement, click Yes, for all.
If you do not understand how to install this or that mod or some other questions, ask them in the comments, we will try to answer them.
In this article I will tell you in great detail how to install mods on Minecraft game
, so if you want to diversify your minecraft with mods, but do not know how to install them into the game, then here is an excellent installation guide.
The guide is suitable for both the licensed version of minecraft and the pirated version, there is no difference.
What is needed to install mods on Minecraft?
Minecraft game of one of the versions.Hands.
99% of modern mods are installed by copying the mod file into the Mods folder, but let's get it in order:
At the moment, 98% of mods use a special mod loader called, and about 2% -.
Therefore, in this article it will be shown using the example of Minecraft Forge, it is installed completely in the same way.
Let's start installing the mod:
Step 1.
Let's find out what version of the game you have, start the game and in the game menu you will see the version:Step 2.
Great, let's say we have Minecraft 1.12.2, now we need (link), download it for minecraft 1.12.2.
There are 2 types of automatic installer, file installer as program .exe and the installer file .jar, there is no difference between them at all, but for many players the .jar file opens as an archive, or stupidly does not start, because download the .exe installer and run it.
Installation example:

Step 3.
Now open your minecraft launcher (the program that launches the game). A new version of Minecraft with the forge postscript should appear in it:
Here's an example from two launchers:

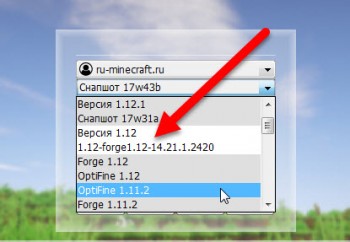
We select the version of Minecraft with the Forge postscript, run it, if it starts, great, close the game immediately.
If it does not start, you probably already have mods or mod files in the game folder that prevent the game from starting, you need to look at the error. Read the news below about the reasons for not launching the game.
Step 4.
Now we need to select the desired mod for minecraft, the version of the mod must match the version of the game, that is, mods for 1.12.2 are only suitable for 1.12.2, rarely (or if indicated) mods from 1.12 can be suitable for version 1.12.1 or 1.12.2, try it.
Downloaded the desired mod, also read the brief installation for each mod, in some cases there may be some additional steps.
Step 5.
Just in any folder, enter% appdata% in the address bar and press Enter:
Installing the mod into the game, first we need to get into the folder with the game, it is located at:
C: \ Users \ Your_User\ AppData \ Roaming \ .minecraft
If you cannot find the folder
Appdata:
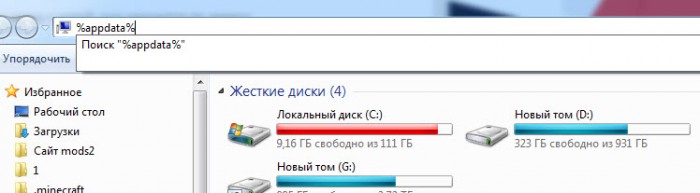
You need to enable showing hidden folders and files.
Or press start - in the find field, enter this:% APPDATA% and press enter, there you will find the .minecraft folder.
Or you can enter the Win + R combination on the keyboard (the Win button is a button between Ctrl and Alt on most keyboards, there is a Windows icon on it).
In the window that appears, enter% APPDATA% and press Enter there you will find the Roaming folder, and in it .minecraft.
Some launchers can change the name of this folder to something else, for example to .tlauncher
If you have Windows 10, then open Explorer go to the "View" tab. Then click on the "show or hide" area and check the "hidden items" option. 
Further, you can find this folder where it should be.
Inside the folder .minecraft you will find the folder mods if not, create it.
Copy the downloaded mod file to the mods folder, start the game - the version of the game with the Forge postscript.
Done, you are beautiful.
Possible problems and solutions:
Can't open Forge installer like forge-1.12.2-14.23.1.2556-installer.jarAnswer: download and install.
After installing some mods, the game does not start, crashes at startup without an error:
Answer:
It happens, there is a problematic mod, or one mod is not compatible with another mod, or some mod requires an additional mod to work. Look for incompatible mods by deleting mod files, update mods to more recent versions. (mod versions, not game versions).
Perhaps the mod requires additional libraries, usually the authors and those who post the news indicate the need to install additional mods, read the news with the mod in more detail.
It is extremely rare, but it happens that the version of the mod is not compatible with new version Forge, if the mod is old, you may have to find and install more old version Forge.
You will probably have to stop using the problematic mod.
The game starts, but the message is displayed, there is no game menu.
Answer: As a rule, if critical error did not happen, then Minecraft Forge is trying to report possible reason, for example:
1) Some mod requires a more recent version of Minecraft Forge. (for example forge-1.12.2-14.23.1.2556-installer.jar - where 1.12.2 is the version of the game, 14.23.1.1.2556 is the version of the bootloader itself), you may need to install a more recent minecraft forge bootloader.
2) Some mod requires an additional mod, it will be written there, the mod requires a name: name, you need to find this mod and drop it into mods.
3) You copied a mod in Mods for another version of the game, then usually writes that this mod requires a game version of this.
What to do if after installing Forge the game won't start, or won't start at all.
Answer:
Save your minecraft world, delete all contents in the .minecraft folder, re-download the game version, and go Forge installation again.
Or find another launcher for minecraft, similarly delete everything from the .minecraft folder, install the game with another launcher,
Every real minecrafter has put mods at least once, because they can add absolutely anything, the main thing is to choose the most interesting one. But the problem is that not everyone knows how to install them. Therefore, this guide appeared:!
The guide will be for Minecraft versions 1.5.2 and higher (1.6. *, 1.7. *, 1.8. * 1.9. * And so on), because before it was a little different.
1) Download and install TLauncher if you are using something else. It is much better, you can read about the features on our website on the launcher page, for installing mods it is good because Forge (if you do not know what it is, it will be described later in the article) can be installed in one click.
2) Select the mod you want to install, we have a directory: Minecraft Mods. We remember for which version of the game it was developed, we will use Plants Vs Zombies: Minecraft Warfare 1.7.10 as an example, that is, version 1.7.10.
3) We go into the launcher, and select the version of Forge (This is an intermediate mod that processes all the others) for the version for which you selected the mod (In our case, Forge 1.7.10) and click "Install", then wait for the installation to complete and the first launch.


5) Find the folder " mods"(It will appear by itself, if it is not there, then you have not installed, but you can try to create it manually if you are sure that it is installed) and copy the mod file there, it will have the extension .jar or .zip (It may be packed in .rar , so you need to unpack it and transfer the file with the desired extension to the folder).

6) Run the required one from the launcher again. To make sure that the mod works fine, in the main menu, press the mods button and see the new mod there:

Done, now you can play with the new mod! We hope you understand now how to install a mod in Minecraft!