Windows 7 is an operating system whose visual style can be changed beyond recognition. There are a huge number of third-party themes available for free download. Gamers can design the system in the style of their favorite game: Stalker, World of Tanks, Dota, Diablo, Skyrim, Call of Duty, etc. Fans of simple compact themes pay attention to minimalism. There are themes for every taste:
- mentioned games;
- movies;
- anime;
- music;
- minimalism.
Skins in style are especially popular. operating system MacOS. No Apple computer - now it does not matter.
There are many sites on the web with themes for every taste. Below is a list of trusted resources. You are guaranteed to download the theme you like without registration and do not drag viruses or adware onto your computer.
Site Comparison
| Site | Description | Number of topics | Sort by category (games, movies, etc.) |
|---|---|---|---|
| 7Themes.su | 7Themes. A site hosting over 650 themes just for Windows 7. A big plus for 7Themes: categorization | Over 650 | Yes |
| Oformi.net | The site is similar to the previous one. But the number of topics is half as much - 300 pieces. Free download yes clear instructions for installing themes. A nice feature of the site is the ability to sort topics by date added, popularity, number of comments and alphabetically. | Over 300 | Not |
| All4os.ru | All4os.ru completes the top 3 sites with free themes. There are over 230 of them here. As on previous resources, there is the possibility of sorting, detailed description each theme and screenshots | Over 230 | Not |
How to install a Windows 7 theme
After choosing a suitable skin - Windows preparation to support third party themes. The task is simple and will take no more than 10 minutes. Although Windows 7 supports full style conversion, it may not work properly. Therefore, we recommend that you create a restore point before the installation procedure. In case of OS problems, you can "roll back" it to the previous level. The instruction consists of two parts: installing patches and directly adding the theme itself.
How to patch system files

Now it remains to place the downloaded theme in the desired directory in Windows.
How to add a theme in Windows 7
Step 1. Download your favorite theme. Click "Details".

A separate theme page will open. On the right side there is a Download button.

Note! If you can't download the theme using the first button, try Yandex. Disk"
The downloaded archive opens with WinRar.


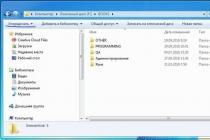
Then open "C:" - "Windows" - "Resources" - "Themes" and move the theme files to this folder.


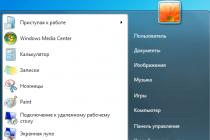
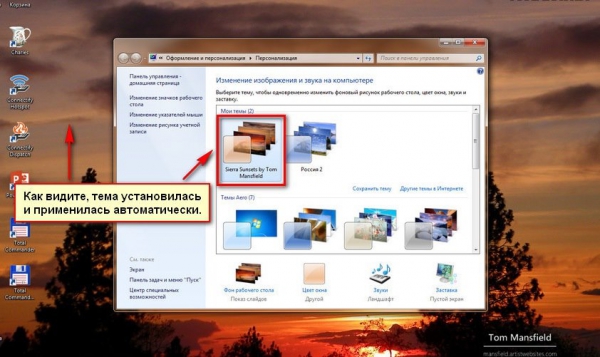
Step 2 Examination. We go to "Personalization". Click on the desktop with the right mouse button, select the lowest item "Personalization".

If you follow the instructions and follow the steps correctly, you will get the result - the installed theme will be displayed in the window.
Step 3 We click on the topic. We wait a few seconds. Ready! The photo shows an example of the Mac White theme installed.

How to change the start button in Windows 7
If you want to radically transform the Windows interface, there is the possibility of customizing the "Start".
"Start" is tied to an explorer file (explorer.exe). Therefore, to transform the skin, you will need the rights to the file. The Takeownershipex utility helps to solve the problem.
Method 1. We download the program. Go to the site 7themes.su. In the menu, select "Miscellaneous", then - "Start Buttons".

Then click the "Installation Instructions" button.


It will help us get access rights to the explorer.exe file.

Method 2. Download Windows 7 Start Button Changer. It is designed to change the skin of the button. You can download it from the "Installation Instructions" page described in method 1.

It remains to select the line "Select & Change Start Button" in the program.

In the explorer that opens after clicking, we are looking for the downloaded skin.

Ready-made skins are available on the sites described in the article.
Where are installed Windows 7 themes located?
All themes are located in the folder "C:" - "Windows" - "Resources" - "Themes". "C:" is the name of the drive where your system is installed. It may be different. The main thing is to find the folder with "Windows".

Where are the default themes in Windows 7?
In the same folder as those installed by you personally: "C:" - "Windows" - "Resources" - "Themes".
How to delete topics?
Just delete the theme files from the "Resources" - "Themes" folder.
"Installation windows themes 7 Home Basic and Windows 7 Starter. Unfortunately, in these editions of operating systems there is no "Personalization" item. Right-clicking on the desktop will not show it. But the problem is solvable. The Personalization Panel utility will come in handy.
- We load the program. We go to the Oformi.net website. In the menu we find "Miscellaneous", in the drop-down list select "Programs".

- Then click on "Sort by Popularity".

- Scroll down a little and find the program you need.

- We start the utility. Select "Typical Installation". Click "Next".

- Examination. We go to "Personalization". Right-click on the desktop and select the bottom line of the menu.

- The themes window opens.


How to update DirectX: improvements for gamers
In order for the system to support skins and the smooth operation of games, it is recommended to update DirectX regularly. This is done in three steps.
Step 1. We find out current version DirectX. Open the Start menu, select Run. Or use hotkeys (simultaneously press the Ctrl + R keys).

In the program that opens, we drive the command "dxdiag.exe" into the text field.

Click "OK" and a summary of the information about the system appears. Find the line "Version DirectX".

Step 2 Download the program from the official Microsoft portal: https://www.microsoft.com/ru-ru/download/confirmation.aspx?id=35
Step 3 Install the program by simply following the installation instructions.

Note! Uncheck "Install Bing Bar" if you don't need this browser add-on.
We are glad if our article helped you decorate Windows and make the system irresistible. Thanks for reading!
Video - How to install a theme on Windows 7
One automatic shift background pictures may not be enough to improve performance and efficiency. We need to change the entire style of displaying information on the screen. How to update the desktop theme in Windows 7 using special programs or manually, we will understand further.
Is it possible to change the subject?
In most cases, when talking about Windows 7, it is precisely “Windows 7 Ultimate (Ultimate)” that is meant. You can change the theme for this version. However, not everyone has the opportunity to use this particular version, and the options for the home - "Windows 7 Home Basic" or "Windows 7 Home Starter" - are completely devoid of customization options: the "Personalization" item is simply absent from the desktop context menu. So in the future, speaking about installing themes, we will focus specifically on “Windows 7 Ultimate”.Also, before starting the topic change activity, it is worth making sure that your Account has sufficient rights to perform such actions in the operating system. It is best if you are an Administrator on your PC. If this is not the case, most likely, you will not be able to replace the topic that has set the teeth on edge. Try to contact system administrator or a computer expert with a request to expand your powers.
Theme Installer for Windows 7
A global application software brand, StarDock, has been producing WindowBlinds for many years, which is the most popular theme manipulation program for Windows.Download the program is offered on the official resource, which is located at https://www.stardock.com/products/windowblinds/

The following window will open:

After downloading and running the installer, the program will prompt you to use paid version or free for review, which is active for 30 days.
To run the program, you will need to enter the address Email, after which an email with an activation link will be sent to the mailbox:

After clicking on the button indicated in the letter, activation will automatically occur in the WindowBlinds application and from this moment the trial period will begin:

During installation, you will be prompted to install another useful program from the same developer, changing the theme of the desktop design - "Fences". It will allow you to organize the icons on the desktop, spreading them into a kind of folders. However, the folders themselves on the table will have the shape of rectangles of arbitrary sizes, which you can define yourself. In addition, you can “flip through” additional screens to the right and left of the main one, as in a smartphone.
The installed program "WindowBlinds" looks like this:

The application allows you to choose from 15 styles. Each of them is both similar and different from the others. Among such a variety, for sure, you will find something suitable for yourself. In addition to the style, you can immediately change the desktop wallpaper, as well as create your own unique and inimitable style in the "Modify style" tab.
How to install the official theme?
The operating system offers its users several themes to choose from, which are installed according to the following instructions:

If you don't like the above options, you can download other official themes. To do this, we continue our actions:

How to install a third party theme?
Microsoft does not allow its users to arbitrarily set and change themes in the operating system. This is done for general increase stability of the OS and the security of the users themselves. However, if workplace not too responsible, it is quite possible to afford experiments, choosing a topic that suits you individually. But for this you will have to conjure a little.The principle of installing an unsigned Microsoft theme is to download any program that allows you to patch system files, and then download and install the new theme itself.
The most recognized programs for our purposes are as follows:
- Universal Theme Patcher. It replaces some system files, and after that you can install any themes of any creators without restrictions. However, replacing system files may be negatively perceived by your antivirus. After replacing the files, you need to restart the PC.
- ux style core. Its difference from the previous one is that no system files are affected, but an additional Unsigned Themes background service is launched. However, the application has a significant drawback: when you try to change the theme, sometimes the theme "flies" to the usual classic one. In this case, uninstalling and reinstalling UxStyle Core helps, after which the desired theme can still be installed. Maybe until the next change.
- Vista Glazz (VG). This application also affects system files, but it also has important additional features: automatic creation of initial copies of operable files with the possibility of automatic recovery if necessary; adding a "transparency" effect to windows (expanded folders, etc.).


Next, proceed directly to downloading and installing a third-party theme.
One of the most popular and trusted sites with a huge number of themes for every taste is located at https://winzoro.net/themes/windows7_themes/
The themes themselves are downloaded to any folder on the PC, even on the Desktop itself. Most often, a downloaded theme is an archive in *.zip format, which can contain not only files for the theme (Theme), but also thematic ones:
- wallpapers (wallpaper) - background options for the theme;
- preview - screenshots to get an idea of the appearance of the theme;
- me - a file that describes the features of the theme, the nuances of installation and a little self-promotion of the creator;
- System Files is a subfolder whose contents need to be replaced by system files, but this is at your own peril and risk.


To fully comply with the creator's idea, you may need to install fonts, wallpapers and replace the "explorer.exe" file. It must be remembered that when changing the theme, the results of these manipulations will have to be canceled or restored. Therefore, it is better to copy the replaced files in advance to a backup folder on a PC or USB flash drive.
Tip: I would like to warn lovers of everything free from downloading themes and styles for Windows 7 in the format of "*.exe" files. Any of these files may contain a virus, and instead of updating appearance Desktop, you may have to reinstall the entire Windows 7 (see). In this case, you can lose all your documents, settings for Word, Excel, other office or accounting programs. If you still download executable files from the Internet, be sure to use an antivirus.
Video instruction
V short video The simple process of replacing a theme in Windows 7 is described step by step and visually:Well, now, after reading our article, you can change themes and styles in your Windows 7 yourself. You can make your workplace less formal, more friendly and individual, in some ways even surprising you. Special programs and a huge number of themes for Windows 7 posted on the Internet will help you with this. Good luck with your design search!
Many personal computer users want to give the Windows operating system a more interesting and attractive appearance by personalizing it.
Therefore, the question of how to install a theme on Windows 7 is relevant.
Let's take a look at the whole theme installation process for different versions of this popular operating system.
The easiest way to install a theme on Windows 7
For novice users, the easiest and most affordable way to change the appearance of the operating Windows systems 7 will be the installation on Personal Computer one of the certified themes downloaded from the official website of Microsoft.
In this case, you need to perform a number of simple steps:
- right-click on an empty spot on the desktop to open the context menu;
- select "Personalization" in the menu;
Selecting "personalization"
- to select one of the themes preinstalled on your computer, simply click on the option you like with the left mouse button.
Advice! If none of the existing options suits you, you can install another theme by downloading it to your personal computer. This is done very simply and quickly.
- When you left-click on the link "Other themes on the Internet", the page of the official Microsoft website will open, where a wide selection of various topics is presented.
- Once you've chosen the one that appeals to you, click on the "Download" button located directly below the corresponding image.
Download the selected theme
- Next, you should run the downloaded file to install the theme - after that it will immediately be displayed in the "Personalization" panel.
- If you want to change the image, you need to select the “Desktop Background” item on the “Personalization” panel and select the desired image option.
- In order to install several images on the desktop at once, you must select them and set the slide show mode.
- After all the settings are made, do not forget to save the result.
Installing a Theme on Windows 7 Home Basic and Windows 7 Starter
Many people use versions of this popular operating system such as Windows 7 Home Basic and Windows 7 Starter on their computers.
In these cases, there are some nuances and features of installing themes.
Let's consider where and how to install the theme if the default personalization feature is disabled here.
Before you can install themes on Windows 7 Starter or Home Basic, you need to enable personalization.
You can do this by installing a special patch on your computer called the Aero Patch.
Downloading the patch
You can download it on the winaero.com website in the Unsupported software section. Next, the downloaded file must be unpacked and run as a computer administrator.
Run as administrator
After this procedure, you must reboot. As a result, the personalization function of the operating system will be activated.
This method works equally well for both Windows 7 Starter and Windows 7 Home Basic.
Installing a non-certified theme
Quite often, users of personal computers need to install non-certified themes on Windows 7.
Therefore, it would be useful to consider how the third party themes without any threat to the operating system.
This process is not particularly difficult, so on average it will take no more than ten minutes.
The main thing is to perform preliminary preparation of the operating system, strictly following the instructions and rules.
In order for the installation process to be as successful as possible, you must first download and install two patches: Theme resource changer and Universal Theme Patcher.
Then each of them in turn run as administrator.
After both necessary patches are installed, you need to restart your computer.
Thus, the operating system will be completely ready in order to install third-party themes of your choice on it.
This process consists of several successive stages:
- we open a site that presents a wide selection of interesting themes for Windows 7;
- choose the option you like best and download it to your computer;
- as a rule, such themes are offered in archive format, so the contents of the archive must be extracted;
- the extracted folder should be moved to the C:/Windows/Resources/Themes directory.
- after the theme is displayed in the Personalization panel, you can apply it and see the result.
Changing the Start Button and Navigation Buttons
After the new theme for Windows 7 is installed on your personal computer, you need to give an appropriate updated look to such important components as the Start button, as well as the navigation buttons that are present in File Explorer.
We start by replacing the Start button. To do this, follow these steps:
- pre-prepare the system for further changes - get access rights to the explorer.exe file using special program, such as Takeownershipex;

Many personal computer users want to give the Windows operating system a more interesting and attractive appearance by personalizing it.
Therefore, the question of how to install a theme on Windows 7 is relevant.
Let's take a look at the whole theme installation process for different versions of this popular operating system.
The easiest way to install a theme on Windows 7
For novice users, the easiest and most affordable way to change the appearance of the Windows 7 operating system is to install one of the certified themes downloaded from the official Microsoft website on a personal computer.
In this case, you need to perform a number of simple steps:
- right-click on an empty spot on the desktop to open the context menu;
- select "Personalization" in the menu;
- to select one of the themes preinstalled on your computer, simply click on the option you like with the left mouse button.

- When you left-click on the link "Other themes on the Internet", the page of the official Microsoft website will open, where a wide selection of various topics is presented.

- Once you've chosen the one that appeals to you, click on the "Download" button located directly below the corresponding image.

Download the selected theme
- Next, you should run the downloaded file to install the theme - after that it will immediately be displayed in the "Personalization" panel.
- If you want to change the image, you need to select the “Desktop Background” item on the “Personalization” panel and select the desired image option.

- In order to install several images on the desktop at once, you must select them and set the slide show mode.
- After all the settings are made, do not forget to save the result.

Installing a Theme on Windows 7 Home Basic and Windows 7 Starter
Many people use versions of this popular operating system such as Windows 7 Home Basic and Windows 7 Starter on their computers.
In these cases, there are some nuances and features of installing themes.
Let's consider where and how to install the theme if the default personalization feature is disabled here.
Before you can install themes on Windows 7 Starter or Home Basic, you need to enable personalization.
You can do this by installing a special patch on your computer called the Aero Patch.

Downloading the patch
You can download it on the winaero.com website in the Unsupported software section. Next, the downloaded file must be unpacked and run as a computer administrator.

Run as administrator
After this procedure, you must reboot. As a result, the personalization function of the operating system will be activated.
This method works equally well for both Windows 7 Starter and Windows 7 Home Basic.
Installing a non-certified theme
Quite often, users of personal computers need to install non-certified themes on Windows 7.
Therefore, it would be wise to consider how third-party themes are installed without any threat to the operating system.
This process is not particularly difficult, so on average it will take no more than ten minutes.
The main thing is to perform preliminary preparation of the operating system, strictly following the instructions and rules.
In order for the installation process to be as successful as possible, you must first download and install two patches: Theme resource changer and Universal Theme Patcher.
Then each of them in turn run as administrator.

After both necessary patches are installed, you need to restart your computer.
Thus, the operating system will be completely ready in order to install third-party themes of your choice on it.
This process consists of several successive stages:
- we open a site that presents a wide selection of interesting themes for Windows 7;
- choose the option you like best and download it to your computer;
- as a rule, such themes are offered in archive format, so the contents of the archive must be extracted ;

- the extracted folder should be moved to the C:/Windows/Resources/Themes directory.

- after the theme is displayed in the Personalization panel, you can apply it and see the result.
Changing the Start Button and Navigation Buttons
After the new theme for Windows 7 is installed on your personal computer, you need to give an appropriate updated look to such important components as the Start button that are present in Explorer.
We start by replacing the Start button. To do this, follow these steps:
- pre-prepare the system for further changes - get access rights to the explorer.exe file using a special program, for example, such as Takeownershipex;

- after obtaining access rights, you should select the most suitable option for the Start button and download a simple utility called Windows 7 Start Button Changer;
- when you run this utility, a window will open in which you need to click on the button labeled Select & Change Start Button;

- next, the "Explorer" window will open, where you need to find the place to save your "Start" button;
- Now it remains to click "Open" - and new button will be instantly installed on your computer.

Replacing the navigation buttons in the Windows 7 operating system is as follows:
- downloaded and installed on a personal computer Windows program 7 Navigation Buttons Customizer;

- the program is run as administrator;
- in the window that opens, select the appropriate option and click on the Change Selected Bitmap inscription;

- after selecting the image you like, you need to open it and save the changes made.
Keep in mind that installation of themes from third-party developers is only possible on such versions of the Windows 7 operating system as Professional, Ultimate, Home Premium, and Enterprise.